Laying tiles on a wooden floor is not the best option in many ways. It's all about the completely different characteristics of two materials - ceramics and wood:
- Ceramics require a strong static base, and wood changes its dimensions within significant limits with changes in humidity and temperature. As a result, the tiles separate or crack during active movements.
- For normal operation, wood needs air, which does not pass through dense tiles and water-repellent glue. This situation causes the wood to quickly deteriorate.
- The service life of wood without repair is several times shorter than that of tiles. Tiles usually cost a lot. And it’s annoying to lose a good coating because you need to change the substrate.
- The weight of ceramics and mortar (glue) is several times greater than the weight of wood. If you do not pay attention to this, the mass of the new finishing coating may exceed the strength capabilities of the boards or joists. As a result, the floor will collapse. Therefore, it is advisable to minimize the load - choose tiles of light weight, and also increase, if necessary, the load-bearing capacity of the wooden floor (install logs more often or take boards of greater thickness).
So if you have a choice, try to abandon this idea. If you still decide to lay tiles on a wooden floor, be prepared for the fact that the amount of work will be large.
[toc]
The first important rule: tiles should not be laid on a new wooden floor, in a new building or on a new floor. At least several years (one, or better yet two years) must pass, during which the main shrinkage occurs.
If the base is not strong enough, the boards will bend and the tiles will bounce off.
Before laying the tiles on the floor, it is necessary to carry out preparatory work. Their main task is to create conditions acceptable for both wood and ceramics. There will be several stages, and as a result the foundation must meet the following requirements:
- Air access to the wood is ensured.
- The load is distributed evenly and is not excessive.
- The base is motionless.
In bathhouses, the need to lay tiles most often arises in the washing room: constant humidity creates ideal conditions for the development of rot and fungi. That’s why they try to protect wood with ceramics. In other rooms, it is better to consider other flooring options.
Insufficiently well-done waterproofing will cause boards and slings to rot from water.
Assessing the condition
The first step in the room where you plan to lay tiles on a wooden floor is to disassemble the floor: remove the boards. Next, a careful and meticulous inspection of all components of the structure is required: beams, joists, boards, insulation, water and vapor insulation. All the components of the pie.
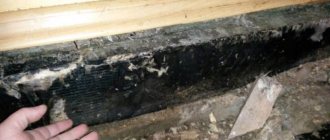
If there are any signs of destruction, they must be eliminated. When inspecting the wood you can see the following:
- Rot. There are many types of this lesion: dry, white, soft. This is the result of the activity of wood-destroying fungi. The type of destruction varies, but in any case the tree becomes soft. The condition is checked simply: if you see any changes in color or structure, drive the tip of an awl into this place. If it goes in and out easily, the wood is destroyed. The affected areas must be removed. If a small fragment is damaged, remove it, capturing some of the healthy tissue, then treat everything with antifungal compounds. If the damage is significant, the structural elements are completely removed, adjacent and new wood is also treated with antiseptics.
- Wood-boring beetles. It is mainly the larvae that destroy the tree. They gnaw through numerous passages, significantly reducing strength. The approach to the problem is similar; if the damage is significant, the floor fragment is replaced, thoroughly treated with special compounds. And all bug exit holes are treated especially carefully.
These are the “surprises” you can see when you remove the floorboards
Many types of fungi that destroy wood can only develop in conditions of sufficiently high humidity - at least 20%. In dry rooms this occurs due to unsuccessful waterproofing. Therefore, we check the condition of the waterproofing materials along the way. If there is damage somewhere, we eliminate it and, if necessary, lay/apply another layer of insulating materials. Only with effective waterproofing will a wooden floor last a long time: fungi simply do not develop if there is insufficient humidity, even if there are spores in the wood.
Read how to fight fungi in a bath here.
Preparatory stage
Before you begin laying tiles on a wooden floor, you need to carefully inspect the subfloor to make sure it is stable. The need is caused by the following factors:
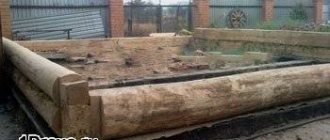
Scheme for replacing a wooden floor before laying tiles
- Different deformability of ceramics and wood. In the case of wood, some bends and deflections are possible: wood can easily adapt to minor deformations due to its own flexibility. Ceramics is a rigid material that requires a rigid base. If you lay it on an unstable base, large-format floor tiles will crack. The only way out will be to replace the flooring in the house and strengthen the foundation. But it would be right to prevent this and make sure that the wooden floor or ceiling is stable before starting work.
- If small-format tiles are used, if the quality of the base is unsatisfactory, it is not the tiles that cause cracks, but the cement joints. This problem is also not pleasant, since dirt accumulates in cracks and crevices and worsens the appearance of the coating. In the bathroom, this is compounded by moisture getting into the cracks. If the base is very unstable, the floors in the house become uneven, which adds problems during operation.
It is important to remember that tiles have a fairly large mass. Laying tiles on a wooden floor creates additional stress on the floors and substructure. When conducting a thorough visual inspection, it is necessary to identify:
- sagging of flooring boards in the bathroom and other rooms in which you plan to lay tiles yourself;
- creaking floor;
- damage from fungus, mold or other organisms;
- instability of all or individual elements of the system;
- loose fastenings.
If at least one of these problems is identified, the floor needs to be repaired, strengthened or rebuilt. In some cases, completely dismantling the wooden floor and pouring a cement screed will be an effective method. This is true for older houses with wooden floors. If we are talking about a house with wooden floors, the question of strengthening the load-bearing structures may arise. Depending on the condition of the floor, they choose the method of laying ceramic tiles.
Strengthening, leveling and processing
If the logs are laid in increments of more than 50 cm, additional ones must be installed, otherwise the structure will not support the weight of the new floor covering. When installing new elements, do not forget to treat them with antiseptics and fungicides.
Next, check the floor for horizontalness. This is done using a good building level. Usually there are deviations: shrinkage is usually uneven, in some places it will shrink more, in others less. All deviations are corrected: the lags are leveled. The excess is cut off with a plane, to increase the level, wedges are hammered under the joists or pieces of bricks and other materials are placed. In some cases, it is not possible to push anything down, then they stuff a board on top, removing the excess height with a plane.
The joists must be leveled
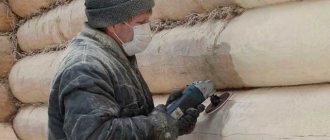
The next step is antibacterial and antifungal treatment. For a wooden floor under tiles, you need to find a composition with the longest period between two treatments. Then, according to all the rules, all wooden elements must be processed.
For baths, many people prefer to use only natural impregnations. The most reliable way is impregnation with hot drying oil. For normal protection it must be carried out several times. At least three, and preferably five. A new layer of hot drying oil is applied after the old one has dried. You can check this by touch: the surfaces should not stick.
Treatment with hot drying oil is an effective method of antifungal treatment
When processing, make sure that the drying oil does not cool down. When hot, it destroys spores, bacteria, larvae, and also becomes more fluid, penetrating deeper. So high temperature is the key to effective protection.
When heating drying oil, be careful: even vapors can flare up. Therefore, they heat the drying oil not on the tile, but above the tile, and keep a piece of tarpaulin or felt nearby to quickly cover the container that has caught fire. As soon as the smell of drying oil intensifies sharply, remove the heat source - a couple more moments and the vapor will flare up.
Compatibility issues between wood and ceramics
When laying tiles on a wooden floor in a bathroom on his own, the developer is faced with the problem of incompatibility of these two construction materials:
- the board changes linear dimensions with changes in humidity and temperature;
- tiles and porcelain tiles have a very low coefficient of linear expansion;
- wood is actually a heat insulator, and ceramics perfectly transmit heat through itself;
- boards and beams are destroyed by excess moisture absorbed from the environment;
- By default, tile is a waterproof material, which is why it is chosen for decorating bathrooms.
In other words, there is a high probability that with constant contraction and expansion of the wooden floor elements, the glue will not withstand such loads, the tile will fly off or crack.
Preparing the boards
While the antibacterial treatment is drying/absorbing, it is necessary to treat the floor boards. If the previously used ones are in good condition, they can be installed again. But be sure to remove the varnish or paint with which they were covered before doing this.
If you have a sanding machine, removing paint is not a problem.
Removal of paintwork is possible using:
- Construction hair dryer. Set the temperature to about 200-250°C and direct the air flow to the surface. The paint swells with bubbles, you immediately pry it off with a spatula, a knife with a wide blade, or a scraper. Using a blowtorch is undesirable: the wood overheats, loses its properties and quickly collapses.
- Chemical removers. They are available in a wide variety at any hardware store or market. They are a gel-like mass. Apply to the surface with a spatula or brush. After a period of time, the paint softens and is removed with a spatula. Everything is fine, but if you need to treat a large area, a lot of washing is required, and this is not cheap.
- Clean off with a spatula or sandpaper. This is the cheapest, but also the most ineffective way. In the sense that it is ineffective because it requires a lot of time and physical effort. Paint can be removed faster if you have a sanding machine.
You should definitely not reuse boards that have been warped or damaged by pests. It's better to replace them. After cleaning off the paint, the boards are also subjected to antibacterial treatment. After drying, you can lay the subfloor under the tiles.
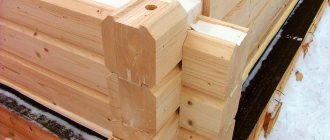
Tile on a tongue and groove board
The technology of decorating tongue and groove tiles is very complex due to the following nuances:
- It is not economically feasible to decorate fresh flooring made of tongue-and-groove boards with tiles, since it will need to be pulled together after several months of use;
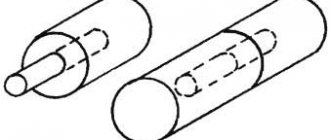
Pulling the tongue.
- flooring with some service life most often has an uneven plane, as the floorboards are bent in a “hump”;
- When worn out or rotted, creaks appear on the joists.
Therefore, in this particular case, it is recommended to lay the tiles on a wooden floor after preliminary leveling and strengthening the structure with a self-leveling floor.
Advice! A layer of self-leveling floor, glue and cladding will dramatically increase the structural loads on the wooden floor beams. It is highly desirable to make a new calculation for the deflection and load-bearing capacity of structural elements using the method of rigidly clamped single-span beams.
Revision and strengthening
Before gluing tiles to a wooden floor, it is imperative to inspect the supporting structures:
- add joists to reduce the distance between them and/or increase the thickness of the floorboards;
- eliminate creaking, tighten screws or add additional fasteners to the existing structure;
- replace vapor barrier and insulation materials if necessary;
- pull together the tongue-and-groove board to eliminate gaps;
- remove the paintwork completely with a sander;
- treat the tongue with an antiseptic or fire-bioprotectant (the composition additionally includes a fire retardant that increases fire resistance).
Initially, only the first, every fourth and last row of floorboards are attached to the joists. After tightening with self-tapping screws, all boards are fixed to the joists.
More information about laying tongue and groove boards was discussed here.
Self-leveling floor
To level the plank flooring in a wooden house, budget modifications of a cement-based self-leveling floor are used. They have self-leveling properties, which makes working with these compounds easier. The main nuances of the technology are:
- damper layer - the perimeter of the walls to the height of the finishing coating must be covered with tape;
- layer thickness - if there are differences in heights, place at least 5 - 10 mm of solution at the top point;
- mixing - according to the manufacturer's instructions, to ensure the specified water-cement ratio, the mixture is always added to water;
- application - the solution is poured evenly around the perimeter of the room, additionally leveled with a squeegee;
- creating a uniform structure - the surface of the uncured self-leveling floor is rolled with a needle roller to release dissolved air.
Self-leveling floor on wooden floors.
To walk on liquid solution, paint shoes with needle soles are used.
Unlike wet concrete screed, the minimum thickness of which is 3 cm, self-leveling floors can be leveled to zero. However, separating layers of hydro- and vapor barrier films, sound insulation and insulation are prohibited.
Sub flooring
The first step is to carry out insulation. The main requirement for insulation (except for low thermal conductivity): non-hygroscopic material. To prevent fungi and mold from developing, the floor must be dry. Secondly, it must be light: we need to make the load as small as possible. Extruded propylene foam has these qualities. Plus, bacteria and fungi do not multiply on it: there is no nutrient medium for them. The disadvantages of this material are its unnatural origin, the fact that it does not conduct air and is quite expensive.
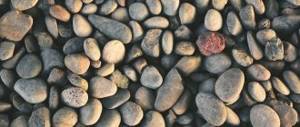
The second material that can be used is expanded clay. It is, of course, heavier than polypropylene foam, and also more hygroscopic. But it is natural and conducts air.
The most common insulation material for bathhouse floors is expanded clay.
Having chosen the insulation, it is laid out on top of the waterproofing layer. The thickness is such that there is a distance of 5-7 mm to the boards laid on the joists. This is a ventilation gap that will provide the wood with normal conditions and allow excess moisture to be removed.
The floor will now be rough - the finishing coating will be laid on it. Treated old boards are a great option. They are laid across the joists, but not closely, as before, but leaving gaps of 3-4 mm. A ventilation gap is also left along the perimeter, along the walls: about a centimeter wide. These distances will allow the wood to expand as conditions change, and the gaps will then be closed with skirting boards.
Fasteners must be moisture-resistant: stainless or galvanized nails or self-tapping screws. At the points of attachment to the outer joists, they are driven in or screwed in two pieces; for all other points, one is enough.
The laid boards are puttyed if necessary, then smoothed using a sanding machine. Now all the cracks are sealed with polyurethane foam: it is hard enough to bear the weight of the tiles and adhesive and elastic enough so that the wood can expand and contract. After the foam has dried, it is cut off flush with the floor.
If you want to fill the screed instead of a wooden floor
This desire can be fulfilled when the floor is above ground or on a concrete floor. In this case, you need to do the following:
- Remove skirting boards, floorboards and dismantle joists;
Dismantle the old floor
- Clean the concrete base, remove fallen cement, develop every crack, or level the soil and fill in expanded clay;
Clean the concrete base
- The concrete floor is primed or insulated with heat-insulating materials (expanded clay, expanded polystyrene);
Insulated with thermal insulation materials
- Lay the damper tape;
Lay damper tape
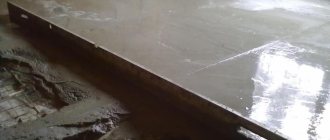
- A leveling screed is poured (a cement mixture for a self-leveling floor may be suitable for this); if a cement mortar is used, beacons are placed before pouring the screed; Afterwards, it is advisable to fill such a screed with a self-leveling mixture;
Fill the leveling screed
- Wait for the screed to dry completely and begin laying the tiles.
Start laying tiles
Waterproofing floors under tiles
The next step is to ensure tightness. The floor is impregnated several times with hot drying oil or covered with latex impregnation. This must be done carefully, sparing no materials: the waterproofing must be reliable. While the impregnation has not dried, roll out the painting mesh on top. The edges overlap each other by about 5-10 cm. This will be reinforcement that will reduce the effect of wood shifts on the tiles.
As an option, you can use rolled waterproofing materials. Often they put parchment paper, plastic film, or use bitumen or paraffin materials. They are also laid with an overlap, overlapping the edges by 10-15 cm and gluing them with tape.
Preparing the wooden base
Before performing facing work, it is necessary to properly prepare the wooden surface. The construction of a multi-layer floor pie will ensure solidity and ventilation of the base, reducing the load on the wood.
First, the wooden floor structure is dismantled. Deformed and damaged elements are replaced with new ones. If necessary, the lag laying step is reduced and the surface is leveled. Additionally, the structure is treated with antiseptic compounds.
Instructions for the preliminary preparation of a wooden floor include the following steps:
Stage 1. Dismantling the base and preliminary cleaning of the paintwork. Surface cleaning is carried out in three ways:
- Chemical. Treating wooden floors with chemicals that help dissolve varnishes and paints.
- Teplov. Heating the base using a hair dryer and dismantling the coating with a metal spatula.
- Mechanical. Removing the coating using a power tool - an angle grinder with an attachment, a grinder or medium-grain paper.
Stage 2. Checking the condition of individual floor structural elements - joists and beams, replacing with new parts and leveling the surface.
Stage 3. Antiseptic surface treatment. Wood is susceptible to high moisture and temperature changes, and therefore requires maximum protection from rot, deformation and mold. Treatment is carried out in accordance with the manufacturer's instructions, observing the interval and intensity of application.
Stage 4. Arrangement of a thermal insulation layer. For insulation, fine expanded clay is used to fill the free space between the joists in the floor. To maintain natural ventilation, a 6 cm technological gap is provided between the lower part of the log and the insulation.
Stage 5. Installation of the subfloor. For these purposes, a clean and level board is used, which is fixed to the base using galvanized screws. The surface is leveled with a thin layer of putty. The distance from the wall to the floorboard is filled with foam.
Instead of a floorboard, 12 mm plywood or chipboard sheets can be used after pre-treatment with antiseptics.
Rough screed
Now we need to create a rigid base for the tiles - a rough screed. To do this, a metal reinforcing mesh with a pitch of 20 cm made of 3-5 mm wire is laid on top of the waterproofing layer on the prepared wooden floor. Fill with a thin layer of solution. What is the minimum layer of screed? At least 3 cm. A thinner base will crack.
Wet and semi-dry screed
You can use standard cement-sand mortar. You can add additives or add fiberglass to increase its elasticity and strength. For the washing room in the bathhouse, you can choose additives that at the same time make the concrete water-repellent.
Polymer screeds have good characteristics, but their attractive appearance is useless as a rough coating. And the high price calls into question the feasibility of their use.
When using a regular solution, you will have to wait 3-4 weeks for the screed to mature.
One of the compositions of the polymer screed - with liquid glass - can be made with your own hands. To do this take:
- two parts of liquid glass;
- two parts of washed and sifted coarse sand;
- one part water.
Everything is mixed and the floor is poured with this mixture. The result is a coating that is flexible enough to compensate for wood movement. Instead of liquid glass, you can use two-component polyurethane glue.
When laying the screed, try to make the surface as smooth as possible. According to modern building codes, tiles can only be laid on a perfectly level base. If you are making the floor in a washing room or shower room, then a slope towards the drain will be necessary. And it is formed precisely at this stage.
By adding plasticizers to the composition, the amount of water is greatly reduced. Because of this, the “setting” time of cement is reduced to several days.
Read more about how to make a concrete screed in the article “Do-it-yourself concrete floor screed”.
To make it easier to work with concrete, plasticizers are added to the solution. If the surface turns out to be not even enough, you will have to level it (remove unevenness and fill in depressions) and apply another layer of self-leveling mixture. To make the solution more homogeneous, it is advisable to treat it with a concrete vibrator.
After the screed has dried (takes several weeks), the preparation of the wooden floor for tiles is completed. You can start installation.
Dry screed for tiles
It is not necessary to use “wet” screeds in all rooms. For dry ones, you can prepare the floor for tiles using:
- moisture-resistant drywall (the most fragile of all the proposed materials, use only in extreme cases);
- GVL slabs (gypsum fiber sheets);
- CSP (cement particle boards);
- moisture resistant plywood.
But this option for preparing the floor for tiles is only suitable for dry rooms - a locker room or rest room in a bathhouse, a corridor or hallway in a wooden house. The tiles of a washing bath, in a bathroom or kitchen should be laid exclusively on a “wet” or “semi-dry” (with additives) screed.
Some people also lay gypsum fiber board, plywood, or fiber board under the tiles.
When using sheet materials, laying GVL, DSP, etc. has general rules. They need to be laid so that the joints of the sheets do not coincide with the joints of the boards or joists. This is only possible if they are placed at an angle of 30-45° to the boards. Moreover, the laying should be staggered - the sheets should be shifted one relative to the other.
The laid slab materials are secured around the perimeter and in the center with self-tapping screws. The distance between the fasteners is 25-30 cm. Then the seams are filled with compounds intended for moisture-resistant drywall. After drying, the seams are sanded. We can assume that the preparation is complete: we begin laying the tiles.
How to lay tiles on the floor in a bathhouse and sauna, read the article “Laying floor tiles in a bathhouse or sauna with your own hands.”
Laying tiles on a wooden floor
Ceramic tiles are an excellent material for flooring, especially in rooms with high humidity or where there is a high likelihood of liquids or other substances getting onto the floor. Typical examples are bathroom, toilet, hallway, kitchen. They do not refuse to use tiles in residential premises if the floor is equipped with a heating system.
Laying tiles on a wooden floor
But what about the owners of private housing, in which all the floors are originally wooden? A similar question may arise for owners of apartments in old buildings, where the plank covering is mounted on joists. Is it possible to lay tiles on a wooden floor?
You can immediately reassure those who are worried - this is a completely doable operation that does not require complete dismantling of the coating to the ground or concrete base and subsequent pouring of a thick concrete screed. True, you will have to work hard, since the success of such a modification of the coating will mainly depend on the quality and strength of the wooden base.
- 3.1 2. It is planned to pour a thin screed
The most important thing is a thorough revision of the old coating
Taking on the task of laying tiles if there is even the slightest suspicion that the wooden base is unstable is the height of recklessness. This is explained simply:
- Wood is a fairly flexible material, tending to return to its original configuration after deformation. But what is “forgivable” for a wooden floor (slight deflection, springing, etc.) is absolutely unacceptable for ceramics. Each individual tile is very rigid and cannot be bent. If the floor “plays”, it may simply crack.
- Another case is if, for example, the ceramic tiles are small-format. Cement-containing tile adhesive also does not like dynamic bending loads. It will definitely develop small cracks, begin to delaminate, and the tile, even maintaining its integrity, will simply move away from the base.
We should not forget that the load on the coating will increase significantly - in addition to everything else, the ceramic tiles themselves, mortars, and other possible structural elements of the multi-layer “pie” of the floor being created have considerable weight. Thus, the wooden base must have guaranteed static stability. This is exactly what needs to be achieved at the first stage of work.
It is clear that the first step is always a thorough visual inspection, applying efforts to the most problematic areas of the wooden floor in order to identify its possible vibrations and sources of squeaks. If there are any, then no questions should arise at all - the coating must be thoroughly rebuilt and repaired, and not only in places of instability, since strengthening the floor in one place does not guarantee that it will not appear in another. It is necessary to understand the cause and eliminate it at the root.
Sometimes after dismantling the floor a “scary” picture appears
Moreover, experienced craftsmen always advise, in all cases of laying tiles on a wooden base, to carry out a complete search of it. If you are planning a ceramic coating, then you need to think that it is for the long term, and not for a year or two. Where is the guarantee that a defect hidden by a wooden floor or a process of wood decomposition that has begun, which does not appear in any way today, will not be discovered literally in a month or even a year, when the tiled covering has already been completely laid? To carry out repairs, you will have to remove all the tiles, dismantle the wooden base - and all due to the fact that the proper principles were not shown during the preparation. Isn’t it better to be completely, 100% confident in the reliability and stability of the wooden floor before you start laying tiles?
The main thing is to get to the joists and floor beams
Don’t let this prospect be particularly scary - compared to completely dismantling a wooden floor and pouring a new concrete slab to replace it, this procedure is much simpler and requires significantly less labor and financial investment.
Typical wood flooring with subfloor
So, the usual layout of a wooden floor is a plank covering mounted on logs. The logs themselves can be installed on a concrete base. Another option is that they are a double timber covering system, with a rough and finished floor and a space between them, which can be filled with thermal insulation material. For any type of floor inspection, you will have to remove the boardwalk completely to expose the joists for inspection, repair and alignment.
- If the condition of any of the joists causes even the slightest concern - there are cracks or areas with signs of wood decomposition, it must be unconditionally replaced.
- If the distance between adjacent joists exceeds 500 mm, it will be necessary to install additional beams, otherwise even the thickest floorboard may bend in this place.
- The logs must be leveled horizontally. If they are securely embedded, and it is not possible to change the height of the supports, this can be achieved by adjusting it with a plane, or, conversely, by increasing it with a wooden plank.
- Of course, if there is a subfloor, it should also be given some repairs - replace worn out or cracked boards, eliminate possible distortions, creaks, etc. When it is ready, both it and the logs are covered with a layer of dense waterproofing film.
- If you already have the opportunity to get to the joists and subfloor, you should take the opportunity and treat all the parts with antiseptic and water-repellent compounds. You should not attribute your reluctance to carry out this procedure to the fact that similar treatment was carried out earlier, during the initial installation of the floor - the compositions are inexpensive, the process itself will not take much time, but the durability of the structure will certainly increase.
A prerequisite is antiseptic treatment of all parts of the wooden floor
- Literally every board of the removed flooring is checked for integrity, the presence of weak areas, cracks, hammered and bent unnecessary nails, etc. All boards with significant flaws should be disposed of and replaced with fresh ones.
- An important action that should not be forgotten is cleaning the finished floor boards from old paint layers if subsequent laying of tiles is planned directly on them. Creating a reliable base for tiles involves working with a cleaned wood structure.
This cleaning can be done in several ways:
- So, paint or varnish can be removed in advance by scraping or using abrasive materials - grinding and polishing machines, sandpaper or special attachments on a grinder or electric drill.
- Sometimes a chemical cleaning method is used - washing off the paint with solvents. However, this is not the best option, because organic solvents are actively absorbed into the wood, disrupting its natural qualities and leaving an unpleasant, pungent odor for a long time.
- The thermal method is widely used - using a hair dryer or even a blowtorch. Under the influence of high temperatures, the paintwork either burns out or melts to such a state that it can be easily removed with a regular scraper (spatula).
- Before proceeding with the reinstallation of the floorboards, it is possible to consider additional insulation of the floor. Between the logs you can fill expanded clay, lay mineral wool mats or expanded polystyrene slabs. Additional thermal insulation will never hurt anyone.
- The reverse laying of the boards onto the joists is not carried out “solidly”, but leaving a gap of 3-5 mm between them is necessary so that the wooden floor under the tiles has the opportunity to “breathe” and to compensate for possible linear vibrations of the material. Another option is to drill through holes in the boards in a random order. Be sure to leave a gap at the walls around the entire perimeter of the room, about 10 mm. Any remaining gaps can be lightly covered with adhesive tape or foam.
- After the final installation of the floorboards on the joists using self-tapping screws, a thorough quality control of the coating is carried out again. If no shortcomings are identified, you can proceed to preparing the base for laying ceramic tiles.
Several ways to prepare the base for laying tiles
So, we have a repaired, solid plank base. What should I do next to fully adapt it to laying ceramic tiles?
The tiles are supposed to be laid directly on top of the boards
- First, you need to create a thin but stable and reliable waterproofing layer. To do this, the wooden floor is thickly treated with hot drying oil, but this method is quite outdated and also very unsafe, so it is better to use a latex impregnating composition. It is applied thickly with a wide brush to the floorboards, which immediately after this, without waiting for the composition to dry, are covered with a fine-mesh fiberglass painting mesh.
Fiberglass painting mesh
- When the latex composition is completely dry, the mesh should be secured to the floor surface with galvanized self-tapping screws with wide heads for reliability.
- The result is a durable waterproofing coating, which, in addition, has certain reinforcing properties.
- Now it’s tedious to achieve good adhesion of the tile adhesive to the resulting base. You can do it this way. A solution is prepared consisting of 2 parts coarse sand, 2 parts silicate glue (often called “liquid glass”), and one part water. After thorough mixing, the resulting composition is evenly applied in a thin layer to the entire surface of the floor.
After complete drying, you will get a rough monolithic surface, completely ready for laying ceramic tiles.
Video: example of laying tiles directly on plank flooring
It is planned to pour a thin screed
- If you read the opinions of many experienced craftsmen, some of them are categorically against laying tiles directly on a plank base. Their suggestion is to pour a small light screed on top of it.
- The initial process - impregnation of the floorboards with a waterproofing compound - does not change.
- Next, a damper tape should be glued around the perimeter to prevent deformation and destruction of the screed near the walls.
- A beacon system is installed, based on the screed thickness of about 30 mm. Between the beacons you can additionally lay a thin metal or fiberglass mesh.
- For screed, you can use a standard basic cement-sand mortar with fine seeded sand (1: 3), but it is better to use special dry construction mixtures that contain fiber microreinforcement and plasticizers. This screed matures faster and is more durable for such conditions. In addition, nothing prevents the use of the technology of pouring a self-leveling composition.
Light screed device on top of a plank floor covering
- After the screed has hardened and fully matured, it is treated with a primer, after which it can be considered ready for laying ceramic tiles.
The floorboards will be covered with plywood (chipboard, OSB)
If there is no desire to stir up dirt by filling the screed, the room does not belong to the category of high humidity, but is characterized by a fairly intense dynamic load, then the plank base can be covered with plywood sheets 10 mm thick. The thickness may be greater, but we should not forget that this is an extra load on the joists and floorboards. By the way, here you can save on the floorboard - it is enough to lay it at intervals of even up to 150 -200 mm.
If the floor is covered with plywood, the floorboards can be spaced wider
The work is carried out in the following sequence:
- The plank base, after antiseptic impregnation, is covered with waterproofing material. In the described case, this role can be played by waxed, paraffinized or bitumen-impregnated construction paper or even ordinary polyethylene film with a thickness of at least 200 microns.
- The plywood sheets are laid out staggered so that there is always a compensation gap of 5 to 10 mm between them. A similar gap is left around the perimeter of the room along the walls.
Approximate layout of plywood sheets
- The plywood is attached to the board base with self-tapping screws, in increments of no more than 150 - 200 mm, both along the perimeter of the sheet and along its plane. The screw caps must be completely recessed into the thickness of the material.
Sometimes, for greater strength, additional gluing of plywood is practiced.
- After laying the plywood over the entire area of the room, the expansion gaps between the sheets and along the walls are sealed with sealant or polyurethane foam. After drying, excess material is cut off to floor level.
The floor is completely covered. Pay attention to the compensation gaps between the sheets
- The next step is to create a waterproofing reinforcing layer and prepare the surface for laying tiles. Here everything is exactly the same as described above for the plank floor: latex impregnation → painting mesh → treatment with a silicate-sand composition.
After this, you can proceed directly to laying the tiles.
Once prepared, tiles can be laid on plywood
The wooden floor is covered with gypsum fiber sheets (GVL)
This method is somewhat similar to that described above (with plywood), but it also has its own characteristic features:
- As a rule, gypsum fiber boards are equipped with a locking part for mating adjacent sheets. In these places they are connected with a special adhesive and self-tapping screws. The use of self-tapping screws along the entire perimeter of the gypsum plasterboard and in its center is not required.
It is convenient if the GVL is equipped with a locking part
- If the strength of the wooden base of the floor allows, and the operational features of the room require special reliability of the coating, gypsum fiber boards can be laid in two layers. In this case, the second one should be oriented perpendicular to the first. Coincidence of joints is not allowed.
Approximate diagram of the resulting “pie” with two layers of gypsum fiber board
- The GVL surface, after being treated with a primer, does not require any additional manipulations - it is ready for laying ceramic tiles.
The process of laying tiles on a surface prepared on a wooden floor is, in principle, no different from conventional technology, which is discussed in detail in other articles on our website. The only thing you should pay attention to is the brand of tile adhesive. It is best to choose a composition “for complex surfaces”, and some adhesive mixtures in the instructions for use directly indicate the possibility of using them for laying tiles on a wooden base. This installation of tiles will be more reliable.
Options for preparing floors for tiles
Schematic representation of the “pie” for preparing the floor for tiles.
As you can see, laying tiles correctly on a wooden floor is not easy. It's a lot of work and it takes a lot of time. Is there any way to speed up and make the process easier? It is highly undesirable to skip any steps. There is only one option: if after disassembling part of the floor, you find that there are no “sores” or troubles. The floor is insulated, it is level and there is no need to level it. Then you can immediately begin laying the subfloor from the boards, but be sure to remove the paint or varnish. You should also not skip impregnation with protective compounds and the creation of a waterproofing layer.
You can somewhat speed up the process of laying the subfloor if you use slab materials rather than old boards (we don’t use new ones - they can still crack). Not everyone trusts them: it is unknown how the same GVL or DSP will behave under tiles, and even in a damp room. Therefore, whether to use them or not is up to you.
If you will make a subfloor for tiles from cement bonded particle boards, plywood or gypsum fiber board, they are laid staggered so that the seams overlap. A gap of several millimeters is left between the plates to compensate for the movement of the wood. They are then sealed with compounds for working with drywall. They are fastened with galvanized self-tapping screws, the caps are recessed into the material. When impregnating, creating a reinforcing belt is unnecessary - the slabs themselves are sufficiently rigid, but more attention needs to be paid to waterproofing so as not to create conditions for destruction.
When the need arises
Many older buildings require wooden floors. In addition, when building houses of the following categories, you will need to lay ceramics on a wooden base:
- frame;
- frame-panel;
- lumber;
- log
The tiles are quite durable, easy to clean and repel water without problems, so they are perfect for laying on a wooden floor.
In all these cases, the design of the house requires the presence of wooden floors, so when using ceramic tiles as a finishing material, it is necessary to lay them correctly.
The most important question in this case is whether it is possible to lay tiles on a wooden floor. Laying is possible, you just need to take into account some features of the base. The main rooms in the house where ceramics need to be placed are:
- bathrooms;
- bathroom premises;
- kitchens;
- halls;
- corridors;
- hallways;
- utility rooms (for example, laundry room).
In all these cases, there is no better option than laying the tiles yourself. Since this particular material has high strength, wear resistance, moisture resistance and ease of cleaning.
Waterproofing layer under tiles
Careful waterproofing of the surface will ensure a long service life of the floor cladding. For these purposes, a practical, wear-resistant and reliable material is used that is resistant to moisture penetration and condensation.
The surface is treated with heated drying oil or latex-based impregnation, over which a special damper tape is laid overlapping. It provides the necessary shock absorption and compensation for movements of the wooden base.
Double-sided shock-absorbing tape is installed with the elastic side facing the wood and the durable side facing the tiles. An additional benefit of using a damper layer is to maintain natural ventilation and prevent moisture penetration.
Methods for leveling the floor surface
To lay tiles on a prepared wooden floor, you need to create a reliable monolithic surface. This can be done in three ways:
- dry method,
- method of pouring cement-concrete screed,
- express way.
Dry leveling
A fairly popular method of obtaining a flat surface using moisture-resistant plasterboard, plywood and OSB boards. Such materials are characterized by increased strength and static properties, resistant to deformation and rotting.
Dry surface leveling is different:
- Increasing the thermal insulation characteristics of the base.
- Simplicity and accessibility of the technological process of laying insulation.
Among the disadvantages are:
- A significant rise in floor level, which is unacceptable for small rooms with low ceilings.
- Visual difference between a smooth and untreated surface.
Dry leveling is carried out according to the following scheme:
- Installation of thermal insulation, treatment with protective compounds and fixation of the overlapping paint mesh.
- Filling with a leveling dry mixture of expanded clay chips, sand and other binding components. Uniform distribution of the mixture over the entire surface.
- Installation of the selected material - plywood or slabs - in a checkerboard pattern so that the joints between the individual elements do not coincide.
- Cleaning the surface and joints with a grinder and treating with a deep penetration primer mixture.
Wet screed
The method of leveling the surface is similar to creating a conventional screed for decorative finishing.
A floating screed is prepared from leveling polymer and cement-sand mixtures.
Its main advantage is the creation of a monolithic base that is resistant to movement of the wooden structure. And the disadvantages include: an increase in the height of the floor cake, significant labor and financial costs.
Work on arranging a wet screed is carried out in the following order:
- Increasing the strength of the base. If the logs are located at intervals of 50 cm from each other, then it will be necessary to check and replace the deformed areas with reinforcement of the structure using bars.
- Installation of intermediate flooring from boards. For these purposes, solid floorboards up to 4 cm thick are used, which are fixed to logs while maintaining technological gaps of 1 cm.
- Installation of plywood or slabs up to 12 mm thick, similar to brickwork. Technological gaps between individual elements are 3 mm.
- Installation of a waterproofing layer of polyethylene film or oiled paper over the entire surface of the floor, secured with double-sided tape.
- Pouring a ready-made leveling mixture or cement-sand screed up to 10 mm high over the entire surface.
Express method of surface leveling
It is used to level surfaces that are in excellent operating condition or have minor visual defects. For work, moisture-resistant cardboard is used, which is fixed to the rough board using self-tapping screws or special polymer-based glue.
The main advantages of the method include simplicity and low cost of installation, and resistance to temperature changes in wood.
The process itself is performed as follows:
- Before installing drywall, the horizontalness of the floorboards is checked. Differences are eliminated using improvised means: wax paper, roofing felt or fiberboard.
- Drywall is mounted on the surface using brickwork in two layers. It is important to ensure that the joints between the rows do not match.
- A gap is provided around the perimeter of the base, and the seams between the individual elements are filled with sealant.
- The base is carefully treated with a primer mixture.
- The gap is filled with polyurethane foam, after which the baseboard is installed.