Decorating wooden doors
When all structural elements are ready, you can move on to the next stage of manufacturing wooden doors - decoration. This moment is very responsible and important, because during the finishing process it is very easy to damage components if you act ineptly.
Experts advise not to do such actions yourself, but to trust the professionals. However, if you have at least some skill with a brush and know how to apply paint, then treating the door yourself is not difficult.
If you need to paint several structures, then before making a wooden door, you can buy a spray gun and a compressor, which will make the process easier. But this is quite expensive and does not make sense if it is used only once. It's cheaper to rent them. These devices allow you to quickly and efficiently apply paint to the surface of wood.
In addition to painting, ways to decorate the door leaf are:
- treatment with varnish or stain;
- gluing with PVC or veneer;
- coating with film or laminate;
- leatherette lining;
- drawing a picture on wood;
- wallpapering;
- fabric decor;
- wax impregnation and more.
If you decide to make wooden interior doors with your own hands from a material that is susceptible to moisture, then before decorative finishing you should coat the future door with a water-repellent composition. It is also recommended to apply a composition that protects against putrefactive processes, as well as the formation of mold and the spread of parasites.
Doorway or jamb
Homemade doors, if you have the necessary tools, will cost much less than those purchased or ordered from a workshop. The consumption and quality of the material will depend on the functionality of the room and the type of structure being manufactured. A door for insulated rooms will cost more than a simple door for a barn, but still, making it yourself will result in significant savings compared to those purchased in a store. For more complex designs, it is necessary to have some experience and a set of tools.
The front door for a house is a rather complex structure and must be manufactured with the proper quality. In the absence of the necessary experience, it is advisable to purchase it in a specialized store.
For the manufacture of doors, it is necessary to use well-dried material. During the manufacturing process and after final assembly, the product must be coated with protective solutions against moisture. Otherwise, the door will change its size depending on weather conditions.
Coating the door with protective solutions against moisture
To make the simplest door for a summer house, you will need the following tool:
- wood hacksaw;
- electric or manual plane;
- screwdriver or hammer;
- emery cloth;
- meter ruler or tape measure.
Before starting work, you should determine whether the doorway needs to be installed or whether the door can be fixed to the wall. You also need to consider which way the door will open, outward or inward. If the room has wooden walls, in some cases door hinges can be attached to the wall. It is advisable to install a stop on the second side so that the door does not fall in the opposite direction.
Manufacturing should begin with the doorway, if there is a need for it. From a block of the required section you need to cut two vertical posts and horizontal crossbars. When determining the size, be sure to take into account the type of connection of the bars: end-to-end or half-timber. A door made of boards can be made recessed; the outer or inner surface of the door must coincide with the corresponding plane of the doorway. To do this, quarters are selected in the block - special grooves where the door will fit. This operation can be performed on an electric plane or woodworking machine. If you have some experience, the grooves can be cut with a circular saw, precisely adjusting the depth of the cut. It is advisable to plan all lumber before cutting. For planed surfaces, the consumption of protective coating is less. If it is impossible to plan the whole material, you can process cut pieces.
Installing a doorway
With an overlay design, when closed, the door rests on the surface of the doorway.
The blanks for the opening must be connected to each other using the chosen method. For fastening, you can use wood glue, screws or nails. When using glue, you need to wait the required period of time for it to harden. During assembly, it is necessary to strictly control the position of the corners of the structure.
Making your own box
In order to understand how to make a door frame with your own hands, you need to familiarize yourself with some aspects of the work itself.
To begin with, measurements are taken. There are 2 ways to retrieve data:
- along the doorway;
- on the installed door.
For example, calculating data on an operating door. First, measure the sides and add 5 cm on all sides of the door. Next, measure the threshold and the upper part of the system, leaving room for allowance. Then they calculate the footage and begin sawing.
Next, lay the bars on the floor; they will be needed when installing the side box. They should lie level, with the grooves on top. Mark the upper and lower boundaries of the future door, while adding the thickness of the threshold. Certain notches are made from the bars that are applied to the threshold and crossbar so that the sawing line is visible.
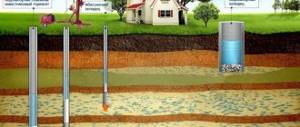
Scheme for taking measurements of a doorway.
Then the prepared materials are sawed for collection. After cutting the workpieces, it is necessary to adjust them to the appropriate size. A slot for future loops is made in one of the blanks using a chisel and hammer. Before you start, you need to know the necessary side of opening the structure.
To continue self-assembly, you must use screws and nails to strengthen the future structure. Next, hinges are hung and the doorway is strengthened. Even out the gaps.
The necessary tools to help assemble the door are:
- construction knife;
- square;
- roulette;
- pencil;
- hammer;
- screwdriver;
- plane;
- hacksaw.
Use a set of screwdrivers of different configurations, use pliers, a crowbar, and small nail pullers.
To punch a hole in concrete, you need a hammer drill. A miter saw can prepare materials for the door. An electric router also does quite a lot. Using it, holes for the necessary locks and hinges are made in a short period of time. If you have a large set of cutters, even better. If you need to make a door frame with special quality, you will also need a woodworking machine.
Installation
Do-it-yourself installation is carried out in two stages. The first is assembly. Assembly must be done on a flat, horizontal surface, such as the floor.
It is necessary to connect all the parts together and adjust them to the dimensions of the canvas. If everything matches, proceed with installation.
Detailed video instructions in the video below:
Installation is carried out in the following queue:
- Measurements are taken from the door and the locations for the hinges are determined.
- A small layer of wood is removed so that the canopies lie in line with the stand.
- Mount all parts.
- Install the box in the opening.
- Adjusting the position of the slats and checking the level of the built-in box.
- Fixing the box with wedges.
- Fastening the box with bolts.
- Install spacers between the frame and the opening.
- Filling the void from the box to the opening with polyurethane foam.
- Removing protruding wedges and dried foam.
If all the conditions for manufacturing and assembly are met, then this operation will not be difficult for you.
Design selection
The design and consumption of lumber depend on the purpose of the product. When making an entrance door yourself, the leaf is made massive and strong, and it is advisable to make the interior structures lighter and more delicate.
The classification of products depends on their design features:
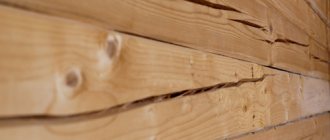
- From the array. The door leaf is assembled from a thick board, and the rigidity of the structure is created by horizontal or inclined lintels. Depending on the installation location, the door can be decorated with carvings, artificially aged and varnished, or covered with clapboard.
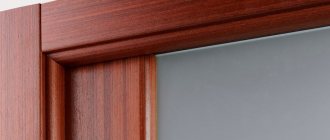
- Paneled. It consists of a frame assembled from a processed board and panels - inserts made of wood, plywood, MDF or glass. The product is assembled using wood glue.
- Panel. The wooden frame, which is the basis of the structure, is sheathed on both sides with plywood, thin metal or MDF, and the internal cavity is filled with cardboard cellular padding, glued timber, insulation or left hollow.
The simplest homemade designs of solid wood products are placed at the entrance to a barn, bathhouse or cellar, and if the canvas is insulated and decorated properly, it will become an excellent entrance door to a private home. Paneled doors are installed in interior openings or as a second door to an apartment. Frame products are a budget option for canvases used everywhere except the entrance to the house. They are easy to manufacture, light weight and low price.
Plywood doors
You can make good interior doors with your own hands from blocks and plywood. There may be several options.
Single layer
This design is suitable for installation in some utility room where sound and heat insulation is not important. This is a frame made of wooden blocks with several transverse strips, onto which a plywood sheet of suitable size is stuffed.
Plywood can be any kind, but 1-2 grades are required for good appearance. It does not contain (class 1) or almost no (class 2) knots on the front surface. This material comes in different thicknesses: from 3 mm to 21 mm. There is moisture-resistant plywood - it can be used in wet rooms, there is laminated - in this case there is no need for finishing: it is covered with PVC film and has a look similar to wood.
There are many types of plywood and as a construction or finishing material it is very convenient
When choosing plywood for residential premises or baths, you need to pay attention not to safety: in its manufacture, glue is used that contains formaldehyde. The content of formaldehyde is controlled, depending on its quantity and intensity of its release into the atmosphere, and an emission class is assigned: from 0 (almost none) to 5. Plywood with emission class 0 and 1 is allowed even for the manufacture of children's furniture. Therefore, it is also suitable for doors to the bathhouse.
Multilayer
The design is similar, only there can be two or three layers. Heat/sound insulation can be laid between them. As a result, similar doors can be installed in a steam room. You will only need to take moisture-resistant plywood. It can then be tinted with stain and covered with heat-resistant varnish (if you want, of course) or soaked in drying oil or wax.
Multi-layer plywood doors are easy to make with your own hands
You can fasten plywood using small nails or self-tapping screws. You will have to drill holes for the screws: then you will be guaranteed that the top layer will not be damaged.
Required materials and tools
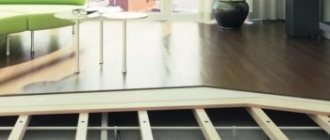
Installation of sliding plywood doors begins with preparatory work. You need to stock up on the necessary materials and tools so that nothing later distracts you from your work. To create a simple door you will need the following materials:
- Beams in the amount of 5 pieces, length 3 m and cross section 45 x 20 mm.
- Waterproof plywood, coniferous varieties are suitable. The dimensions of the sheet depend on the size of the door leaf.
- Insulation or filler. For a regular interior door, you can choose an inexpensive option that does not have noise and heat insulation properties. But even in interior structures, inexpensive mineral wool or expanded polystyrene can be used as insulation.
- PVA construction adhesive
- Rail
- Profile to be used as guides
- Rollers
- Wood putty
- Acrylic sealant for wood
The tools you need to prepare are:
- Circular saw, hand or electric
- Jigsaw
- Sandpaper
- Spatulas of different sizes
- Screwdriver
- Electric drill
- Fraser
- Ruler
- Pencil
- Masking tape
- Tassels
If you are planning decorative surface treatment, then a milling machine and a miter box will be useful to you.