A very simple device that allows you to quickly make removable hooks and hangers from wire.
Greetings to all do-it-yourselfers.
In my last article, I talked about the use of wire hanger hooks, which, thanks to their special design, can be quickly removed and installed on a base made of a piece of thin plywood or hardboard (see my article: “Removable wire hanger hooks”).
Today I want to continue this topic and share the design of a simple device for making such hooks.
This is what the finished device looks like.
Wall construction: recommendations for manufacturing
Before getting started, prepare the following tools:
- piece of board,
- screwdriver,
- jigsaw,
- hacksaw of different grain sizes,
- hooks,
- awl,
- blowtorch.
The work plan is as follows:
- Decide how long you want the clothes hanger for your hallway to be. Cut a piece of board to the appropriate size. Using a jigsaw, you can make the edges rounded with wavy lines or leave them in a regular rectangular shape.
- Sand the edges (if the surface of the board is not sanded, sand that too). Use coarse sandpaper first, and when the job is almost finished, sand the edges and surface with fine sandpaper.
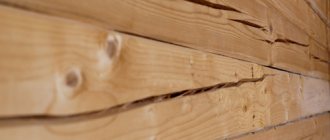
- Burn the surface of the board using a blowtorch. If you don’t have a blowtorch, you can burn the board with your own hands over a gas burner. However, be very careful not to burn your hands.
- Attach the resulting blank to the wall. There are two ways to do this. The first is by attaching metal “ears” to the back of the board. Holes should be drilled in them for fastening with long screws into dowels. The longer the screw, the more weight of clothing the hanger can support. The second way is to attach the workpiece directly to the wall by drilling holes through it.
- Secure the hooks with screws. A wooden hanger looks best if it has antique metal hooks. Useful recommendation: to make the structure more spacious, choose treble hooks.
A simple DIY wooden hanger is ready.
From perforated sheet
This hanger will display the phrase “I can also cross-stitch” in every sense, show your creativity and become a good home decoration.
Materials
In order to create it, you will need the following materials:
- plastic or metal panel with perforation,
- multi-colored floss threads (in principle, knitting threads are also suitable),
- scissors,
- hooks (in this case 4 pieces with a ball at the end).
TIP: where can I get such a perforated sheet? At any hardware or furniture store, ask for perforated sheet. And they will cut you the size you need.
Work order:
- We buy a perforated sheet of the required size.
- You do regular cross stitch with threads, only the fabric is larger.
- You can choose any word you like, or a simple picture (a heart, for example), the main thing is to make sure that everything fits and the spaces between the letters are the same.
- When the inscription is ready, attach the hooks through the holes in the panel and hang the hanger on the wall (you don’t even need to drill holes for the fasteners, they are already there).
Floor design
You can make a practical and beautiful floor clothes hanger with your own hands.
To make it, first of all, stock up on the necessary tools and materials. You will need: drill, Phillips screwdriver, self-tapping screws, fitting, drills, level, tape measure, hacksaw, sandpaper with coarse and fine grain, stain, varnish. The following materials will be needed for making a hanger for the hallway with your own hands:
- Thick wooden blocks about 60–70 cm in length. They can be replaced with an old metal tree support or a heavy floor lamp. The main thing is to create a stable base so that the clothes do not fall along with the hanger.
- Wooden post. It is best to buy a ready-made one at a building materials store, shaped on a lathe. You can make it yourself from a dry young tree trunk. You need to remove the bark from it and treat it with “sandpaper” (first coarse, then fine).
- Set of metal hooks.
- Glue (carpenter's glue or any other transparent one).
- A small piece of thin rubber. You will glue it to the lower surface of the base (the place of contact with the floor) to prevent slipping.
- A massive board that will be attached above the cross. On the one hand, it will strengthen the center of gravity of the product. On the other hand, you can use it as a stand for handbags or accessories.
Wooden hangers
Wood and building materials based on it are best processed. From them you can create many hangers of different sizes and shapes.
Crocheting a tablecloth - choosing a type, buckles, practical tips, patterns and photo examples
Craft a boat with your own hands - master classes on making it from paper and scrap materials, photo ideas
Manufacturing
Creating a standard hanger will not take much effort or time. Before starting work, it is advisable to understand the upcoming design, the manufacturing procedure, and the list of necessary materials. Draw a scale sketch of the proposed design.
Place a board, a sheet of plywood, or chipboard on a stable platform. In accordance with the sketch, mark the board and sheet. Use a saw or jigsaw to cut out the load-bearing part of the structure. Clean the cut plane and the edges of the workpiece with sandpaper.
The processing stage is the moment of giving the product the desired appearance. At this stage, the product can be lightly burned with a blowtorch, covered with stain, and the design can be burned out. Once finished, paint and varnish the finished parts.
The hanger can be hung freely or placed with emphasis on the floor. In the first case, hanging on the wall can be done on special external or internal hinges or through special holes in the base of the product. With the second option, the stability of the structure increases.
How to make a butterfly with your own hands - choosing material, creating a template, tips and photo ideas
How to make a children's book with your own hands - choosing the appropriate option and type of book, tips, photo examples
In the final part of the work, metal and plastic hooks are attached. They are located on the frame as desired by the manufacturer. Attached in various ways. The most reliable way is to screw it with self-tapping screws, which allows you to hold your outerwear. Less practical is the use of adhesive bases, magnets, and vacuum suction cups. Such hooks are capable of holding light items and hats.
The quality of fastening the hooks in the first option corresponds to the method of fixation on wooden rods. To implement this, rods up to 100 mm long and 10-12 mm thick are manufactured. Holes with a depth of at least 15 mm are drilled according to their diameter on the frame. The base of the rods is lubricated with glue and firmly installed in the holes. After the glue has dried, the hanger is ready for use.
Attention: When making such a hanger, you must use well-dried wood. If you use raw wood to make a frame, the wood will dry out over time. The rods will decrease in diameter, the recesses of the base will increase. The hooks will fall out of their sockets and the hanger will become unusable.
Making the lower part
First of all, you need to start making the cross. Cut the prepared bars in half, sand them to remove burrs, and connect them at right angles. For a tighter connection, use a chisel to select indentations on the elements of the cross across the entire width of the block. Having connected the selected areas, you will see that they are fastened together. Next, using a fitting, cut out 4 bars - supports for the trunk of the product. You screw them with self-tapping screws to the legs and trunk.
Useful tips:
- Before you start screwing in the screw, drill a hole with a drill. In this way, it will be possible to avoid the appearance of small cracks in the wood, which will shorten the service life of the product.
- The diameter of the drill must be smaller than that of the self-tapping screw.
- Fill the holes with glue, and only then screw in the screw.
Glue rubber to the finished bottom part, make sure that the product does not slip.
Wooden hanger and example of a drawing of the device
If you want to show your creativity, you can combine different options. For example, you can design a wall hanger with reinforced, supplemented floor support. You can also create an excellent design for the nursery by making the main part in the form of a cloud or a tree.
An original do-it-yourself fence or antlers hanger will fit into the hallway.
These devices are divided according to the type of hanging clothes:
- with hooks;
- with a barbell under the shoulders.
In the first case, a hanger with hooks takes up less space, but clothes on it may wrinkle. In the second, you can hang any outfit on hangers, and at the same time it will remain neat and not wrinkled.
You can build a wall hanger yourself using all the necessary tools.
The product can be given an original appearance and completeness using various decoration methods:
- decorate with decoupage;
- cover with craquelure or glissal;
- paint.
The material option may be different, the best of course is wood.
First, using a wire brush, you need to clean the wooden surface of the hanger from dirt, dust and grease. After cleaning, using a spray bottle or roller, you need to apply a layer of primer, very carefully filling all the cracks.
Using the decoupage method, it is possible to create products that will fit original into any interior.
You can recreate pattern elements on furniture with an antique effect.
For work, use blanks with drawings and scissors. The wrong side of the picture is smeared with glue and placed on a wooden surface and leveled to avoid the formation of air bubbles. After the glue has dried, the surface of the product is coated with furniture varnish. It is better to complete the work using craquelure.
There are more interesting options for this craft.
Glizal is a transparent paint that forms a textured surface. It is diluted with water and applied to the surface using a textured sponge, creating the desired pattern. This must be done quickly, as everything will harden within half an hour.
Craquelure is a type of varnish that is used to achieve the effect of artificially aging wood.
Floor and wall hangers are considered a kind of classic.
Making the top part
When the lower part is done, you can move on to making the upper part and attaching the hooks. It is advisable not to screw hooks to the trunk. It is better to attach a small square to it that already has hooks. Or go another way. Stepping back a little from the top, attach 4 bars to the trunk, aligned with corners and sawn through using a fitting. If during operation the product will constantly carry a large weight of clothing, for strength, drill a hole under each screw and fill it with transparent glue. All that remains is to give the hand-made clothes hanger some neatness - treat it with stain and varnish it. Go over the entire surface of the product again with fine sandpaper, then dry it. The stain will highlight the natural grain of the wood. Finally, open with varnish. So you made a hanger for the hallway with your own hands!
Alternative options
There are many disused items in the household that can be used to create a hanger. Making household items from these items is not difficult. These pieces of furniture can be created with your own hands to suit the interior of the apartment, characterize the family’s hobbies, or be made as a necessity.
Reflection of hobbies
The most common variant of these items are hangers made from elk and deer antlers. The manufacturing process is simple. It is necessary to clean the horns themselves and open them with varnish. Make a hanger base from boards, plywood, chipboard, and paint it with paints to match the interior walls of the room. Prepare reliable fastening of the frame. Use a hacksaw to level the base of the horns. Drill a small diameter hole in the horns at the base. Place the antlers at the point of attachment to the board and trace around the perimeter with a pencil. Carefully hollow out a hole with a chisel and insert the horns tightly into it. Secure with self-tapping screws through the previously drilled holes. The hat hanger is ready.
Leather belt hanger
This product can be used in all common areas of the apartment. It will be an interesting addition to the interior and will require a minimum of effort in manufacturing.
Accessories:
- two belts (preferably made of leather);
- two pieces of hard leather;
- tree branch;
- hooks made of hard wire (diameter 4-5mm);
- scissors, thread, needle;
- hole punch for leather.
Manufacturing procedure
We cut the belts to the required length. We wrap the belt around a tree branch. We sew the belt at the girth. We carry out the same manipulations with the second end of the belt. We make decorative straps from a piece of hard leather and put them on the places where the straps are sewn. Use a leather hole puncher to make holes in the upper part of the belts. We screw hooks into the wall or ceiling and hang straps from the holes.
We make hooks from dollar-shaped wire. We hang it on a tree branch.
Advice. It is advisable to dry and sand the tree branch. Clean with sandpaper and varnish.
Hanger made of branches and cuts
Branches and cuttings are excellent material for hanging. Wood is always fashionable, you can always find cuttings of branches, it is not expensive to produce.
Materials:
- four boards;
- branch cuts;
- self-tapping screws;
- flat furniture corners.
Manufacturing procedure:
For production you will need a board 20-25mm thick. The rectangular frame of the hanger is made from the board. The dimensions of the frame are determined by the geometric dimensions of the room. The frame boards are fastened together with self-tapping screws, and metal stiffeners are installed at the corners on the inside. “Ears” are attached to the top bar of the frame. Branches are cut according to the width of the base. Installed vertically inside the frame of the hanger. They are attached with self-tapping screws to the upper and lower crossbars of the frame. They are attached to the wall by the “ears”.
To make a hanger, all materials available in the house are suitable. The main thing is to format and present it correctly. Such furniture elements are always necessary. They can be produced quickly and inexpensively. The individuality and creativity of homeowners are emphasized. They will help improve the interior and comfort.
Selection of material for the manufacture of towel holders
Accessories for drying towels in the bathroom are almost always made of metal or plastic. Plastic products are cheaper, which affects their service life. And plastic holders are unlikely to decorate a room, given the simplicity and modesty of their design. As for metal hangers, they always delight the eye with their luxury and shine, which is inherent in chrome car parts. It is also possible to purchase goods combined with wood, ceramics and glass. Such models will certainly appeal to connoisseurs of everything exquisite and extraordinary.
If you wish, you can easily find hangers of fancy shapes and sizes on the market, but the cost of original products from famous designers is almost always overpriced, and the quality often does not justify it. When a bathroom towel rack is created with your own hands, the author has the opportunity to give it the desired look. It’s also good that he himself will be responsible for the quality and strength of the finished item. Another important nuance is significant savings. Judge for yourself, you will be able to purchase all the necessary materials at cost, and you will not have to overpay for the work of the master.
DIY towel holder in the form of a tree
A wooden hanger will look very good in rooms where the walls are painted in pastel colors. To get started, make a stencil of a tree along with leaves, which will later be hooks. The size of the stencil must match the size of the holder. The stencil is ready, we transfer it to the wall. Paint the tree itself in the color you like; white, black or beige look best. We wait for the design to dry completely, then use a glue gun to glue hooks onto the “leaves”; it is advisable to match them to the color of the tree.
What is needed to make hooks
Materials and tools may vary depending on the material chosen. For example, for hooks made from children's toys, you need the following:
- Glue.
- Screws.
Attention! The perfume lid hanger only requires glue.
To create hooks from sea stones you need:
- Screws.
- Iron cylinders.
- Glue.
For hooks made from wooden branches you need:
- Glue.
- Paint and primer.
But for it from a rolling pin, you need:
- Hacksaw.
- Nails.
- Primer and paint.
Sample
First you need to put the idea on paper, make an accurate drawing, taking into account the size of the boards and the specifics of the project. Then the resulting template should be carefully transferred to the boards and outlined with a pencil. Sketches of products are presented in large quantities in virtual sources, from which you can take only an idea or print a ready-made template on a plotter, if one is within reach.
The most accessible and simplest is the rectangular shape. A more intricate wooden wall base for hooks will have to be cut out. You should not choose too complex templates, especially for a novice master.
Hook options and wall mounting
The final stage is perhaps the most important, because the meaning of the idea is lost without hooks and reliable fastening of the entire structure to the wall.
There are many possibilities for making hooks, ranging from a variety of ready-made products made from metal alloys and wood to homemade devices made from hemp, metal staples, and leftovers from wooden coat hangers.
If a wall hanger is planned to be used in outbuildings to place garden tools, then a rake is sometimes secured with the teeth up as a set of hooks. It turns out powerful, reliable and durable.
The finished wooden structure is nailed or fixed to the wall using a drill or hammer drill.
Installation of any hooks and the final fastening of the hanger are usually easy to do using ordinary tools (screws, dowels, drills), sometimes you may additionally need universal glue. After assembly and the glue has completely dried, test hang a load with the maximum planned weight and observe the hanger. Surely the result will please you, the product will serve for a long time and reliably.
Cutting and sanding
After obtaining the outline on the workpiece, you can begin to cut it out using a small jigsaw or saw. You need to work carefully so as not to crumble or damage the edges of the hanger. The resulting semi-finished product will have a rough surface that needs to be sanded after moistening, directing hand movements along the wood fibers.
The length of the hanger varies at the discretion of the craftsman; you can make a long structure with a shoe stand located almost at the floor. In small rooms, a shortened hanger is organic, under which there is a bedside table, shelves or ottoman.
Advice! A wooden hanger looks beautiful, the edges of which are slightly rounded and smoothly varnished.
Rounding can be achieved by processing with fine-grained sandpaper. Experienced craftsmen do not recommend using special wire sold in stores for grinding; it is intended for other materials.
A well-prepared wood surface, when stroked with a hand on which a nylon stocking is placed, will not leave any snags and will create only pleasant sensations. If you feel any of these, it means the job was done correctly and the wood can be varnished.