- 1 PVC film 2 in 1 – waterproofing and finishing
- 2 Varieties
- 3 Advantages and disadvantages of the material
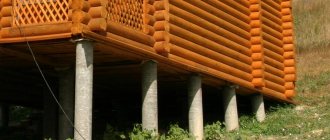
- 4 Work on the installation of a pit pool
- 5 Finishing work
- 6 Frame pool made of PVC film
- 7 Videos
A swimming pool is a useful building, as it cools you down in the hot summer heat, helps you relax, escape from everyday worries and have a good rest. An important stage in the construction of such a structure is its interior decoration. Often, the pool is lined with ceramic tiles or mosaics - materials that are not only aesthetically beautiful, but reliable and durable. But, as you know, technology is moving forward with great strides, so these days there is another material that has won an honorable place among such facing materials as tiles and mosaics. What is it about? This is a PVC film for a swimming pool. More and more often, pools are covered with this material, and not without reason. After all, the price of such film is significantly lower than other materials, and working with it is much easier and faster. Moreover, PVC film can act not only as a finish, it may well be the main material for the manufacture of a pool. Let's find out how to make a PVC pool with your own hands.
PVC film 2 in 1 – waterproofing and finishing
PVC film for swimming pools
Polyvinyl chloride film (PVC), in addition to looking aesthetically beautiful, has another important advantage - it can act as a waterproofing material. Water will not pass through such a film, so you can save your money on waterproofing the pool bowl itself. The nice thing is that even if there are cracks in the concrete, and all the work was carried out without waterproofing, appropriate waterproofing putties and primers, the PVC film will be able to hold all the water in the pool, despite the enormous pressure of the water column.
Due to this property, the film is often used in the restoration of old swimming pools, the bowl of which is cracked and problems with waterproofing have arisen. Covering the pool with PVC film will help save the situation. And what’s most amazing is that this can be done even without removing the old material, for example, mosaic. In this case, it is only important to take care of the tile’s strong adhesion to the surface so that it does not peel off. Thus, by choosing PVC film as a finishing material for the pool, you can kill two birds with one stone.
Pros and cons of a pool made from scrap materials
In general terms, the advantages of the simplest pools include:
- speed of construction;
- minimum costs;
- availability of building material;
- design at your discretion.
The disadvantages include:
- short service life;
- limited sizes;
- not always aesthetic appearance of available materials.
Positive and negative features must be considered for each individual font, based on the fact of what available material they are made of. For example, wood is well processed, affordable, but disappears in dampness. The metal is durable, but expensive, susceptible to corrosion, and requires welding. The advantage of large tires from agricultural equipment is that it is an almost ready-made pool. However, only one person can fit in it.
Advice! When choosing a material at hand to build a pool, you immediately need to think through all its pros and cons. Making the right decision as to whether it is suitable for the job depends on this.
Varieties
Blue mosaic
Manufacturers took into account the various preferences, financial capabilities of people and the purposes for which the film will be used. Thanks to this, you can choose a pool cover from several types of PVC film:
- Simple unreinforced film. It is an economy class material that anyone can afford. This is the cheapest material of the three types of films. Its thickness varies from 0.65 to 0.85 mm. This film cannot be called very durable, but it still copes with its functions. It is impossible to make a frame pool from such a film, but it is quite possible to cover the bowl of a small pit pool.
- Reinforced film. The most common option. The price/quality ratio is completely justified, since this film not only has a thickness of 1.5 mm, which is 2 times more than the usual one, but it is additionally reinforced with polyester threads, which gives it greater strength. A pool with such a finish can withstand significant mechanical loads without deforming. This property is especially useful for those who want to make a frame pool, where the film serves as the walls. It takes on the entire load, being a load-bearing structure, so it must withstand enormous pressure, which it copes with.
- Anti-slip film. Its difference from all others is its ribbed surface, so it is often used to prevent slipping on the surface of the pool. Families with small children cannot do without such a film.
Reinforced film
Please note that there is also a material that has an acrylic coating. What does it give? Thanks to it, the film is protected from bacteria and algae that can colonize micropores. As experts say, with such a coating the film will last twice as long and will better retain color and elasticity. But what are the advantages of PVC films compared to other finishing materials?
What if there is an unevenness?
A number of plots in any garden cooperative have a difference in ground heights in the range of 0.5 - 1.5 meters. Typically, summer residents do not like such geography: they are afraid that rain runoff, especially storm water, will destroy the beds and destroy either the plants or the crop.
This is partly fair. Those who have such slopes put retaining walls under them to level the area. In the case of building a swimming pool, the disadvantage will turn into an advantage: there will be less excavation work and the natural overflow of water to clean the bowl will be better.
Advantages and disadvantages of the material
One of its main advantages is its affordable price. Building a pool in itself is an expensive proposition, so finishing with PVC film is a salvation for some. Another important point is that, as already mentioned, it acts as both a waterproofing and decorative material. Moreover, this material is hygienic, resistant to ultraviolet rays and sudden temperature changes. The material is easy to care for, because it is not afraid of chemical care products.
Work on the installation of a pit pool
Pool pit
If you want to make a pit pool at home or in the country, you need to follow this sequence:
- First, decide on the design and shape of the pool. After that, choose the optimal place where it will be located. It should decorate your site and serve as a suitable place to relax. You should not choose a place where the pool will often be polluted. Please note that the structure must be close to the water supply system.
- Now you need to choose the size of the future tank. Typically, such pools are made no less than 4x4 m. Choose the depth according to your preferences, it can range from 1 m to 2 m. The average depth, suitable for everyone, is 1.5 m.
- When everything has been figured out with the dimensions, the appropriate markings must be made at the site of the pool using pegs and rope. The pool can be rectangular, round or square.
The formwork is installed and poured.
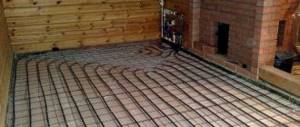
Now dig a pit of the required depth. This can be done either independently or by calling a special technique. Keep in mind that the pit itself must be made slightly larger than the size of the pool itself. For example, make the dimensions of the walls larger by 40–50 cm, and the same with the bottom, since waterproofing work, pouring, etc. will then be carried out. The bottom of the pit must be compacted.- Next, the finished pit is leveled and waterproofing work is carried out. Pour 30 cm of sand onto the bottom and compact it. Then lay roofing felt in 2-3 layers and bitumen mastic.
- At this stage, it is necessary to carry out all the work to ensure the drainage of water from the pool.
- To make the walls, build formwork along the edges of the pool.
- Now pour concrete between the soil and the formwork. In order to strengthen the walls, make a mesh of reinforcement in advance and install it.
- After the concrete has hardened, the formwork is removed.
- All that remains is to make the bottom. Pour another layer of crushed stone, install a reinforcing mesh and fill the bottom with hydraulic concrete. Now, after the concrete has dried, you can begin finishing the pool.
Preparing to create a pool
To begin with, polypropylene sheets are selected. They are always offered in a wide range and have different dimensions, for example, 1500 x 3000 mm or 2000 x 4000 mm, while the thickness also varies greatly. PP sheets can be from 5 mm to 15 mm. It is recommended to use sheets of different thicknesses for different areas of the pool. For the walls it is better to choose thicker sheets, and for the bottom you can take those that have a smaller thickness.
In any case, it is not recommended to use sheets less than 8 mm thick. For example, when welding 5 mm sheets, the material may deform, leading to unevenness of the entire structure. The width should be selected based on the size of the resulting container. In general, the larger the container, the higher the wall thickness should be.
The base of the future pool is made using geotextiles. This material forms a waterproofing layer for the foundation. You will also need reinforcement and concrete mixture for the base. At the same time, when choosing a place for a pool, it is necessary to take into account that the pit should be approximately 50 cm deeper than the bowl, and also 100 cm wider. Also, there should be no large trees near it that could damage the pool with their root system. However, there is another danger regarding trees: leaves falling from them, which fall even in the summer, albeit in small quantities. This will already be enough to litter the pool.
Of course, you also need to draw up a drawing of the pool and for this you can contact a specialist, especially if you need a pool that is not of the most straight shape. A specialist will help you not only make a drawing, but also carry out all the necessary calculations. You will also additionally need to calculate the required volume of concrete for the structure and foundation. And for a concrete base you will need reinforcement; the grid spacing is taken to be 20 cm.
Finishing work
Finishing the pool with film
To install PVC film, it is important to follow the instructions. The process itself is simple, but requires attention. Even if you are a layman, the tips below will help you deal with this matter.
- First of all, you need to prepare the surface: remove all debris, leaves and everything unnecessary. If the poured walls and floor are not level enough, they must be leveled with plaster. A flat surface is necessary, since under water pressure the PVC film will repeat the relief of the bowl; if the surface turns out to be curved, after installation it will be very noticeable.
- To finish the pool with film, a fastening strip or corner is laid around the perimeter, which must be secured with screws. On one side, the strip has a plastic coating, to which the film will eventually be welded; if it is a corner, then the film must be secured with screws. When the pool is large, stripes are additionally fixed to the walls.
- Now lay a special insulation over the entire surface, thanks to which the friction of the film on the concrete will decrease, it will not wear off, and the service life of the material will increase. When the pool is placed indoors, geotextiles can be laid instead of insulation. The substrate is attached with fastening strips, and in difficult places it is fixed with glue.
- After this, a film is spread on the surface with an overlap of sheets of 8 cm and a distance of 1–2 cm from the wall. To ensure that the film adheres well to the corners, use a corner.
- Using special equipment for gluing PVC films, weld the drain seams and additionally seal them with sealant.
- At the last stage, the PVC film must be connected to the mounting profile on the side of the pool.
Side mounting
You can see how this work is done in the video below:
All that remains is to fill the pool with water and test the new coating. Your pool is now ready for full use. To complete the job you will need the following tools:
- perforator;
- sharp knife;
- sealant;
- equipment for gluing PVC film;
- silicone roller;
- corner;
- the PVC film itself.
Very small pool for a quick fix
An inflatable pool is considered one of the cheapest options. But there are even cheaper options:
A pool made from a large tire. Used tires from the wheels of large tractors, combine harvesters or trucks are suitable for this purpose. The rubber is freed from the disc, completely degreased and cleaned on both sides.
The base for such a pool is leveled and concreted. A wheel is placed on top of it, the upper bending part of which is cut off. Concrete mortar is poured onto the bottom of this structure and leveled so that all protrusions are filled.
To make it easier to drain water, you need to provide a hole in the side with the hose outlet away from the structure. Then a PVC film is laid inside or the surfaces are treated with paint. A fairly reliable water feature appears in the garden quickly and cheaply.
Swimming pool made of cast iron bath. This structure is not a full-fledged swimming pool, but if desired, it will provide long-awaited coolness to a hot body. The bathroom is a ready-made bathing container. You just need to figure out how to fit it into the garden design.
Plastic pool for kids
Such a font can be dug halfway into the ground, and the part protruding above the ground can be decorated with stones or wood. You will get a stone or wooden terrace around a mini pool. On one side you can plant some plants and create an oasis. And leave the other side open for easy entry into the water.
To prevent the bathroom from sparkling with its white sides in the middle of the garden, you can take paint and paint it green or blue.
Wooden pool. Another option for an inexpensive pond for a summer residence. At the place where it is planned to install the pool, sand is poured, compacted, leveled and a timber frame is built. All sides must be aligned horizontally at the same level.
Then all the side walls are strengthened with spacers so that a large mass of water does not squeeze out the horizontal planks. This frame is covered with PVC film, which can be purchased in stores. It is used for sewing car covers or making banners.
The colors are very varied. You can also use a former banner without damage for this purpose, but before doing this it is advisable to rinse it well. It’s much nicer to buy new, young blue material. It will look more like a real swimming pool.
It is attached to the boards with special eyelets, which are installed along the upper edge of the fabric on the reverse side. When measuring and subsequent cutting, this allowance for the upper bend must be taken into account. A pool of this design does not need to be made large. A sufficient size is 2x3 meters and a depth of 1.5.
You can take all the options for the above structures as a basis or come up with something of your own.
You can even use a metal container for this purpose. The gardener's imagination and ingenuity will help to achieve the desired result.
Frame pool made of PVC film
Frame pool
If you don't have the space or ability to build a pit pool, you can make a PVC frame pool that will be installed on the ground. We will look at a homemade pool made of wood and PVC film, which will have dimensions of 4.5 × 2 m and a wall height of 1 m. It can be made in a day.
- To install an in-ground pool, it is important to ensure a level and stable surface. Choose an ideal location to avoid labor-intensive excavation work.
- Prepare the site by removing the top fertile layer of soil, removing roots and unnecessary plants. The surface must be clean, free of pebbles and protruding solids.
- After this, make a sand cushion that will level the area. The layer of sand should be 5–10 cm. To simplify the leveling task, install level beacons, which will serve as a CD profile and stretch the sand to obtain a flat surface.
- Now we need to assemble the frame of the future pool. It can be made from wooden beams with a cross-section of 100×50 mm, half-edged and unedged boards 25 mm thick. Lumber should be cleared of bark and treated with an antiseptic. Dry wood, or at least dried wood, is better suited for this work.
- To make a frame, mark the corners of the structure. Check all dimensions to ensure everything is equal and even. After that, you need to make holes, manually with shovels or a drill, about 50 cm deep. To strengthen the structure, two additional posts are installed on the long sides, and 1 between the short sides.
- Vertically install the pillars, which will be wooden beams. To ensure waterproofing, the part that will be in the ground is covered with molten bitumen. The space in the pit is covered with crushed stone and compacted well.
- After all the pillars are securely fixed and leveled, they are tied with boards.
- Since the support pillars will bear all the pressure of the water column, they must be additionally strengthened with jibs.
- When the frame is ready, you should make a staircase. You can buy it in the store.
First you need to solder it.
Now the pool is lined with PVC fabric. But first you need to cook it. Cutting and soldering of the film is carried out on a flat surface in a spacious room. It is important to be careful not to damage the material. So, take your welder and select a temperature that is acceptable for the material you purchased. Cut the material and lay it with an overlap of 2-3 cm. Heat the film at the joint until it melts slightly so that the material softens, and press it tightly with a silicone roller along the line, gluing the film together.- Watch the quality of the seam, because this is the weak link of the pool, which must be reliable and airtight. For best effect, seal the seam with sealant. In order not to spoil the canvas, you can practice on pieces of film to check the temperature, speed of movement and fill your hand.
Processing the edge of the canvas
When everything is ready, fold the film 5–7 cm around the perimeter on top and boil it again. Now in this side you need to make holes in increments of 50 cm and install metal rings (eyelets) into them using a special press or flaring tool. Through these holes, the pool sheet will be attached to the frame with ropes or screws.- Finally, you need to connect the canvas to the frame. It is better to fix the film to the wood using self-tapping screws with a 35 mm press washer and additional large washers, which are larger than the holes made in the canvas. It is important that the fasteners are galvanized. Stretch the fabric well and perform all work carefully.
PVC Wooden Frame
That's all, all that remains is to check the tightness of your new pool by filling it with water. You can make such a pool quickly and inexpensively, but there will be many benefits from it.
Kinds
There are two large groups of pool designs: stationary and temporary. The first category includes solid structures completely or partially dug into the ground. It will not be possible to move them to another place without destroying them. For bathing bowls use:
- monolithic concrete;
- brick;
- concrete blocks.
The temporary structure is removed after the swimming season until next year. These are frame and inflatable structures. Their service life is from 2 to 4 years. It depends on how often they will bathe in it. If you are not yet sure of the need to have a permanent structure at your dacha, it is better to choose an inflatable model, which is inexpensive. This is a simple and quick way to build a font. The frame type is a little more difficult to install, and its price is higher. It has a frame made of pipes. A film in the form of a bowl is hung on them. The depth can reach 1.8 m.
Those who decide to install a stationary pool should know that the installation work will be expensive, and in the future you will have to constantly look after it. First, they dig a pit, pour a monolithic slab, then proceed to erecting the walls. They need to be waterproofed from the outside. If this is not done, melt and groundwater will begin to penetrate into the bowl. The walls must be insulated, otherwise heating the water will become a problem. Then they waterproof the walls inside the bowl. The pool needs finishing.
It must have pumps. Their number depends on how complex the system is, as well as on the volume of water. In order for the structure to operate and maintain normally, it must be equipped with a pump for pumping water. It is necessary for filling the reservoir, for draining in case of repairs, preservation for the winter and purification. There must also be a circulation pump.
It moves water to the heating and cleaning units, and then back from them. If they want to organize water attractions or hydromassages, they install a pump that creates a counterflow. For inflatable and frame pools, a pump with a filter element is used.
Inflatable pool
A cheap inflatable pool is very easy to install. An inflatable ring holds the water. The largest depth of the structure is 1.5 m, width - 5 m. When using it, you should pump it up from time to time. For installation, you need to choose a safe place so that the case is not damaged. The disadvantage is that there are no devices that can be used to clean the product. The water will have to be changed frequently, which is not easy. The downside is that inflatable models only last a short period of time.
Plastic pool
Plastic pools are made in different shapes. They come in large sizes. There are plastic products with height differences, with beveled sides. If desired, you can use models that have molded internal steps. They are installed for more than one season; there is no need to remove them for the winter. For a plastic pool bathtub, a special pit is most often prepared in which it is installed. Water and sewer pipes are connected to it. The main disadvantage is that plastic structures are bulky and massive. In order to bring them to the place, you will need to order special transport.
Frame pool
Frame pools for summer cottages are considered the most convenient. They stand out for their ease of assembly and disassembly. For winter, the structures can be folded so that they do not take up much space. Must be stored indoors. Such a pool can have a depth of up to 3 m. Water is poured and drained into it using special equipment. They are also cleaned using special equipment. Although frame structures seem complicated at first glance, they can be installed independently.
Attention! It is necessary to think carefully about the water supply system.
Models vary in size. For adults, a pool is installed with a depth of 3 m and a length of 10 m, for children with a height of sides not exceeding 30 cm. To make the walls of the product, a dense PVC film is used, which is supported by a metal frame. Such a structure weighs little.
Video
To make your task easier, you can use wooden pallets as a frame:
A DIY PVC pool is a very real and inexpensive implementation. If you are not a fan of special beauty and are not obsessed with bringing your site to perfection, then you can make a homemade pond from available materials at minimal cost, for example, from a PVC banner. But for lovers of everything beautiful, there are also DIY PVC options. Making a PVC pool - DIY construction tips. Stages of building a pool from PVC film with instructions - read here.
PVC film for finishing a pool can be purchased for 1,000 - 1,500 rubles. (Russia). The cost of the same material with patterns from imported manufacturers will cost twice as much.
Stages of building a frame PVC pool with your own hands.
- Choosing a location.
- Surface preparation.
- Construction of a platform or ditch for a future swimming pool.
- Construction of formwork.
- Laying with polyvinyl chloride.
- Installation of a filtration system.
How to build a swimming pool with your own hands at your dacha from film?
First, it is necessary to carry out planning, which takes into account the dimensions of the pool, its location, purpose, appearance and construction scheme of the pool.
Then building materials and equipment for the normal functioning of the reservoir (filters, pumps) are selected.
Then preparatory work is carried out: this includes excavating the soil (if the structure is planned to be “sunk” into the ground) and creating a drainage system, after which it is necessary to create technical niches and piping.
After this, installation work begins. This includes pouring concrete mortar that forms the walls and bottom of the reservoir, as well as finishing with PVC film and installing all purchased equipment.
The last step is to check the system for functionality.
This is roughly what a step-by-step diagram of building a swimming pool with your own hands looks like. Let's take a closer look at some of the key points.
Selecting a location
In order to make a PVC pool, the first thing you need to do is choose the right place for the future reservoir. It should be level, without slopes or holes. In a well-lit area, away from bushes and trees. To prevent additional debris from spoiling the water. Accessible to local water supply and electricity. It will be more convenient to collect water and connect the filtration system.
Site preparation
- The area for the pool needs to be prepared. Make markings for the future bowl using pegs and thread. If the pool is round, then a peg with a thread is installed in the center, and a bottle of paint is tied to the other end of the thread. It turns out to be a homemade compass, which is convenient for drawing a circle.
- Remove the fertile layer of soil. If the pool is above ground, remove stones, grass, and sharp roots.
- A wooden podium or concrete pad is constructed. As a last resort, the area under the frame pool is covered with sand. The pillow will help avoid deformation of the PVC material.
- If the bowl of the PVC pool is planned to be semi-buried, then you need to remove the fertile layer of soil from the edges of the marking, towards the middle. Moreover, the walls should be made at an external angle. This will help avoid soil shedding.
Preparatory work
Preparation for creating a pool at the dacha includes:
- procurement of materials for construction. If it is wood, you need to saturate it with solutions that will protect it from moisture;
- choice of location;
- collecting tools;
- creating a plan;
- markings
Tools and materials that you will need in any case: tape measure, building level, sand, crushed stone, knife, insulation pad (hydrotextile or polystyrene foam), concrete, boards, shovel, wire.
Installing a purchased PVC frame pool with your own hands
- Remove the PVC film covering from the packaging. Carefully place on the prepared sand cushion.
- Lay out the frame elements. These could be plastic pipes for a seasonal pool. Or metal plates for a pool intended for conservation.
- It is advisable to lay out the frame and number and sign all the parts. In the future, when installing and dismantling, it will be convenient to work and not get confused.
- Polypropylene pipes are assembled like a construction set. The kit comes with clear instructions. The material is immediately attached to the side elements and assembled in a circle, fastened with tees. Pipes from the base are attached to the board, in tees.
- The bowl is gradually filled with water and the film coating is smoothed out.
Swimming pool for sauna
Some dacha owners are interested in: how to make a pool in a bathroom or bathhouse? Building a pond indoors is more difficult than outdoors. To create a stationary tank, you will need to install a bowl at the initial stage of building a house.
In an already built dacha, you can install a prefabricated model. A solid, stable base is enough for it, so a tiled, stone or wooden floor is perfect. You just need to assemble the walls of the structure and place a sealed bag in it. Such a reservoir will be quite enough for a dip in ice water after a hot bath.
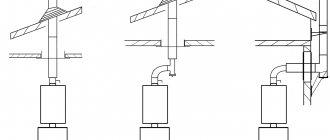
Installing a skimmer in a PVC pool
A skimmer for frame pools is usually mounted.
- It hangs on the side of the pool, and the kit includes fastenings for a frame pool.
- And it is connected to the pump using adapters and a hose.
If the reservoir is large, then it is advisable to have several skimmers around the perimeter for more intensive work. Skimmers are also necessary for the operation of a water vacuum cleaner. The hose from the vacuum cleaner is inserted into this device.
Choosing a pool by size and shape
In determining the perfect design model, a big role is played by the size of the plot, the number of people splashing in the pool at the same time, and, naturally, the amount of money allocated for the purchase. The length and width depend on these factors, and the depth depends on who will swim in it. If it is intended for children, then this figure is from 0.5 m to 1 m. Adults who like to jump and dive will like structures with a depth of 2.5-3 m.
Dacha owners really like the options with a round bowl. They are convenient and economical. In small areas it is recommended to install oval models, while in large areas there is enough space for rectangular structures. The most spectacular, beautiful and at the same time the most expensive pools are those that have a complex configuration and different bottom levels.
Installing a filter in a PVC pool
ADVICE!
The maximum effect is achieved by comprehensive cleaning - an earthen filter plus a floating trap for surface debris. The earthen filter is cleaned at approximately the same frequency, disposing of the filler that has become toxic, as recommended by the instructions for the finished pool filter.
As for the filter, the choice of power is based on the volume of your pool. It is better to use a pump power several times greater than the volume of water in your pool. The throughput in liters per hour is indicated in the instructions. Such a filter can drive all the water out of the pool several times in a day, and accordingly, the cleaning properties will be higher. But the quality of clean water will also depend on the filter model. A more inexpensive option that comes with a frame pool is a cartridge filter. Other models are sand filters. They clean better by passing water through sand and are not very expensive. But the most reliable and high-quality cleaning filter is a diatomaceous earth filter. It not only mechanically cleans dirt, but also saturates the water with beneficial properties.
- The filter is installed on a flat, dry area. At a distance of 1 meter from the side.
- The hose for water intake, if there is no skimmer, is attached to the upper edge of the side. This is where most of the garbage accumulates.
- The water outlet hose is installed closer to the bottom, on the opposite side of the pool. Then the circulation of liquid in the pool will be better.
- The filter must be washed daily.
Filter system
A pool filter is an integral device that must be present. Without it, it will be impossible to use water for a long period of time. It will need to be replaced frequently. The device can be installed either near the pool itself or in a specially prepared place. There are a large number of ready-made options. For a small pool there is no need to take a filter that is too powerful. If desired, you can assemble it yourself. For this you will need a 100 liter plastic barrel. The main condition will be the presence of a lid that can close hermetically. You will need a centrifugal or drainage pump, plastic pipes, fittings and a filter flask cartridge.
Filtration system
- A hole is drilled below the neck of the container.
- A threaded nipple is inserted into the hole. Sealing rubber bands are put on both sides and locknuts are screwed on.
- The same exit is made 5 cm above the bottom diagonally.
- A pipe is connected to the upper adapter, which will draw water from the pool.
- A filter cartridge is placed on the bottom from the inside. A pump is connected to the external one. The pump leads to the pool.
- Coarse sifted sand is poured halfway into the barrel.
- The installation must be below the water level in the pool. The liquid will flow by gravity into the container. Passing through the sand, it is cleaned and fed back into the bowl using a pump.
With the right approach to the matter, the pool will last for many years. A concrete or polypropylene structure can easily be made in a bathhouse or basement of a house. But this should be planned at the construction stage in order to avoid unpleasant consequences from uneven load.
What you will need when installing a pool liner
- Hair dryer. Moreover, it is special, construction (it is also called industrial). Without it, it will not be possible to properly glue individual fragments of the film. There should be several nozzles for the electric tool - with different widths of the outlet pipe and directions of the hot air stream.
- "Metal" brush. To remove carbon deposits on the working part of the hair dryer.
- Pressure roller. It is necessary for rolling the joint after welding the film strips.
- Electric drill (perforator) with a set of drills or drill bits for concrete. Will be needed when installing the substrate.
- Screwdriver. Installing fasteners using a screwdriver is not only time-consuming, but also ineffective. There is no guarantee that all screws will “go” strictly perpendicular to the plane of the base. This means that there will be distortions in the fastening tapes, and this will cause difficulties when forming the joints of the pool film strips.
- A cutting tool (scissors or a sharp knife) for cutting the coating material.
- Plumb (for leveling vertically installed fragments).
- Solvent, glue (but only elastic after drying).
Technology of finishing the pool bowl with film
Preparatory activities
Cleaning the surface of the bowl. It is advisable not only to remove all debris from the pool, but also to literally “lick” it. This will reveal all defects in the base on which the film will be laid.
Elimination of defects. What could it be?
Firstly, the unevenness. This is typical for concrete pools. The slightest bulge will eventually cause abrasions, scratches on the film or its damage, and therefore leaks. The same goes for shells. If the “bumps” are easy to knock down and sand with your own hands, then the “notches” just need to be sealed with cement mortar, putty and leveled.
Secondly, partial peeling of the tiles, if they were used in the initial design of the pool, and the film is supposed to be laid on top. And such defects are also relatively easy to eliminate.
If necessary, in case of obvious damage to the bowl, it is advisable to lay a leveling screed on it. The technique for this work is simple, and there is a fairly large assortment of appropriate dry mixtures or liquid formulations on sale. There are plenty to choose from.
Laying film in the pool bowl
Cutting PVC sheets
This is one of the most important points when finishing an artificial reservoir. It is necessary to take into account that after filling it with water, the film will stretch, and the stronger the steeper the walls of the bowl. Therefore, when determining the geometry of the fragments, it is necessary to take into account that the strips are laid with an overlap (about 6 ± 2 mm, depending on the thickness), and they must lie freely in the bowl, without excessive tension. For corner joints (for example, at the junction between the bottom and the wall of a pool), the value of this parameter is doubled. That is, at least 12 mm.
Film installation
- You should start by finishing the bottom of the pool. The quality of all other operations depends on how accurately this work is performed.
- Installation on walls is done from bottom to top. The main assistant at this stage is the plumb line. It is along this that the film fragments should be aligned.
Welding of film sheets
One of the most difficult aspects of installing a film in a pool. It will no longer be possible to transfer something by correcting the mistakes made - you can only replace a piece of coating material.
- Adjacent strips should be laid first. After alignment, they are “tacked” to prevent their possible shift during the welding process. This can be done in two ways. If the film is thin, then it is enough to organize “point” connections with a solvent. It will melt at the places of application, and their gluing is ensured. The second option is to briefly heat the film with a hairdryer in certain areas and fix it. The work is painstaking, but everything else depends on its quality.
- After such preparation, direct welding of the film pieces is carried out. The strips at the joints are heated by hot air. Depending on the location of their installation, the appropriate nozzle for the hair dryer and its operating mode (jet temperature) are selected.
Processing the seams of the installed film
Since pools are not finished with your own hands every day, therefore, most of us have no practical experience. Therefore, small defects in welded joints are inevitable. To seal them more reliably, it is advisable to treat them with a special composition of liquid consistency - seam sealant (available for sale). It’s easy to choose the shade to match the film, and it’s easy to work with. “Jelly” is squeezed out of the tube, and after application along the joint it hardens in about half an hour (at room temperature), maintaining its elasticity.
The quality of the seam largely depends on the uniformity of heating. Therefore, a number of conditions must be met:
- try to maintain the distance between the cut of the nozzle and the seam being processed;
- ensure that the voltage supplying the hair dryer remains constant. In the private sector, this is one of the problems of power supply, so when installing the film in the pool, it is advisable to switch it on through a stabilizer;
- during the welding process, it is necessary to periodically remove carbon deposits from the nozzle (the brush has already been mentioned), otherwise the jet will gradually “play” (deviate), which will affect the reliability of gluing the film;
- Lastly, the inner corners of the pool are treated with a hairdryer. At this stage, you can make some adjustments - straighten the remaining strips, trim off the excess, and then glue them together.
It remains to add that after installing the PVC film, you need to fill the pool bowl gradually, and always with warm water. Under such conditions, the material becomes more elastic and stretches better.
Instructions for installing swimming pools
Anyone can make swimming pools at their dachas with their own hands, but all activities must be done step by step. Once the location where the structure will be located is determined, a plan is drawn up. It is necessary to draw all communications and the exact dimensions of the structure. It is impossible to complete the work without a diagram that indicates where the equipment intended for circulation and water purification is located. It is necessary to mark a place on the territory for digging a pit.
Think carefully in advance so that you don’t have to change your decision later. Because digging and throwing earth is not an easy job. After digging a pit, the space between it and the walls of the bowl is filled with sand, and a layer of waterproofing is laid on top. They can be rolled bitumen materials or geotextiles. Roofing felt should be laid overlapping, and then glued with a special mastic or treated with a polypropylene torch. Geotextiles are blinded with double-sided tape.
Made from polypropylene and fiberglass
A quick way to install a pool includes installing a bowl made of polypropylene or composite materials. The structure is manufactured in a factory, and the finished product is delivered to the customer. The materials used are resistant to water and mechanical stress. There is no need to further finish the finished polypropylene or fiberglass bathtub inside. After delivery, you just need to put it in a pit, and build a reinforcing layer along the entire length of the sides.
Attention!
Under the scorching rays of the sun, the polypropylene bottom and walls can become soft because the material expands under the influence of high temperature.
It will be noticeable that the surface will become a little wavy, but after the heat begins to subside, the structure will again take its original shape. Composite fiberglass is resistant to heat, but its cost is higher. The remaining characteristics of these two materials are almost the same; the bowls are assembled using the same technology. A concrete slab is poured at the bottom of the excavated pit.
Its thickness should be no less than 25 cm and no more than 30 cm. The solution is made using cement grade M300 and higher. After the bathhouse is installed, they begin to install communications, reinforced with a fiberglass or steel layer of 6-8 mm rods. Spacers are placed inside the bowl and a little water is poured into it. A concrete solution is poured into the space that has formed between the pit wall and the bathhouse. As soon as it hardens, they arrange the edges and improve the area around the structure.
You can also install a polypropylene pool in the courtyard of a private house using sheets made from the same material. Their thickness should be above 8 mm. The font can be built in different configurations and sizes. It is very important to try to weld the sheets correctly.
The work is carried out with a welding extruder and a hot air gun. A small polypropylene or fiberglass bowl does not need to be reinforced and filled with concrete mortar. You can simply fill the outside with crushed stone and then compact it.
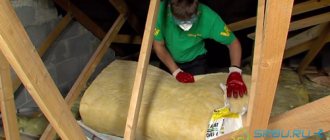
When constructing a bathhouse in regions with cold winters, the entire bowl and pipes are insulated with thick polystyrene foam before being filled with concrete. This will help to a certain extent prevent them from freezing if the water from the system is poorly drained. However, since such a measure does not always help, it is necessary to completely and efficiently empty the pipes of water.
From a concrete monolith
For a concrete monolith structure, formwork is used to form the pool floor and sides. Later they are covered with tiles or mosaics. The composition of the concrete solution is similar to that used when installing a propylene bowl. 2 layers of reinforcement with 15-20 cm cells are placed at the bottom of the pit. Devices designed to drain water are assembled inside the resulting structure.
The concrete solution is poured in such a way that there is a slight slope towards the drain hole. After waiting for the concrete to become hard, the reinforcement and formwork necessary to pour them are installed along the entire length of the bowl for the walls. As a result, the entire concrete surface will be waterproofed with a coating material.
Uneven sides are plastered, always using metal or expensive composite polymer reinforcing mesh. A product made of polymer materials will not rust. If the mesh is not used, the layer of plaster used to level the surface will begin to quickly collapse. To finish the font use:
- tile;
- mosaic;
- PVC film.
These decorative materials provide the structure with an attractive appearance, but also protect the concrete solution from the negative effects of water. This work must be approached with all responsibility, otherwise in the near future the structure will have to be overhauled, or even re-filled.
Recommendations for choosing a film for a pool
By thickness
The geometry of the canvas does not matter, it is standard (in cm): length - 2,500, width - 240 or 680. But with thickness, not everything is so simple. To optimize material costs and ensure sufficient strength (and therefore durability of the coating), it is necessary to take into account the depth of the pool bowl.
- If it is within 2 m, then you can install a film thickness (in mm) in the range from 0.7 ± 0.2.
- In other cases – no less than 1.0.
- The bowls of large pools of complex configuration (embossed) are finished with a thicker, two-layer film - from 1.5.
By execution
- Regular film. The cheapest modification, which is not characterized by high strength, is therefore used to a limited extent for finishing bowls. As a rule, they are purchased for installation in prefabricated pools.
- Film with reinforcement. The most popular product modification in the private sector. Such canvases can withstand significant loads, so they can be used for DIY installation with virtually no restrictions.
- Film with anti-slip coating. It costs significantly more, but in terms of safety of using the pool (due to the ribbed surface) it significantly outperforms its analogues.
- Acrylic coated film. The main purpose of this layer is to provide bactericidal protection of the water in the pool. It does not bloom, bacteria, rot, and the like do not multiply in it. The service life of such canvases in an aquatic environment is 1.8 times higher than samples without acrylic painting.
If you understand all the features of installing the film in the pool bowl, then doing this work yourself will not cause much difficulty. The main thing is accurate calculations, extreme accuracy, attentiveness and strict adherence to the recommendations of specialists.
>
Types of swimming pools for summer cottages
There are several options for mini-pools for summer cottages, which have their own advantages and disadvantages. The most common models are stationary and seasonal. Stationary - the main feature of such structures is small frame sections. Each section can include several material options - plastic, wood, duralumin and steel. This type can be used throughout the year, so the sections must be connected using a locking type fastening. The internal area should be covered with polyvinyl chloride film. The advantages of such pools are a long period of use (about 15 years), the depth can reach 2.5 m. The disadvantage is that they cannot be dismantled and placed in another place. Seasonal - this type is used for one season, so when the season passes, they can be dismantled and stored. The design itself includes hollow tubes inside, united by special connections. The bottom is covered with a film 2 mm thick. This container can only fit two people. This design is easy to maintain, only the period of operation does not exceed six years.