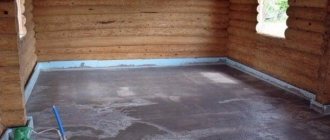
In a bathhouse with convector or radiator heating, heated air and steam rises directly to the ceiling, but at floor level it can be much colder. Previously, in order to at least slightly compensate for this temperature difference, wooden floors were made, now they are most often made on a concrete screed, and tiles are laid on top of it.
Having decided to create a warm floor in a bathhouse under tiles, you need to immediately decide which one is better. The information below will help with this.
Advantages and disadvantages
When installing a heated floor, the air is heated evenly and this completely eliminates the appearance of a convective draft, which is observed with radiator heating.
An electric floor helps in cases where the bathhouse is located far from gas lines. It has a number of advantages over other types of heating:
- Thermal insulation provided when installing a heated floor prevents heat from passing through it. Thanks to it, up to 40% of heat is retained.
- The installation process, if organized correctly, takes little time.
- Reducing the cost of heating itself, because unlike its centralized counterpart, it is turned on only when using the bathhouse, and not every day.
- All installation work can be carried out independently.
The disadvantages of heated floors include:
- electromagnetic radiation;
- expensive electricity (but this is a relative minus, since the bathhouse is not constantly heated).
Floor installation for water heating
Both the effectiveness of the heated floor and the level of comfort in the bathhouse depend on the correct creation of the cake.
About the installation of a warm water floor
The general layout of the base looks like this.
- Rough concrete floor , ensuring the strength and evenness of the entire structure.
- Waterproofing layer. It is necessary to protect floors from condensation. You can use both coating and roll materials.
Why do you need waterproofing of the floor in a bathhouse?
- Thermal insulation . With its help, you can minimize heat loss by directing it into the room.
- Mesh for reinforcement . It is necessary to protect insulating materials.
- Foil backing . It will ensure the direction of thermal energy into the room.
- Pipeline heating line laid in a “snail” pattern, which ensures better heating uniformity.
- Finish concrete screed , which is necessary to protect the underfloor heating system and level the base. When installing it in a washing room, it is necessary to provide a slope for water drainage.
- Cladding floor covering.
Layout diagram of such a system
It is the concrete screed that is considered the most suitable option for placing a water circuit. However, we should not forget that concrete gains strength within four weeks. Accordingly, the period of work will increase by this time. In addition, if problems arise in the underfloor heating system (for example, due to pipe leaks), repair measures are labor-intensive. As an alternative, you can use special polystyrene mats with grooves to accommodate the coolant and a foil layer to reflect thermal energy.
Weber base mix prices
Weber base mix
Expert opinion
Afanasyev E.V.
Chief editor of the pol-exp.com project Engineer.
It is allowed to place the stove on a wooden base, as well as laying a heating pipeline in a wooden floor structure. However, for this it is necessary to correctly calculate the location of the holes that will have to be made in the logs to install the coolant. It should be noted that repair measures (in case of problems) in this case are less labor-intensive.
Heated floor pipe circuit length calculator
Go to calculations
Types of underfloor heating systems
In the bathhouse, all the same systems are used as in ordinary housing.
Water
Its design, consisting of a closed loop, is laid below floor level. It involves pipes in which hot water or antifreeze circulates under pressure pumped by a special pump.
The coolant is heated to a set temperature using an electric or gas boiler.
We also recommend looking at - Warm water floor under tiles: installation instructions
Electric
This system is better known as a “warm floor”, which consists of special heating sections. The expenses for arranging such a floor with daily use will return after 6 years, but for a bathhouse they will pay off much earlier.
Installation of such a coating will take only a week.
Infrared
This option is distinguished by its electrical safety and airtight design; infrared mats are laid on the sauna floor. Their gentle operating mode allows the use of such floors in wooden structures, such as baths.
At the same time, the height of the room is not lost, since laying such a floor will only require a couple of centimeters.
Installation of a warm water floor
A water floor in a bathhouse under tiles can be laid in two ways:
- concrete - implies the presence of a concrete screed, it is poured over the pipes;
- laid - the heating circuit is laid on polystyrene foam boards or wood flooring, used when the foundation is not strong enough to withstand cement pouring.
However, more often a concrete option is used for the floor in the washroom and steam room. The procedure for installing floors using this method is as follows:
- The surface is leveled; for convenience, you can apply a special rule. In the case of wooden floors, it is necessary to make openings for pipes.
- To increase the efficiency of heat transfer, mineral wool is laid under the circuit.
- The mounting surface is installed using heat-insulating material with bosses, and pipes are laid between them. However, the pipeline can also be secured using clamps.
- The pipe is being laid; it should not have sharp turns. The step can be anything, but don’t stand too close, it will be expensive, but the effect will not change.
5. The system is connected and the presence of leaks is checked.
6. The final stage is pouring the screed.
An important point is that there is no tilt. Although the pump will be able to supply water in this position, the increased pressure will quickly damage the system.
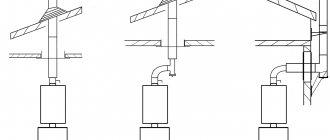
Installation
Before carrying out it, you should check the sealing of walls, window openings and doors. Then you will need to prepare the base; it must be level. Using a level, check the flatness of the base; if there are deviations, then eliminate them by performing a screed.
Initially, a location for installing the thermostat and access to communications are selected, if we are talking about electric heating; in the case of water heating, the location of the boiler, pipes and taps should be considered.
The installation work is different for each heating system and is described in more detail below.
Wet floor
Installation begins with the selection and organization of the location for the coolant supply. Holes should be made in the walls through which the pipes will pass and the necessary shutoff valves should be installed.
It is best to arrange an outlet for such heating to provide a free niche in the bathhouse, which can be converted into a cabinet so that the communications are invisible.
A mesh for fastening pipes is laid on the pre-leveled floor, which is secured using ties. The pipe must be folded in half to organize not only the coolant input, but also its output.
When laying pipes in a spiral, it is necessary to avoid kinks, which will reduce the permeability of the coolant.
After checking the installation of water heating, you can connect it to the taps (supply and return).
After this, a test run of the system is performed, which will help identify a leak, if any, and wait for the maximum pressure of the network, which will depend on the heating of the coolant.
At the end of the installation, the screed is poured and the floor material is subsequently laid.
The entire design of water heating is multilayered:
- waterproofing material;
- insulating;
- foil;
- pipes;
- screed with reinforced elements;
- finishing floor
Pipe laying patterns can be different, and although a spiral is often used, sometimes a snake or its double version is used.
Pouring the concrete screed through the laid pipes starts from the far wall and ends at the door.
It is imperative to provide for zoning the room according to beacons, and the concrete mixture poured over the pipes is leveled according to the rule to avoid distortion of the base of the new floor.
If semi-dry mixtures are used for pouring, then after about 6 hours the surface must be sanded so that it does not completely harden.
Dry floor
Its installation will depend on the choice of the type of electric floor, and it can be:
- film;
- cable;
- using heating mats.
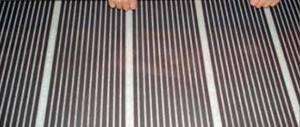
Film
It is made of thin strips that emit infrared radiation, it is similar to solar radiation, only unlike the latter, it excludes the influence of harmful ultraviolet radiation. Flexible strips are made of carbon and sealed in a polymer film.
When laying such a floor in a bathhouse, you should first lay Isolon - the material will reflect the resulting heat upward. Then the heating elements are laid out, which are covered with plastic film.
The latter serves as waterproofing for heating elements. At the end of the installation process, the finishing coating is laid.
Cable
The convection type of underfloor heating consists of a heating cable that is laid on a mesh base. Cable flooring is sold in rolls.
Installation of this type of electric floor is a rather labor-intensive process; it is best to entrust it to specialists. It can be used under different floor coverings.
Infrared
The rod elements are called mats. Their name comes from the heating rods that are connected to the power wires. They are connected in parallel, so there is no need to worry if one element fails.
When considering infrared mats, they can be compared to a rope ladder. They are mounted in tile adhesive or cement screed protected with isolon.
For more information about installing an infrared floor, read the article - How is an infrared heated floor installed under tiles? Overview of methods
Bathhouse: preparation before installing heated floors
As a rule, wood is widely used as flooring in bathhouses. This is explained by the fact that it has lower thermal conductivity and the floor temperature in such cases remains comfortable.
You can often find tiles: then a concrete screed is used as a base, which cools the tiles down nicely.
In order to insulate heated floors in a bathhouse with your own hands, it is enough to take care of an additional layer of heat-protective material in advance.
It can serve as:
- felt;
- glass wool;
- expanded clay;
- Styrofoam.
An example of floor insulation using expanded clay.
If we are talking about wooden floors, the insulation is located between the joists and is covered with a layer of waterproofing on top. The latter is often played by a special waterproofing film. Before laying everything described above, it is also necessary to make a vapor barrier layer using:
- roofing felt;
- glassine;
- special film with a thickness of at least 0.2 mm.
To make the concrete floor in the bathhouse warm, the insulation is placed between two layers of concrete. In order to save space, the latter is made thinner than the base one.
It is important to note that logs and other elements of the subfloor must be treated with moisture-repellent and antiseptic preparations.
Electric floor in the bathhouse
This is an excellent solution for country villages where there is no central heating, but it is worth considering the high energy consumption. Although with proper organization of installation and insulation of the entire bathhouse and its foundation, they can be significantly reduced.
Heated floor safety system
Before purchasing and installing one of the electric floor options, it is necessary to make calculations and determine the expected resource consumption and whether the network will withstand such loads.
There are also high requirements for the bathhouse premises:
- all components and the heated floor itself are installed only in dry and clean rooms;
- the top floor covering is laid carefully so as not to damage the heating elements located underneath it;
- the flooring is selected depending on the characteristics of the room.
Operating principle of electric floors
The surface of such a floor serves as a kind of transmission panel, radiating heat along the entire perimeter of the room. The heating element itself is a system of cables enclosed in a screed or located under the tile.
The principle of heating a room is based on the conversion of electrical energy into thermal energy, due to which the bath is heated.
The thermostat built into the system maintains a comfortable temperature, and if it rises too much, its automation is triggered and turns off the entire system.
And when the room gets cool, the system turns on again.
Recommended coatings
Installing an electric floor involves using not only tiles, but also laminate, parquet boards, linoleum and plywood.
Features of flooring materials:
- Tile. Ideal for both water and electric floors, it differs from its analogues in its high wear resistance, heat transfer and variety of design.
Sudden temperature changes typical of a bath do not affect the condition of the tile surface; it is also moisture resistant.But considering that a person can drip onto it when leaving the steam room or shower, it is better to choose a rough surface to avoid slipping. If one part of the floor is destroyed, there is no need to remove all the tiles; it is enough to replace the deformed products.
- Laminate. For a bathhouse, you should choose only a waterproof type, but do not confuse it with moisture resistant, these are two analogues of different strength and resistance to water.
You need to select a material with a thickness of at least 8 mm and lay it on a substrate or plywood.If its installation is carried out on a concrete screed, then it is carried out as a “floating” floor. When laying laminate on plywood, it is attached to it with self-tapping screws.
- Parquet. The material is known for its heat-conducting properties, but unlike laminate, it expands and deforms from moisture, which is why you need to keep the room dry. It requires a plywood backing, which must be at least 20 mm thick.
- Plywood. More precisely, its painted and laminated version is similar in thermal insulation to parquet boards and laminate, but costs less. A screed thickness of more than 6 cm is required under it.
If 20 cm plywood is used, it can be mounted directly on aluminum or wooden guides.It is often used for temporary floor covering.
Infrared floor: what are the advantages and how to install it
Often the desire to install heated floors in a sauna arises when it is already ready. Of course, destroying the floor covering, losing the height of the room and installing additional communications such as a pipeline is not always rational. The financial issue is also important.
Infrared floor
Infrared heated floors in a sauna in a private home are an excellent budget solution that does not require large financial and physical costs.
Essentially, it is a thin film containing heating elements. The advantages of this floor are:
- simple installation;
- if part of the system breaks down, the rest will continue to work;
- affordable price;
- possibility of organizing spot heating.
- low energy consumption.
It is worth mentioning some features of this type:
- possible points of increased surface heating;
- A separate power line may be required.
Laying a heated floor in a sauna does not require any preparatory work, since the infrared system can even be placed on top of the old floor covering. The fastening itself is done using regular tape. A small layer of leveling screed is acceptable on top of the infrared film, but you can do without it.
Example of a roll of infrared film
Installation features
It is almost the same, but each individual species has its own nuances. Initially, it is necessary to prepare a pit well, which will serve to drain water.
In one of the outer walls of the bathhouse, install a pipe, the end of which will go into the collector, drainage ditch or other drainage point. The walls of an organized well must be secured to prevent them from being washed away.
Level the earthen floor and create a sand and gravel cushion 15 cm thick on it; it needs to be leveled and try to compact it more tightly. Pour a 7 centimeter thick concrete screed on top and then wait for it to cool.
Lay waterproofing, insulation on it, then heat-reflecting film. Then the installation process is slightly different.
For electric type
Laying the coolant starts from the thermostat.
Electrical rolls are laid from the far wall to the near one.
To save material and future resource consumption, you must first mark the places where wardrobes or other massive furniture will be installed and go around it.
When the rolled out roll reaches the opposite wall, it must be carefully cut to within a few centimeters. Then lay the next heating tape parallel to the previous one, as close as possible to it.
After installing the coolant, its operation is checked, the cable is connected to the network, if everything works properly and heats up normally, then you can proceed to laying the finishing coating.
For infrared type
The film model of electrical systems is a thick cellophane, inside it there are copper wires, and on top of the material there are graphite strips. The latter, under the influence of electricity, create infrared radiation, which heats not the air, but the floor covering.
There is also an option for such a heating system as plastic mats, for which there is no need to prepare a concrete screed; they are quickly installed and heated. It is better to place infrared mats in an area free from furniture; they should cover at least 70% of the floor.
It is advisable to decide in advance on the location of the mats, make a paper sketch, on which you can also schematically arrange the furniture in order to get around it.
The base for the thermal film should not have strong differences, a slope of 1 cm per 1 linear meter is acceptable, so that the heat does not escape into the floor, it is covered with a thermal insulating substrate.
You can cut the heating film only in the designated places, which are marked on it with a dotted line; if you start doing this diagonally, it will be irrevocably damaged.
When laying mats on the floor, you need to move 10 cm away from the walls. They are laid joint to joint, with a gap of 5 mm between them. The cut areas are pre-insulated with bitumen insulation.
When all the infrared mats have been laid, they proceed to installing the thermostat, and then the functionality of the “warm” floor and all its turns is checked.
Specifics of water floor construction
First, a heat-insulating substrate is applied: all debris is removed from the floor of the bathhouse and a heat-insulating layer is laid out. It consists of strips that are fastened together with heat-reflecting tape.
Then a pipe layout diagram is drawn up; to simplify the task, you can use a checkered notebook sheet.
It is preferable to choose a “spiral” scheme, with which the room will be heated evenly.
Clips for fastening pipes are placed on the floor, then the plumbing elements themselves are laid and connected to each other, at the outlet they are connected to the boiler. A distance of 20 cm must be maintained between the walls and pipes.
Recommendations for pouring screed
The concrete base for the finishing material is made taking into account the option of arranging a “warm” floor and the specifics of the room, which may be humid.
If these are electric floors, then a plasticizer is added to the solution to create a screed above them. When the infrared mats are fixed, the solution is poured onto them, and then they wait for it to harden.
The dried screed is sanded, and then finishing material is laid on it.
It is worth noting that the screed is carried out after all the rough work has been carried out in the room.
The rough screed under the water floor must be carried out along the beacons.
The walls need to be puttied about 15 cm from the floor, this will help install the damper tape. Expanded clay concrete screed has the highest insulating layer.
First, as for an electric floor, an insulating layer is laid using an adhesive composition, and then the surface is reinforced using a special mesh. It is laid on nickels, which separate it from the insulation by about 4 cm.
After placing the pipes, fill the finished floor with a solution containing a plasticizer and small fractions of crushed stone. You can also use leveling mixtures.
After all the work done to create the screed, you must wait at least 28 days for it to harden well.
If you use a self-leveling mixture, it will dry faster.
Arrangement of a leaky floor depending on the type of installation
You can install a leaking floor in different ways:
- Install a drain during the construction stage. To do this, you can use either a strip or columnar foundation, raised more than 50 cm above the ground. Also, during the construction stage, it is worth worrying about arranging a ventilation system, the shafts of which are located at a height of no more than 30 cm from the ground. The drainage pit is installed underground. To do this, dig a pit more than 70 cm deep into which a sewer pipe is inserted. This sewage option can be used in areas where the soil is loose and absorbs water well. The pipe is located at a slope and allows the water accumulated underground to go into the soil.
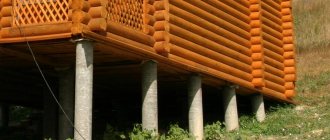
- In a bathhouse on screw piles, there is no need to equip a sewerage system, but such a room can only be used in the summer. The structure rises above the surface of the site, and water simply flows through the floor. The space between the pillars is filled with drainage material: expanded clay, crushed stone, sand.
- Full sewerage is used for baths that are used all year round. Waste water from the floor goes directly into the system and is transported to settling tanks. This flooring is created to be particularly durable and airtight. It can be equipped with a heated floor system.
Installing a heated floor in a recreation room can be done using heating elements. Before you begin building a bathhouse, you need to determine the structural characteristics of the structure. For example, in a frame bathhouse, the floors can be arranged in a combined way: in the recreation room - electric, in the washroom - leaking with a full sewerage system.
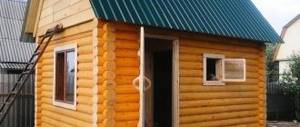
A bathhouse is a place where you can not only wash yourself, but also have a great time. It should not only provide its intended purpose, but be comfortable and cozy. It must be created in the same style. Walls, floors, furniture, firebox - everything should harmoniously complement one another. Before you start building a bathhouse from timber, think through every detail, and then your bathhouse will delight you for many years.
Common mistakes when laying heated floors
Negligence bordering on laziness can lead to unpleasant consequences and after installation of the heating system it will not work. The most common mistakes made by builders when creating heated floors are:
- laying an electric floor under furniture, as a result of which not only its integrity suffers, but also the cable itself from overheating in these places;
- it is necessary to clearly calculate and mark the placement of heating elements; if this is neglected, it may turn out that one area becomes very hot, while the other remains cold;
- you cannot use “warm floors” immediately after pouring the screed, this will lead to its cracking and problems with heating;
- Before laying the cable, everything must be thoroughly cleaned, otherwise small dust particles can cause the cable or mat to become clogged and it will stop working.
Electric cable floor: characteristics and installation method
This heating system is based on a heating cable. The installation of warm electric floors in a bathhouse is completely safe, since there will be no direct contact with moisture.
The cable itself can be:
- Single-core. Has more electromagnetic radiation, both ends must be fixed to the thermostat.
- Twin-core. Less electromagnetic radiation, the second end is not attached to the thermostat.
In general, it is almost impossible for an ordinary person to notice the difference in the work of these two types.
An example of an electrical cable floor connection diagram
Before making an electric floor in a bathhouse, you need to decide on the installation scheme. Since there is no heat loss along the entire length of the cable, a snake is most often used - it is easier to install.
It is important to note that during installation, you should observe not only the standard 5 cm from the wall and 10 cm from other heat sources, but also the pitch between the turns. Each manufacturer has its own requirements in this regard. You can see specific numbers on the packaging.
The installation procedure itself is simple. A special mesh is often used as a basis for fastening, but tape can also be used. Following all the rules, the cable is laid over the entire required floor area.
It is important to remember that it is better to avoid placing the cable in the area where furniture will be placed.
If you follow all the steps step by step, you can install an electric heated floor in a bathhouse with your own hands. However, it is recommended to use the services of professionals to connect it.
The undoubted advantages of such a system include:
- full temperature control;
- the ability to heat the bathhouse at any time;
- quick heating of floors.
However, it is necessary to recall that such a warm floor consumes a lot of electricity. For this reason, it is unlikely to be suitable if you plan to use the bathhouse very often.
Overview of methods
Installation of underfloor heating system
To carry out the work, you will need tools and equipment: a container and mixer for mixing concrete, a spatula, usually scissors for cutting plastic pipes, beacons, a container for heating bitumen.
The materials you need to prepare are: ready-made dry sand-cement mixture (or its individual components), waterproofing (you can take roofing felt and bitumen), thermal insulation (for example, Penoplex), damper tape, clamps, reinforcing mesh, fiberglass, mushroom dowels, plastic pipes diameter 1.6 cm.
Fiber fiber for screed reinforcement
Step 1 . The base is cleaned. If defects are found in the form of cracks or potholes, it is necessary to pour a thin screed to level the surface (providing for drainage if necessary). The drainage chute must be made of stainless steel or plastic. After this you will have to wait for the concrete to harden.
Step 2 . The base is being waterproofed. To do this, heated bitumen is applied in an even layer to the subfloor. Roofing felt sheets are placed on it (with an overlap of 100 mm). After this, the procedure is repeated: a layer of bitumen and a layer of roofing material. In this case, the strips of rolled waterproofing in different layers should be placed perpendicular to each other. The unpleasant smell will disappear over time.
Waterproofing the floor in the bathhouse
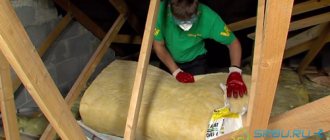
Step 3 . To reduce heat loss, thermal insulation is installed. She must be tough. The thickness of the sheets is at least 100 mm. During installation, you need to ensure that there are no gaps between the elements.
Laying thermal insulation
Step 4 . A metallized substrate is laid.
Step 5 . A reinforcing mesh is placed (wire diameter - 4 mm, mesh cell size - 150x150 mm). It is needed to give rigidity to the structure and secure the contours.
Step 6 . The perimeter of the room is covered with damper tape. It is made from foamed polyethylene. The purpose of the tape is to compensate for possible thermal expansion of the concrete screed (this effect may cause cracks to appear). It has an adhesive layer applied on it for ease of installation. However, it is recommended to additionally secure the tape with dowel mushrooms.
Step 7 . The plastic pipe circuit is laid in a spiral. To do this, at the initial stage, pipes are placed around the perimeter of the room. Gradually, in increments of 25 or 30 cm, they wrap towards the center. From the central point, the contour layout is carried out in the opposite direction (parallel to the previous one) so that in the end there is 12.5 or 15 cm between the pipes.
A circuit of plastic pipes has been laid
The contour is fixed using clamps that secure the pipes to the reinforcing mesh.
Step 8 . The thermal circuit is connected to the heat exchanger. A test run of the system is being carried out. It is recommended to leave the heated floor running for two days. This way you can check its functionality and tightness of connections. If no problems are found, you can proceed to filling the system with screed.
Step 9 . A solution of CPS and water is mixed. For this it is more convenient to use a concrete mixer. But if you don’t have it, you can make do with improvised means (a large container and a shovel). To increase the strength of the base, it is recommended to add fiberglass to the mixture.
Prices for electric concrete mixers
electric concrete mixer
The performance characteristics of a concrete composition can be improved by adding a plasticizer.
Instructions for use of plasticizing additive
Beacons should first be installed on the base to determine the filling level. The screed should rise approximately 5 cm above the pipeline. If water needs to be drained from the room, it is necessary to provide some slope in the direction of the drain holes. The concrete solution is poured onto the base and distributed evenly (using a rule and a spatula) over the beacons. Once the floor level has been determined, the beacons can be pulled out, and the resulting depressions must be filled with the same solution.
Pouring concrete solution
After the concrete base has gained strength (this usually takes 4 weeks), you can begin laying the decorative coating. Most often, tiles act in this capacity. We must not forget that before fixing the tiles to the adhesive, the screed must be treated with a primer.
All work must be performed as carefully as possible so that later, due to mistakes made, there is no need to repeat the process, which will require significantly more effort and time.
Warm floor in the bath
High-quality water heating in a bathhouse is quite possible for anyone who has at least some skills in finishing work. Using a furnace as a heat source, it is possible to significantly reduce equipment costs, as well as energy costs. The result of the work will be comfortable conditions for everyone who likes to spend time taking bath procedures.