Material selection
Work begins after installation and testing of the functionality of all engineering systems. Before covering it is necessary:
- Determine the type and volume of materials;
- Make a list of necessary tools;
- Perform heat and vapor barrier;
- Install the sheathing.
Previously, edged boards from various types of wood were used for interior cladding. The lack of necessary equipment and technology sharply reduced the range and quality of manufactured products. New production technologies have made it possible to increase the range and quality of modern lumber.
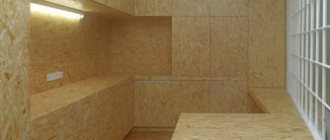
The main material for covering modern bathhouses is lining. The lining is a thin edged board with a special profile.
This is interesting. The name of the paneling comes from the thin wooden strips that were used to cover railroad cars.
The difference between lining and edged boards is the presence of recesses (grooves) and protrusions (tenks) along the long side. These elements ensure a tight connection of the panels during installation.
The widespread introduction of lining as a finishing material is facilitated by:
- Increased thermal insulation;
- Durability of the material;
- High installation speed;
- Ease of maintenance and repair;
- Beautiful exterior design.
Criteria for choosing lining for cladding
The lining for the interior decoration of the bathhouse must be selected taking into account several rules. First, you should pay attention to the type of wood. Pine is completely unsuitable for high temperatures, as it also does not cope well with high humidity. But a rest room can be easily sheathed using lining made from this material. If you want to save money, then it is better to choose exactly this material for finishing the dressing room.
If you want to completely protect yourself and those who will visit the bathhouse, you should choose alder lining for lining the inside of a brick bathhouse. It has a pleasant aroma and attractive shade. When covering a bathhouse for yourself, you can also choose linden. It is completely unsuitable for premises that will be visited by a large number of people, since this breed is not resistant to mechanical damage.
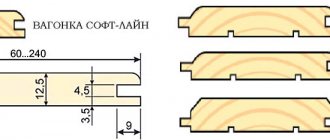
If you want to do the work yourself, you should also pay attention to the profile. If you are looking at a soft line, you should know that products with such a comb have a wide board. After finishing, the brick wall will look aesthetically pleasing and without obvious changes.
If you prefer high quality and compliance with European standards, you can choose eurolining. It does not shrink at all and is manufactured according to international standards. Such products have their own geometric parameters and grade.
If you don’t plan to cover the wall yourself with anything after finishing installation, you should ask how the slats were protected. It is best if the finishing layer is acrylic compounds with antiseptic characteristics. They are made on a wax base. Special impregnation for baths is excellent. It forms a colorless film on the surface, which is easy to care for, and does not change the natural color of the wood.
Prices for wooden lining
If you want to decorate a bathhouse with clapboards yourself, then you should also inquire about the cost of the material. For example, top-class fake products cost 130 rubles. a piece. Sometimes manufacturers also indicate the price per square meter. So, you can purchase aspen trim for 815 rubles.
Marking and technical requirements
The cheapest type of finish is the one designated by the letter “C”. This material has visible defects, but it can be used for cladding indoor bathhouses for household purposes. This allows you to save money, and not only when you want to decorate utility rooms. After all, although such material has its drawbacks, it can be used for all rooms if the bathhouse is a family one and it is not intended to invite guests.
If you want to purchase higher quality material, but at the same time save money, it is best to choose grade “B” lining. It includes dark and light knots, as well as cracks and recesses. Such material will be ready to last longer, but it can be further decorated to be installed, for example, in a dressing room or a rest room.
Grade “A” lining is made of even higher quality. You will not see any defects on the surface other than light knots. The base will be smooth and is perfect for finishing the main rooms in the bathhouse. This is what is called the golden mean. Since it is in a not so high price segment, it also looks quite presentable.
When your budget allows, you can purchase “Extra” grade lining. There will be no defects on it, the base will be smooth, and this decor can also be used to decorate the main premises. The Premium grade is based on smooth wood with an ideal surface. You will not see any defects on it. The service life of such material is so long that you will most likely want to build a new bathhouse, but not change the finish.
Lining in the steam room: vertically or horizontally
There are two ways to solve the problem of how to line a bathhouse with clapboard quickly and efficiently:
- With horizontal planks;
- With vertical slats.
With the horizontal method, the lining is installed parallel to the floor surface. In a vertical position - perpendicular to the floor.
The horizontal position more effectively protects the lining from water penetration. This ensures good ventilation of the space between the wall and the panels.
The choice of method affects the technology of work and the final cost of repairs. For lining the inside of a bathhouse, they prefer the horizontal method. In this case, the wooden panels are installed with the tenon facing up.
How to line a bathhouse with clapboard inexpensively and save on finishing
Few people want to waste money. A thrifty owner will first calculate how much it will cost him to decorate a bathhouse with clapboards, draw up an estimate, and weigh the pros and cons of alternative options. And only after that he will make a final decision.
Tips on how to reduce the cost of finishing a bathhouse with clapboard
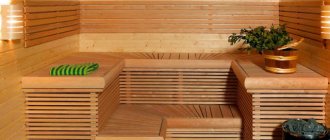
- use different types of wood. For example, in the dressing room and washing room, give preference to cheaper lining made of coniferous wood. You can also combine hardwood and coniferous lining in the steam room. For example, in places where there will be contact between the body and the wood (wall near a shelf, sun lounger, heater), use hardwood paneling from hardwood. In other places, use coniferous;
- in the washing room, use alternative options, for example, plastic lining or tiles;
- vary not only the species, but also the types of wood. For example, buy a high-grade lining for the steam room, and a lower grade for the dressing room. In the dressing room, operating conditions are more humane, and the presence of knots and differences in color and tones will give the room a certain flavor;
- combined clapboard finishing (combination of panels of different lengths). The commercial length of the lining ranges from 1.5 to 3 m. The longer the lamellas, the more expensive they are. You can save a lot if you combine lining of different lengths when decorating a bath;
- insulation. Of course, you will have to bear the initial costs of insulating the bathhouse. But, during operation, you can appreciate the benefits of insulation, when the cost of heating the bathhouse will be reduced;
- cost of work with lining. Professionals price their work dearly, and those who set a low price cannot guarantee decent quality, and it is not yet known how much the rework (reconstruction) will cost. Although, this is all subjective. Therefore, the easiest and most reliable way is to install the lining in the bathhouse yourself. And this step-by-step instruction for covering with wooden lining will be a good help for beginners in construction.
Required tools and materials
To carry out the work, a significant amount of tools and materials will be required.
List of necessary tools and materials for sauna cladding
| Tool | Materials |
| Gasoline or electric saw | Bar 20x20 mm and 30x30 mm |
| Drill or hammer drill | Roll or piece insulation |
| Screwdriver | Kleimers |
| Axe | Nails and screws |
| Plane | Polyurethane foam |
| Hammer | Tape measure or laser level |
| Doboynik | Construction pencil |
| Clamps and Clamps | Ladder |
| Construction stapler | Workwear set |
Calculate the area of the internal lining
If you want to finish a bath with clapboards, then first you need to calculate the volume of material that you have to purchase. To do this, you need to determine the area of the walls and add these values together. Then the area of one lamella is determined. These numbers are found using the same formula: the width of the surface must be multiplied by its length.
If there are window openings in the room, it is not recommended to subtract their area from the area of the walls, since the material is usually taken with a reserve. As soon as the area of all the walls of the room where the finishing will be done is known, this value must be divided by the area of one lamella, which will allow you to obtain the number of products that you have to purchase. In general, you can subtract the area of the openings from the area of the walls, then the calculation will be more accurate. But after determining the amount of material you need to purchase, you will need to add about 10 percent to the final value.
Preparatory work for wall cladding
Before quickly sheathing the inside of the bathhouse with aluminum foil and wooden clapboard, it is necessary to insulate the walls. Before laying the insulation, install the counter-lattice and sheathing. A layer of vapor barrier is laid on top of the insulation.
Thermal insulation device
The best material for insulating baths is basalt wool. This material has good thermal insulation and a high degree of fire resistance. Basalt wool does not rot. This type of insulation does not burn and does not emit harmful substances. Basalt can withstand temperatures up to 1500° C.
Experts recommend using Rockwool brand “Light Butts” mineral wool. The mineral wool of this company is of high quality, increased density and affordable price.
To cut basalt wool sheets, large, sharp knives with a high-quality blade are used. When cutting, the knife blade is held at an angle of 30-45° to the surface of the blade. When tilted, the blades dull much more slowly.
The width of the canvas is taken to be 2 cm greater than the distance between the vertical posts of the sheathing. The increased width helps to fix the blades in a constant position.
Thermal insulation sheets are laid in 3 layers with overlapping joints. The amount of overlap is equal to half the length of the canvas.
All layers are laid in height within one span of the sheathing. The laying direction is from floor to ceiling. They move to another span after laying all the layers of the previous span.
Attention! You should not choose insulation from artificial and synthetic materials. When exposed to high temperatures, they release substances harmful to health.
Laying the first layer begins from the floor. First, the whole canvas is laid. After laying all the canvases of the first layer, the second layer is laid.
Laying the second layer also begins from the bottom. For overlapping joints, the length of the first web of the second layer is taken equal to half the length of the standard web.
At intersections with obstacles, elements of the required shapes and sizes are cut out.
Before covering the bathhouse with clapboard, care should be taken to protect the walls from dampness and rotting. Therefore, after installing thermal insulation, they begin to install the vapor barrier material.
Vapor barrier device
The vapor barrier layer is designed to protect walls from condensation and increase the heat-reflecting properties of the insulation.
The work of laying vapor barriers is the most critical when constructing bathhouses. The efficiency of steam use depends on the quality of vapor barrier work.
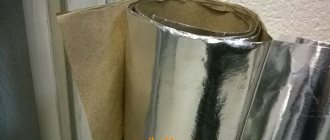
Aluminum foil with a thickness of 50-80 microns is used as a vapor barrier. Attaching the foil begins from the corner of the room in the direction from bottom to top.
Advice. Finnish foil is in greatest demand. The products of this company have high quality, durability and increased heat-reflecting properties.
Vapor barrier sheets are sewn with metal nails or staples to the vertical posts of insulation cells. To attach the foil, use a pneumatic gun or a special construction stapler.
The foil is laid with an overlap of 2-3 cm of vertical seams. All seams are taped with aluminum adhesive tape.
Advice. To seal the seams of the foil, use Unibob adhesive tape, 50 microns thick. This tape adheres well, has high strength and durability.
In places of transition from the walls to the floor and ceiling, the foil is laid with an overlap of 5-10 cm in each direction. The free ends are sewn to the ceiling and floor with nails or tacks.
At the junctions of walls and ceilings, gaps often appear in the foil. To eliminate these gaps, use foil corners. To make such a corner, a piece of foil is placed on the corner of a table or chair. The resulting shape is carefully beaten with a light object to soften the foil. The broken corners are glued with aluminum adhesive tape. The manufactured corner is inserted into the corner and carefully taped.
Advice. To prevent damage to the foil, it is necessary to cut the edges of the bars at 45 degrees using a plane.
After completing the work, check the quality of the vapor barrier installation. Any damage found is covered with adhesive tape.
After installing the vapor barrier, the installation of the counter-lattice begins.
Counter-lattice device
The counter-lattice serves as the basis for the main sheathing. Designed to ensure air exchange in the space between the foil layer and the lining.
To construct the counter-lattice, wooden blocks with a cross-section of 20x20 mm are used. The bars are nailed to the vertical posts of the insulation cells. The distance between the slats is taken to be 400-500 mm. Installation of counter-lattice slats is carried out according to level and plumb.
Advice. Do not use cheap knives with low quality blades to cut basalt wool. Such knives cannot withstand high mechanical loads, quickly become dull and fail.
When installing a counter-lattice, a hole with a diameter of 80-100 mm is drilled in the ceiling for the exhaust duct pipe. A sealing cap (valve) is inserted into the hole. During bath procedures, the hole is closed. To ventilate the bath after washing procedures, the hole is opened.
Periodic ventilation prevents the appearance of dampness and rotting of the lining. To ensure air exchange, a gap of at least 2 cm is provided between the lower end of the lining and the floor.
Execution of work
Sheathing device
A timber with a thickness slightly greater than that of the insulation used is used (mineral wool is usually used as a heat-insulating material). It is installed perpendicular to the selected direction of the lining in increments of approximately 45-55 cm. If the walls are uneven of significant size, it is necessary to use pads made of the same type of wood or some material of sufficient density. The sheathing is attached to the wall with screws and dowels made of plastic or self-tapping screws made of galvanized metal.
Laying insulation
In most cases, as mentioned above, mineral wool is used, which is available on the market in a wide variety of types and modifications. The main rule for laying insulation is that there are no gaps between the materials to avoid the formation of cold bridges.
Video instruction:
Sometimes mineral wool is not installed at all - if there is no need for additional insulation, and the lathing is done only to secure the lining.
Vapor barrier device
Glassine, roofing felt or simple plastic film can be used. The strips are fastened with a stapler for furniture work with an obligatory overlap of at least 5-7 cm. For greater reliability, the joints are additionally glued with adhesive tape or tape as wide as possible.
Ventilation device
A favorable microclimate in a bathhouse largely depends on proper ventilation. For its normal functioning, when installing insulation, it is necessary to provide ventilation holes.
Installation of lining on the walls of the steam room
Fastening must be done using a hidden method, using self-tapping screws, clamps or nails.
This is necessary in order to:
- avoid the possibility of contact with heated hardware;
- prevent it from coming into contact with steam or water, and as a result, prevent corrosion, which can ruin the surface of the lining
Coating bath walls from clapboard
Standard technology is used, during the production of which the following points must be taken into account.
- The lining is fastened with self-tapping screws made of galvanized steel into a tenon, and the holes must first be drilled to avoid chipping. It is allowed to use fastening with nails or clamps (special staples for wood).
- The coating device starts from the corner, access to which is most difficult. This is explained by the fact that the last board will need to be adjusted both in length and width, which is almost impossible to do if there is insufficient access to the place of its installation.
- The corners are finished using a wooden plinth, which is secured with stainless steel nails.
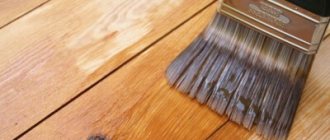
- We should not forget that all wooden structures must be treated with an antiseptic compound.
Installation of a ceiling covering for a steam room made of lining
The installation of a lining ceiling covering, as a rule, starts from the entrance. Only clamps or nails are used for fastening. This is due to a fairly serious load from the mass of the material. When installing the last boards, a hidden nail without a head is used, which is driven in using a hammer. To give a pleasant appearance, the place where this nail is driven is treated with sandpaper. It is necessary to take into account the need to leave a gap of 4-5 cm between the ends of the lining and the wall of the bathhouse for normal ventilation. In addition, it is necessary to provide the structure with the opportunity to “play”, since the temperature under the ceiling will be the highest.
Correct gap between boards
The coating looks most attractive when all joints are made of the same type.
This can be easily achieved by marking the boards when installing them, and also using a level to ensure that the boards are level or vertical. The wall covering must be closely adjacent to the ceiling covering.
Covering door and window slopes with clapboard
When finishing doors, you must first prepare boards of the required length. Doorways are trimmed with platbands.
To simplify the finishing of window slopes, it is recommended to use the initial strip to the plastic lining. A more complex option involves constructing a frame and then covering it with clapboard.
Classification of lining
To choose the right lining, you need to get acquainted not only with the assortment, but also with the classes that determine quality. The first thing people pay attention to is the grade of the products.
- Extra, Premium, Prima. This is the highest, elite grade. This lining has an impeccable appearance, so the buyer will not see knots, resin pockets, stains or other defects.
- A - first grade. This class also belongs to high-quality building materials, but rare, minor flaws are allowed. These include knots, but not more than one per 1.5 meters.
- B - second grade. Here a resin pocket, two cracks, and minor damage are already resolved. The maximum permissible number of knots is 4 by 1.5 linear meters.
- C - products of the lowest quality, but the lowest price. Such material is not used for cladding bath rooms, since their service life in such “wet-hot” conditions is very short.
The purpose of grade “C” lining is the cladding of outbuildings, where finishing is not so important.
The next thing to think about is the type of boards.
- Classic lining. The slats are small in width, so they are better suited for vertical installation.
- Eurolining. These are wider boards, but if we talk about quality, these products are slightly different from the usual version, for the better.
European lining is better suited for lining a bathhouse. There are several reasons for this preference. This:
- the large dimensions of the tongue-and-groove locking connection will allow you to quickly, more easily and accurately fasten the boards;
- the presence of compensation slots that allow unhindered ventilation of the “car wall”;
- unnecessary additional processing of products, since the eurolining has already been treated with a special impregnation.
Lining can be not only wooden, but also vinyl, metal, and plastic. For obvious reasons, wood is always chosen for the interior design of a steam room, and other types of slats are left for cladding less demanding rooms (for example, a washing room), for finishing the facade, fences (the metal variety).
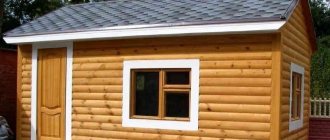
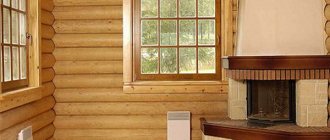
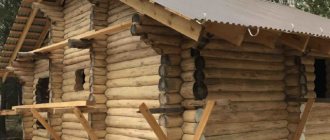
Features of finishing a brick bath
A brick bathhouse in terms of the features of wall cladding with clapboard is no different from if the external walls were built from any other material. It is necessary to begin work, moving from the corner farthest from the entrance. In the dampest room, it is better to avoid using nails, as they are prone to corrosion when exposed to vapors.
A brick bathhouse is usually lined from the inside with clamps, which are good because they do not damage the lining. If you have not yet started construction, then it is best to make a dressing room no larger than 150 x 250 cm. This way you will not only eliminate drafts and the creation of a cold space, but also save on lining, which will be used for finishing brick walls.
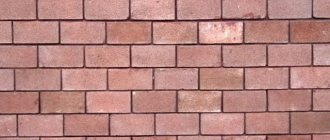
The premises should be insulated; mineral wool or polystyrene foam are excellent for this. The first is fixed using wooden slats, but for foam plastic special fastenings must be provided. Brick walls should be finished from bottom to top. This also applies to work on the floor, walls, and ceiling. Experts recommend abandoning products in “quarter” and “rabbet”. The most recommended lamellas are those with tongue-and-groove profiles. Such finishing on brick walls will not move over time, and the density of the joints will not be disrupted, which is especially important for a material that transmits heat so easily.
Choosing the method of installing the lining
Lining for the interior decoration of a bathhouse, according to step-by-step instructions, can be installed in one of several ways.
- The first is the simplest and involves the use of finishing nails. The products will need to be secured in such a way that the nail fits into the groove of the lining, and then is covered with the next lamella. Keep in mind that not all fasteners are suitable for these purposes, because under the influence of moisture and high temperatures, the metal can oxidize, and even the highest quality finish can lose its attractiveness.
- The second fastening method involves using a screwdriver. Many experts believe that this method is the most suitable when installing wooden lining. You will need to drill a hole in the panel so that its diameter is similar to the diameter of the screw.
- The third way to finish the inside of a bathhouse with clapboard is to use standard nails. This algorithm is often accompanied by deformation of the finishing of the walls of a brick bath; the wood may split. For this reason, this method in the bath should be chosen and used with caution. The fourth technology is to use staplers that are driven into the sheathing.
How to attach it to the wall
Indeed, there are some nuances in how to fix the lining in the bathhouse - on the wall or ceiling. The principle itself, of course, does not change , but where to start, how to finish and how to work in cases where you need to leave a hole is worth describing.
As for how to fasten the paneling in a bathhouse to the wall, the options are those that have already been described - with nails or self-tapping screws, or staples, through clamps or without them.
Since we have two directions for laying the lining at our disposal, we can use any of them, remembering, however, that horizontal laying in wet rooms is more profitable, because damage over time concerns only a few strips, which are easy to replace, whereas with vertical laying the ends of all may deteriorate (!) planks.
Horizontally
Cut off the tenon from one of the planks. She will be the first.
IMPORTANT! According to the rules, the first plank goes from above, from the ceiling. And it should face the groove down. In this case, the joint is kept dry - water will not flow into the groove.
The final bottom strip is usually fixed not through the groove (you can’t crawl into it), but right through from the front side. It is assumed that these places will not be visible later anyway, because they will be covered with a plinth.
If the last board cannot be installed , they do this: they connect the last two or three planks separately, then they install everything at once as one, usually it works. Fastening, unfortunately, is only through the front side.
There is one secret that not everyone knows about yet. It happens that everything was done perfectly, but after several fires the wall began to “wave”, the planks at the junction points began to rise like drawbridges.
Here is a visual demonstration of the process, with torn screws:
The reason why this happens is simple - when you mounted the boards on the wall, they were in a dry state, they had one volume. And when they heated the bathhouse and turned on the steam, the wall became damp, the lining swelled, and there was nowhere for it to go, so it swelled.
BY THE WAY! This applies to both horizontal and vertical installation methods.
tongue-and-groove joint does not have to fit perfectly when the parts are put together. There should be a small empty space between the top of the tenon and the bottom of the groove - the tenon does not seem to reach the bottom of the groove. Only in this case will you avoid trouble when the wall goes into “waves” after moistening. Watch a video that talks about just this.
But here’s the difficulty: if you push the slats too far apart, then during the swelling-drying process, cracks may form. There is only one way out - take a lining with a long tenon, so that you can retreat even a millimeter, and so that there is still enough left.
Another option is to use linden wood. It practically does not change dimensions when moistened - that is why bath doors are made from it, because a swollen door usually does not want to close, and a linden door does not swell. Linden shelves are popular in bathhouses. A separate publication about them provides all the useful information for those who decide to make shelves for a bathhouse from linden: what do you need to know about linden wood? what to process? Antiseptics and impregnations are not the only means for treating wood; do not forget about the possibility of painting.
Yes, and the wood, which is called “thermowood”, does not change its dimensions, that is, dried in a chamber with a high temperature until the bound moisture is almost completely evaporated. But such lining will be very expensive. !It is important not to confuse thermowood with impregnated wood.
Vertical
You can start attaching the paneling in the bathhouse vertically from any angle. It is advisable to cut off the tenon of the first board. There are no problems with securing the first board, but the last board can cause some inconvenience.
Firstly, it may be wider than the remaining distance. In this case, there is no other choice but to cut to the desired width . Of course, it’s better to calculate this in advance and make sure it ends up in the least noticeable corner.
Secondly, it will not be possible to mount the last board on the wall in the same way as the previous ones were mounted. Therefore, you will have to nail it right through the front side, as in the case of the last horizontal one. If you plan to cover it with a decorative corner, then the fastening will not be noticeable, otherwise it is better to cut off the heads of nails or screws. Or drown them and fill them with a mixture of wood dust and PVA. (Dust can be collected from a sander.)
You can learn how to make holes from this video: