Advantages of cast iron
A stove made from a cast iron bath will last almost forever. Even enamel will not burn out quickly. In Soviet times, enamel was applied in two layers. The enamel contained quartz sand. After coating with enamel, the product was baked in an oven at a temperature of more than 800 degrees. The sand melted, and this coating served for decades. The enamel could only be damaged by a strong blow from a heavy object.
Cast iron bathtub is durable enough to make a stove out of it
In addition, cast iron has a high heat capacity, accumulates and releases heat well. Not afraid of corrosion. The industry produces fireboxes and grates from cast iron, since it does not burn out for a long time, unlike steel. But cast iron is a rather brittle metal.
External façade design
The external design of the stove depends on the wishes of the owner. The masonry can be plastered and painted, various decorative mosaics and natural stone are applied to it. Decorating the structure is not always necessary - a bathroom stove will always look like an amazing structure on the site.
Building a stove from an old cast-iron bathtub is an undertaking that requires equipment and some skills in carrying out installation work. But building a stove is worth it - it has an excellent design and will serve its owner for many years, surprising with culinary delights and decorating the estate.
Cutting the bathtub
It is best to saw the bathtub outdoors, after turning it upside down. Cast iron is a brittle metal, so the procedure requires care. The cutting is done with a grinder. Buy several cutting discs at once. We make markings, and then lightly cut the enamel along the line so that when a full cut is made, chips do not form. We saw through the cast iron at a slight angle and make sure that the tool does not heat up. We take breaks. To prevent the halves of the sawn tub from pinching the disk at the final stage of cutting, place supports made of wood or brick along the edges of the cut.
Bathroom cutting is done with a grinder
Stage No. 2: cutting the cast iron font
I would like to warn you right away that this process is very labor-intensive, requiring great patience and caution, since during its implementation you can break the instrument and tear the disc, as a result of which there is a high probability of serious injuries to people nearby.
Schematic instructions for sawing a cast iron bathtub
- To begin with, I laid the bathtub on the ground upside down for ease of further operations;
- Strictly in the middle I drew a straight line with a marker, marking the place of the cut;
The cutting line should be strictly in the middle
- Next, strictly following the applied markings, using a grinder, I carefully made a cut into the enamel layer, the depth of which, as a rule, ranges from 1.5 to 2.5 mm. If you immediately start sawing the cast iron itself, then chips will form on the enamel covering it;
Scheme of cutting the enamel layer
- Now I moved on to sawing the font itself and did it slowly, regularly giving the tool rest. Believe me, the price of haste here can be very high; the saved 20-30 minutes will not replace your burnt angle grinder.
We invite you to familiarize yourself with Heating a bath with electric heated floors
Furnace foundation
The type of foundation depends on the total weight of the furnace:
- A brick base is suitable for a light stove. The bricks are laid on edge and bonded with mortar. Cement grade for binder mortar is not less than M300;
- for a heavy furnace weighing more than 700 kg, a self-leveling foundation with a depth of at least 50 cm will be required. Formwork is made and filled with liquid concrete with or without filler. The filler will be fine broken brick or crushed stone.
The stove can only be built on a strong and heat-resistant base.
The top of the base is placed flush with the floor or 15 cm below the floor level. To protect the base from moisture, the bottom and walls of the formwork are covered with roofing material and all joints are coated with bitumen.
Advice. The base should protrude 50 cm beyond the boundaries of the stove. In front of the combustion chamber, 1.2 m of space should remain free.
Furnace No. 1
This version of the stove is capable of heating a bathhouse of 7 square meters. m to 80 degrees in just a couple of hours. To build a stove you will need scrap metal: a cast iron bath, a gas cylinder and a metal drum from a conveyor belt with a diameter of 40 cm. The drum can be replaced with a gas cylinder or pipe - this will be the combustion chamber. The sequence of work is as follows:
- A concrete foundation is being poured for the future furnace.
- The end of the bathtub is cut off.
- We make a combustion chamber: holes are drilled at the bottom of the drum. A box is welded to cover the holes and serve as an ash pit.
- We put the door on the firebox. You can use this spare part from an old stove.
- A gas cylinder is welded vertically at the opposite end of the drum.
- Now the resulting structure is placed in the bath.
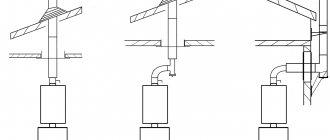
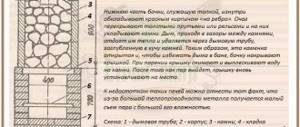
Brickwork around the bathtub - A chimney pipe is welded to the cylinder.
- Lay the foundation with bricks to the height of the bathtub. Clay mortar is used for binding.
- After the masonry has dried, it is decorated with ceramic tiles. Tile adhesive is selected that is heat-resistant.
- Stones with a fraction of 7 to 15 cm are poured into the bathtub. Granite or pink quartzite. The stones quickly gain temperature and give off heat for a long time. Quartzite releases chemical compounds into the air that normalize blood pressure and metabolism. This bathtub can hold approximately 350 kg of stones. Bathhouse technologists claim that this number of stones is enough for a bathhouse of 10 square meters. m.
Advice. If you weld a flat metal platform to the cylinder, you will get a stove for heating the kettle.
Stage No. 4: finishing
Here I had two tasks:
- Insulate the stove structure even more;
- Decorate the building, making it an excellent addition to the country interior.
And I started:
- I mixed a solution of clay and sand in a ratio of one to two;
The composition of clay and sand tolerates high temperatures well
- I covered the cooking compartment with a steel mesh, the mesh size of which is 20 mm, and fixed its edges to the brickwork using self-tapping screws and plastic dowels. Now the clay plaster applied on top will not slide down the smooth cast-iron surface, and when it dries, it will have sufficient strength;
- By this time, the mixed mixture had reached the desired consistency, and using a spatula I applied the first finishing layer, which I did not smooth;
The first layer is ready and drying
- After the clay had set, I completed the final finishing, then moistened the spatula and carefully leveled the created coating. In total, my cladding was approximately 70 mm thick;
- After hardening, I whitewashed the fur coat, adding to the similarity of the appearance of the structure with ancient stoves.
Oven after whitewashing
Also, in the future, I also want to cover the brickwork with ceramic tiles, but in order to save money, I don’t want to specifically purchase expensive materials for this. Therefore, I’m waiting for the time to renovate the bathroom at the dacha to use the ceramics removed from its walls.
Furnace No. 2
From a cast iron bath sawn into two parts you can make a combustion chamber for a sauna stove. You will need one half, the second can be used for the fireplace.
- We are laying out the foundation.
- We install half of the bathtub with the dome up. The cut edge is inserted into the wall from where the firebox will be produced. The rest of the bath remains in the steam room.
The process of building a stove from half a cast iron bath - We fill the hole with a brick wall, into which we build the doors of the combustion chamber and the blower.
- Now we build a brick wall around the perimeter of the bathtub, flush with the bathtub. The distance from the bathroom to the wall is taken from 8 to 15 cm.
- We fill the space between the cast iron container and the brick wall with stones after the brickwork has completely dried. The stones will heat up and give off heat.
The remaining half can be used to build a fireplace. Cast iron can easily withstand brickwork if you line the fireplace with an arched vault. Moreover, for this you do not need to make a complex template from plywood. The front part is decorated with a portal. The chimney is removed. You can make the fireplace closed by installing a transparent door on the firebox and admire the flames.
Advice. Cast iron and red ceramic bricks have different coefficients of thermal expansion. Therefore, when constructing brick walls, expansion joints are provided, which are filled with asbestos or fire-resistant basalt cardboard.
Conclusion
Despite the fact that cast iron bathtubs of the last century are considered obsolete, a number of their qualities - durability, resistance to rust and stress, heat retention and strength - can be used to obtain objects with unique properties. The result of converting a used font into various ovens, a pond, a greenhouse, a flower bed or country furniture will become a source of pride and envy for your neighbors.
There is nothing difficult about creating your own stove from a cast iron bathtub. Follow the instructions carefully to get fantastic results. Rest assured that the quality of the stove will not be inferior to industrial models, but the cost will be orders of magnitude lower than that of the original!
Furnace No. 3
The third version of the stove is often used as a garden barbecue and for cooking in the summer. If the upper chamber is filled with stones, then such a design will replace a traditional stove in a small bathhouse, so we will not ignore this model.
- The foundation for the furnace is being poured.
- The bathtub is sawn into two identical components.
- Supports are placed on the foundation if you want the stove to be higher.
- The first half of the bath is installed. A sheet of metal with a thickness of at least 5 mm is laid on top, which will completely cover the upper and lower compartments and serve as a hob.
Construction of a barbecue stove from a cast iron bath - We cut the chimney pipe into the sheet and weld it along the contour.
- We install the second half on top with the bottom up, having previously cut a hole for the chimney.
- We glue the metal sheet and the halves of the cast iron device with high-temperature sealant. This will prevent smoke from entering the upper chamber.
- We clamp both parts with clamps and drill holes along the contour for 10 mm bolts. We fasten both parts of the bathtub and the metal sheet.
- We lay a brick pedestal under a three-wall oven.
- The grate is installed 15 cm from the bottom of the combustion chamber. If the grate size is small, then two corners are welded to install it.
- The front part is covered with a sheet of metal or brickwork with a door installed opposite the combustion and ash chambers.
Finished product from cast iron bathtub and sheet metal - A metal shutter is made according to the size of the upper chamber. In this form, the chamber can be used as an oven.
- Now all that remains is to give the product a noble appearance: cover the brick with tiles or plaster.
Such non-standard designs are easy to manufacture and require minimal financial costs. An item that has served its purpose will get a second life, and you will receive a convenient and practical stove that will serve you faithfully for many years.
Necessary equipment and materials for work
To build a stove from a cast iron bath yourself, you will need to stock up on the necessary tools.
Here is their exhaustive list:
- grinder (angle grinder), as well as discs for it (cleaning and cutting);
- electric drill and set of drills;
- equipment that allows gas cutting of metal elements (if available);
- wrenches of different sizes, hammer and pliers;
- crowbar and shovel;
- container where the solution will be mixed;
- spatula and trowel;
- tools for taking measurements: building level, plumb line, tape measure, metal corner;
- a welding machine (will be needed to install the chimney), as well as electrodes for it and a protective mask;
- hacksaw for woodworking.
The main element of the stove is a cast iron bath. However, the stove has significant weight, so it must have a foundation. For its construction, a certain amount of sand, cement mortar, brick, as well as clay and water is required.
Making a stove from a cast iron bath is much cheaper and more profitable than buying a new one
In addition, you will need:
- corner (metal);
- metal sheet (4 millimeters);
- a grid of a certain size;
- pipe required for the manufacture of a chimney (length - from 2 to 3 m, diameter - from 10 to 12.5 cm, wall thickness - from 3 mm);
- hinges for doors;
- Rabitz;
- polyethylene film (necessary for waterproofing the foundation);
- board (thickness - from 2 to 2.5 cm);
- slats (2 by 2 cm);
- nails.
Welding machine
Building a stove from a cast iron bathtub with your own hands will require the use of the following tools:
- angle grinder (grinder);
- Cutting and cleaning discs for angle grinders;
- Electric drill, drill bits;
- Pliers, wrenches;
- If available, equipment for gas cutting of metal;
- Entrenching tools – shovels, crowbar;
- Hammer;
- Trowel, spatula;
- Container for preparing the solution;
- Measuring tool - tape measure, plumb line, metal corner, building level;
- Welding machine for installing a chimney, mask, electrodes;
- Wood saw (for formwork construction).
The beginning of construction implies the presence of a cast iron bathtub. The bathtub stove has a foundation, since the total weight of the structure takes on a decent value. In addition to the bathroom, you will need the following materials:
- Cement;
- Sand;
- Red brick;
- Water;
- Clay;
- Sheet of metal with a thickness of 4 mm;
- Metal corner;
- Homemade or factory grill of the appropriate size;
- Metal and hinges for doors;
- A chimney pipe with a wall thickness of at least 3.5 mm, a diameter of 100 - 125 mm, a length of 2.5 - 3 meters;
- Material for waterproofing the foundation – polyethylene film;
- Rabitz;
- Boards 20 - 25 mm thick, nails, slats 20x20 mm.
We suggest you familiarize yourself with How to properly mate rabbits at home