After you have built a bathhouse on your plot of land, you need to take care of the interior decoration of the steam room, which is the final, although not the easiest, stage of construction. There are many materials for decoration: this includes lining made from various types of wood, ceramic tiles or a more expensive option - natural stone. High-quality finishing of a steam room in a bathhouse is not only a beautiful appearance. It ensures the durability of the structure, as it protects the walls from exposure to elevated temperatures and humidity.
Features of the decorative lining of the stove
High-quality finishing of a sauna stove must meet basic operational requirements: withstand high humidity, temperature changes, ensure durability and safety of the surface. The lined stove should quickly heat the bath rooms and create a comfortable microclimate inside.
Lining a stove in a bathhouse has a number of advantages, including the following:
- fast and uniform heating of rooms;
- heat accumulation for a long time;
- minimal risk of getting burned from a heated oven;
- the air does not dry out;
- simplicity and accessibility of maintenance of finished cladding;
- attractive appearance of heating equipment;
- resistance to mechanical damage and deformation.
Types of stove lining
In addition to the fact that the stove is the main heating equipment, it also performs an aesthetic function.
The cladding of the sauna stove is made using practical and durable decorative materials:
- ceramic tiles;
- refractory bricks;
- artificial and natural stone;
- decorative plaster;
- tiles;
- frame made of metal plates.
All materials are distinguished by high performance characteristics and installation features.
Ceramic tiles - elegance and durability
The best material for lining a sauna stove is ceramic tiles. It is easy to install, affordable and durable.
The following types of tiles are used for facing work:
- Clinker room. It is made from red clay with the addition of fireclay, melting agent and dye.
- Majolica. Material with a pressed base, covered with a protective glaze layer. This type of tile is distinguished by its rich color scheme, decorative patterns and ornaments.
- Terracotta. A facing material whose performance characteristics are similar to majolica. Important differences are the porous structure and the absence of a protective glaze. Terracotta is characterized by durability, increased strength and resistance to mechanical damage. This type of tile is made in a round shape.
- Marble. This material is distinguished by its increased wear resistance, practicality and ease of installation, and is devoid of almost all disadvantages.
When choosing this type of finishing, stove owners ask themselves the important question of which tiles are best for covering heating equipment. Experts believe that the best option is a material that has a minimum coefficient of thermal expansion and a dense structure - clinker tiles.
Firebrick: reliability and safety
Decorating a sauna stove with brick is the simplest and most budget-friendly option for owners who decide to do the cladding themselves.
The material has a number of advantages:
- fast and safe heating;
- accumulation and maintenance of heat for a long time;
- resistance to high moisture;
- low cost and ease of installation.
Work on lining the stove in a bathhouse with bricks consists of arranging a reliable decorative screen around the entire perimeter of the equipment. To increase aesthetics and attractiveness, it is allowed to combine materials of different colors.
To fill the joints, it is recommended to use grout that is resistant to high moisture and temperature changes.
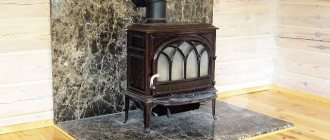
Artificial and natural stone: exquisite nobility
The main advantage of cladding with decorative stone is the creation of a noble and attractive appearance. High strength, durability, environmental friendliness, resistance to high temperatures, a variety of color palettes and textures allow the material to be used for finishing bath rooms.
The following types of stones are used for facing work:
Decorative stones can withstand an unlimited amount of heating; they accumulate thermal energy well and maintain a given temperature for a long time. In addition, this material is resistant to acids and alkalis.
In terms of their performance characteristics, artificial elements are not inferior to natural stones. With their help, you can qualitatively line a stove in a steam room or a fireplace in your home.
The technology for laying stones is simple and therefore does not require additional preparation. Non-standard shapes of elements can cause some difficulties during the fitting process, so before installation it is recommended to lay out the material on a flat base. The stones are numbered and fixed on the surface of the furnace using an adhesive composition.
Decorative plaster: simplicity and accessibility
A simple option for lining a Russian stove is plastering the surfaces. Over time, the decorative and protective properties of the plaster composition decrease, which will require frequent renewal of the cladding.
Important! Decorative plaster is used only for brick stoves and is not suitable for metal devices.
Plastering a stove in a bathhouse is simple; all work is performed in the following order:
- the surface is cleaned of dust, debris and remains of the connecting solution;
- the seams are cleared to a depth of 10 mm;
- Before the cladding begins, the oven warms up;
- a mesh of metal rods is installed on the surface with wire fixation;
- the surface is moistened and a primary layer of plaster mixture is applied;
- After the plaster has hardened, a second layer is applied.
The thickness of each subsequent layer does not exceed 6 mm. The plaster solution is applied using a trowel and leveled over the surface with a spatula. When plastering the surface, it is necessary to avoid the appearance of defects - air bubbles and sagging.
After hardening, the top layer is thoroughly cleaned until a smooth surface is obtained.
Tiles: originality and practicality
The use of tiles is an ancient method of cladding stove equipment for a bath. Tiles are tiles made from pottery plastic clay by firing in a kiln at a temperature of more than 1000 degrees. On the back of the tile there are pumps designed to fix the material on any surface. Tiles are presented in several categories:
- with a smooth surface;
- majolica;
- with glazed surface;
- with a relief surface.
Tiles are distinguished by high performance characteristics - durability, practicality, strength and high heat transfer.
The work of tiling should be entrusted to professionals who will do a good job of installing the material on the surface of the stoves.
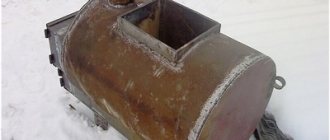
Metal frame: accessibility and safety
A sauna stove can be lined with a metal frame, which is installed on top of the device and covered with protective shields. The steel frame provides reliable protection for the furnace portal and an optimal level of heating of the air in the room.
This type of cladding has the following advantages:
- accumulates released thermal energy;
- quickly heats the air and walls in the room;
- It is distinguished by its affordable price and ease of installation.
A serious drawback of such cladding is the likelihood of burns upon direct contact with the surface. Therefore, experts do not recommend installing metal frames for stoves in bathhouses in order to avoid possible injuries.
A competent choice of decorative material for cladding and adherence to the technological process will ensure the correct operation of the sauna stove and the creation of a comfortable microclimate in the premises.
Deciduous trees
The most commonly used varieties are linden, birch, alder, aspen, ash, and oak. Each breed has its own characteristics.
| Titles | Characteristics |
| Linden. | It stands out for its durability and wear resistance. Its wood attracts many with its white color. Linden is a honey-bearing tree, so at high temperatures it emits a pleasant and unobtrusive aroma, which has a relaxing and calming effect on humans. Its wood “breathes”. In addition, its high resistance to water prevents the appearance of small cracks and deformations during drying. Linden is considered the leader in cladding steam rooms among other deciduous trees. |
| Aspen. | It belongs to hard rocks and is not susceptible to rotting (they used to put it in cabbage to prevent it from turning sour, as it destroys all fermentation fungi and mold). When properly prepared and dried, it acquires amazing strength (even a nail cannot be driven into it). It is resistant to moisture and completely free from cracks. Therefore, steam room floors are often made from it. Has a bitter smell. Aspen relieves a person from headaches and inflammation in the joints. However, its disadvantage is that as a result of exposure to extreme conditions, the steam room darkens faster than linden. |
| Alder | It is of high quality. Its perfectly smooth surface has no defects, so after installation it does not require additional processing with a grinding machine. Alder as a finish is excellent for a steam room: both the color and its cognac aroma only become richer and more noble over time. |
| Ash | One of the most valuable types of wood. It has high decorative qualities: its core is especially beautiful. This is a durable, odorless material that will last for many years. |
| Birch. | Its wood has a loose structure, so it dries out a lot. In addition, it is more afraid of water than other breeds and rots quickly. |
| Oak. | The wood is dense and heavy. Has a beautiful texture. Durable. If the steam room is decorated with oak, it will have a beneficial effect on human health. |
Rare species include the African abashi tree. This material seems to be created for the steam room. It does not absorb water and does not change color. The unique quality of wood is its ability to heat up for a very long time even at the highest temperatures. It has a snow-white or pale yellow color. Due to its low thermal conductivity and water resistance, this wood is popular for interior decoration of steam rooms.
Using tiles
The tiles on the stove in the bathhouse are afraid of thermal expansion, therefore, when performing work, it is important to carefully follow the technological process. The lining of the stove in the bathhouse does not tolerate negligence.
Typically, 7 types of tiles are used for cladding:
- Terracotta is a tile that has not been glazed. It consists of terracotta clay and fireclay, which are mixed in a certain ratio. Such tiles have been known for several centuries. A correctly implemented technological process greatly influences the final quality of the material. This tile can be easily recognized by its characteristic red tint.
- Clinker tiles - clay is the main raw material. The material is obtained by pressing, then it is fired at a temperature of +1200 0 C. The crystal lattice of the clay changes and the tile acquires the properties of ceramics.
- Majolica is very difficult to produce. Previously, only manual labor was used for drawing. Now there are industrial designs. The glaze on the tile is obtained by firing. Properties resemble terracotta tiles.
- Tiles are the most preferred option due to the air gap between the tiles and the oven wall. This layer works as an additional heat insulator, allowing the stove to retain heat near itself even longer.
- Porcelain tiles can also be used for lining a stove. Marble chips added during the production of porcelain stoneware give the material unique decorative properties and high strength. Due to this, porcelain tiles are rapidly gaining popularity.
- Fireclay is able to withstand direct exposure to fire. Fireclay is pressed into blanks and fired at a temperature of +1300 0 C.
- Tile - only a material with a high heat resistance coefficient can withstand temperature loads.
Instructions
Do-it-yourself tiling of a sauna stove is done as follows:
- It is necessary to properly prepare the surface. All traces of old finishes must be removed from the wall. Each seam should be selected at 10-15 mm.
- We dilute a deep penetration primer and add marble chips to it. Carefully prime the surface. Do not forget that the primer must dry (at least 24 hours).
- We stretch and fix the metal mesh using dowels. Such reinforcement will significantly increase the strength of the structure.
- The tiles should not be laid on an uneven surface. We level the wall with plaster. We recommend using stove mortar that is specifically designed for plastering stoves. The plaster must be allowed to dry for 48 hours.
- Apply the facing adhesive evenly to the entire surface of the tile. Carefully cover the surface of the stove and press lightly. The tiles can be leveled in about 10 minutes. Then the glue will set. We check the correctness of the masonry using a level. The glue layer should not exceed 1 cm. To make the seams even, we use special crosses. The thickness of the seam is 2-3 mm.
- When the glue dries, we grout the joints.
Possible materials for lining chimneys
Brick lining of chimneys involves the use of materials that reliably isolate the room from combustion products and will not disturb the harmony of the interior. The external finishing of the chimney is developed not only to prevent the ignition of the roof, many of whose elements are made of wood, but also to minimize the impact of the external environment on the structure.
Natural slate tiles
What materials can be used for cladding? The easiest way is, of course, facing brick - either Italian or our domestic. This is quite banal, and therefore I will offer more interesting materials for lining chimneys than just brick. It has one drawback - you can’t insulate it, and even if you do insulate it, it makes no sense to spend money on expensive brick if it won’t be visible.
Tin cladding
The next possible material is colored tin, using which you can save money. Finishing the chimney will be cheaper. We lay out a chimney from simple domestic bricks. If it is not insulated, then 2 U-shaped parts are simply bent from tin and attached to the pipe using a fastening key. This is the work of roofers as it is performed on the roof. But if you think that you can do it yourself, then this article is for you.
Material and tools:
- Beam 40x30.
- Hammer drill for 6 and 8 mm.
- Amoshki 6x80 mm.
- Press washers to match the color of the gesture or roofing screws, also to match the color.
- Mineral wool for insulation.
- A screwdriver with three roofing bits and a hexagonal socket.
- Mushrooms for attaching mineral wool.
Insulation of chimneys
The first thing you need to take care of when doing work on the roof is safety. Having provided insurance for those working on the roof, you can begin installation:
- We fasten the beams on the sides with the help of boots, checking the vertical with a level on each side - at least two beams. If the sides are wide, we make three beams each and calculate in advance the joints of the tin. We also attach timber there.
- We lay the mineral wool, drill holes, insert the fungus and wedge it.
- We attach the mineral wool to the side along the entire chimney with mushrooms.
- Next stage. We place the already bent sheet metal on one side, attach about 2-3 press washers to the beam and also the second part of the sheet metal. We secure the joints with press washers.
- We close the top with an end corner of the same color, or you can choose a different color - it will also look good.
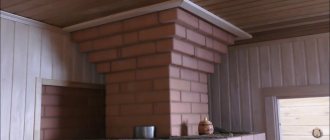
Finishing the stove with bricks
Traditionally, the stove lining is made with brick. This material is also suitable for wooden walls near the stove. It is an additional heat accumulator.
The following types of bricks are used for cladding the stove:
- ordinary ceramic brick (solid);
- refractory fireclay brick.
It is not recommended to use silicate and hollow bricks. It will not hold heat well and will collapse. Fireclay brick is preferable to use, but it is more expensive.
Instructions
- The laying is done using a mortar specially designed for ovens. It will ensure optimal structural strength.
- The foundation design must be designed to withstand such a load. Otherwise, you will have to make a separate foundation.
- The masonry is done in half a brick. The brick is placed on the bed. We start laying from the corner, bandaging 1/3.
- For heat exchange, ventilation holes must be provided in the masonry.
- Between the rows we reinforce the masonry with mesh.
- After completing the masonry, we perform jointing.
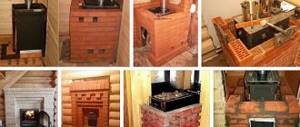
Examples of brick lining a stove in a bathhouse in the photo:
Problems that arise during cladding
First of all, you should pay attention to maintaining tightness at the junction of the pipe and the roof; if the technology is violated, water and debris penetrate inside. After completing the finishing work, it is important to install a protective cap over the chimney so that the draft will not be disrupted. Sometimes they forget to install it, as a result the pipe becomes deformed due to precipitation.
Chimney treatment performs many functions, primarily ensuring the safe operation of individual heating. During facing work, a variety of fire-resistant materials are used, the choice of which depends on the type of firebox and the design of the house. At each stage of finishing, it is important to follow the technology in order to extend the life of the structure and protect the adjacent elements of the building.
Tags: stone, cover, pipe
« Previous entry
Do-it-yourself finishing of a metal stove in a bathhouse with bricks and tiles
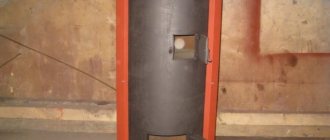
There is no bathhouse without a stove, so it must be included in any project. Usually they install a wood-burning stove, which can work as a heater to generate steam in the steam room. The boiler only copes with the heating function, but does not produce steam. If there is little firewood in the region, then they install the lowest-power heater, and compensate for the lack of heat with a boiler.
The sauna stove can be either ready-made or built independently from brick. In any case, finishing of the stove in the bathhouse is necessary. It is required as it protects wooden walls from overheating. You can finish either the stove or the walls, or both. The stove cannot be used without finishing, except in very rare cases when the stove is located in the middle of the room.
Why is it necessary to plaster the stove?
Why do you need to plaster heating brick structures? Fireplaces, and especially stoves, are decorated for several reasons:
- The plaster creates an airtight layer, which, in the event of cracking of the masonry mortar in the seams between the bricks, will not allow carbon monoxide to enter the room.
- Plaster adds neatness and improves the appearance of the building as a whole.
- The plaster mixture also plays a hygienic role. So, over time, in the seams, especially if masonry mortar made from natural materials was used, colonies of insects or microorganisms harmful to humans may appear, which will be quite difficult to remove.
Finishing the stove in the bathhouse with various materials
The finishing around the stove in the bathhouse can only be made from safe fire-resistant materials. The most common one is brick, but this is not necessary. Other materials are also suitable:
- Red stove brick, decorative facing brick;
- Tiles, ceramic products for decorating fireplaces;
- Natural stone: various slabs and tiles made from it;
- Decorative plasters (applied only with a thick fire-retardant layer);
- Steel fire-retardant finish (requires good design work).
As you can see, the choice of materials is quite large. Brick is reliable and practical. The rest of the materials are taken either because of the design, or when the budget for bricks is not enough, but another fire-retardant material is already available. We will consider the finishing of each type of material in more detail.
Sequence of work
The general technology of internal cladding comes down to several stages:
- Prepare fire-resistant glue, grout and the tile chosen for decoration.
- Soak the tiles in water for about a quarter of an hour.
- Dilute the glue according to the instructions.
- Apply adhesive to the surface of the tiles and chimney.
- Attach the finishing material to the base.
- Secure the gaps between the tiles with temporary plastic fasteners.
- The fasteners were removed after the glue hardened.
- Fill the seams with grout; it will dry in a few days.
For the street part of the building, you can use corrugated sheets.
To finish the part of the chimney that is located on the street, corrugated sheets are often used that are attached to self-tapping screws. It is prohibited to use vinyl siding, which is deformed by high temperatures. Sequence of work for finishing with plaster and tiles:
- Clean and prime the surface.
- Reinforce the pipe with galvanized metal mesh.
- Apply a mortar of cement and expanded clay sand.
- Plaster the surface (attach clinker tiles or natural stone), following the procedure for internal cladding.
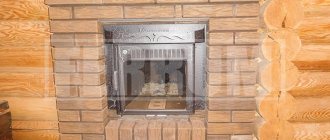
Benefits of brick
This solution can be seen in almost any bathhouse. The brick finish protects the wall from overheating. Very often this protection is made even more powerful and extended to the floor. Finishing the stove in a bathhouse with brick performs both a protective and decorative function. For it, the same type of brick is taken as for the rest of the stove, or another facing brick of the required appearance is additionally purchased.
The rules for brickwork for walls, the stove and the protective portal around the stove are general.
Strict adherence to row levels and neat and thin seams are necessary.
On the walls and in the oven, bricks are laid with overlapping seams. If the portal is laid out in one layer, then it is not at all necessary to comply with this requirement. This is why you can often see protective portals where bricks are stacked on top of each other.
The horizontal row is checked by level. Covering the wall with bricks is plumb. For a corner stove, three planes are laid out with bricks, two on the walls and one on the floor.
For a stove near the wall, there are only two, of which one is located on the floor, and the second is on one wall. Brick, even if it is laid in one layer, has good thermal insulation ability. Its masonry is carried out directly on wooden walls and floors without other fire-retardant insulation.
It is advisable to lay out the horizontal part of the portal in one row between the foundation of the furnace and the subsequent masonry next to it. This advice should only be followed with brick sauna stoves. It is not suitable for metal ones.
In baths, thick fireproof cardboard, mineralite or basalt wool are most often used. There are also basalt cardboard and other materials that are a variation of the previous ones. Minerite is the most preferred. These are ready-made boards specially designed for thermal protection in areas around stoves.
Preparation of a mixture for plastering fireplaces and stoves
When using factory-made plaster with the preparation of the solution, no questions should arise. The manufacturer always provides detailed instructions on the packaging. Usually the dry mixture is simply diluted with water and kneaded with a construction mixer.
The factory-made plaster mixture is mixed with a mixer before use.
When you make your own heat-resistant plaster for stoves and fireplaces, first each component included in its composition is sifted through a sieve to remove solid impurities. The second important condition is the correct choice of the main binder and calculation of proportions. For plaster, fireclay and ordinary clay are used. It is distinguished by its fat content. The higher the indicator, the more sand is added.
The consistency of the solution resembles thick sour cream
Advice! Experienced stove makers add a little salt to the clay solution, which will prevent insects from settling.
The clay must be soaked for a day before mixing. It is better if the process lasts two days. During this time, all solid lumps will dissolve. Sand is added sifted and always dry. This important condition will help maintain the correct proportions. Lime is the most commonly chosen additive. The substance is a kind of plasticizer. With lime, the viscosity of the solution and adhesion to brick increases. If cement is also selected as an additive, then the M-400 grade is used. This plaster will begin to harden on the stove or fireplace after 4 hours. Full setting will occur after 12 hours. The plaster will gain its final strength in a month.
Ceramic tile
Ceramic tiles have the same fire resistance as brick.
At the same time, she simply has an incomparably greater variety of appearances.
Now, instead of tiles, almost all manufacturers have mastered the technology of semi-dry pressing, which allows you to create any designs and textures on the surface of the tiles.
This material received the trade name “Porcelain stoneware”, although it does not contain granite. Finishing a stove in a steam room with tiles has its advantages, and the main one is the variety of design solutions. Unlike brick, tiles can be any color.
The side of the old tile had a size of 10-15 cm. With modern porcelain tiles, the side length can reach 40 cm. The longer the side, the more accurate the coating. It has fewer seams, but the complexity of installation increases significantly. Porcelain tiles should be laid by specialists.
This requires a lot of experience. If the tiles are small, you can do the tiling yourself. There are no particular difficulties here. Laying is carried out using a conventional solution on a sheet of heat insulation. It is better to use a special solution based on a dry construction mixture for the appropriate purpose.
Natural stone is as fire resistant as brick. It is equally suitable for finishing a stove, but its appearance is much more decorative.
The finishing of the stove is carried out not with raw stone, but with finished products made from it. These are tiles or special stone elements for finishing fireplaces.
Classic types of stone are used: marble, granite, but in a bathhouse they may be inappropriate in design and expensive. In this case, they are replaced by cheaper sandstone and slate stone. Slate stone is often cut into flat pieces, so its price is very low.
Finishing the stove in a bathhouse with decorative stone begins with the selection of material. Untreated stone is cheaper, but its surface in a bathhouse can quickly become dirty.
The part of the portal that is laid out on the floor is especially susceptible to contamination.
Despite the fact that untreated stone looks beautiful, it is recommended to use a polished and honed version for a steam room.
Tiles are a classic solution for finishing stoves. They have cheap production technology and very reliable installation. The external surface, finished with tiles, looks like high-quality, thick tiles.
This appearance will be achieved only if you use tiles without a pattern on the front surface. They do not produce a special decorative effect, since they do not differ much from the usual tiles. The only benefit is in the strength of the fastening, which is why other tiles with a three-dimensional pattern on the front side are more popular.
Tiles are laid in the same way as tiles, but require a significant thickness of the finishing layer. If a portal for a sauna stove is made from them, then part of the wall and floor is covered with tiles. They don’t have to be used on the floor if the stove foundation is raised above the floor by one or two brick rows.
If the tiles have holes for wire, then it must be used.
The diameter of the rods is selected according to the instructions. Larger diameter means higher strength, but the complexity of installation increases.
On average, tiles are the same thickness as one brick.
They can just as well be used to create the same protective layer.
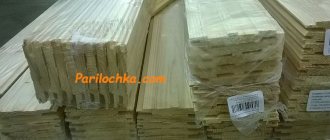
Coniferous trees
Larch has a high density and an unusual internal pattern. The secret of this tree is the presence of gum, which makes it resistant to moisture and rot. In addition, she is not afraid of any tree bugs or rodents. The disadvantage of larch is that it splits easily, so it is not easy to process. It also does not have increased thermal insulation properties. When finishing with larch, it is necessary to heat the steam room to very high temperatures for the first time so that the resin polymerizes and the wood does not “cry.”
Pine lining is not suitable for finishing walls and ceilings, as it contains resin. At high temperatures it begins to flow and when it comes into contact with the skin, it causes a deep burn. But some fans of baths like this lining because of the smell of resin, which creates a unique aroma in the steam room. In addition, over time it will stop protruding onto the surface of the finish.
Cedar, with its soft, flexible wood, is easy to work with. When a person touches it, the wood immediately takes on its temperature. Therefore, it is impossible to get burned by it. After heat treatment, the wood acquires a chocolate color. This material has gained particular popularity due to its pleasant aroma, extraordinary beauty and healing properties, since the essential oils released by wood have a beneficial effect on the human respiratory system. It is believed that this tree improves well-being and improves mood. But the choice of this material may be influenced by its high cost.
In addition to lining, the steam room can be finished with more budget-friendly options: edged or unedged boards made of various types of wood. Only untreated wood will need to be pre-prepared for installation - the bark must be removed and sanded.
It is important to remember: wooden panels cannot be coated with varnish or paint, even of the best quality. When heated, they emit an unpleasant chemical odor.
Decorative plaster
Plaster for stoves began to be used relatively recently. Indeed, a good stove does not need to be plastered. It is made either of high-quality brick, which in itself looks decorative, or of metal, which also does not need plaster.
In this case, we are not talking about plastering the stove itself, but about creating a protective separating layer of plaster between the walls and the stove. Plaster is quite suitable here.
Finishing the walls in the bathhouse around the stove with decorative plaster is especially often done when the stove is not placed in a steam room.
In this case, the requirements for moisture resistance are much lower.
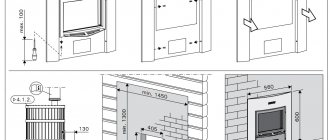
Installation of a chimney on the roof
Arranging a chimney on the roof and passing through the roof is perhaps the most difficult and important stage. If a pipe inside a building without finishing simply spoils the interior, and even if you are careless, you can get burned on it, then external finishing is, first of all, protecting the chimney from destruction and only then a beautiful decor.
Ceramic insulated frame for finishing round chimneys.
The easiest way is to arrange the passage of a round insulated sandwich pipe through the roof. Here you can do without completely disassembling the roofing pie.
- I start this installation from the inside of the roof. If you are dealing with an equipped roof, then first the decorative covering on the ceiling is dismantled. There you will most likely find a vapor barrier membrane, followed by a layer of insulation and a windproof film. All this will need to be cut to the size of your pipe;
Cotton insulation for round chimneys.
- It is more convenient to cut a hole for a round pipe in the roofing while on the roof. But in order not to make a mistake, I drill several holes from below along the contour of the future pipe;
- Now the bottom flange ring is fastened with self-tapping screws onto the sheathing, on top of the vapor barrier;
Conical elastic flange.
- Further work will be carried out on the roof. Using the previously made designations, a hole is cut for the pipe, after which you can immediately install the sandwich pipe;
- To seal the joint between a round chimney and the roof covering, the industry uses special corrugated flanges made of soft polymer; they can withstand temperatures up to 270ºC.
We suggest you read: How to properly install a chimney pipe in a bathhouse
The corrugation in them is made in the form of a cone. You only need to cut it in the right place so that the hole on the soft flange is slightly less than the diameter of the pipe;
Fastening the lower flange ring.
- Next, lubricate the flange with soap and pull it tightly on top of the pipe. The base of the flange is made of flexible metal, usually aluminum or copper. You will need to tap this metal ring with a rubber hammer so that it takes the shape of the roof;
- At the final stage, lubricate the joint with sealant and screw the curved flange to the roof with self-tapping screws.
Step-by-step technique for installing a soft flange on the roof.
Sometimes the pipes from the boiler and fireplace are discharged in one place, then the exit is arranged in a package, and this package is immediately decorated. The rectangular outer frame for such a package is most often made of wood. In this case, the wood is impregnated with fire retardants, although no one forbids assembling it from metal profiles.
The inside of the frame is sheathed with basalt thermal insulation. And for external cladding there are several options, I will talk about them a little later.
The passage through the roof of a brick pipe and a rectangular frame with a package of pipes is carried out in almost the same way. But it’s a little more difficult to seal a brick chimney, so I’ll tell you about it.
Wooden chimney lining box.
It is better to seal the brick pipe before installing the roofing. If such a coating is already in place, then this sector will have to be opened, otherwise a high-quality finish will not work.
To prevent water from leaking, you will need to install 2 aprons. The lower apron is considered the main one and is mounted under the roofing material on the sheathing. The top apron is installed on top of the roofing and is more responsible for the decor.
We start naturally with the lower apron. In most cases, it is made from galvanized sheet with a thickness of 0.5 - 0.7 mm. The entire structure consists of 4 sectors, corresponding to the number of planes of the pipe.
The lower part of the apron is placed on the roof sheathing; the width of this sector is about 300 mm. Then the sheet bends and rises along the pipe, here the width is 150 - 200 mm.
Assembling the lower apron from segments.
This is sufficient for wooden and metal frames. When it comes to brick pipes, the upper edge of the apron is bent towards the pipe at 90º by about another 10 mm.
- First, all parts of the apron are applied to the installation site and a line is marked along the perimeter of the pipe;
The edge of the lower apron, inserted into a groove on a brick chimney.
- Then, along this line, a groove with a depth of about 10 - 15 mm is cut with a grinder. This groove is immediately cleaned and washed with water;
- Now we fill the groove with heat-resistant sealant and immediately, before it hardens, install all 4 parts of the apron in their place. In this case, the upper bend on the apron goes into the groove filled with sealant;
- Ideally, all sectors of the apron should be soldered. But in practice, craftsmen usually join the planes overlapping, coat the joints with sealant and screw them to the base with self-tapping screws and press washers;
- There is one more important point: below the pipe along the roof slope, you will need to install a so-called tie - a wide galvanized sheet that is placed under the lower apron and lowered to the edge of the roof or into the nearest valley. The sheet is taken 50 cm wider than the pipe on each side; this is a kind of insurance in case of a roof leak near the pipe.
Sealing of the soft top apron.
Next, the roofing covering is installed and the outer apron is mounted on top of it. Nowadays such aprons are made from corrugated lead or aluminum sheet.
This corrugation is screwed to the pipe trim using self-tapping screws and press washers. And it bends around the roof using a rubber hammer. Sometimes flashings are made from rigid galvanized sheet, but they are more difficult to seal.
As I already said, the chimney sandwich pipe does not require any finishing. There you will only need to install a protective top deflector.
Finishing the chimney with corrugated sheets.
- The cheapest and easiest way is to sheathe a wooden frame with a package of pipes with corrugated sheets. Such sheets are simply simply attached to self-tapping screws with a press washer. Special fittings are produced for arranging the corners and top edge. Owners who have chosen metal tiles for their roofing often finish their chimneys with it, so the technology here is the same as when finishing with corrugated sheets;
- If there is a desire to plaster the frame under the chimney, then this frame is sheathed on top with asbestos-cement slabs and they are already plastered;
- I've even seen pipes lined with fiber cement siding. It looks beautiful, but fiber cement siding is heavy and needs an appropriate frame for it. Therefore, it is better to entrust such finishing to a professional.
Colored decorative plaster on the chimney.
Lining a brick pipe with a corrugated sheet is even easier than a frame structure. You will need to attach several wooden blocks or metal profiles to it and screw the cladding on. By the way, it is advisable to lay basalt wool slabs between the lathing strips; outdoor temperature changes are especially harmful to structures.
In addition to facing with corrugated sheets, old brick pipes that have lost their appearance can be finished in two more ways: clinker tiles and plaster. In both cases the technology is approximately similar.
Fastening insulation to a brick pipe.
Naturally, the surface will first need to be cleaned and primed. Since we are dealing with constant temperature changes, the pipe will need to be reinforced. In this case, it is better to choose galvanized metal mesh for reinforcement. We fasten the mesh with anchors or heat-resistant dowels.
For the rough layer, I mix a cement-sand mortar, only it is better to take expanded clay rather than ordinary sand. Expanded clay inclusions will act as insulation.
Chimney reinforcement with galvanized mesh.
You will need to try to level the rough layer well, and then think about what you can do best. You can lay tiles or apply a layer of finishing plaster. By the way, instead of clinker tiles, the chimney can be lined with natural stone, the technology is the same, only without plastic crosses.
Finishing the chimney with roofing.
Steel case
Steel is also a fire-resistant material. It cannot be left untreated, as it will instantly rust in a bathhouse. When finishing the space around the stove with steel, you need to keep in mind that unlike brick, tiles and stone, steel does not insulate heat at all.
A protective portal around the stove made only of steel will be completely pointless, since it will not be able to fulfill its main task - to protect wooden walls from overheating. In order for this function to be fulfilled, it is necessary to provide a good heat-insulating layer of another material, and then cover it with a facing steel sheet.
This heat-insulating separation layer is created from mineralite. Other fire retardant insulation materials can also be used. Simple mineral wool is not suitable, since after getting wet once it shrinks in volume, and this defect cannot be corrected by anything.
The insulation near the stove should not get wet. You need to take care of its waterproofing. Moreover, this waterproofing should only be on the side of the cold wall, but not on the side of the stove.
Steel has a metallic luster. This effect can be used to greatly increase the efficiency of the portal.
If made from uncoated polished stainless steel, it will act as an infrared reflector.
A similar element can very often be seen in electric fireplaces, heating stoves and any other heating devices.
The main difficulty of this solution is the need to use only stainless steel. Compared to ordinary steel, it costs 10 times more, but the total thickness of the sheets for the reflective screen can be small.
Stainless steel perfectly withstands any humidity. It can even be placed in rooms such as a steam room in a bathhouse; the decoration around the stove will be compact and with a modern design. In a steam room, all interior elements are usually made only from wood. Stainless steel would be appropriate next to a metal stove-stove.
We design a steam room by combining various materials
In modern baths, when designing a steam room, combining different types of finishes is becoming increasingly popular. Experiments on combining different finishing materials are not only possible, but also give original results. Designers combine ceramic tiles of different sizes, textures and colors with wood panels. An unusual result is obtained using decorative types of natural stone.
They combine different types of wood, which allows you to add zest to the interior of the bathhouse. The decoration in the steam room turns out very beautiful. Stones combine perfectly with wood, increasing sound insulation.
Original panels made of Himalayan salt with LED lighting are popular. Salt stone combines harmoniously with natural wood. The atmosphere of such a steam room promotes complete relaxation.
You can lay out the walls of the steam room under the shelves with tiles. Finishes that are not high from the floor begin to deteriorate quickly and will require replacement after a while, but tiles eliminate this nuisance. The walls are covered with paired wooden clapboards on top of it.
Fire protection system in the partition
To achieve maximum heating efficiency in a bathhouse, it is advisable to place the stove in a partition. In this case, it will heat the partition, and not the outer wall or corner, which is much more rational and profitable, since firewood or gas will be well saved.
The partition in the bathhouse near the stove should be well protected. All the same methods are suitable for this as for the usual placement of the furnace. You can use all the techniques described above (brick, tile, metal) both for the outer wall and for the partition.
A brick partition in a bathhouse near the stove will be the most convenient option. It should be noted that brick partitions are often found in wooden bathhouses. Basically, they are made there for design reasons because of the beautiful facing bricks, but the option with a stove is much more functional.
The result is a highly efficient bathhouse for heating; the partition-stove in it is located in the center of the building and does not lose heat. In this case, the portal around the furnace is made lighter. For its construction, it is appropriate to use the same brick as for the rest of the partition. In this case, you will not need to purchase additional materials. If the design requires it, you can use any other option.
If you decide to leave everything as is
If you do not want to plaster the structure, the brickwork must be made decorative. But in this case, laying decorative plaster with your own hands is unlikely to work. The best option would be facing bricks .
For the outer walls of the structure, brick with a flat and smooth surface is used. In this case, the masonry is done very carefully, and the seams are unstitched.
Decorative jointing is done between rows of bricks with a special concave tool using ordinary mortar. The edges of the bricks that face the front parts of the stove can be edged by cutting diagonally. The edged corners serve as an additional decorative element and add attractiveness to the structure.
If the jointing is colored, choose bricks of a uniform shade. When constructing the front surfaces of the oven, leave the seams unfilled to a depth of 1 cm.
The completed masonry is wiped with a damp cloth and sanded with a piece of brick. During this work, all protrusions, chips and potholes should be smoothed out.
Mix white cement with asbestos flour, dilute with water and rub into the seams with a rubber-gloved hand. The aesthetics of decorative masonry depends on the uniformity and straightness of the seams, so embroider them using the rule.
Advice! The jointing can be done in different colors by adding pigments to the solution.