1910
The surface for many finished floors must be level. Therefore, the question of regulating the basis for them is relevant. Thanks to the adjustable joist systems and the plywood laid on them, a good base is prepared. This method of preparing a flat surface is convenient and simple, which allows you to make an adjustable wooden floor with your own hands.
Adjustable joists have many advantages
Pros of adjustable floors
There are several types of “adjustable flooring” depending on the purpose of the room, the quality of the base and the design height of the floor. To solve the problems of raising the floor level to the required height and placing various communications under it, a floor structure on adjustable DNT joists is used, which provides not only the required levelness of the floor for laying any types of coverings, including wooden floor coverings that require minimal differences in the base, such as parquet , parquet board or laminate (no more than 2 mm per 2 linear meters), but also allows you to make a floor frame if wooden beams are used as an interfloor floor.
Adjustable floors DNT
This design raises the floor to a height of 5 to 20 cm or more, depending on the height of the polymer bolts and the cross-section of the logs, and also allows it to be fixed to a concrete, wooden or any other base.
To solve the problems of leveling the floor base without loss of height, an adjustable floor design using adjustable DNT slabs is used. Its use allows you to prepare a base for parquet, laminate or parquet boards with a difference of no more than 2 mm per 2 linear meters. At the same time, the floor will rise to a height of 2 to 5 cm, which does not exceed the thickness of a conventional screed.
All these designs of adjustable DNT floors allow you to install in the shortest possible time (there are no wet and dusty processes associated with concrete) a flat and reliable floor that has increased sound and heat insulation of the room, the cost of which is no more expensive than traditional types of leveling (concrete screed, semi-dry screed or Knauff floors), and with a floor height of more than 5 cm, it allows you to significantly save on preparing the base for the finishing coating.
Fastener Selection: Adjustable Floor Anchor
Adjustable floors can be built on metal studs or a special brass anchor can be used.
This method is especially suitable for those on a limited budget, because bolts can make work more convenient and simpler, but they are quite expensive.
Adjustable floor anchors may vary in diameter and length
Drive-in anchors and studs are more affordable and work well for installing an adjustable floor. For one adjustment link you will need an anchor - a collet, a metal pin, as well as two large nuts and washers.
The diameter of the studs must be at least 8 mm:
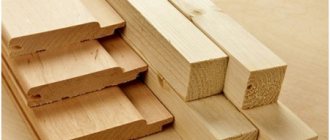
- In this case, timber measuring 45x45 mm is used for the logs. It must be well dried and pre-treated with an antiseptic.
- The beams of the required size are placed so that the gap at the walls is at least 5 cm, the intervals between them should be up to 40 cm.
- Marks are made on the beams for placing the studs - the first is located 10 cm from the end of the log.
- After the holes for the studs and nuts are made, the fasteners are installed. A recess is also drilled in the floor for mounting the anchor. This is done through a block and there is no need to mark the floor.
- The anchors are inserted into the holes and the stud is screwed on. For reliability, two nuts are screwed onto the stud. This way it can rotate freely. The anchor is also secured with a nut.
- After this, nuts, washers and the block itself are put on the studs.
Related article: How to use regular and wicker baskets in the interior (66 photos)
Alignment adjustments begin with the outer studs.
Pros and cons of "adjustable floor"
The disadvantages of an adjustable floor may appear if the requirements for proper installation of the floor are not met, which also applies to other methods of leveling the subfloor.
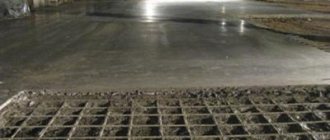
If installed correctly and all material quality requirements are met, the “DNT adjustable floor” is a reliable and durable base for any finishing coating on which you can not only walk, but also drive a car.
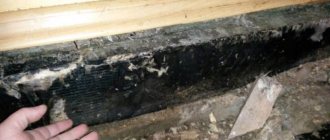
If you do not follow the DNT adjustable floor assembly technology, entrusting it to “woe to the specialists”, or use a regular plastic dowel and nail to attach polymer adjustable bolts to a concrete base, the adjustable floor will look like this:
DNT adjustable floor installation technology
Features of adjustable floors
Pros of adjustable floors
- You can install an adjustable floor yourself without the help of a professional. To do this, it is enough to purchase the necessary materials and stock up on simple tools.
- Installing the floor takes very little time: 1-2 days. For comparison, a concrete floor screed must dry for several weeks.
- An adjustable floor allows you to hide communications in the technological space, which means you can save space and remove all visual defects under the base of the floor.
- Using an adjustable floor, you can significantly increase the sound insulation of a room, which is why this type of flooring is often used in concert halls, studios and residential buildings.
- The adjustable floor is quite light in weight. Therefore, you can install it in rooms with weak ceilings - in private houses or on loggias.
- When installing an adjustable floor, virtually no dirty work is carried out. Accordingly, this coating option is ideal for rooms where it is important to maintain cleanliness.
- The adjustable floor can withstand loads of up to 2.5 tons per square meter. This means that this coating can be used for almost any type of premises (residential buildings, offices, shops, warehouses).
Advantages and disadvantages of adjustable floor installation technology
Development of construction of adjustable floor joists
We invite you to familiarize yourself with the technology of installing an adjustable floor on joists with plastic bushings. To install plastic bushings, adhere to the following rules:
- When drilling the first hole, step back 100 mm from the end part;
- The remains of 10 cm from each edge are divided identically for fixing fasteners;
- Do not forget to leave the ventilation and compensation gap between the wall and the slab;
- Set the logs in relation to the previously determined step of their fixation;
- The logs that are in rows are installed so that no matter what part of the plywood rests on the surface of the beam.
Among the advantages of introducing this method of laying lags, we note:
- Creating a hot and comfortable atmosphere in the room;
- Greater floor strength and resistance to mechanical action;
- Long service life and ease of maintenance of wood structures;
- Environmental Safety;
- Ease of installation work;
- Affordable price.
To ensure that the floor made of adjustable joists lasts as long as possible, before installation, all wooden structures are treated with disinfectant compounds and other protective impregnations.
Boards are often used as floor covering material. At the same time, the most ergonomic ones are tongue-and-groove floorboards. They are distinguished by the presence of tongue-and-groove joints, which form a solid and strong coating.
During the installation process, you will need the following tools:
- Hammer;
- Electronic drill and screwdriver;
- Ax and hammer;
- Level;
- Electronic jigsaw.
The materials you will need are logs, floorboards, heat insulation, special materials for the substrate, and fasteners.
At the preliminary step of installing a wooden floor with adjustable joists, the base is prepared for work. First, the old base is cleaned of dust and debris. When laying the floor, there is no need to smooth the base; this process is carried out by adjustable joists. If there are large potholes on the concrete base, fill them with putty.
Later, cut the logs to a certain size. A jigsaw is used for these purposes. The size of the floor lag is 5x5 or 6x4 cm. First, the old covering is covered with a layer of roofing material, which will ensure reliable waterproofing of the floor.
Later, the floor is marked and the locations for fixing the joists are determined. The clearance of the log installation is determined by the following factors:
- The thickness of the heat insulator installed on the floor;
- The thickness of the floor boards themselves.
The best clearance for installing joists on the floor is half a meter. To fix the logs, use anchors for adjustable floors on the logs.
We invite you to read the detailed instructions on installing an adjustable floor on joists:
1. On the block, mark the places for fixing the fasteners. Later, use a feather drill to create holes for the support bushings. They are fixed to the surface with screws. Adjusting the floor height is done by tightening the last bolts.
2. The log on which there are bushings is installed in the intended place. By means of internal points, places for fixing the lags are marked.
3. To make a hole, use a hammer drill. The depth of the hole should not be more than 5 cm. Install the joist and secure it with bolt fasteners.
4. Install dowel and nails along the last sections of the log using a chipper. The final driving is done after leveling the floor. Ordinary dowel nails are installed after all the joists are installed and leveled.
5. Use a hex screwdriver to adjust the placement and height of the lag. To do this, install it in the last two bolts. To control the action, use the level.
6. Upon completion of determining the perfect position of the lag, fix the last dowel-nails and install all other fasteners.
7. If there are parts that protrude above the floor surface, use a chisel to remove them.
So, each element of the floor covering is installed. Then, plywood or floorboard is installed on the joists. The gap between the plywood fasteners creates a maximum of fifteen cm. This method of installing joists makes it possible to purchase a reliable and technologically advanced coating for future work on the installation of the final finish.
Using adjustable floors
Adjustable floors are suitable for any type of room
Despite all the advantages of adjustable floors, many owners still think about the advisability of installing this type of covering. So, in what cases is it best to use an adjustable floor?
- If the floor surface is difficult or almost impossible to level (there are strong differences or unevenness).
- If it is impossible to use heavy materials to level the floor according to technical specifications.
- If you need to make a floor with different height levels.
- If there is a need to hide communications under the floor.
- If you want to create additional insulation from noise or cold.
Specifications
How to Make Adjustable Plywood Floors
Plywood is a board pressed from several layers of wood material - veneer, rather than their wood shavings. Therefore, it is quite durable, despite its low weight. Plywood floors are environmentally friendly, easy to use and easy to carry out work. This material can be used to make both rough and finished floors.
Adjustable plywood floors can be installed even on uneven surfaces
Installing an adjustable plywood floor has its advantages:
- Cost-effective investment and speed of the process;
- High thermal insulation qualities;
- If a moisture-resistant material is selected, resistance to humidity;
- Low abrasion, long service life.
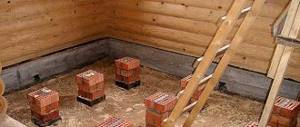
When the ground has significant flaws, it makes sense to build a deck on legs using wooden beams.
First, the base is prepared, debris and dirt are removed. The surface is lined with any waterproofing material - film or rolled roofing felt. Logs made of wooden beams are installed taking into account the zero level - its line must run in exact accordance with the surface of the log.
The timber is laid against opposite walls - the position is controlled using planks and then checked with a level. Threads are stretched between the lags, playing the role of beacons, intermediate beams are laid at intervals of 40 mm.
Plywood panels are adjusted and placed on supports. For fastening, a bolt or self-tapping screw can be used with its complete immersion in the material.
It should be borne in mind that to lay the entire system you will need a plywood sheet 2 cm thick. At the end, the surface is polished.
Types of adjustable floors
Types of adjustable floors
Before we move on to a detailed description of the installation process of an adjustable floor, let's understand its key features. Today there are two types of adjustable floors on the market - floors on joists and adjustable floors on slabs . The main difference between these types of floors is the minimum lift height.
When installing a floor on joists, the rise is 5-20 centimeters or more. For an adjustable floor on slabs, the minimum lift height can be from 3 centimeters.
The process of installing adjustable floors on joists or on slabs is almost identical, but we will still describe the installation of each type in detail so that you can do it yourself at home.
Installation of adjustable floor joists - construction technologies
To adjust the floor, plastic support bolts are used, which have external threads and dowel-nails. Plastic bolts are installed either in the slabs or inside the logs themselves.
After installation of the dry screed is completed, the bolts and smoothing structural parts are fixed to the floor. To do this, a dowel and nails are installed inside the bolt. Adjustable floors differ from regular floors in that they have a special screw-shaped system that allows you to quickly adjust the height of the floor. In addition, screw-shaped mechanisms function as guides for the dowel-nail. Dowel-nails have different sizes, the choice of which is determined by the power of the smoothing structures and the floor area. To hammer in dowel nails, a hammer is used.
Dowel nails are installed in this case if the floor is installed on a cement base. To fix a floor on a wood floor, it is enough to use zinc-coated screws.
Lightweight adjustable floor bolts contain a metal rod and external thread. Their lower part contains elements for fixation on the surface of the base floor. The upper part of the fastener is distinguished by the presence of parts that regulate the fixation of the floor. Another option is to use iron U-shaped parts. They are fixed to the floor using self-tapping screws, but installation work under such conditions takes quite a long time and requires additional physical effort to carry out.
Sleeve-type support bolts are installed either on the surface of the joists or on the slabs. Based on this, it is customary to distinguish two technologies for installing an adjustable floor. The choice of one or another option is determined by the planned height of the preliminary floors:
- If the floor rises by more than 50 mm, then the introduction of standard joists is sufficient;
- If the amount of floor elevation is less, then the introduction of smoothing slabs is sufficient.
In any case, a flat surface on the floor is created using special control supports. But the differences lie in the length of the support bolts. In addition, the holes for the screws are located according to different patterns in the first and second cases.
When choosing adjustable floor joist supports, pay attention to the height of the covering. In this case, take into account the height of the existing floor, add to it the communication systems that will be located in the underground space. Later, decide on the option of arranging a system of adjustable logs.
Draw up a project for the room, write down its total dimensions on a certain scale. With the help of such easy drawings it is possible to quickly calculate the amount of material for arranging the floor. Please note that there should be a ventilation gap of 10 mm around the perimeter of the room. Place the slabs, factory supplied, in the appropriate order on the drawing. Mark each slab with its number, determine the steps for drilling holes for fasteners, and to determine them, take into account the material for final finishing of the floor.
To form a perfect dry-type screed for laying tiles or linoleum, the clearance between the fasteners must be at least three hundred mm. Half a meter creates a large gap for fixing fasteners. Please note that increasing this value leads to a loose fit of the slabs to the floor, so after some time a squeak may occur.
If, after installation of the adjustable joists, a plank floor will be formed, then plywood will not be installed on the leveled floorboards. Under these conditions, the board is fixed to the timber.
Technology for installing adjustable floors on joists
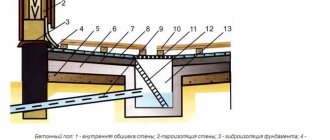
Adjustable floor installation diagram
Floor arrangement diagram
Logs are planed timber. Its dimensions, as a rule, do not exceed 50x50 centimeters. So, before we begin installing the floor on the joists, we will decide on the materials and tools that we will need.
Adjustable floor with insulation
Video - Adjustable logs on homemade racks
Tools
To install the floor yourself, you will need: logs, wear-resistant bolts, a drill, a laser or water level, a hammer, and dowel-nails.
Accessories for assembling an adjustable floor
Plastic stand bolts for adjustable floor installation
You will need similar drills for drilling holes in joists.
Now we will look at step-by-step steps that will help you quickly and efficiently install an adjustable floor on joists.
Complete set of consumables for 4 square meters of floor
Preparatory stage of work
- Clean the floor surface. If necessary, we lay communications that will later be hidden under the adjustable floor.
- We manually screw the polymer bolts into the wooden joists. If the joists have threaded holes, screw the bolts into them. If there are no holes, we make them ourselves. For a log 2 meters long you need to make about 5 holes. You can drill holes using a drill with an extended tip. The holes should be slightly smaller than the diameter of the bolt. This is necessary for the rigidity of the adjustment.
- After manually screwing in, tighten the bolts using a drill with a special attachment.
Floor installation diagram on joists
Video - Adjustable logs preparatory process
Installation phase
- We lay the wooden joists evenly on the base of the floor. The distance between the joists depends on the choice of floor covering. If you plan to cover the floor with linoleum or lay tiles, the distance between the joists should be small. Experts recommend taking a step between lags of no more than 30 centimeters. It is advisable to leave a distance from the joist to the wall of at least 1 centimeter. This will create the necessary ventilation.
- After laying out the joists, we move on to rigidly attaching the bolts to the base. To do this, take a rigid drill and drill a hole in the concrete through the bolt. The depth of the hole should be about 40 millimeters. Next, we insert a dowel-nail into the prepared hole.
- We hammer in the dowel-nail with a hammer, securing the polymer bolt to the base of the floor. Try to drive the nails as firmly as possible so that the entire floor structure does not move in the future. Also, good fastening will avoid squeaks and noise when using the floor.
Log installation process
Log installation process
Floor height is adjustable, protruding bolt heads are removable
Alignment
After the wooden logs are installed around the entire perimeter of the room and tightly bolted, we proceed to leveling. To do this, we need a water (or laser) level and a special tool (key) for adjusting the height.
- We carefully measure the level data. The height difference can be no more than 1-2 millimeters.
- Using a special wrench, raise or lower the bolts, focusing on the level. We try to achieve perfect alignment, since the quality of installation of the final floor covering depends on this.
The final stage of work
Fastening plywood to joists
The process of laying plywood on adjustable joists
- After leveling the joists, firmly secure the nails to the floor using a hammer.
- We cut off the unnecessary remains of the post bolts using a knife or any other cutting device.
- If necessary, we lay materials between the joists for soundproofing or thermal insulation of the room.
- We place the flooring on the upper base of the joists. The choice of decking materials depends on what type of flooring you plan to use. Most often, plywood is used as flooring. It is suitable for further installation of laminite or linoleum. GVL or DSP is also used as flooring.
This is what the adjustable floor looks like from below
Technological vent
Adjustable floor ready for finishing material - After installing the flooring, we lay tiles, linoleum, laminate, parquet or any other covering on the adjustable floor.
Mistakes when installing an adjustable floor
Types of control systems
Adjustable logs are mounted using various fasteners, which we will discuss in more detail.
Device illustration
Plastic bolts
Adjustable plastic supports for joists are sold complete with fasteners. It contains plastic bolts and fasteners. Assembling joist structures using these adjusting fasteners is surprisingly simple:
A set of plastic bolts will allow you to make an adjustable structure quickly and easily
- Holes are made in the joists for installing adjusting screws in half-meter increments.
- Bolt threads are cut into these holes.
- Bolts are screwed into the prepared threaded holes.
- The logs are installed with a distance of 50-60 cm from each other.
- The holes on the joists must correspond to the holes on the concrete base, onto which special fasteners are installed.
- Rotation of the polymer bolt adjusts the joists and levels the base. After obtaining a flat surface, excess parts of the bolts are removed with a chisel.
Attention! Using plastic bolts is beneficial because iron ones are cut with a grinder - this takes a lot of time and effort.
The plastic support allows them to be installed both with joists and under plywood floors, which are laid directly on concrete without the use of wooden joists. Fasteners are mounted into plywood and onto the surface of the base in the same way.
Holes are made on the plywood in 50 cm increments into which the flanges are secured.
A threaded flange regulates the height of the slabs.
Using plastic bolts is convenient, but not all hardware stores can find such fasteners, so anchors are used.
Adjustment with anchors
If wedge anchors are used to change the height of the base under the logs, then it contains a couple more washers and nuts. In such logs with a cross-section of 50x50 mm, holes are made for fasteners with a distance of 50 cm.
Washers are inserted into the anchors inserted into the prepared holes and nuts are screwed on.
Regulating anchor
The holes made on the bars must have a secret niche with a diameter of 20 mm and a depth of 10 mm, into which fasteners are driven so that they do not touch the flooring over the subfloor joists made of plywood.
After this, the logs are placed on the anchors so that the prepared nuts with a washer on the log are on the side of the concrete base. Rotating the nut will allow you to adjust the height of the joist. The upper fastening nut is designed to secure the lag.
After installation is completed, excess parts of the anchors are cut off. To do this, use a grinder or a hacksaw.
In a similar way, anchors are used to adjust the plywood base without the use of joists. The technology has some differences. For example, support nuts are embedded at the required level before laying the plywood sheets.
Adjustment with studs
Installation of an adjustable floor on studs is similar to installation of anchor adjustment systems. A stud is added to the anchor set. A pin is used with a diameter of 8 mm. The remaining fasteners (anchor, nuts and washers) are selected to match the size of the stud.
Holes are drilled in the base and anchors are installed in them. A pin is screwed into the anchor. A nut is installed on the stud and a washer is put on it. The upper nut serves as a clamp for the beam. As in other cases, excess pins are trimmed.
Adjustable floor with stiletto heels
The use of the stud is made difficult by the use of anchors. Installing anchors takes the most time because it is the most difficult part of the job. Due to the hollow structure of the floor slab, the sleeve may fall into it. Therefore, it is advised not to push it too far into the floor slab. In addition, the reinforced floor slab system can also become problematic areas for anchor installation.
Adjustment by corners
The use of corner fasteners is possible. They are fixed to the concrete base with dowels. Corners are selected as necessary to raise the floor above the concrete base, but with a cross-section of at least 50x50 mm. It is more profitable to use corners if the anchor system holds less well due to a weak base.
Corner floors
Fasteners are installed along the line with an interval of half a meter. A block with a previously checked and set level is fixed into the installed corners. At least a couple of people are needed for installation.
To give strength, similar corners are installed on the other side of the wooden blocks.
Algorithm for creating a floor on slabs
The second type of flooring is done on slabs. It is chosen if the height of the floor should not exceed 3 centimeters. It is difficult to hide communications in such a space between the base of the floor and the covering, but it is quite possible to place cables from the telephone or the Internet here.
The process of installing this type of floor is somewhat reminiscent of installing an adjustable floor on joists.
Algorithm for creating a floor on slabs
Materials and tools
Before installing an adjustable floor on slabs, you need to prepare the following tools and materials: sheets of plywood or other material, bushings, stand-up bolts, drill, self-tapping screws, hammer, water or laser level.
| Type of plywood | Description |
| Plywood FC | moisture-resistant appearance; urea resin is used for gluing veneer sheets. This plywood is intended for indoor use. |
| FKM plywood | has increased water resistance and is made on the basis of melamine resins. This type of plywood is unique, since environmentally friendly melamine resins are used for its production. Due to its environmental characteristics, plywood is used in furniture production and for interior finishing work. |
| Plywood FSF | Veneer sheets are glued together using phenolic resin. This type of plywood also has increased water resistance. It is not recommended for interior decoration, as phenolic resins are harmful to health. Typically used for exterior finishing work |
| Laminated plywood | It is based on FSF plywood, which is covered on both sides with a special film. Laminated plywood is used for the manufacture of formwork. This type can be used repeatedly |
| Bakelized plywood | Bakelite resin is used to glue veneer sheets together. This type of plywood is used in aggressive climates, sea water, aggressive environments, and sometimes for monolithic work. |
| Marine plywood | similar to bakelized, but less durable. Made from foreign wood species |
| Plywood Flexible | foreign version. A distinctive feature is the ability to bend well in the transverse and longitudinal directions |
Video - Which plywood is better
Preparatory stage of work
- Just like when installing an adjustable floor on joists, installing a floor on slabs requires certain preparation of the working surface of the floor. Be sure to remove excess debris and correctly distribute communications that you plan to hide under the floor. Remember that the maximum lift height will be about 3 centimeters.
- Carefully place the sheets around the perimeter of the room. The distance between the sheets should be 2-3 centimeters on each side of the sheet.
- Mark the points for drilling holes. With a sheet size of 1.5 by 1.5 meters, 9 holes will be enough. One hole should be located in the middle (center of the sheet), four holes can be at the corners of the sheet and four more should be located in the central part of each side of the sheet. This arrangement of holes will ensure reliable fastening of the sheet.
Instructions for installing an adjustable floor on slabs
Installation of sheets
Fastening plywood
- After we have marked the holes, we begin drilling. We take a drill with a special attachment with an extended tip.
- We insert stand-up bolts into the drilled holes. We attach the bushings to the underside of the bolts using small self-tapping screws.
- Once the bolts are inserted and secured into each hole on the sheet, we turn the sheet over and place it on the subfloor.
- We drill holes in the concrete base through the post bolts and insert dowel nails into these holes.
- Hammer the nails exactly halfway.
Installation process
Adjustment
- After preparing and installing the sheets, we proceed to their alignment and adjustment. To make adjustments, we use a special key, as well as a water or laser level.
- After carefully adjusting the height of the sheets, we carefully cut off the extra centimeters of the post bolts.
- Using a hammer, drive the dowel nails all the way to the base of the floor.
Instructions for installing an adjustable floor on slabs
DIY adjustable floors
First and second layers of plywood flooring
First and second layers of plywood flooring
Final stage
- If necessary, we place thermal insulation or sound insulation of the floor on top of the sheets.
- After installing the sheets, we also lay out laminite, tiles, parquet, linoleum or any other selected floor covering.
Secrets to successfully installing an adjustable floor
Adjustable plywood and joists
After completing installation work, be sure to thoroughly clean the floor surface before installing the flooring. Excess debris, sawdust, and pieces of plastic can create squeaking and noise after laying the top layer of the floor.
Carefully hammer and tighten all floor fastenings. The reliability of the entire structure depends on this.
If you are making a high floor, it is advisable to place soundproofing material between the joists. This will avoid unnecessary noise when using the floor. Don't skimp on the quality of materials. It is more profitable to immediately choose more expensive materials for installing the floor, instead of completely redoing the entire job after a short time.
If, after installing the floor, you need to move communications, you can simply remove several strips of the adjustable floor in the right place. After completing the necessary work, you can easily put the floor back in its original place.
We hope that our tips, as well as step-by-step instructions, will help you install an adjustable floor in your home, cottage or office yourself, quickly and without any difficulty.
Why doesn't it make sense to reinforce a wooden floor with anchors?
The creaking can be caused precisely by poor-quality fastening of the boards, so why not use anchors to correct the situation?
Firstly , anchors are not recommended for use in systems made of too soft material. If the load is too strong, the anchor can not only pull out, but also lead to damage to the entire structure. Installation in such cases is very difficult, and sometimes even impossible. It is also strictly forbidden to use such strengthening systems in hollow red brick.
Secondly , anchors are quite expensive; for the money spent on them, you can find many alternatives that will not only be cheaper, but also more practical in the case of wood.
Anchors are a good way to strengthen a structure, but not when it comes to wood floors or hollow red bricks. This is expensive and impractical, and such “strengthening” will last very little. It is better to use cheaper and easily implemented alternatives.