A level base of the floor is the key to ensuring that the finishing coating lays beautifully and will last for many years (this is especially true for materials such as laminate or tile). Cement-sand floor screed is an opportunity to create not only a smooth and even, but also a durable base. However, the work of filling it is not as simple as it seems at first glance. Let's figure out how to create such a screed yourself.
Cement-sand screed
Cement-sand screed
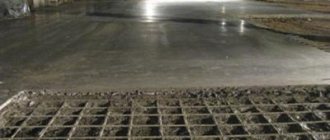
A screed made from a mortar made from sand and cement is an almost perfectly flat base that is suitable for laying absolutely any floor covering, be it tile, laminate, linoleum or parquet. It is with the help of such a screed that most often they level rough foundations - concrete floors in houses, brick floors, and even simply create a foundation lying on ordinary soil. On average, the thickness of a cement-sand screed varies from 3 to 8 cm. It can be larger, but due to the large weight of the mortar used for pouring, when calculating the thickness of the screed, it is necessary to take into account the strength of the floors.
Cement-sand floor screed
Concrete floors are leveled using cement-sand screed
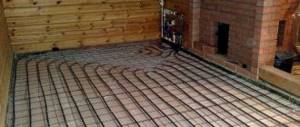
The main tasks of the screed are not only to level the surface, but also to the fact that it will redistribute the loads experienced by the floor, create a solid foundation, make it possible to equip heat and waterproof layers, and even in itself is an excellent option for heat and waterproofing. Inside this structure, you can lay various types of communications, equip a heated floor system, etc.
Reinforced screed on the ground
On a note! Certain types of screeds, called self-leveling floors, will help bring to life the most daring design solutions. Such floors can be of different colors or have a very interesting pattern. Special compositions make it possible to create real 3D paintings on the floor.
3D self-leveling floor in the bathroom
Video about installing a screed over a “warm floor”
Installing a screed from a cement and sand solution is not a very simple job. In addition to diligence, it will require considerable time and physical effort. Even having thoroughly understood the technological aspects, few will take on a task that is difficult in all respects. However, knowledge of how to correctly make a strong cement screed is needed not only by independent craftsmen, but also by owners who have entrusted the leveling to a team of builders. For control, technical information is required no less than for DIY installation.
Benefits and Features
Cement-sand screed has many advantages. This applies to its physical and physico-chemical parameters.
Cement-sand floor screed
Advantages of sand-cement screed.
- Evenness . Thanks to this method of leveling the floor, you can create an almost perfectly level base.
- Durability . Such a screed can easily serve for decades - on average, the service life is about 50 years.
- Durability . The screed does not deform under the pressure of heavy furniture; it is one of the most durable types of bases for a finished floor.
- Possibility to hide communications. Inside the screed you can lay water or sewer pipes, a heated floor system, or electrical wires. There they will not disturb anyone and cannot be damaged. If it is necessary to repair communications laid inside the screed, the cement-sand layer will have to be partially or completely dismantled.
Warm floor scheme
- High sound insulation rate . The screed does not conduct sounds well, which means noise from neighbors below will not disturb the residents. Various soundproofing materials can also be laid under the screed.
- Possibility of thermal insulation equipment . The cement layer itself retains heat well, but the use of additional materials when installing the screed will provide reliable protection from the cold from the outside, and will also not release heat from the inside of the room to the outside.
- Low shrinkage rates . Despite the fact that during the drying process the sand-cement screed “shrinks” somewhat, it still has low shrinkage rates compared to other materials. And if installed correctly, it will not crack.
- Low cost of work . Compared to other methods of floor leveling, screeding is not expensive at all.
Leveling screed over insulation
But, like any other method of leveling the floor, cement-sand screed has its drawbacks, which you should be aware of before installing this type of base. The disadvantages of cement-sand screed are given below.
- Considerable mass . Cement screed exerts significant pressure on the floors, and therefore its use may be limited by this factor. For example, 1 m2 of cement-sand screed, laid in a layer of 1 cm, weighs about 20 kg.
- Long drying time . Before you can safely move on the screed and carry out further finishing of the floor, it is necessary to dry it well. The drying time is long - about a month.
- It is difficult to achieve a smooth surface by hand . Fortunately, if this was not possible, but evenness is necessary, you can pour a self-leveling mixture on top of the screed.
- Difficult installation . Pouring screed is a very complex process, which is often carried out with the help of strangers. The work, of course, can be done independently, but it is important to follow all the steps and key points when pouring the screed. Otherwise it will crack.
Cracks in the screed
In any case, a properly poured screed is an excellent base option for any type of finishing coating. In addition, after drying during use, it is easy to clean, even if not covered with finishing, and is also not afraid of water.
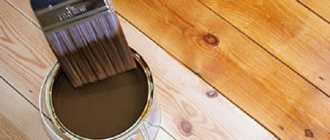
Primer work
As a rule, a cement-sand mortar screed can be laid on bases primed with ready-made compounds for concrete bases. If the package says that the primer can dry out, then you can use double priming of the base surface under the screed. To apply the primer solution, it is better to use brushes, this makes it easier to cover all surface irregularities.
If the production packaging indicates that the primer solution should be applied immediately before screeding, then the work should be carried out precisely according to this principle. In this case, you should not re-prime the surface of the slabs.
Types of cement screeds
There are a large number of ways to make such a screed. However, we can distinguish the main ones - tied and untied screeds and floating.
Types of floor screed
bonded screed method is used if the permissible leveling layer can be up to 4 cm thick. The base becomes one with the floor and walls. This type of screed requires careful preliminary preparation of the rough foundation - all large holes, cracks, cracks in the floors are sealed, all significant irregularities are removed as much as possible. If there are small bumps or pits on the surface of the ceiling, they do not need to be sealed. Builders even recommend artificially roughening freshly laid floors by walking over them with a metal brush - this way, the adhesion of the mortar to the surface will be better.
The solution for pouring the screed should have the consistency of sour cream or cake cream. It turns out quite liquid and about 20 minutes after pouring it will begin to gradually harden. Therefore, you need to have time to fill and arrange the screed during this time.
The solution for pouring the screed should have the consistency of sour cream
Attention! Large rooms are usually filled in stages, since one person cannot quickly level such an amount of mixture.
You can carefully walk around the room the next day, but the drying time for such a screed is long - up to 40 days. It is important to properly dry such a base - the water cannot quickly evaporate from the layer, it must come out gradually, so it is recommended to moisten the fresh screed with water and cover it with film.
There is an untied screed , which, on the contrary, is mounted on a perfectly smooth surface. In this case, the base should not have water-absorbing properties, so as not to draw moisture out of the screed. The thickness of such a layer can reach 5 cm. The main difference from the previous type is that a primer is not used before pouring such a screed. Also, no methods are used that can increase the adhesion strength of the solution and the rough base.
Floor screed - mortar and grout
Also often installed is a so-called floating screed . It is usually used if its thickness should be 5-7 cm. The design of such a layer is different in that it does not even directly come into contact with the rough base - on the contrary, layers of hydro- and thermal insulation are laid between the solution and it, various materials that simply will not give the solution will adhere to the ceiling.
Attention! It is this type of screed that is most often strengthened using reinforcing mesh. Fiber fiber can also be added to the solution to increase its strength, reduce the risk of cracks and reduce the risk of shrinkage.
Fiber fiber for floor screed
Fiber fiber mixture
Due to its large thickness, such a screed could have the maximum weight, but it is poured using the so-called semi-dry technology. That is, the solution is mixed using a small amount of water and resembles the structure of wet sand.
Prices for fiberglass for screeds
fiberglass for screed
Semi-dry screed over heated floor
Rules for cutting damper seams
Approximately 48-72 hours after installing the cement screed, regardless of the degree of moisture of the initial mixture, damper joints must be cut. Peculiar grooves in the monolithic slab will prevent the appearance of cracks during linear expansion.
Note. Damper joints are cut if the screed area is equal to or greater than 30 m². It is also recommended to form seams between rooms if the alignment was carried out in several rooms.
To create a damper grid, you will need to “divide” the slab into unique rectangles with a minimum area of 10 m². According to the rules, the seams must be tied to the connecting lines between the floor slabs, to the border of the reinforcing mesh, if one was used. The approximate width of the damper “groove” is 3 mm, the depth is 1/3 of the thickness of the leveling layer. After cutting, a cord is laid into the grooves, and then the remaining cavity is filled with sealant. The location of the seams must be taken into account during further installation of the coating.
Proportions of cement and sand
Depending on which screed option is chosen, the composition of the mixture for its manufacture is also determined. The proportions of the two main components are selected depending on what brand of cement will be used and what quality of sand. To install a screed in an apartment, it is enough to use M200 cement. The finished base will be able to withstand a significant load - about 200 kg/cm³. You can take 1 part of M500 cement and mix it with 3 parts of sand. And you will need as much water as is necessary for the solution to achieve the required consistency. This is approximately 1 liter per 1 kg of cement.
Attention! There is no need to add a lot of water, as this will make the solution of less quality.
Screed mortar
It is very important to choose the right sand to create the solution. It should not contain (or at least contain) various inclusions - silt, clay, etc. These components negatively affect the strength characteristics of the finished screed. It is best to use washed river sand. Quarry sand is also suitable, but its quality is somewhat worse than river sand due to the angular shape of the sand grains.
Table. Mixture compositions according to GOST when using M400 cement, wt. h.
| Brand of solution | Cement | Water | Sand |
| 150 | 1 | 0,55 | 3 |
| 200 | 1 | 0,48 | 2,8 |
| 300 | 1 | 0,4 | 2,4 |
Calculator for calculating the amount of ingredients of a mortar for floor screed
Go to calculations
Thickness and calculation of floor screed
The thickness and process of laying cement-sand screed are regulated by regulatory documents (SNiP and GOST). According to them, the minimum thickness of the mortar layer can be 3 cm; at lower values, the screed will simply crack due to the high tension inside the material that will appear when drying. And the maximum thickness of the screed, according to the documents, is only 7 cm, although in some cases it may be more.
Floor screed
Expert opinion
Afanasyev E.V.
Chief editor of the pol-exp.com project Engineer.
It is easy to calculate the solution consumption per 1 m². To do this, you need to take into account that on average 1 m³ of cement and sand solution has a mass of about 2 tons. The composition includes 1350 kg of sand and 450 kg of cement. Thus, we find that for 1 m² of screed layer 1 cm thick, you will need 20 kg of mixture, which contains 13.5 kg of sand and 4.5 kg of cement. Knowing the thickness of the screed and the dimensions of the room, calculating the amount of mortar is very simple.
Installation of beacons
Installing the beacons in accordance with the measurements made allows you to subsequently fill the room with the solution quickly and without unnecessary hesitation.
On the floor, every 30 centimeters, “chopiki” or cement (alabaster) posts are installed of such a height to which a specific section of the future floor needs to be raised. Then lighthouse slats are laid and secured onto the “chopiks”.
Lighthouses
The highest point of the lath is the height to which the cement mortar level should reach. Experienced builders often do without beacons, setting the level with thread or fishing line. However, for those who are making a screed for the first time, we strongly recommend installing beacon strips - it is not quick, but it is clear and convenient. With a lath, you can be sure that there will be no significant differences on the surface, and there will be no overuse of solution during pouring. In addition, the rail allows you to accurately calculate the amount of solution.
Dry mixes
You can prepare the solution yourself, or you can buy a ready-made mixture. The building materials market is rich in such offers. They are simple to use - just like when creating a regular solution, water is added to the dry ready-made mixture - all the necessary components are already mixed in the required proportions, often with the addition of plasticizers. These substances can reduce water consumption without losing the quality of the solution.
Dry mixes for screed
Attention! Any solution must be mixed using a construction mixer.
Execution Sequence
Typically, a cement-sand mortar screed is performed in the following sequence:
- Layout of the required base thickness using surveying tools.
- Preparatory work (for the base of the floor).
- Primer work.
- Fastening elements for beating the floor level.
- Installation of damper tape.
- Preparation of cement-sand mixture.
- Pouring the mixture.
- Maintenance of the finished base.
Next, we will consider each of the stages in more detail.
TOP 3 best manufacturers of dry mixes for screed
| Photo | Name | Rating | Price | |
| #1 | Perfecta | ⭐ 96 / 100 | More details | |
| #2 | Bolars | ⭐ 95 / 100 | More details | |
| #3 | Rusean | ⭐ 94 / 100 | More details |
Perfecta
Recommended for preliminary leveling and installation of a durable and reliable floor, used under conditions of low and moderate loads.
Perfecta
pros
- special reinforcement of the base screed with fiberglass;
- suitable for heated floors;
- environmentally friendly;
- easy installation;
- suitable for any base;
- maximum layer 120 mm;
- high frost resistance of the material;
- solution viability 120 minutes.
Minuses
- only tiles should be laid on top (for laying other floor coverings, the surface is sanded or leveled with self-leveling floors);
- cannot be laid at low temperatures.
floor screed Perfecta
Bolars
Suitable for rooms with any level of humidity, as well as foundations subject to significant temperature fluctuations and increased operating loads. It is used for filling floors manually and by machine.
Bolars
pros
- does not shrink and leaves the layer height;
- hardens quickly;
- compatible with heated floors;
- maximum layer up to 100 mm;
- it is allowed to lay the screed directly on the ground, wood, concrete;
- Suitable for most floor coverings.
Minuses
- the cost is above average;
- viability of the finished solution is 60 minutes;
- afraid of low temperatures.
Bolars floor screed
Rusean
Rusean floor screed is a highly effective, economical material based on cement binder, coarse sand (grain size up to 5 mm) and chemical additives.
Rusean
pros
- suitable for manual mixing;
- low mobility of the dissolved mixture;
- maximum layer up to 150 mm;
- suitable for heated floors;
- The screed can withstand frost down to -35 degrees;
- packaging up to 40 kg.
Minuses
- subsequent sanding of the floor is required to cover it with finishing material;
- high consumption;
- Complete drying time (for laying floor materials) is about 10 days.
floor screed Rusean
Unbonded screed with structural elements
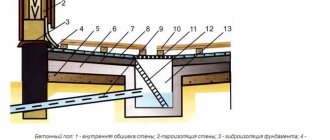
In the case of an unbound screed, the principle of preparing the base changes. In this particular case, all unevenness of the base must be leveled out. It is strictly forbidden to use a primer, since its use increases the binding properties. It will also be necessary to lay a waterproofing layer, and in order to reduce thermal conductivity, it will also be necessary to lay thermal insulation.
This screed is usually five centimeters thick. The rest of the principle completely coincides with the algorithm described above.
Laying separating material between the base and the new screed
DIY cement screed
All work on pouring this type of screed involves several stages of work. Let's look at the process in detail.
Floor screed device
Step 1. The very first - the preparatory stage - includes preparing the necessary tools and clearing the base of debris. To create a screed, you should prepare a building level, a long rule, spatulas, containers for the mixture, beacons, a construction mixer and the construction mixture itself. All necessary calculations are also made in advance, because if there is a shortage of solution, you may not have time to buy more. Because of this, all the ingredients of the mixture are purchased with a small reserve. The surface is prepared very simply - it is cleaned of debris, dust, old coating (if any), all cracks are sealed. In some cases, it is recommended to treat the surface with a primer to improve adhesion.
Preparing the base
On a note! If you plan to lay waterproofing material, the surface is not treated with a primer. The waterproofing layer is laid with an overlap of approximately 20 cm on the walls, the excess is then cut off. As an option, you can use waterproofing mastic instead of rolled materials. It is also recommended in any case to tape the perimeter of the walls with damper tape.
Step 2. Using a building level, the slope of the base is determined. This is necessary for proper installation of beacons. Using a level, markings are applied to the walls, measuring the distance from which to the level of the rough foundation, it is possible to calculate the slope of the floor. In general, knowing the height difference is necessary in order to accurately calculate the mixture consumption, because if the slope is significant, then more solution will be required. After this, beacons are installed along the level, which will then help level the screed layer, although their installation is not always necessary. When the rule is carried out around the room according to the beacons, the places where there is not enough solution are easily calculated - it is simply added there.
How to set beacons
Installation of beacons
So, the beacons are installed approximately 50-70 cm apart from each other along a long wall, but so that the distance between them is not greater than the length of the rule. The basis for them are pieces of cement mortar. Beacons must be located on the same level! After their installation, the cement bases must dry for 2 days.
Beacons must be located on the same level
On a note! After the screed has hardened, the beacons are often removed, but this procedure is not necessary if a self-leveling mixture is applied to the surface at the end of the work.
Step 3. Only after the previous procedures is the solution mixed in a concrete mixer or any other container using a construction mixer. First, all the dry ingredients are mixed, then water is gradually added to them. Do not stir the whole mixture at once! The solution is applied to the surface, starting from the far corner of the room. The rule relies on the beacons and moves along them - this is how the screed is leveled by removing excess mortar and calculating the places where it needs to be added.
Pouring cement-sand screed
Important! During work on pouring the screed, the temperature in the room should be above zero (from +5 to +30 degrees).
Step 4. In this way, the entire base is poured and leveled. The screed is ready.
Ready-made floor screed
Installation of cement-sand screed, part one
Installation of cement-sand screed, part two
Video - Filling the floor screed
Video - Leveling the floors yourself
Base thickness breakdown
The construction of a new screed begins with determining the horizon level. To do this, we use a laser or water level. By the way, it is better to purchase a laser with a beam in the form of a strip. When performing work using a laser level, we do the following:
- set the level to a level place on the floor;
- adjust its position so that the bubble in the device is in the center;
- turn on the device and make a mark at the place where the beam falls;
- carefully turn the device without disturbing the location of the bubble;
- we make similar marks on different walls in the room;
- We connect all the resulting points with a solid line and get our horizon.
When using a water level, we carry out work in this order:
- fill the bent level tube with settled water without air bubbles;
- the water level should be 10-15 cm below the edges of the device;
- to check the suitability of the device, you need to rock it, and the water level at the two ends of the tube will be at the same level;
- then on any of the walls in the room at the level of a person’s gaze, we make a mark and apply a level to it with one end 10-15 cm higher;
- another person places the other end of the level in any corner of the room at approximately the same height;
- then, moving the end of the device, you need to align the mark on the wall with the water level in the hose;
- put a mark on the wall in this place;
- We carry out similar measurements in other corners of the room;
- then we measure the distance from the marks to the floor and ceiling of the room;
- the lowest indicator will be at the highest point of the floor or ceiling;
- By connecting all the points in the corners we get our horizon.
Then, from the horizon lines obtained by any method, we carry out test measurements until the overlap. It is possible that there are unevenness on the ceiling. If it is not possible to get rid of them, then we take the lowest indicator as the control mark.
Now you need to determine the height of the future floor. To do this, you need to subtract the thickness of the floor structure (screed + coating) from the result obtained. We plot our result from the marks at eye level, connect the line and get the required level of the new floor. For the convenience of work, you can also mark the level of the screed.