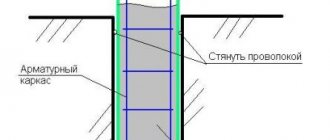
Foundation drainage is one of the key processes in the construction of a country house. If you do not know how to choose the right groundwater drainage system, you should contact specialists to arrange ring, wall or layer drainage for a strip, monolithic or columnar foundation of a private house. The list of negative consequences that will arise in case of refusal to build drainage is quite wide, but the main ones should be highlighted: ♦ Undermining or flooding of the base of the building; ♦ Dampness; ♦ The appearance of fungus; ♦ Cracking of walls and foundations of the structure. The reason for the increased humidity on the site is the characteristics of the soil and topography, an increased level of groundwater or a nearby body of water, seasonal floods - in such cases, proper drainage design significantly increases the life of the house. The foundation material absorbs moisture, which contributes to its rapid destruction. To avoid this, it is necessary to create an effective system for draining water from the house. It is best to arrange foundation drainage during the warm period of the house.
Types of drainage
As for the existing types of drainage, the following options can be distinguished: • Perfect type drainage - it is located on an aquifer and collects water from above and from the sides; • Imperfect type drainage is located above the aquifer and collects water from above, below and from the sides.
There is also a gradation according to the types of drainage from the foundation: • ring drainage; • wall-mounted; • reservoir. It is worth familiarizing yourself with each of them in more detail, so that all materials used in the work are used for their intended purpose, without inflating volumes and estimates.
Foundation ring drainage
Ring drainage will protect the basement from flooding, which is inevitable on sandy soil. Water easily passes through grains of sand, so protecting the basement in the form of a ring drainage is mandatory. You need to know the following about such drainage: ⊕
the inside of such drainage is waterproof, which does not allow water to penetrate into the basement;
⊕
ring drainage is not necessary if water enters the basement only from one side - in this case the drainage circle can be made open;
⊕
perforated pipes for collecting water are located below the basement floor level;
⊕
the distance between the ring drainage and the building is approximately 5-8 m - in this case there is no need to worry about weakening the soil.
Wall foundation drainage
Wall foundation drainage is relevant for clay and loamy soils through which water penetrates rather slowly. Features of this type of drainage: ⊗
such drainage can be arranged as a preventive measure against flooding of the basement if the source of groundwater is mixed;
⊗
the drainage system is laid outside the building at the closest possible distance from the foundation;
⊗
the drainage system is located below the level of the base of the foundation; moreover, if the basement is too deep into the ground, then the drainage system must be located below the base.
⊗
taking into account the fact that groundwater on clay soils contains a significant amount of tiny particles, to increase the service life of the system it is recommended to use drainage wells with enlarged sand traps.
Arrangement technology step by step
The process of installing foundation drainage can be divided into several stages. The first step is drawing up a project, which is best entrusted to a professional engineer. The project must contain general drawings and diagrams, a detailed description of drainage equipment, an action plan, and an estimate.
Step #1: Planning and Executing Calculations
According to the standards, drains are laid along the walls of the building at the level of the foundation base or 0.3-0.5 m below it. This prevents the accumulation of moisture in the upper layers and provokes the drainage of groundwater to the lower levels. The slope parameters are standard - 0.02 m for each meter of pipe. Suppose, taking into account the norm, the difference between the beginning and end of a 40-meter pipeline is 0.8 m (2 cm x 40). These calculations are important for trench equipment.
If the house has a simple rectangular configuration, inspection wells are installed only in 2 corners. Larger buildings with a more complex shape are equipped with 4 wells.
Throughout the entire pipeline, a slope should be maintained from the highest points towards the storage well, which is located at the lowest point of the relief in relation to the entire section. The outlet from the well is also laid with a slope - but towards the drainage ditch (ravine, reservoir)
When calculating the total length of the pipeline, do not forget that it will be located at some distance from the foundation, that is, the length of the branch along one wall will be at least 2 m greater than the length of the wall itself.
If it is not possible to provide a gravity system, it is necessary to connect pumping equipment. When choosing a drainage model, pressure (height of water rise) and performance are important. The optimal power of household models is 400-1000 W.
Step #2: Preparing materials and tools
With the advent of new building materials on the market, designing a drainage system has become much easier. Polymer pipes and fittings for them, elastic insulation, geomembrane, geotextiles - all of the listed products can be purchased at a construction supermarket. There is no need to prepare, as before, special solutions for waterproofing the foundation or look around for clay with special technical characteristics.
So, to make a trench you will need the following tools:
- level;
- perforator;
- shovel;
- bucket;
- pick or crowbar;
- wheelbarrow;
- tamper for compacting the backfill.
The main tool is working hands; the more of them, the faster the process of digging and backfilling will go.
If necessary, you can rent a mini-excavator and a truck for removing soil. Equipment is usually necessary for digging a deep pit, but for drainage of a country house, ditches can be dug manually
To install a pipeline, you need polymer pipes (HDPE, polyvinyl chloride, polypropylene), as well as couplings and elbows made of similar material. Exterior sealant wouldn't hurt either. If the pipe laying area is not below the freezing level, as recommended by SNiP, but at a shallow depth, artificial insulation may be required to prevent the occurrence of ice and ice plugs.
The filter layer is constructed using geotextiles and crushed stone (gravel) backfill with a fraction of 0.3-0.4 cm; coarse sand will also be needed. For waterproofing, you can use traditional bitumen mastics or a profiled membrane, but it is better to use a combined method of protecting the foundation.
Step #3: Selecting Drain Pipes
We will focus separately on the choice of drainage pipes, because they are the main parts of the drainage system.
According to the recommendations of SNiP, ceramics, asbestos cement and plastic can be used, but recently the first two options are practically not used. They are heavier than their polymer counterparts and have a more fragile structure. Plastic pipes (drains) are distinguished by their low weight, which is welcome during transportation and installation, as well as their high strength and wear resistance.
Materials for the production of pipes are PP, HDPE and PVC. Plastic drains do not deform under soil pressure, tolerate the aggressive composition of groundwater, and have a long service life (up to 40-50 years).
Along with polymer pipes, fittings made of the same material are also used: couplings, adapters, tees. A set of shaped elements should be purchased together with drains
The main difference between drains and conventional pipes is the cuts, which are located on the sides during installation. To protect the holes from clogging with pieces of soil and silt, an effective filter is used - geotextiles. There are smooth and corrugated types, the latter are more elastic and at the same time rigid.
The choice of type, cross-section and method of installation of drains depends on the type of soil and volume of water. For example, if the building construction site is dominated by crushed stone soil, there is no need to take additional measures to create a filter - just dig a trench and install a pipeline.
An economical and practical option for drains is pipes with a geotextile layer. Factory filter winding reduces installation time and increases drainage efficiency
For pipes located in clayey soils, crushed stone bedding with a thickness of 0.20-0.25 m is required, and in loams additional protection against siltation is required in the form of geotextile wrapping. Structures placed in sandy soil require maximum attention: both crushed stone and geotextiles are needed.
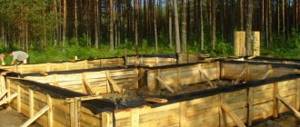
Step #4: Construction of trenches - excavation
Having prepared the material, you can begin marking the place for laying drains. To make it easier to determine the scope of work, pegs are placed along the contour of the trenches and string is pulled between them. Excavation is the most labor-intensive part of drainage installation.
When digging trenches, it is necessary to ensure that the bottom slopes slightly towards the storage tank. For accuracy, a level and poles are used, with the help of which it is easy to determine the height difference. To more accurately comply with slope standards, sand is usually used, which is part of the filter. By the way, when using factory-made drains equipped with a geotextile layer, you won’t need another “cushion” - a sandy one will suffice.
After excavation work, a large amount of soil will remain. Part of it is useful for backfilling; the rest of the soil can be used to decorate a garden plot, lawns, vegetable garden or flower garden
Having built a trench along the foundation, it is necessary to dig a pit for a storage well and another ditch to drain water beyond the fence (if all the water is not planned to be used for irrigation or technical needs).
Step #5: Waterproofing the foundation with membrane and bitumen
Waterproofing of concrete foundation parts is necessary in any case: even if there is no utility room or storage for canned vegetables inside the basement. A dense layer of protective material will increase the strength of concrete structures and protect them from regular erosion by groundwater if the drainage system cannot cope with their volume.
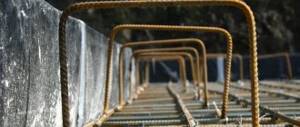
To treat foundation walls, bitumen mastic is traditionally used - to increase its water-repellent qualities, it is applied in several layers. At the joints of concrete structures, additional fiberglass reinforcement can be made. The thickness of the bitumen layer depends on the laying depth: up to 3 m, a 2 mm bitumen layer is sufficient, more than 3 m - up to 4 mm.
When the bitumen dries, a PPM, a roll-type profiled polymer membrane, is fixed across the entire width of the foundation.
PPM is a dense waterproof polyethylene film with a corrugated surface. Protrusions with a height of 8 mm to 20 mm increase the strength of the material and allow water to roll down freely
More expensive types of PPM are initially equipped with a layer of geotextile. There are also three-layer products, additionally reinforced with polyethylene film. The roll is rolled out along the length of the foundation, trying to leave as few joints as possible.
Layout of drains and waterproofing. The membrane is mounted with its spikes facing outward, towards the ground. If there is no factory layer of geotextile, it is fixed separately, on the side of the protrusions
The principle of operation of membrane protection is simple: water seeps through geotextiles, collides with waterproof polyester material and rolls down to the drainage pipes.
Step #6: Laying the Perimeter Pipeline
Let's assume that the required slope of the trench bottom (2 cm/1 m) is taken into account at the excavation stage. The generally accepted method of laying pipes looks like this:
- Pour a layer of sand (0.15-0.20) m onto the bottom.
- Rolled geotextiles are spread along the entire length of the trench, the edges of the fabric are secured in the upper part of the trenches.
- A thick layer (also at least 0.15 m) of clean crushed stone is poured onto the canvas. After each event, check the slope.
- Pipes with a diameter of 0.11-0.20 m are laid with holes to the sides, short fragments are connected with couplings.
- If the pipes do not have a protective layer, they are wrapped in geotextile and secured with polymer twine.
- At turns, in places of differences and connections of drains, inspection wells are installed. It is possible to use wide-section pipes equipped with covers (they will be required in the future for flushing the pipeline).
- The drains are covered with a layer of clean crushed stone (0.15-0.20 m).
- The free edges of the geotextile are laid with an overlap on top, and for fixation they are covered with a heavy layer of clean river sand (in some cases, up to the level of the ground surface).
At the very end, when all the pipes are laid and technical wells are installed, backfilling is carried out - part of the soil is returned to its place, lightly compacting it.
The patency of the slots or holes in the drainage pipes is an important condition for the operation of the system. Make sure the holes are smaller than pieces of crushed stone or gravel, otherwise the filter media will clog the perforations
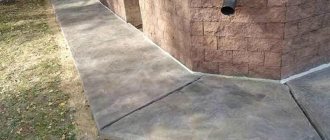
When installing pipes, do not forget about the concrete blind area - a necessary protective element that is laid along the wall of the house. The width of the blind area is from 0.5 m to 1.0 m.
Step #7: Installing a drainage (collector) storage tank
The simplest scheme is considered to be one in which the main line is taken outside without the equipment of a drainage well. However, its presence is still necessary if:
- drainage water removed is necessary for irrigating crops or plantings;
- the additional storage device is a backup storage facility for process water;
- There is no possibility of discharging water beyond the boundaries of the site.
In the latter case, they often equip not a storage tank, but a filter well, which, instead of a bottom, is equipped with a powerful filter made of gravel and sand backfill.
For the construction of a tank, bricks and concrete rings are used, but due to progress in the production of special equipment, ready-made factory containers made of polymer material are increasingly being installed.
If it is not possible to arrange water drainage by gravity, the well is equipped with a drainage pump. It is installed under water, at some distance from the bottom surface (submersible) or next to the well (surface)
A durable plastic barrel is mounted on a leveled bottom and covered with soil. There is a hatch in the upper part through which it is easy to access water and equipment.
Reservoir foundation drainage
Reservoir drainage is most often combined with ring or wall drainage. It is worth knowing the following about such a drainage system: • such drainage is chosen regardless of the type of soil in the presence of a large amount of groundwater, it may also be needed as a preventive measure for flooding on clay or loamy soils; • reservoir drainage is located through the entire foundation of the building and interacts with the outer walls or ring drainage. • drainage pipes located in the water-bearing horizon collect only excess groundwater, thus maintaining the natural level of soil moisture throughout the entire area. • if there is local, pronounced soil moisture in the area, which can be seen by the more saturated color of plants, or their generic composition, the arrangement of reservoir drainage is vital.
Valuable tips and tricks
If you follow the rules listed below, there will be much fewer problems with the functioning of the drainage system.
- Drainage pipes are installed along the lower border of the foundation base. The permissible step up/down is from 0.3 m to 0.5 m. If you lower the drains lower, groundwater and rainwater will systematically wash away the soil from under the foundation, which can lead to subsidence of the building.
- If it is not possible to protect the foundation with a geomembrane, you will have to build a clay castle.
- The level of accumulation of drainage water (drain zone) must be below the level of the finished floor in the basement or cellar.
- Backfilling with river sand is more effective than backfilling with “native” soil.
Considering the dynamic movement of groundwater, be sure to secure geotextiles when installing the pipeline. It should cover the filter “roll” tightly, without gaps.
A properly equipped drainage system lasts 20-30 years, so after installation is complete, you can begin choosing a method for landscaping the local area. One of the popular options is a flower garden
To more effectively remove excess moisture, along with wall drainage, a drainage system and a storm drain are installed - underground or external.
How to arrange a classic drainage system
The drainage system must be understood as a closed system of special perforated pipes. It is located below the lowest point of the building, and its constituent pipes (drains) are laid at a slight slope so that water naturally flows down into a special tank. Such a tank is also called a drainage well - this device allows you to gain access to the drainage and, if necessary, assess its condition and even clean the system using special equipment. Groundwater entering the pipes flows into a well, from which the water can be drained outside the site using a gravity system or a forced one using a pump. Drainage of water from the building allows you to avoid the appearance of moisture in the basement, however, it is not always possible to achieve the expected result 100%; at least, waterproofing the foundation should be an additional element of drainage.
Building regulations
Before you begin installing drainage for the foundation of a house, you should take into account the construction and technical conditions:
- work is carried out in the summer, in the absence of heavy rains;
- when doing the work yourself, you should build a canopy from boards or polyethylene to protect the dug trenches from crumbling and moisture getting into them;
- to protect the walls of the trenches from crumbling, the structure is reinforced with special gratings;
- to protect trees, shrubs, and flower beds, the surrounding area is equipped with wooden blind areas;
- excavation of the foundation of an existing structure is carried out to draw up an accurate drainage scheme; at the same time, its dimensions, shape, and depth are determined;
- calculation of the laying depth of the pipeline system and the location of drainage wells.
Installation of foundation wall drainage
This type of drainage system is the most budget-friendly, since the cost of materials for its arrangement is low. At the same time, wall foundation drainage allows for control over the groundwater level - if the building stands on a shallow or normally buried foundation, then you can choose the wall option. In general, the drainage design looks like this: √ drains are laid in trenches dug around the building; √ the drainage well is placed in the lowest place near the house; √ connect trenches into a single system; √ pipes are brought into the well. Step-by-step instructions for arranging wall foundation drainage with your own hands are as follows:
Layout
Drainage system around the house
By and large, it is not difficult to carry out wall drainage; the main thing is to carry out all the work step by step, in the following order:
- When creating a sand cushion, it is necessary to carefully measure the differences in height in different places, using a level (a geodetic instrument that measures the difference in heights at different elevations). Markers or milestones are installed at the marked places. Where the depth is less than necessary, add sand; where it is greater, cut off the soil. This will create a uniform slope along which the pipes can be laid so that water flows through them evenly, without the use of a pump.
- It is necessary to spread a geotextile fabric on top of the sand layer, and then pour the washed gravel onto it. When the gravel is scattered, a depression is made in it, in which drainage will be laid. During installation, it is necessary to ensure that the slope is the same along the entire length of the trenches.
- Perforated polyvinyl chloride pipes must be laid on the gravel. The holes in them should be of a size that will prevent small particles of gravel from forming a blockage.
- Upon completion of all connections, we check the overall slope as a whole. This can be done by pulling the cord. For every couple of meters, the slope should increase by 2 cm. That is, after 2 m the drainage outlet will drop by 2 cm, after 4 m - by 4 cm, and so on.
- We use tees at the corners to make corner joints, and bring up a vertical pipe that will have a tightly closing lid. Thanks to such outlets installed at each corner, the system will be easy to flush from trapped debris or sludge.
- Pipes laid in trenches are wrapped with geotextile, and the wrapping must be without gaps. Also, no gravel or sand should get into it. To prevent the geotextile from unwinding, it is tied with nylon thread.
- After the winding, it is backfilled with clean gravel, a layer about 17 cm thick. The resulting gravel cushion must be covered with the same geotextile to prevent soil from getting into the holes.
- Coarse river sand is poured on top of the gravel, which will make it possible to additionally filter wastewater.
- The outlet of the sewer pipe leaving the house must be insulated. For this, you can use foam plastic with a thickness of at least 20 cm.
Actually, this is the last stage in the construction of wall foundation drainage. In the photo at the end of the article you can see what certain stages of arranging such protection look like. The finished system can be used for several decades if it is looked after and serviced in a timely manner.
Materials for arranging foundation drainage
In order for the drainage system to be effective and function for a long time without failures, it is necessary to use high-quality materials. The arrangement of drainage for the foundation of a house must comply with building codes, which allow the use of pipes made of the following materials: ♦ ceramics; ♦ plastic; ♦ asbestos cement. Plastic pipes, which are used in 98% of cases, have optimal technical and economic characteristics. They are superior to building materials made from ceramics and asbestos cement in a whole list of indicators, among which are: ⊕ Low cost. ⊕ Wide range on the construction market. ⊕ Easy installation. ⊕ Reliability and durability. In addition to pipes, for installing a drainage system you will need all kinds of fittings, tees and couplings - these connecting elements allow you to combine drains into a single system. High-quality drainage allows you to protect a building from moisture penetration, regardless of its origin, be it groundwater, melt water or precipitation. Therefore, we recommend that you contact specialists who will help you arrange turnkey foundation drainage on your suburban area, starting with geodetic work and ending with a ready-to-use groundwater drainage system.
What to consider when designing drainage
Design work, which includes the development of a scheme and calculation of site drainage, is carried out taking into account the condition of the soil and climatic conditions in the area.
Each soil has a certain percentage of moisture content, the value of which depends on the throughput of the upper layers of the soil and the depth of the aquifers. In this regard, three categories are distinguished:
- Dry. Due to the good water permeability of the upper soil layers, stable surface runoff is ensured. Groundwater is at a sufficient depth and does not have much effect on the level of humidity.
- Raw. The upper layers have low permeability, so water slowly leaves the surface. At the same time, groundwater does not moisten the upper layer of soil. Such soils have signs of surface waterlogging, which are especially evident in the spring and autumn periods.
- Wet. Taking into account the low permeability of the soil and the close location of the aquifer, water in such an area can remain on the surface for more than 20 days. Wet places include peat and gleyed soils, as well as salt marshes.
Peat area
Another indicator for correctly calculating the drainage of a site is the source of water supply. That is, the designer needs to find out how the soil is saturated with water.
- Atmospheric nutrition - showers and melt water. It is a source of waterlogging in areas with a low slope, where clayey rock predominates.
- Soil nutrition is the capillary rise of moisture from the lower soil layers.
- Ground-pressure recharge is the influx of pressurized water from the nearest aquifer.
- Heaving nutrition is the thawing in spring of ice crystals that accumulated in the ground during frosts.
Heaving soil is especially dangerous for construction sites