Properly designing and building a bathhouse is only half the battle. It is very important to pay special attention to choosing a stove that should be powerful enough, compact and safe. The range of sauna stoves is huge, and in order to purchase a truly high-quality model, you need to know about all its advantages and disadvantages, as well as characteristics and functions.
There are three main types of sauna stoves: wood-burning, electric and gas. Next, we will look at the most popular models that have managed to win consumer recognition.
How to choose a stove for a bath
What kind of stove to build in a bathhouse?
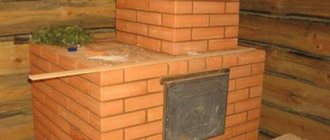
A sauna stove can have different dimensions, selected primarily in accordance with the area of the room served. The most common stoves are built with a base measuring 890x1020 mm (3.5x4 bricks) or 1020x1290 mm (4x5 bricks) and a height excluding the chimney of 168 cm or 210 cm, respectively. The second option is better suited for steam rooms with increased ceiling height.
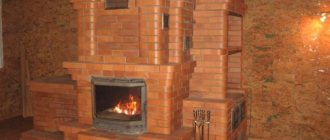
The most preferable option for a brick stove for a bath is a model with a water circuit (a tank for heating water). It makes no sense to present many projects - they are almost identical, only the location of the tank for heating water changes. The most popular options are a brick stove with a bottom-mounted tank and a brick stove for a bath with a top-mounted tank.
The following images show diagrams of a brick oven with a bottom-mounted water tank.
Schemes of a brick oven with a bottom-mounted water tank
Schemes of a brick oven with a bottom placement of the water tank (order)
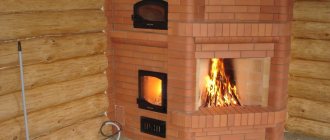
The following images clearly demonstrate the design of a brick stove for a bathhouse with the tank placed at the top.
Project of a brick stove for a bathhouse with a tank placed at the top
Project of a brick stove for a bathhouse with a tank placed at the top
What to look for when choosing a stove?
We have already figured out the pros and cons of the best models of gas, wood and electric stoves, and also looked at how exactly these three types differ. However, when choosing such equipment, you need to look at several criteria at once - this will allow you to choose a truly ideal model for you.
The first criterion is power . This is the main criterion. It is clear that the greater the power, the faster and better the steam room will warm up. However, here it is necessary to take into account the area of the room, otherwise the device simply will not work correctly: if it is too powerful, the steam room will heat up quickly, but then the stove will stop heating, therefore, the stones will be cold. And if, in order to save money, a low-power stove was purchased, it will have to work hard to properly warm up the steam room. Therefore, it will break quickly.
Be sure to calculate the volume of the room by multiplying its length by width and height. Also consider any uninsulated areas, such as tiled areas or windows. If the window has a length and width of 60 cm, you need to multiply 0.6x0.6, and the resulting number by 1.2. The result will be 0.432, and this number must be added to the total volume of the room. And if suddenly the door to the steam room is made of glass, the total volume is multiplied by 1.5.
Note! So, for example, after all the calculations you get that the stove should heat a room with a volume of 9.5 m3. Then a stove capable of heating a steam room of 6-9 m3 will clearly not be enough - it is better to buy a device “with a reserve”, i.e. heating a steam room for 12 m3. But the devices for a large steam room, 20 meters there, will be too much.
The main criterion that needs to be taken into account when choosing a stove is its power, which is important to calculate taking into account the volume of the room.
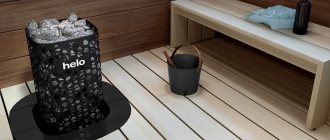
The second criterion is the capacity of the heater . Everything is simple here: the more it holds, the better. A lot of stones will produce a lot of steam, and that's exactly what we need. Of course, for small steam rooms, 25-40 kg of stones will be enough, but for larger ones, 70-80 kilograms are better.
The third criterion is the type of heater . Closed ones can heat the stones even up to 500 degrees, and this will create a really “light steam”, while open ones usually create a temperature of 250-300 degrees, and the steam is more humid. In addition, stoves with open heaters heat up much faster.
The fourth criterion is how long the stove will operate without additional fuel . If it is enough to “fill” it once and then forget about it for a long time, without interrupting the procedures, this is an ideal option.
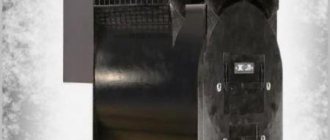
The fifth criterion is the body material . Typically, you can most often find stoves made of steel - it is quite durable and heats up quickly. A rarer option is cast iron, although it is also very good. It’s difficult to determine a favorite here: both types “work” perfectly. Of course, there are also brick stoves, but you can’t buy them - you can only pay for the services of a stove maker who will build a brick stove in your steam room.
The type of heater and its capacity, the material of the body are also important.
These parameters are decisive when choosing high-quality stoves for a bath. If this is important to you, you can also take into account the weight and size of the stove, location in the room - this will allow you to find the most suitable place for such equipment in the steam room.
Making the project safe: basic principles
Before you begin to study further information on arranging a sauna stove, you need to consider and remember the key safety provisions, violation of which can lead to extremely adverse consequences.
Traditionally, the oven is built near the wall opposite to the shelves in the steam room. The stove design must be created in such a way that a minimum distance of 30-40 centimeters is maintained between the heating parts of the finished unit and everything that supports combustion. If special protection is installed, for example, made of asbestos cardboard, this figure can be reduced to 15-20 cm.
Using a heat insulator in the construction of a furnace - an example
Using a heat insulator in the construction of a furnace - an example
Asbestos cardboard
Basalt cardboard
Prices for asbestos cardboard
asbestos cardboard
A gap must be maintained between the smoke exhaust pipe and the floor/roof elements that come into contact with it, which is subsequently filled with fireproof material. Asbestos is most often used for protection. From above, the mentioned gap with insulation is closed with a steel shaped plate.
Diagram of the chimney passage through the roof
Chimney
For additional protection, the area of the floor in front of the stove firebox is covered with a metal sheet about 10 mm thick. It will protect the flooring material from fire if coals fall out of the firebox.
Pre-furnace sheet (brass)
Pre-furnace steel sheet
The standard option for placing a stove in the bath space is shown in the following image. Here you can also see the order of organizing the water circuit, which can be taken as a basis if the supply of warm water will be provided by the stove unit, as well as the features of connecting and removing the chimney.
Standard option for placing a stove in a sauna space
What to build a stove from?
The kit for self-construction of a brick sauna stove includes the following items:
- brick;
- clay for preparing masonry mortar (sand will also be needed);
- container for preparing the solution;
- tools for marking (pencil, rope, square, tape measure, etc.) and masonry (trowel, pick, mallet, etc.);
- materials for insulation (roofing felt, asbestos);
- elements for the manufacture of a water tank and a smoke exhaust pipe (if you plan to assemble them yourself, but it is much more profitable in terms of time and labor costs to purchase ready-made units).
The issue of choosing bricks for masonry deserves special attention. The strength of this material, first of all, should be higher than that of ordinary white or red brick. The ideal option is fireclay bricks with the highest fire-resistant properties.
Red kiln brick
Fireclay brick
In terms of key performance characteristics, bricks based on fireclay clay are noticeably superior to their closest “brothers,” but are much more expensive. In view of this, in order to keep the final costs of constructing a sauna stove within reasonable limits, fireclay bricks are used for laying areas exposed to the most intense heating.
Prices for fireclay bricks
fireclay brick
Fireproof fireclay brick
In places that heat up to more modest levels, it is advisable to use solid red brick, designed to perform the work in question.
For example, external walls, smoke vents, various decorative elements, etc. can be made from such bricks.
Facing a red stove with red brick
Important! Solid ceramic bricks can be distinguished by their markings in the form of the letter “M” and accompanying numbers indicating the value of the maximum load per 1 cm2. For laying a brick oven, you should use a material of at least M-150 grade.
You can distinguish real high-quality stove bricks by 3 key features.
- Sound . When going for building materials, take a small pick or hammer with you. Take a brick and hit it lightly with a hammer/pick, holding the building product suspended with your other hand. A hammer/pick will bounce off a high-quality brick, and the sound will be loud and clear. If your tool hits the product being tested, producing a dull sound, you should refrain from purchasing such a brick - there are most likely cracks inside it, the presence of which will lead to very rapid destruction of the masonry.
- Appearance. Firstly, the size of the brick must comply with approved standards (250x120x65 mm). A deviation of up to 2 mm is considered acceptable. Secondly, the brick should not have significant damage or other defects. The presence of minor grooves and thread-like cracks is considered acceptable. Thirdly, you should not buy products with a film that resembles mica - its presence indicates a defect resulting from a violation of the provisions of the manufacturing technology. This film simply will not allow you to achieve the required quality of adhesion to the solution.
- Internal state. Spare no expense to buy one brick for the test. Your task: split the product into 2 parts using a hammer. Carefully inspect the surface of the chip - there should be no third-party inclusions, and the color should not have sharp changes and generally be even. The presence of a darker color in the middle indicates a defect caused by burnt bricks. It is prohibited to use such material for the construction of sauna stoves and any other more or less serious buildings.
Scheme for checking the quality of bricks by splitting them
Video - Choosing bricks for laying a stove
What mortar should I use for masonry?
The laying of brick sauna stoves is traditionally done using clay mortar. It is best if the type of clay used as the basis for the brick used is used for its preparation, i.e. red or fireclay. In this case, the brick and masonry will give the same thermal expansion during the heating process, which will ensure the longest possible life of the finished building.
Helpful advice! It has been established that the thinner the masonry joint is made, the higher the resulting quality of the stove. However, this issue also needs to be approached wisely: ideal masonry is obtained with a joint thickness of 0.5 cm. Reducing the value below the mentioned indicator will contribute to a noticeable reduction in the service life of the stove.
In addition to clay, sand is included in the solution. It must first be sifted so that the solution ends up with material containing grains of sand no larger than 1-1.5 mm in size. The millimeter value is the most preferred. It is also important that the sand does not have silt inclusions and is of a uniform color. For sifting, use sieves of appropriate fractions.
Separate requirements apply to water, which is also used in the process of preparing masonry mortar. First of all, it must be clean, contain the minimum possible amount of mineral inclusions, and not have a musty smell. Laying 100 bricks takes about 15-20 liters of water.
Kneading oven clay
Before preparing the solution, the clay must be placed in any suitable container (for example, a large basin), crushed and filled with clean water in such an amount that the result is the most homogeneous mass, not too thick and not very liquid. Mix the solution thoroughly, dissolving any lumps that have formed. Leave the mixture of clay and water for a day, then strain and rub the resulting lumps through a sieve.
Sand is added to the prepared solution last. On average, a liter jar of sand is added to a bucket of water, but this moment must be carefully controlled, because the amount of river sand in the solution directly affects the fat content of the latter. In addition, the required amount of sand may vary depending on the initial fat content of the clay. If the masonry mixture is too greasy, the stove may simply collapse during operation. A thin (non-greasy) mortar will not allow achieving the desired quality of adhesion of bricks, as a result of which the scenario already discussed will be repeated.
There are several simple ways to determine the fat content of clay in artisanal conditions.
Clay mortar quality
Take 500 g of clay and mix it with water. It is best to knead by hand until you obtain a mixture that has a uniform consistency and does not stick to your hands.
Important! For laying a sauna stove, you can only use a solution of medium fat content.
Roll the previously prepared mixture into a ball the size of a small apple. Place the molded product on any flat, hard surface and gently press it with a board. Press down slowly enough to fix the formation of cracks.
If the clay ball disintegrates without cracking, the clay is non-greasy. The appearance of a crack half the size of the diameter indicates that the fat content of the clay is too high. In the case of a solution of normal fat content, the crack will take approximately 0.2 the diameter of the clay ball.
Scheme for determining the readiness of a clay solution
Preparing oven mortar - tips
Video - Preparation of mortar for laying a stove
Features of the design of sauna stoves with a water tank
These stoves are used to maintain heat in the steam room during bath procedures. They consist of:
- The heater is the part of the stove that retains the heat from the heating stones. They are heated by burning wood from the firebox.
- The firebox is the part of the furnace in which fuel is burned and heat energy is released. It contains a grate, which is placed in different positions depending on the type of fuel. To fire wood, it is placed at the level of the sealed door.
- The grate is most often made of cast iron, as it is a reliable, durable alloy.
- Ash pit is the area located under the firebox. It accumulates ash, which is then cleaned out by hand.
- A passage tunnel with a door is installed to allow the bath to be heated in the dressing room in the adjacent room.
- A heat exchanger is a device that allows heat to be transferred to water from the firebox.
- The chimney is a pipe that comes out of the firebox and carries smoke from combustion to the street.
Furnaces are made of stainless steel, ferrous metals, and brick.
Sequence of construction of a sauna stove
Regardless of the chosen configuration of a brick sauna stove, the procedure for its construction remains identical for all situations: from the foundation to the installation of a smoke exhaust pipe and finishing. In the following table you can find important information about each stage of the event in question.
Table. The procedure for constructing a sauna stove
| Work stage | Description |
Foundation arrangement | There are several types of foundations for sauna stoves. You are offered the most optimal and popular option. Do the following: - mark the area for the future foundation by driving pegs in the corners and along the perimeter of the foundation being built, and stretching a rope between them to make it easier to navigate. Select the dimensions of the platform in accordance with the design dimensions of the furnace base; — dig a pit about 60 cm deep. At the same time, expand the lower 10-15 cm in relation to the main part of the pit by 5-10 cm in each direction. After concreting, such a platform below will provide higher resistance of the entire structure to ground movements; - fill the lower expanded part of the pit with sand and compact it, spilling it with water for better compaction; - pour a 10-centimeter layer of crushed stone or broken brick on top of the sand and compact it as well; — mount the formwork along the contours of the pit. To assemble it, use wooden boards and screws; — place reinforcing mesh in the pit. To assemble it, it is optimal to use steel rods with a diameter of 1-1.2 cm. The rods are tied into a mesh with 15x15 cm cells. At intersections, the reinforcement is fastened with knitting wire or special modern fasteners, which is more convenient. An approximately 5-centimeter gap is maintained between the walls of the pit and the reinforcing mesh. A similar gap must be maintained between the bottom of the pit and the reinforcing mesh. The most convenient way to do this is with the help of special clamps-stands; — into the pit, pour a concrete solution prepared from 1 share of cement (from M400), 3 shares of clean sand, 4-5 shares of crushed stone and water in an amount corresponding to approximately half the mass of cement. Concrete is poured in a uniform layer to such a height that the pouring does not reach the ground surface on the site by approximately 150 mm. Be sure to level the “top” of the fill; - let the filling sit for 3-5 days (preferably 7-10) to gain strength and dismantle the formwork. Fill the resulting voids with compacted fine gravel; - cover the frozen concrete area with molten bitumen and lay a layer of roofing material on top, carefully leveling it and pressing it against the binder. Then repeat the procedure again. The resulting two-layer waterproofing will provide reliable protection of the brick kiln from ground moisture. The previously mentioned 15-centimeter gap between the upper edge of the foundation and the ground surface will be leveled using a starting continuous row of bricks. |
Preparation of mortar for masonry | Detailed recommendations for carrying out this stage were given earlier. |
Furnace laying, installation of additional elements | The laying of the sauna stove is carried out in accordance with a previously prepared order - the main component of the design of the unit in question. The step-by-step procedure for constructing a brick kiln will be discussed further in the corresponding section. The arrangement of additional elements (in this case, a chimney, since the water tank will be proposed to be built-in) depends on the characteristics of a particular project and is considered individually in each case. |
Drying the sauna stove | A fully lined oven cannot be immediately put into permanent operation: the device must be given time to dry. During the drying period, the doors and windows in the room should be open - the oven will dry faster. 4-5 days after completing the laying of the stove, you can start heating it with small wood chips for a maximum of 10-15 minutes daily. The combustion is carried out once a day. Protruding condensation indicates that the unit has not yet completely dried. |
Finishing | At the request of the owner, finishing can be done. There are quite a lot of options. The most popular are the following: - tiling (clinker, majolica, terracotta or marble). One of the most popular options. It is characterized by relatively low cost and ease of implementation; - brick cladding; - stone finishing. Porcelain tiles, granite, marble or coil tiles work well; - plastering. A truly Russian method, which is also the most elementary and budget-friendly; - tiling. A labor-intensive finishing method that allows you to obtain truly unique design compositions. |
Video - Construction of a sauna stove
And which one to choose?
Russian bath stoves have their own unique characteristics. A proper stove in a Russian bath should not cause harm to health. When burning, metal stoves emit hard infrared radiation. Cast iron ones are too heavy. Cast iron grates are more durable. The choice of a stove for a Russian bath depends on the size of the room, tasks, and financial capabilities.
- From the point of view of the optimal combination of price and quality, for a small private bath we can recommend the Harvia Classic 280 TOP. This brand has long been recognized as one of the most reliable. Harvia is also distinguished by its affordable pricing policy.
- For gourmets - connoisseurs of truly Russian traditions - “Zhikharka” by V. Vasyukhin is suitable. For business - its “Cinderella”. These models allow you to fully reproduce the atmosphere of a Russian steam room and delight you with their appearance. Thick metal ensures durability. Metal stoves emit infrared radiation, but this does not happen here; the metal is used like a thermos, which allows you to warm up the room slowly and evenly.
- "Kuban" has 2 small heaters - open and closed. This is her main advantage. There is a drawback - the small thickness of the walls. The number of stones is not enough to create the optimal steam for which the Russian bath is famous. But only an expert who uses all the advantages of a real Russian bath can feel this. The average person is unlikely to notice the difference.
- The most budget solution will be “Laguna”, which will cost approximately 16,000 rubles. An open heater for our purposes is not a very good solution. This made such models less popular. The optimal temperature of the stones is at least +5000 C. When heated, they instantly transform the water that falls on them into light steam, which is impossible for an open heater. A proper sauna stove should have a closed heater. This will help avoid many problems.
- For those who like to surprise their friends, we can offer “Hephaestus 3K” to show off. The forged cast iron firebox will become the central element in the interior.
Sauna stove project: step-by-step order
As an example, we will consider the procedure for constructing a stove equipped with a built-in water tank. The dimensions of the structure at the base are quite impressive - 1020x1290 mm (corresponding to a laying of 4x5 bricks), height - 2100 mm. If desired, the owner can change the dimensions in accordance with the conditions and characteristics of the steam room being equipped. The design image of the structure under construction is presented below.
Design image of the structure under construction
A stove with the specified design dimensions will make it possible to provide a space of up to 10-14 m2 with temperature readings of about 45-50 degrees during washing and up to 100 degrees and higher during steaming. One firebox of such a stove will be enough for up to 10-12 visitors to comfortably take a steam bath and thoroughly wash themselves. The volume of the built-in tank (visible on the right side in the diagram above) is about 180 liters.
To improve the quality of heating and place stones above the fuel chamber of the furnace, pipes in the amount of 6 pieces (visible next to the water tank) with a diameter of 50 mm are laid. The length of the pipes to be laid specifically for this project is 1050 mm. The installed pipes become very hot during the operation of the furnace and continue to transmit thermal energy for some time even after the combustion is completed.
Above the stones there is a double door. Through the opening it closes, water flows onto the laid cobblestones, resulting in the formation of steam.
Let's proceed directly to studying the design order.
Table. Arranging a brick sauna stove
| Work stage | Description |
1 row | As noted, it is made solid and does not have any significant features. The diagram for laying the bricks itself is shown in the image. |
2nd row | At this stage, the formation of the ash chamber begins (dimensions and location are shown in the image) and the corresponding door is installed (highlighted in red in the diagram). Important! The dimensions of the hole intended for installing the door must be 5 mm larger than the dimensions of the mounted frame on each side. Fastening this, as well as other doors in the oven, is done as follows: - an asbestos cord is inserted into the prepared hole and covered with masonry mortar. A cord with a diameter of 0.5 cm will be sufficient; - on 4 sides the door frame is equipped with lobes - wire, pre-twisted from 3-4 rods 10-12 cm long. 10-centimeter pieces of wire with a diameter of about 0.5 cm are attached to the ends; — the prepared structure is inserted into the hole along the masonry and fixed with mortar. The wire embedded in the masonry ensures reliable and high-quality fixation of the door. |
3rd row | The laying of the ash chamber continues. |
4 row | The base of the firebox is made of refractory brick (yellow in the diagram) and 2 grates are installed. The gratings are installed in grooves specially cut for this purpose. |
5 row | The formation of the fuel chamber itself begins. The chamber is completely lined with refractory bricks. |
6 row | The fuel chamber door is installed. |
7 row | Laying of the fuel chamber continues. |
8 row | The actions are similar to the 7th row. |
9 row | The combustion chamber door is closed. |
10 row | Quarters of refractory bricks are laid at each side wall. Openings are formed between the bricks, the dimensions of which should allow the installation of the previously mentioned pipes. At the same stage, in the places indicated in the diagram, a place is prepared for installing a water tank. |
Continuation of row 10 | On the same row, the previously mentioned pipes are laid in the spaces between the quarters of the refractory brick. The easiest way to seal holes around pipes is with basalt cardboard. |
Continuation of row 10 | Also on the 10th row, a water tank is installed. |
11 row | In this and the following images, the water tank is not shown to make the masonry features easier to see, although the tank should be present. The previously laid pipes are covered with ordinary (not fireclay) bricks. |
12 row | The furnace mass rises higher. |
13 row | Similar to the previous one. |
14 row | Similar to the previous one. |
15 row | Similar to the previous one. |
16 row | Similar to the previous one. |
17 row | Similar to the previous one. |
18 row | Similar to the previous one. |
Row 19 | Similar to the previous one. The water tank is visible in this image. The allocated space above the pipes is filled with cobblestones. |
20 row | 2 strips of steel are laid above the water tank (the placement and dimensional relationship can be assessed in the diagram) so that it can be covered with brick. |
21 row | The water tank is closed. The designated space is left free. In the future, water will flow onto the cobblestones through this opening. |
22 row | The construction of the furnace array continues, similar to the previous row. |
23 row | Similar to the previous one. |
24 row | Similar to the previous one. |
25 row | Similar to the previous one. |
26 row | The laying is carried out similarly to the previous row. The diagram is shown with a door installed for the opening through which water will flow. In general, the installation of this door had to be done earlier - when laying the row indicated by red lines. The door was not shown in the diagram so that the principle of masonry could be better understood. To cover the door, 2 steel strips are laid on top - the technique is already familiar to you from the previous stages of the work. |
27 row | The door is blocked. Preparations begin to cover the furnace. The space to be covered is quite large. To successfully cope with this stage of work, it will be necessary to lay 2 steel strips. The thickness of the strips is quite large - about 1 cm. To lay them, recesses are cut out in the bricks (marked in the diagram). It is advisable to place basalt cardboard spacers under the strips. |
Continuation of row 27 | The mentioned strips are laid with 1-2 mm gaps (marked in the diagram), thanks to which the thermal expansion of the metal will be compensated during operation of the furnace. |
28 row | The furnace is being closed. At this stage, you need to leave a hole for installing the chimney pipe (marked in the image). A seat is made on the hole for installing a smoke damper, which is also visible in the diagram. |
Continuation of row 28 | At the same stage, the smoke damper is installed. |
Row 29 | The installation of the furnace ceiling continues. |
30 row | Similar to the previous one. |
31 row | The formation of the smoke exhaust pipe begins. |
32 row | The formation of the pipe continues. Next, the masonry is carried out in a similar sequence until the pipe reaches the design height (determined individually, in accordance with the characteristics of a particular room). |
The masonry is complete. The principle of operation of such a furnace is extremely simple: when fuel burns, hot gases heat the walls of the furnace and a water boiler installed inside the structure, pass through laid pipes and a stone backfill placed on top of them, and then go into the smoke exhaust pipe.
Do-it-yourself brick stove for a bathhouse
Beautiful brick sauna stove
A brick stove in a bathhouse is one of the most correct options
Bath stove
Sauna stove
Brick stoves in the bathhouse
Types of baths
- Finnish sauna
The second name is a dry bath, with a high temperature of up to 110°, a low humidity concentration of 15%, and a long procedure time of up to 1.5 hours.
- Hot Russian bath
The steam room is heated to 85-90°, with moderate humidity from 20 to 35% and a recommended procedure time of 1 hour. The type is characterized as a wet sauna.
- Classic Russian bathhouse
The type of bath is characterized by relatively equal moisture saturation and temperature - 50-65 units. With a duration of 45-50 minutes.
- Turkish bath
The species is characterized by high vapor saturation up to 100%. It is recommended to carry out the procedure for 40 minutes at a temperature of 45°.
| Types of baths | t, С° | steam saturation, % | duration, min. |
| Finnish, dry | 100-110 | 10-15 | 80 |
| Russian hot, humid air | 75-90 | 25-35 | 60 |
| Classic Russian, with steam | 50-65 | 50-65 | 45-55 |
| Turkish, with steam | 45 | 100 | 40 |