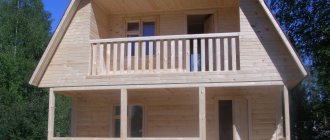
A private bathhouse built on a country plot is an excellent place to strengthen the body and have a pleasant leisure time. In some cases, owners decide to expand the usable area of the building by erecting a functional building. In addition, it is quite possible to build a high-quality addition to the bathhouse; the main thing is to decide on a suitable design and material.
How to build a bathhouse correctly
In order not to get confused in the scheme, it is best for yourself to solve issues related to building a bathhouse with your own hands, step by step, from important to secondary. Therefore, problems and technical issues are identified as they arise:
- Initially, you need to choose a location; the correct placement of the box in the bathhouse makes using the steam room convenient and at the same time does not interfere with the house and yard buildings;
- Box material and insulation used;
- Stove and hot water supply;
- Foundation, laying of communications and drainage;
- Interior decoration and layout;
- Preliminary summing up and drawing up the expenditure part of the project.
After choosing a project, an estimate for the construction of a bathhouse should appear. It is this section of the project that turns out to be underestimated. Therefore, you need to be prepared for the fact that the final costs of building a bathhouse with your own hands will increase by at least 20-25%.
Important! In addition to general issues related to the planning and construction of the box, you need to know a lot of specific details of the technology, for example, how to arrange the grounding of a bathhouse or make the chimney passage unit safe.
Building a bathhouse box is not a problem, but you need to start with a stove project
It would seem that these are secondary issues, but it is on such little things that safety and comfort depend. What is the point of building a steam room in order to not be able to fully relax in it in comfort or to get a fire a couple of weeks after installing the stove.
Choosing a place to build a bathhouse
The decision about where it is best to build a steam room box depends on the size of the bathhouse itself, the terrain and the distance from water sources and sewage systems. In addition, the bathhouse design must take into account existing fire safety standards, SaNPiN and building regulations, namely, buildings of this kind must be removed from housing construction by at least 10 m, and from the sewer septic tank by at least 7 m.
Project location on the site
It is possible to build a home bathhouse in several options:
- A project for a dedicated separate building located in the backyard, at the very end of the site, in a specially equipped recreation area;
- A summer cottage option, in this case, a project is being made for a bathhouse - a summer kitchen, it turns out that two completely different objects are combined in one building. This kind of project is resorted to in cases where there is a need to supply gas and install a gas boiler;
- A bathhouse is an extension to a house; formally, for a steam room you have to make your own project on a separate independent foundation, with heating from the main building. This placement allows you to build a box at minimal cost and solve issues of water supply and wastewater disposal.
If you make a full-fledged building with a rest room, build a shower and toilet in the bathhouse, the project will at least have to be tied to the location of communications and sewerage.
The best location for the project is the corner of the plot
Oddly enough, the best option would be to build a bathhouse next to a body of water, on the banks of a pond or river. In this case, the building is installed below the main house building, 3-4 m above the shore. It is clear that the most rational choice is to build a bathhouse on low-value areas, for example, on a steep slope or on a rocky area. The bathhouse frame is usually light, so there are usually no problems with arranging the foundation.
Selection of building material
Modern bathhouse construction technology allows you to install a steam room in almost any room. But if you build with your own hands, even according to a professionally drawn up project, the number of options is reduced to two:
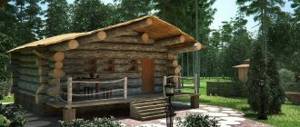
- Baths made of timber or chopped logs. Depending on the chosen project, in terms of price and costs, this is approximately an average level with very good quality;
- A bathhouse box can be built from foam blocks, fortunately, there are a huge number of projects for such buildings, for every taste, size and financial capabilities.
Both projects are quite attractive due to their low costs and the ability to do most of the construction of the bathhouse with your own hands, starting with the foundation. There are also certain disadvantages, for example, very popular log or chopped baths require the participation of professional carpenters who know the technique of laying crowns from logs.
It’s difficult to build such a bathhouse, but it will last for 30 years, no less.
For your information! Building such a bathhouse is not only more expensive, but also longer due to the fact that you have to look for good specialists. Therefore, for small home projects, log buildings are most often chosen for bathhouses; they are simpler, cheaper and do not require such high qualifications.
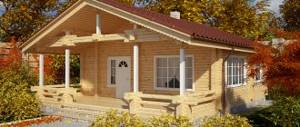
Timber bathhouse of the classic 6x4 design
At first glance, building a bathhouse box from foam blocks is relatively easy if you have at least initial experience working with such material. Despite the excellent thermal insulation qualities of the blocks and low cost, most owners prefer to build only a warm bathhouse frame from foam blocks. In the future, the bathhouse box has to be supplemented with external cladding, otherwise the material quickly fails due to condensation.
A bathhouse box is built from foam blocks in ten days
Advantages and disadvantages of frame baths
Among the advantages of buildings are the following:
- affordable cost - the board is considered one of the cheapest materials suitable for building a bathhouse;
- construction of a lightweight foundation - it is not necessary to make a heavy foundation, the structure will also withstand a lightweight version;
- fast construction - the bathhouse is assembled like a designer, which takes about 3-4 weeks;
- good thermal insulation properties;
- environmental friendliness - natural material is absolutely harmless to human health;
- stability - the structure can withstand even moderate earthquakes, so it is often installed in regions with high seismic activity;
- creating a comfortable microclimate - wooden walls can “breathe”, providing air circulation and eliminating excess moisture.
Frame baths also have disadvantages:
- the need for additional finishing and insulation - the boards themselves look unpresentable and are not able to retain heat inside to the extent necessary;
- fire hazard - no matter what fire retardants the wood is impregnated with, it still remains a highly flammable material;
- shrinkage - the board undergoes shrinkage, which is why it can decrease in size by up to 10% of the total dimensions.
Some disadvantages can be partially overcome. So, if you purchase chamber-dried wood, the percentage of its shrinkage will be several times lower.
How to build a sauna with your own hands: projects and photos
In fact, for home needs, it is best to opt for one of the projects for a timber building or a bathhouse made of foam blocks. The currently advertised options made from sandwich and SIP panels can be considered not as successful as timber and block projects, primarily due to the extreme fire hazard of such material. It only makes sense to build a bathhouse with foam insulation and OSB panel cladding if, according to the design, the steam room is connected to the water or steam heating of the main house; in all other cases, even if you use an electric boiler, the risk of fire remains too high.
Projects of steam rooms and baths made of timber and logs
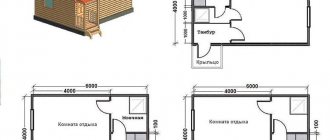
One of the best existing projects for a full-fledged bathhouse with a steam room and a relaxation room is shown in the diagram below.
Project of a log house with a steel stove
The size of the building is 4.6x5.6 m. The bathhouse can be built either from logs or from profiled timber. The second option is even more preferable, since the optimal size makes the room compact and warm. If you choose projects in the bathhouse with the goal of building almost all the parts with your own hands, then perhaps this one will be the most interesting and promising. If you plan to build a bathhouse in full, without saving on any elements, the average cost will be no more than $3,000 without connecting communications.
A more complex version of a timber bath is shown in the diagram below.
Project of a wooden bathhouse with an increased level of comfort
Unlike the previous one, in this project the main emphasis is on maximum comfort, that is, the rest room has been increased to the size of a full-fledged room.
Advice! It makes sense to build a bathhouse according to such a project if the room is also used as a place to relax, for example, in a country house or on a country site.
If desired, it can be easily converted into a guest house or even an impromptu summer kitchen.
Projects for bathhouse buildings made of foam blocks
This is a more complex and costly level of construction. It will take about 30% more money to build a bathhouse box from foam blocks. In addition, it will be necessary to more carefully prepare the foundation and wall cladding.
As a rule, in foam block bathhouse projects the level of comfort is much higher than in timber steam rooms; it is possible to equip a full-fledged bathroom, and even build a full-fledged toilet in the bathhouse.
Block bath project
The disadvantages of such projects include the unsightly appearance of the building. Therefore, if you need to equip a place to relax, you will have to build it in the form of a wooden canopy or covered terrace. To get rid of the unsightly gray cinder block look, the facade and walls are usually finished with siding or clapboard.
All these are real projects, repeatedly implemented by ordinary private developers without the involvement of construction firms and companies. One of the options for building a bathhouse with your own hands from scratch is shown in the video:
Extension to a mobile barrel bath
An extension to a barrel sauna allows you to get a compact and mobile sauna complex assembled from separate parts. Having installed the main structure, over time it can be equipped with additional structural elements that will ensure maximum relaxation and wellness.
The main advantages of a mobile barrel sauna made from boards are its ergonomic design, ease of construction and financial benefits. If it is impossible to build a stationary steam room, then it is enough to equip a barrel-shaped bathhouse with an extension. The mobile design provides the following options for extensions:
- Canopy and canopy.
- Mini gazebo.
- Open veranda or terrace.
- Patio.
Do-it-yourself bath, step-by-step instructions
Of course, the most difficult and important part of construction is the construction of the bathhouse box. The higher the walls and the heavier the roof, the stronger the foundation must be, so in some cases it is not possible to build a building in one season. We have to lay the foundation of the bathhouse in the winter and assemble the walls from timber. And only in the spring, after all shrinkage processes have been completed, will it be possible to build a steam room and even put it into operation.
Preparing the area
The required amount of work associated with the construction of a bathhouse box depends on how lucky you are with the soil on the site. Since most owners plan to build a bathhouse not far from the main household, the foundation and frame should not create problems primarily with the drainage of groundwater on the site.
The approximate amount of preparatory work is as follows:
- Marking is carried out at the site of laying the foundation, the direction of water flow is determined;
- The fertile layer of soil is removed and removed; the foundation and the bathhouse itself can only be built on a base with a depth of at least 30 cm; everything higher will need to be removed and removed;
- If the terrain of the site is flat and there are no natural conditions for water drainage, then drainage will be required. The design of such a system can be copied from home.
Important! It is extremely important to build a drainage system, since baths have always been a source of water. Upon completion of construction, after the foundation shrinks, the soil will subside and a puddle of rainwater will form around the bathhouse.
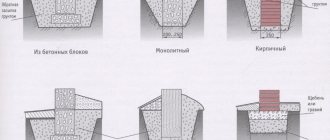
Project of a foundation with a “patch” for a steam room
The final stage of preparation is pouring a sand-crushed stone cushion under the slab for installing the stove. The foundation for the furnace will need to be built in advance and strictly according to the project.
Pouring the foundation
The best foundation option would be a strip foundation reinforced with steel or fiberglass rods. At first glance, it is possible to build a foundation using a simpler scheme. Well, this impression is erroneous, since the box in the bathhouse is very light, and if the walls are made of foam blocks, then the entire building will be supported precisely by the rigid reinforcement of the foundation.
Easiest to build on a concrete strip
For a standard bathhouse 6x6 m or 6x4 m, shallow types of foundation strips laid on a sand cushion are used. After the trench is dug, a sand-gravel mixture is poured to the bottom, waterproofing and a reinforcement frame 25-30 cm wide are laid. For a bathhouse, you can do a direct pour into the ground; the strength of such a tape will be enough to support the weight of the walls and roof. In this case, the rigidity of the base is considered more important than its load-bearing capacity.
The concrete-filled strip is covered with film and left for at least a month. And if, for some reason, you have to build in winter, then for at least 3 months, to gain strength and shrinkage. The upper basement of the bathhouse foundation will need to be built from red brick. The concrete is pre-treated with mastic waterproofing or sheets of roofing material are laid, only after this it is possible to build a base up to 30 cm high.
Construction of the foundation is considered one of the most expensive. For example, if you order the construction of a foundation strip for a 6x6 m bathhouse, then most companies will agree to build for a price tag of at least 1.8-2 thousand dollars.
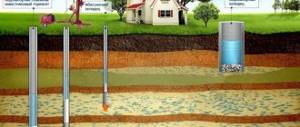
Communications supply
In order for the bathhouse to be used normally, it is first necessary to provide for the presence of sewer pipes and water supply. All other communications, including electricity or gas, are supplied “over the air”. Therefore, before building a brick bathhouse base, pipes are laid in its wall, through which water supply and sewerage will be installed in the future.
If you do not do this, then after erecting the walls you will need to drill holes in the base using special carbide annular drills. The technology is quite mature, but requires certain costs and equipment.
Construction of bath walls
With the laying of foam concrete blocks everything is quite simple; the first row is laid on waterproofing with the obligatory jointing with a reinforcing belt. Foam blocks are easy to process, so building a wall from foam block material is not particularly difficult; you just need to monitor the level and vertical deviation of the masonry.
According to the design, the box should shrink
Assembling walls from timber is somewhat more difficult. First, you need to decide on the selection of material for the first three crowns. It is this part in any bathhouse project that is considered the most vulnerable; the timber often rots and is damaged due to the large amount of moisture and poor waterproofing between the base and the crown. You immediately need to decide how to seal the gaps between the foundation and the timber. Polyurethane foam or any other mixture is not suitable for this purpose; the gap can only be sealed with mastic waterproofing.
Building a bathhouse box from timber is no more difficult than from foam blocks. Another thing is that the walls are less rigid and require additional packing of the cracks with special jute material or dried moss. The technology looks antediluvian, but in fact this is the best option for a bathhouse if you need to build a room that will last at least 20 years.
Creating partitions in the bathhouse
After assembling the main box, there is often a need to redesign the interior, build additional partitions, and separate part of the space for household purposes, storage of firewood and equipment.
According to the project, up to 80% of the surface of the bathhouse walls is covered with clapboard
Capital partitions inside the bathhouse are installed during the construction of the walls, all the rest are made using a frame method, for example, in a timber bathhouse they are sewn from wooden slats or remnants of timber. For foam block buildings, the partition can be built from a profile and plasterboard sheets . There is nothing unusual in this; a foam block box, as a rule, does not shrink, so there is no threat of destruction of additional partitions.
Bath floor
First of all, the soil must be isolated from the bathhouse premises, otherwise moisture and water vapor will penetrate and destroy wooden structures. The earthen base is covered with sand and laid with an insulating film, after which the question of how to build insulation and drain water into the sewer can be decided.
The simplest way is to lay a layer of expanded polystyrene sheets at least 100 mm thick. Waterproofing is laid on top of the insulation and a concrete screed is made. This is the so-called subfloor, through which dirty water will be discharged into the sewer receiving collector. Wooden joists are laid on top of the subfloor and the finished floor is laid. Traditional planks are laid with a gap between the floorboards to allow for ventilation and removal of moisture from the underground.
Creating a bathhouse roof
The humid atmosphere inside the bathhouse requires special measures to protect the ceiling. The ceiling has to be made double, in the form of a sandwich. In the lower part of the ceiling, covered with cladding, a layer of reflective thermal insulation is laid and vents are made, thanks to which it is possible to ventilate the room and remove condensation that has accumulated after bath procedures.
Metal slate roof
The roof structure of a bathhouse can most often be single or gable, usually uninsulated, with a cold attic. The main part of the thermal insulation is laid directly on the ceiling, so the rafters and roof sheathing are protected only by waterproofing and roofing. Moreover, the roof gables are made with enlarged ventilation windows in order to improve the removal of water vapor accumulating in the under-roof space.
It is better to build the ceiling and roof with backfill insulation
For large-sized bathhouses, the design often sets the roof in a hipped pattern, thus reducing the pressure on the walls and reducing heat loss due to improved wind flow.
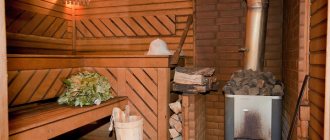
Oven and shelves
It is impossible to build a comfortable and at the same time warm bathhouse without the right choice of stove. For modern projects, metal and cast iron wood-burning stoves, similar in design to potbelly stoves, are most often used. They warm up quickly, provide a huge amount of heat, and most importantly, you don’t need to try to build a particularly strong foundation; it will be enough to lay a sheet of thermal insulation on the floor.
According to the project, a gas stove-stove can be simply embedded into the partition
The second most popular is the electric heater. Its use solves a huge number of problems, for example, there is no need to look for a way to build a safe chimney. At first glance, it’s a trifle, but according to statistics, it is the incorrect arrangement of the chimney in the ceiling and on the roof that is the main cause of fires in a wooden bathhouse.
The use of electric heating elements will require making a separate project and building the grounding of the bathhouse in accordance with all the rules of the PUE. Otherwise, the slightest violation of the insulation can become deadly for the owners and visitors of the steam room. If we compare the economic part, then the use of firewood is considered more profitable than electric heating.
Internal equipment
The walls inside the bathhouse require additional thermal insulation and vapor barrier. It is necessary to insulate both foam block and timber buildings, regardless of the thickness of the walls. In addition, it will be necessary to build a ventilation gap between the outer wall and the insulation layer, otherwise the condensation that falls will quickly lead to the destruction of the timber or foam blocks.
The inner surface of the walls of the steam room and relaxation room must be finished with lining made of linden, aspen or cedar. Often, the design of a steam room is selected in such a way that the consumption of quite expensive cladding is minimal. It is necessary to construct the finishing of the shower room, dressing room and auxiliary premises from coniferous trees. In modern projects, this part of the cladding is usually made of waterproof MDF boards.
Additional accessories
In addition to the stove, the design of the bathhouse must be equipped with a full-fledged washing room and dressing room, so you have to purchase at least a shower stall, plumbing for the toilet and a boiler or heating tank for hot water.
Most connoisseurs of hot steam prefer to build and equip a full-fledged relaxation room with furniture, a sofa, room heating, and most importantly, effective ventilation.
Oddly enough, a long stay in a relatively small room with heated air and a large amount of water vapor is only possible with a normal flow of fresh air. Therefore, in any project it is very important to provide and build full forced ventilation, and not rely on simply ventilating the room using windows, vents and vents.
Bathhouse made of boards: options for frame construction
Such baths are a frame made of wooden blocks (usually their size is less than 10x10 cm, otherwise they are already bars), sheathed with a protective material, for example, wood. Boards attached to vertical posts do not deform and better support the weight of the structure itself. Since, in addition to their own weight, they also have to withstand snow, precipitation and other loads, they cannot do without a strong frame.
The frame must have lower and upper strapping beams, vertical posts and jibs supporting them. The bars are attached to the base using metal corners. The jibs are usually “planted” on wooden nails or metal pins, for which holes are pre-drilled in the timber.
Experienced builders recommend assembling the frame on the ground, and then placing it in a vertical position. This makes it easier to connect structural parts than by weight.
From an overlapping board
You can sheathe the frame with boards in different ways. One of the most common is overlap. It assumes that:
- first, a board is attached to the lowest beam with nails or self-tapping screws;
- then a second one is installed a little higher, slightly overlapping the first;
- if the boards are long, they are also nailed in the middle.
It turns out to be a kind of “herringbone”, thanks to which water dripping from above will flow downhill. No moisture will get under the structure itself. Such an overlap also protects from drafts and allows you not to caulk the timber if cracks appear. When making an overlap, you need to take into account that the board tends to dry out.
From a tongue-and-groove board or on a dowel
Tongue-and-groove is a material that is provided with a tongue-and-groove fastening. Such boards are inserted into one another, ensuring the density and stability of the structure. This method is advantageous because:
- the joints are almost invisible, moisture does not pass through them;
- during shrinkage, the likelihood of cracks appearing is much lower than with other options;
- if insulation is laid between the boards, the thermal insulation properties will increase significantly;
- The construction of such a bathhouse is faster and the process is simplified.
If you make only grooves on both sides at the ends of the material, you can get a dowel fastening. So, a strip is inserted between two boards, which serves as a “lock”. The key in this case looks like a kind of insert “tenon”.
Sheathing the frame follows the same principle as overlap. At the very bottom, a board is attached to the corner beam with the tenon facing up. Another board is inserted into it with the groove down. It is also necessary to consider additional fastenings if the material is long.
From boards and roofing felt
Ruberoid is used for waterproofing. It is a rolled material, under which it is necessary to make sheathing from boards. Usually a wall is covered with roofing felt, after which either a completely continuous sheathing is made, or with small gaps between the boards of up to 1.5 cm. To prevent the material from softening under the influence of sunlight, it is necessary to reduce their exposure as much as possible.
Roofing material prevents moisture from penetrating through the joints into the room and starting to destroy the wood. They cover not only the walls, but also the roof to protect against precipitation.
What else you need to know before construction
Building a bathhouse on your own is quite possible, but it is not as simple as it may seem to an inexperienced developer. The special operating conditions of the bathhouse place increased demands on materials and quality of work. A timber, for example, must have ideal geometry and a smooth surface; it cannot have chips, deep cracks, or a large number of knots. The color of the material is natural, without “blue” indicating fungal damage.
Working with natural insulation materials requires special skills; roofing structures are quite complex to construct. If you do not have experience in self-construction, I recommend turning to professionals, of whom there is no shortage. Many companies and private owners offer turnkey construction of bathhouses. Before choosing a contractor, take an interest in his track record, take the time to look at the bathhouses he built, and talk to the owners.
If you are confident in your abilities and rely only on yourself, I wish you success! And enjoy your steam in the sauna you built with your own hands!
Assembling the frame and floors
When carrying out the work yourself, the best solution is to order a finished bathhouse project with the delivery of sawn and numbered timber or logs. But this method is more expensive. If this is not possible, the stage begins with the preparation of lumber. If necessary, the bark is removed from the logs, the products are treated with antiseptics and fire retardants and laid to dry for 25-30 days without tightly adjoining each other. Good quality lumber that has undergone the necessary preparation is simply inspected and rejected if there is a deviation from the dimensions of more than 5 cm, the presence of large cracks or severe bending. All elements are sawn according to plan, grooves or bowls are cut out in the timber or log, taking into account the chosen technology for connecting them.
Advice! If you are assembling a bathhouse yourself from timber with natural moisture, then you can assemble it right away without waiting for the material to dry, it will dry naturally when folded in the log house. This method is cheaper because even if you unscrew the beams a little, they will not be rejected, but will already be standing in the log house. But at the same time, you need to understand that the cracks of such a log house will be larger and you will have to caulk more.
The method of connecting corners into a paw without leaving a trace is valued for its savings in material and simplicity of the external decoration of the bathhouse, but is suitable only for experienced craftsmen. The technology of joining logs or beams into a bowl, with a protrusion of materials of 20-30 cm, is considered reliable; the baths obtained in this way retain heat well and have stable walls, but at the same time it will be more difficult to insulate your log house.
The type of cutting and the shape of the grooves are selected based on the quality of the lumber and the experience of the assembler. In particular, it is recommended to cut a bowl of profiled timber with smooth walls or a smooth rounded log using the Norwegian, Canadian or Swedish method (with cutting more complex grooves), and round timber – using the Russian method.
The last method is recognized as the simplest and is successfully implemented by beginners. During Russian felling, a straight semicircular groove is cut in the stacked logs using a grinder, an ax and a chisel (angles other than 90° are only available to professionals). The direction of the bowl can be any, but log houses with recesses in the lower part of the upper elements are less susceptible to wear and weather. After choosing the method of fastening the crowns (square dowels or round dowels) and cutting the logs, assembly is carried out according to a simple algorithm:
1. 2 parallel logs are screwed sequentially to the metal plates of the pile foundation. As a rule, thicker and moisture-resistant logs or beams are laid in these areas, with the underside evenly cut and impregnated with antiseptics and pre-prepared grooves for laying floor joists on the sides. When fixing the lower crown to a metal channel or grillage tape, a 20 mm thick linden board soaked in antiseptics is laid between the elements. Bowls in the corner joints of the lower crown must be insulated with linen, jute or a combination of fabric. 2. Using the selected fasteners (beginners should use ready-made pins made of durable wood), tape inter-crown insulation, a drill and a wooden hammer, the remaining links are installed. The recommended dowel pitch is 1-1.5 m; 2 crowns are completely drilled with a drill and the third one is partially, up to half, drilled. To avoid mistakes, after laying each row, the level of the walls is checked horizontally and vertically. The walls of the bathhouse are erected at least 2.5 m (preferably higher). 3. On the first 2 links of the upper crown, matrices are placed in specially cut grooves - logs evenly hewn from below and above or an even rectangular beam with a cross-section of 100 mm or more. As a rule, they are placed across the long side of the bathhouse in increments of about 60-80 cm. The last 2 links of the upper crown are laid in the standard way - with the obligatory insulation of the corner bowl. The resulting comb is the main one for the ceiling and rafter system.
Adviсe! If you are assembling a log house from ordinary timber with natural humidity
- If possible, fasten the beam according to the dovetail pattern, but this is difficult for an untrained person to cut on their own. You can look on the Internet and talk to your builders to see if they can do this; for convenience, you will need to make a stencil and cut it out. As a last resort, if you involve a brigade, then you can make gashes in the paw.
- If you are building it yourself, you can simply lay the timber next to each other like bricks without cuts, but in this case the freezing of the corners will be more pronounced, it is necessary to additionally insulate the corners. And the main thing is not to miss the moment with the dowels, their correct location and sufficient quantity.
- It is best when building from timber with natural moisture, at the assembly stage, to plan the timber from the inside and from the outside if you do not insulate it, this will allow you to better polish your frame later.