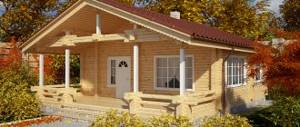
Choosing material for a two-story bath
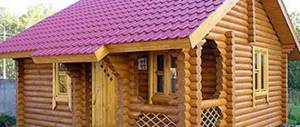
Wood is considered a traditional material for building a bathhouse on your own site.
To build a wooden bath you will need the following material:
- Rounded logs or beams (from 6 thousand rubles per cubic meter);
- Boards for ceilings and floors (from 200 rubles per square meter);
- Material for insulation and waterproofing (from 1500 per cubic meter);
- Cement for the foundation (from 170 rubles per bag).
It is important that the wood is well dried and treated with all necessary pest control agents, and also impregnated with fire retardants.
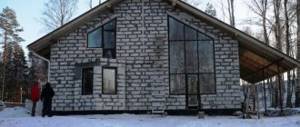
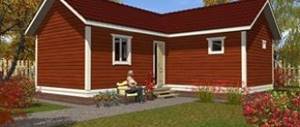
If we talk about ease of construction, then, for example, two-story baths made of foam blocks are built faster and easier. The building material is much lighter, it is quicker to lay, and the foundation can be made simpler, because the structure as a whole is light. But a material such as foam block has one drawback - high heat transfer, which requires large financial expenditures on insulating material for a bathhouse.
When building a bathhouse from foam blocks, prepare:
- Foam block - density D700 (about 2400 rubles per cubic meter);
- Sand (about 250 rubles per ton), cement (from 170 rubles per bag);
- Construction adhesive (from 35 rubles per kilogram);
- Ruberoid for covering the foundation (from 230 rubles per roll);
- Materials for insulation and waterproofing (from 1500 per cubic meter).
Two-story bathhouse: why is it profitable to build
Many who are in a hurry to build a bathhouse in their dacha take into account the fact that it is likely that they will not be alone in this room. After all, it’s much more interesting to invite friends or relatives and spend time together, steaming and getting healthier. This is precisely why people build two-story steam rooms, with attics, bar counters, billiard tables, etc. There are a lot of advantages to this design, namely:
- it is practical, comfortable and presentable;
- comfortable organization of leisure time not only for one person, but for a crowd;
- the ability to erect any objects near the structure, be it a swimming pool, fountain, gazebo, etc.
Some people are afraid to build a two-story steam room because they know that they will have to spend a lot of money on it. However, in this case, there is a good opportunity to save money if you make an attic on the second floor. This way you can save on building materials that would have to be spent on building a full second floor.
Construction of a foundation for a two-story bathhouse
When building a two-story bathhouse from a log or timber, you must take care of a strong and powerful foundation, since compared to frame bathhouses or foam block buildings, a wooden bathhouse is very heavy, and the wood is subject to shrinkage.
Therefore, it is recommended to make a strip or column foundation. To build a strip foundation for a two-story bathhouse, follow these instructions:
- The first step is to dig a pit.
- Then, using sand and crushed stone, we build a cushion at the bottom of the pit.
- Next, we build the formwork, which we fill with concrete.
- When the concrete has dried, remove the formwork.
- After the formwork has been removed, a gap will appear between the foundation and the ground, which should be filled with fine crushed stone.
Use roofing felt or bitumen as a waterproofing material; these materials will protect the future structure well from moisture. Then the two-story wooden bathhouse will last for many years.
The procedure for building a columnar foundation for a bathhouse looks like this:
- We drive the support pillars (at the corners of the building and at the joints of the walls) into the ground approximately half a meter. If the ground is dense and it is not possible to drive a post, then first drill a hole and then place the post in it.
- Next, fill the entire structure with concrete.
- We carry out waterproofing using the same roofing material or bitumen.
If we talk about building a two-story bathhouse from a foam block, then the foundation layout will be slightly different. We dig a closed trench along the contour of the bathhouse. If, for example, a bathhouse of 3x6 m is planned, then the trench should be 50 cm deep and 40 cm wide. We drive wedges into each corner of the trench and stretch roofing felt around them. In addition, the bottom of the trench should also be covered with roofing felt. At the end, we fill the foundation and strengthen the structure with reinforcement. After 10 days (when the foundation has hardened), we divide the foundation into the rooms that are planned, lay the mesh and fill it with cement.
How to heat a bathhouse with several floors
Due to the fact that over the centuries the classical bathhouse has undergone significant transformations, many different types of bathhouses have appeared. Today, a bathhouse can consist not only of such premises as a steam room, a dressing room and a shower room, but can also include many other secondary premises such as a relaxation room, a billiard room, a bedroom, a toilet, a swimming pool and so on. In addition, today there are multi-storey bathhouses, the heating of which is significantly different from classic ones. Consequently, if a two-story bathhouse was built, then the question arises, how to heat a bathhouse with several floors? This article describes the most optimal option for heating a bathhouse with several floors, which includes both a steam room and many other secondary rooms.
A variety of heating systems for a two-story bathhouse.
Initially, the heating system of a classic bath consisted of only a few key elements, such as a stove, a vertical pipe and a stone. Today there are many different systems, since heating must be carried out both in the steam room itself and in secondary rooms. All heating systems can be divided into several categories, namely: integral (single) heating of the bath; separate (local) heating. By integral (single) heating, it is meant that a stove is installed in the steam room or behind its wall, and a pipe is led from this stove to exhaust smoke.
But, the pipe is not just routed strictly vertically through the roof, but rises from the stove to the ceiling of the first floor, is routed around the perimeter of the entire first floor, then is routed to the second floor, also routed along the second floor, and only then is routed vertically to the roof. Thus, when the stove is heated, the stone is heated by the heat and heats the air in the steam room, and the hot smoke, which is produced from the burning of wood, gradually passes through the entire chimney system and, heating the rooms of the first and second floors, exits through the end of the chimney above the roof.
With the help of this system, many solve the problem of how to heat a bathhouse with several floors. It should be noted that this system or its analogue has a number of advantages and disadvantages. Advantages include: environmental friendliness; low heating costs; low cost of construction work. As for the shortcomings, these include: complex construction work; the need to constantly heat the stove, even if the steam room is not in use; long heating time for the bath and the entire bath.
In turn, a separate (local) bath heating system implies the presence of several heating systems. The steam room uses a classic system of stone, a stove and a vertical pipe that removes smoke. This ensures heating of the steam room and dressing room. The remaining rooms of the two-story bathhouse, both on the first floor and on the second, are heated using electric convectors and a heated floor system. Thus, you can solve the problem of how to heat a bathhouse with several floors. However, the disadvantages as well as the advantages of this system should be noted. The advantages include: the ability to heat each room separately; there is no need to constantly burn wood if only secondary rooms are used. The disadvantages include: the high cost of heating due to the cost of electricity; difficulty in installation; high cost of convectors and the “Warm Floor” system. Considering that in all of the above heating systems for a two-story bathhouse, the key element is the stove, it is necessary to pay special attention to how the stove is fired and the required temperature in the bathhouse is ensured.
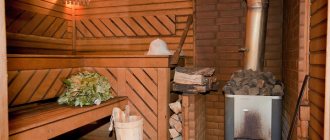
Features of the sauna firebox depending on the firewood
As you know, regardless of the type of stove in the bathhouse, the steam room is heated with wood. For a long time, there has been a rule that firewood must be dry. Just like wet firewood will not give the desired effect and the required temperature. In addition, wet firewood is very difficult to light; it does not hold heat well and only creates smoke.
The second rule, which guarantees the correct heating of the bathhouse, is that the firewood must be of the correct size; as a rule, it is recommended to use firewood with a diameter of approximately six to nine centimeters. This rule is explained by the fact that small logs will not provide the necessary heat, as they quickly burn and smolder. And, logs that are too large, although they burn for a long time and give the necessary heat, they will provide the optimal temperature; they are more difficult to light the stove and provide the necessary thermal conditions in the steam room.
What raw materials to use for heating a bathhouse
As for the optimal type of wood for heating a two-story bathhouse and how to heat a bathhouse with several floors, experienced bathhouse lovers recommend using birch. These “Russian beauties” provide not only material for high-quality bathhouse brooms, but also high-quality logs for the firebox. Birch logs provide a high combustion temperature. Birch, although not too thick, contains a significant portion of tar, which smolders for a long time, and its combustion temperature is much higher than that of other materials. In addition, many people use purchased coal. In addition to the fact that coal provides the desired temperature, when using it there is no need to waste time on burning wood, and the heat output coefficient from coal is significantly higher than from logs.
It should also be noted that to solve the problem of how to heat a bathhouse with several floors, types of wood such as linden and oak are used. Of course, such tree species cannot compare with birch and coal, but such logs are also suitable for a good time in a two-story bathhouse. If the above raw materials are not available, they can be replaced with aspen or poplar logs. But, given that they emit much less heat, much more logs will be needed, which is not significantly profitable from an economic point of view.
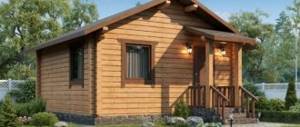
Construction of walls of a two-story bathhouse
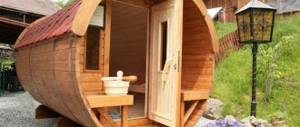
Undoubtedly, a bathhouse made of timber or rounded logs is not only practical, but also quite attractive and respectable. But, as the projects of two-story baths show, the technology for their construction is quite complex, and it is easier for professionals to work with them. For those who like to do construction themselves, there is a good option - a disassembled sauna. This option will not leave you without work - you will have to work hard with your own hands to assemble it.
The process of installing a two-story log bathhouse looks like this.
When the foundation is ready, the lower frame of the frame is made. We caulk the log house and cover it with antiseptic agents. Next, we install windows and doors, insulate and sand the walls. An important point: the stairs to the second floor must be built indoors. We recommend that it be shaped - this will significantly save space. After the walls are erected and the floor is made, you can begin installing door and window frames. To install them, small gaps are first made in the timber walls. After the frame has “settled”, openings are cut in the right places (according to the design) that correspond to the size of the windows and doors.
The technology for constructing bathhouse walls from foam blocks is not much different from a brick building:
- Determine the highest angle of the building using a level. The construction of walls will begin from this corner.
- We lay the first row and fasten the foam blocks with mortar.
- We level the first row using a rubber hammer and “plant” the blocks in place. This is a very important point, since the entire future construction depends on it.
- We lay subsequent rows using special glue. We apply it in a layer of about 5 mm on the foam blocks.
- Every three rows we lay a reinforcing mesh.
- Don't forget to leave free space for windows and doors.
Foam block baths are built in 2-3 weeks.
Choosing a place to build a bathhouse
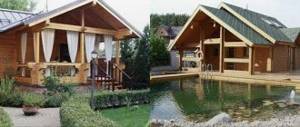
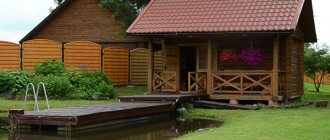
Before thinking about the layout and drawing up projects, you need to decide where exactly on the site the bathhouse will be located. If there is a pond not far from the planned location, then you can build a bathhouse made of laminated veneer lumber right next to it. But since this happens very rarely, it is necessary to determine a place at a distance of 7-10 meters from a residential building. As for the dimensions, you need to decide here depending on the area of the site, how many objects are nearby, as well as the parameters of the residential building. It is best to make the bath medium, that is, not too low, but not too high.
You need to remember, but during the spring flood the bathhouse can be flooded, so if there is a lake or river nearby, then the steam room should be located closer than 12 meters from the water.
Installation of a roof structure for a two-story bathhouse
At the final stage of construction of a two-story wooden bathhouse, shrinkage is carried out.
It usually lasts about 6 months. After this, you can begin installing the roof structure. Roofs on two-story bathhouses can be single-slope or gable. If the first type is cheaper and suitable for small buildings, then the second is more expensive. Gable roofs cover large buildings. This type of roof is perfect for a two-story bathhouse with an attic.
Let's look at the installation diagram for a gable roof:
- We lay a row of boards (beams) on the upper crowns.
- We mount the rafters on the boards. The step should be 1 m.
- We make a lath on top.
- We cover the ridge with galvanized iron.
- We sew up the roof gables. The material for the gables can be chosen at your discretion and budget.
Don't forget to insulate the roof. To do this, we install insulation between the rafters. Avoid gaps at joints.
Disadvantages and features of arranging the second floor in a bathhouse
Now let’s briefly consider the possible disadvantages of the second floor in the bathhouse, and at the same time minimizing them:
- The second floor increases the construction budget. It's unavoidable. You can really minimize the costs (without compromising on quality) for the construction of the second level, for example, by making not a full floor, but an attic.
- Two floors are more difficult to heat. It is a myth. During the heating of the steam room, so much heat will go to the second floor that you will still have to fight with it. But more on that below.
- It will be too hot on the second floor. This is true unless you insulate the chimney, install ventilation, and insulate the roof.
- It takes longer to clean two floors than one. If you operate the bathhouse carelessly, then there will be a lot of work on one floor.
- Stairs + drunk = increased danger. In fact, alcohol in a bathhouse is much more dangerous in a steam room than on the stairs. And in order to slip (stumble, stumble), a ladder is not at all necessary.
From all this we can conclude that a two-story bathhouse is a complete plus. Especially if the site is small, there is a competent design, everything was built without violations of building codes, and the bathhouse is used correctly.
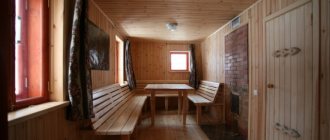
Interior decoration of a two-story bathhouse
If your bathhouse is built of foam blocks, then it is necessary to carry out internal wall cladding.
Foam concrete will not last long if moisture protection is not provided. High-quality moisture protection is especially important on the ground floor, where the steam room is located. The interior decoration of a bathhouse made of foam blocks comes down to the following:
- We impregnate the foam blocks with a water-repellent solution.
- We lay insulating film.
- We carry out vapor barrier using vapor-tight membranes. We fix them between the wall and the facing material.
- We provide decorative wall cladding. Wooden lining is ideal for this.
- You can plaster the walls and cover them with polymer paint or cover them with tiles.
If your bathhouse is made of logs, then it also needs interior decoration. This will help reduce heat consumption, and, accordingly, heating time.
Features of the interior decoration of a log bath:
- We lay foil on top of the walls.
- Cover the top with a layer of insulation.
- The facing layer, as in the previous version, is recommended to be made using lining. However, waterproof materials such as gypsum fiber, drywall, PVC, and tiles are also suitable for decorative finishing.
Concrete, wood or ceramic tiles are used to finish the floor in the bathhouse.
The ceiling can be covered with wood or covered with PVC panels or plasterboard. The main condition is that all materials must have increased resistance to moisture. For wood that is suitable for cladding walls in a bathhouse, we choose maple, pine, ash, birch, hornbeam, and oak. Coniferous species are not suitable for finishing walls in a steam room. But they are perfect for the dressing room, washing room and second floor.
Pros of the second floor in the bathhouse
As real experience shows, a two-story bathhouse has much more advantages than disadvantages. But this is provided that initially there was a competent project, which was implemented without deviations from standards and thoughtless savings on materials. For the same reasons, most of those who built a bathhouse with two floors with their own hands and from rough sketches on a piece of paper do not speak very flatteringly about this decision.
And yet, if a bathhouse with a second floor is built by professionals according to a carefully designed project, then it has the following advantages:
- saving space on the site;
- cost savings;
- more usable area;
- less heat loss in the steam room;
- the second floor can be used for living or hosting guests;
- a two-story building looks more solid than a one-story building.
Space saving. This aspect is especially relevant if the site for building a bathhouse is small. Even if there is plenty of land, then even in this case the second floor will “save” a lot of space for something else - a gazebo, flower bed, garage, greenhouse, and so on.
Saving money. Whether there are two floors or one, they are built on the same foundation and under the same roof. And the usable area turns out to be at least one and a half times larger (not twice, since part of the space will be “stolen” by the stairs). The cost of arranging a roof for a one-story bathhouse or a two-story bathhouse is absolutely no different. The foundation, too, contrary to popular belief, will cost about the same.
There will be more usable space even if on both the first and second floors several square meters will be spent on staircase arrangement. With a minimum bath size of 6*6, the second floor will increase the square footage by approximately one and a half times. With an increase in the size of the building, this increase will tend to double the area (the staircase will not increase).
There will be less heat loss in the steam room due to the fact that there is not only a roof above it, but also a second floor. If implemented correctly, the heat leaving the steam room will move from the category of losses to the category of useful heating of the second floor.
The second floor of a bathhouse is used as a living space by many owners of such buildings. In winter, after the procedures it is warm there all night. And in summer, provided there is thermal insulation of the roof and ventilation (these are inevitable measures in any case), it is not hot. In general, you can live on the second floor, have guests, or simply relax.
Few people doubt its solid appearance. Two floors always stand out favorably among one-story buildings. Whether it’s a house or a bathhouse, there’s no difference.
Tips for heating a two-story bathhouse
To fully heat the first floor of a bathhouse, it is enough to make a brick stove.
Warming up may take some time, but it is economical and the heat will be distributed evenly. You can warm up the second floor in autumn and spring using a chimney duct. At the same time, do not forget about insulating the walls. But if you plan to use the second floor of the bathhouse during the winter months, then the stove will not be enough. Therefore, it is recommended to arrange full gas heating.
Construction of a new rafter system for a bathhouse with an attic
Before you begin to build a rafter system over the bathhouse, you should lay a new layer of waterproofing on the ceiling of the building.
In such cases, it is optimal to use roofing felt or roofing felt. If the floor is wooden, then there is no need to lay beams under the main beams. We carry out further work in this order:
- We prepare wooden beams with a cross-section of 10x10 cm. We place the racks at a distance of about 2 meters from each other. They will form a kind of skeleton of the attic floor. Make sure each post is perfectly level (use a level to do this).
- We sheathe the installed racks on both sides. We use plasterboard or plywood on the inside, and slab on the outside.
- We lay insulation (mineral wool) between the racks.
- We secure each rack separately with spikes and staples. Make sure they don't lean during the process. To do this, you can secure them with temporary braces.
- We lay the top beam. It should have a similar section of 10x10 cm. We secure it with nails or self-tapping screws.
- We install the Mauerlat. It will require a beam of 40x40 cm. Do not forget to install a layer of waterproofing under it to avoid rotting of the wood in the future.
- We fasten the rafter legs. To do this, we make markings on the Mauerlat and the rafter frame in the places where the rafters will be installed. As a rule, the step is 1-1.2 m. For rafters, you can use boards measuring 5x15 cm. Do not skimp on the quality of the rafter boards, so as not to become a victim of roof collapse due to low-quality wood.
- We install fillies. We carry out the process by analogy with rafters. We start with the outermost pair, stretch the twine between them and align ourselves with it during subsequent work.
- We nail the hem board to the fillies. It will prevent winds and precipitation.
- We strengthen the rafters in the places where the skylights are installed. To do this, you need to install cross bars. They will serve as the upper and lower parts of the opening, where the frame will be fixed.
Remember that all wooden elements that are used in the construction of the attic must be treated with antiseptics and fire retardants. Before moving on to the next stage of insulating surfaces, make sure that all supporting structures are in order. All small flaws and cracks must be sealed with foam.
Purpose of the second floor
The second floor of the bathhouse can be arranged as a bedroom or billiard room.
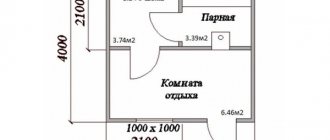
Based on exactly how the second floor of the bathhouse will be used, you need to choose a project for construction. On the ground floor it would be better to leave only the steam room, washing room and dressing room. The rest room can be equipped either on the terrace or on the second floor.
The premises on the second floor can be used as you wish: make it a billiard room, a gym, a tea room, a summer bedroom. But it is becoming increasingly popular to create a mini SPA salon in such a room, which becomes an excellent addition to the steam room and washing room. For this purpose, special interior design, aromatherapy with healing odors are used, and various vibrating massagers are installed. Therefore, if a small two-story bathhouse project has been chosen for construction, just such a SPA corner can be equipped in it, turning an ordinary steam room into a whole home health complex.
If you don’t need a full second floor and the attic would be enough, you might be more interested in bathhouse projects with an attic.
Stairs
Drainage system in the bathhouse.
When choosing a project for a two-story bathhouse, it is a good idea to pay attention to the design of the staircase. If you plan to visit the bathhouse frequently, the more convenient the stairs are, the better.
The most compact space-saving options are ornate staircases. But climbing them often is not always comfortable. Standard steps are more cumbersome. But the worst option, even if it saves a lot of space in the bathhouse, is stairs from the outside of the walls. After staying in the steam room, walking through such a structure can even be dangerous due to drafts. Therefore, initially it is better to choose a project with a good-quality and durable staircase that will not put stress on the spine, and most importantly, will not slip.
Order turnkey
Due to the great complexity of the required work, the most popular method of constructing a bathhouse is to order it from a turnkey construction company.
There are the following options for such an order:
- Ordering a building completely ready for use from scratch. The contractor carries out project development, construction, and installation of supply systems. The most expensive way.
- Regular turnkey order, without supply systems.
- Order only for construction and materials. One of the standard projects is taken. It makes it possible to save about 30 thousand rubles on project development.
- Purchase of a factory design. The kit includes all fasteners, lumber with cuts, and detailed installation instructions. If you wish, you can carry out the installation yourself or entrust the work to the manufacturer’s employees.
- Shrink order. The contractor performs all the basic work that requires high qualifications - installation of the frame, joists, stairs, roofing, subfloor on both floors. Frame houses are not subject to large shrinkage, so the owner can continue finishing work immediately after the contractor completes the work.
The main advantage of ordering a turnkey bathhouse is the speed of construction. On average, the installation of a 6x8 bathhouse by a team of professionals takes from a week (assembling factory equipment) to a month, excluding foundation work. Self-collection with the assistance of one assistant will take from a month to six months.
Where to order in St. Petersburg and Moscow
Almost all major Russian construction companies offer their services in Moscow and St. Petersburg.
In this regard, in these cities and regions, the buyer is more likely to face the problem of choosing from dozens of names on the Internet than the lack of a suitable contractor. You can find reviews about the work of certain companies online and ask your friends for their opinions. The best option would be to involve an experienced third-party builder in the selection process who can evaluate the other work of the proposed contractor.
Where to order in other cities
Large construction companies serve most regions of the European part of Russia. If you want to build a frame house-sauna in the Urals and further east, you will most likely have to turn to regional contractors. Usually there are not so many of them, and you have to make a choice between two or three of the most respectable ones.
The business of building frame houses is very profitable, so in any more or less large Russian city you can find a suitable construction organization using the Internet.
Small contractors usually do not offer services such as delivery of a prefabricated house, connecting supply systems, or developing a unique project.
Installation of a roof for a bathhouse with an attic
Once the roof skeleton has been created, you can begin installing the roof and installing the sheathing.
The step in this case depends on what roofing material you will cover the roof with. If you choose soft tiles, then a continuous sheathing is installed for it, which is made from tongue-and-groove boards. We install a solid sheathing on a sparse one in increments of 30 cm. Thus, we get a double sheathing.
Next, we install a hydraulic barrier on the sheathing. Usually, ordinary polyethylene is used for this; the layers are laid with an overlap from bottom to top. We put a layer of thermal insulation, for example, mineral wool, on top of the film, cover the insulation with a layer of vapor barrier and secure it with tape.
We install the roofing material according to the same scheme as the waterproofing material. We lay the roofing elements from bottom to top, overlapping. Make sure that in places where the roof breaks, the top layer of the roof protrudes above the bottom. We install the ridge so that its design prevents water from entering under the roof.