Frame house construction technology is widely used for bathhouses, garages, sheds and other outbuildings. Frame bathhouse projects (6x6, 3x4) are warm and durable buildings, and the speed of their construction is such that you can take a steam bath within 2-3 weeks after the start of construction. And, of course, the low cost of materials and work process leaves no one indifferent when planning real estate on the site.
Typical drawings of a 6x4 bath
Where to begin
It all starts with a project that you can buy, order from an architect, or create yourself, describing in detail how to build everything yourself - the choice is yours. Typically, projects of any buildings contain the following main points:
- total area
- detailed location of premises
- type of floors
- communications
- Construction Materials
Approximate project of a frame bath with an attic
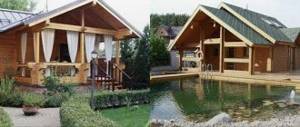
Two-story wooden baths on a turnkey basis - traditional flavor and microclimate!
It’s easy to use your plot area rationally and make your dreams come true. 2-story baths made of planed timber are aesthetically pleasing and retain heat perfectly, testify to your excellent taste, create a healthy microclimate and preserve timeless traditions. We create various projects, build from our own lumber, offer a choice of configurations and deliver turnkey projects. Come and choose your option that matches the rhythm of life and ideas about convenience.
Let's start construction
If the area of the plot allows, then the most optimal project would be 6x6 m. - it will perfectly accommodate all the necessary premises, in addition, the above-mentioned dimensions will make them quite spacious and comfortable. If possible, choose a site for construction that is level, and if this is not found, then try to level the existing territory as much as possible. When the project is ready, you can begin building a bathhouse using frame technology. Next, you can familiarize yourself with one of the many DIY bathhouse projects.
Foundation
For a frame structure, a strip foundation is quite suitable:
- remove the fertile soil layer
- we dig a trench and lay a cushion of sand, crushed stone and gravel in it (you can use ASG)
- fill everything with molten bitumen and lay the concrete in a pre-installed formwork made of boards
Bathhouse on a pile foundation
Before building the frame
- As soon as the foundation hardens, we lay a layer of roofing felt on it, which will serve as waterproofing, and make the bottom frame of the structure. For this we use timber 150x100 or 150x150 mm.
- We connect the joints with nails.
- We install logs made from 150x50 mm boards on the harness.
- We treat the harness and joists with an antiseptic according to the instructions and leave until completely dry.
Frame
From 150x50 mm boards we make frame posts and rafter system parts (everything is done in accordance with the project).
Bath frame
Necessary materials
The basis of a frame house is frames assembled from wooden beams. Depending on the planned size of the bathhouse, timber 100*150 or 150*150 mm is used for their assembly. For jibs and crossbars that are nailed between vertical posts, thinner bars are suitable.
When installing a roof for the Mauerlat, you will need approximately the same timber - 150 * 150 mm or so. For rafter legs, the same bars 100*150 or 150*150 mm. Depends on the configuration of the selected roof and the weight of the roofing material. By the way, it is undesirable to use very heavy roofing material - such as ceramic tiles - for frames - the load on the walls is too great.
You will need a lot of different timber
You will also need slats to create lathing, counter laths, and all sorts of auxiliary work. Moreover, you will need a lot of them: lathing is needed both on the walls on both sides and on the roof. Although, in some versions, the outside of the boards is covered with plywood (as in the video above). There are a lot of construction options, as well as the materials used.
Read about how to make a rafter system for a gable roof with your own hands here.
You will also need subfloor material. What it will be - unedged or edged boards, plywood or other board material - is up to you to decide. But all the wood will need to be treated. And fire retardants - to reduce flammability, and protective antibacterial compounds. Read about how to treat wood inside a bathhouse here.
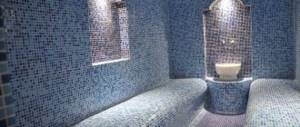
Frame cladding materials inside and outside are selected based on personal preferences or the purpose of the building. If we talk about frame baths, then usually everything inside is lined with clapboard (tiles are placed in the washing room), and outside with imitation timber or a blockhouse.
It is advisable to use mineral wool as insulation for a bath: they do not burn. The thickness of the insulation layer depends on the region. In central Russia, mainly basalt wool is used for baths, in a layer of 15-25 cm. If you are concerned about the possibility of formaldehyde release (a lot has been written about this), then you can use non-woven mats. The emission of harmful substances in them is minimal.
Frame baths are often insulated with mineral wool
It has proven itself well as insulation and polyurethane foam (not polystyrene foam). In addition to low thermal conductivity, it is also a sound insulator, which is important for frame construction. There are a few "buts":
- It cannot be used in a steam room - the temperature conditions do not allow it;
- it melts and supports combustion;
- This insulation costs a lot (we are talking about extruded polystyrene foam).
You will also need a lot of nails and screws. For the construction of bathhouses, it is advisable to use galvanized ones: so that they do not rust and do not leave unsightly streaks on the wood. They will be needed in different sizes and diameters - large frames for assembly, smaller frames for sheathing and cladding.
Read about what fasteners to use when building a bathhouse in the article “Fasteners for baths and saunas”
From all that has been said above, we hope you have concluded that you can build a frame bathhouse with your own hands. To make sure of this, watch the video. The house was built using frame technology with the participation of only one person. It describes in more detail the technology for constructing some units.
If you have selected a frame bath project and decided to build it yourself, but have no idea how to proceed, we recommend watching the video. In it, experienced American carpenter Larry Hohn explains and shows the technology for constructing the walls of a frame house. The video is very detailed and takes more than an hour, but by the end of watching the frame construction technology will be clear to you.
We build walls
- We install two racks in the corners, and several intermediate ones between them
- we install the sheathing (in our case, these are OSB boards) - we fasten the boards to the frame with self-tapping screws (using a screwdriver when doing the work yourself will significantly save time and effort)
- do not forget to periodically check the position of the sheets with a building level
- Simultaneously with the installation of the slabs, we install subsequent racks to which the sheathing will also be attached
So, by installing the racks and attaching OSB sheets to them, we install our entire frame structure (do not forget about door and window openings).
Wall construction
Attic insulation
The attic space will most likely not be used often, but despite this, it is necessary to carefully insulate the attic.
When installing a thermal insulation layer in a bath attic, you need to take care not only of the thermal insulation of the rooms, ceilings and walls, but also be sure to take into account the need to carry out floor insulation work. This is important, since on the ground floor there will be rooms in which there will be humid air combined with high temperature.
Based on this, when insulating the attic, the following should be taken into account:
- thermal insulation materials should not support combustion;
- the insulation must repel moisture, not be subject to rotting and the formation of mold and mildew;
- when carrying out thermal insulation work, it is necessary to ensure natural ventilation of the building and provide a high-quality forced ventilation system;
- knowing the fact that chimney channels pass through the attic, it is necessary to take fire-fighting measures, making the room safe;
- Thermal insulation based on mineral wool or basalt wool best meets the conditions. This insulating layer retains heat for a long time, does not rot, is made from natural materials and meets environmental requirements.
Installing the roof
- According to the project, we assemble the truss structure on the ground;
- We lift the finished structure and attach it to the frame racks.
- To make the work more convenient, we attach a temporary ceiling to the beams. We apply markings for attaching the sheathing to the gable of the building.
Mansard roof
Do not forget that all wood that we use for construction must be well dried and treated with fire protection. This is necessary so that the house is not eaten by bugs, which is especially important in houses located in close proximity to the forest.
- between the counter beam and the rafters we lay a layer of special film for ventilation
- We attach the roof sheathing directly to the rafters, then we install the roof
- When the installation of the roofing material is completed, we attach OSB sheets to the gables of the building
Advantages of a frame bathhouse
The strengths of frame-type structures are the following:
- fairly low construction cost compared to other options;
- surprisingly low time costs;
- independence from terrain conditions;
- use of pile type foundation.
Also, a big advantage of a frame structure is that every owner who has basic construction skills and handling tools, who has chosen or ordered the necessary set of building materials, can build it on his own territory.
Interior and exterior decoration
- We insert windows and doors into the openings and begin interior decoration.
- To arrange the ceiling, you can use the same OSB boards - we attach them to the beams from below.
- We insulate the ceiling and walls with a layer of insulation; in addition to the insulation, we lay a layer of “screen” foil into the walls of the steam room. Glassine is mounted on top of the insulation.
To arrange the floor, we use boards left over from the temporary ceiling when installing the roof (we remove the boards from the beams and nail them to the joists).
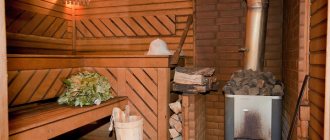
Typically, steam rooms in baths are equipped with a stove-stove, and boilers for heating water are installed in the dressing room near the common wall with the steam room (the wall between the steam room and the relaxation room must be brick - this is required by fire safety standards). You can use ordinary building bricks.
Finishing for a frame bath
In principle, the exterior finishing can be done simultaneously with the interior. This approach will significantly save your energy and time. The frames of internal partitions can be made during construction and the final finishing materials can be immediately attached to them (this can be either a block house or lining).
As for the interior decoration, it all depends on the purpose of the room. So, for a rest room you can use a block house, and for other rooms - wooden lining. Exit to the attic can be arranged in the dressing room by making a hatch in the ceiling and installing a ladder.
Interior finishing with block house under timber
The ceiling in the steam room must be additionally insulated and lined with clapboard. If you decide to draw up a project and build a sauna with your own hands, you should take into account that additional insulation of the steam room ceiling significantly reduces the ceiling height. According to standards, the ceiling height should not be less than 2.1 m.
We design ourselves: modern types of baths
Ready-made design documentation for a bathhouse made of timber with an attic or any other can be purchased at special bureaus or completed independently. In the second case, any standard project for the selected size of the building will come to the rescue.
Before starting to design a bathhouse based on a frame, key issues are resolved:
- find the most rational location of the building, taking into account convenience and simplicity for the provision of water, sewerage and lighting communications;
- plan the size of the future building;
- at the selected location, study the composition of the soil and differences in the ground surface. These factors will be decisive in choosing the type of foundation;
- solve the need to build 2 floors, an attic and the construction of external elements such as a veranda, terrace;
- determine the type of roof. Options for single-slope, double-slope and multi-slope structures are being considered.
When choosing the number of roof slopes, the size of the bathhouse, the climatic features of the area, the distance to other buildings, and the type of coating are taken into account.
The finished project will become an assistant in the rational distribution of spaces and the choice of building materials. Photos of bathhouses will also help you decide on your preferences.
Preliminarily think through the internal layout of the bathhouse in terms of functionality. Determine the installation location of the stove. It determines how the chimneys and ventilation will be located.
At the design stage, the issue of choosing the materials from which the structure will be built is decided and the approximate cost of construction is calculated. The more detailed the design of a frame bathhouse is developed with your own hands, the easier it is to make adjustments to it if unforeseen circumstances arise.
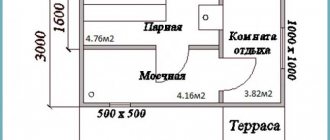
Option 4*5 m
The building, measuring 20 m2, is compact and suitable for a bathhouse consisting of three rooms:
- rest rooms;
- steam rooms;
- sanitary room with toilet and shower.
When determining the dimensions of interior spaces, the calculation is made not for the “pure” size, but taking into account the thickness of the partitions and walls.
The most suitable area for a relaxation room is 7-8.5 m2, for a steam room - up to 5 m2, for a bathroom - at least 2.2 m2. The small size of the building does not require a dressing room. The steam room houses the heater and the entire main surface of the stove. A firebox is brought into the rest room, which also plays the role of a heating device. To prevent cold air from entering the bathhouse from the street, it is necessary to provide a closed porch.
Consumables and elements of a 4*5 m bath:
- The foundation is a strip foundation buried 70 cm and a plinth height of 40 cm. Its arrangement requires a gravel cushion up to 20 cm thick.
- The frame consists of posts and trim along the upper and lower edges of the structure. It is optimal to use boards 100*50 mm.
- The roof is gable with a rafter system made of 150*50 mm boards. Laying pitch 580 mm.
The cladding is selected depending on the required level of thermal insulation.
Option 6*6 m with veranda, balcony
The size of 6*6 m gives space for imagination. The design of such a bathhouse can include the following premises:
- terrace or vestibule;
- rest room and bedroom;
- steam room;
- full bathroom;
- washing room
Linear dimensions require the use of standard length lumber, which reduces the cost of construction due to the small amount of waste.
The washing room can be made extremely large with direct access from the steam room and place sun loungers in it. In another version of the project, it is planned to separate the washing room and the steam room with a small corridor connected to the rest room. In this case, the washing room will be somewhat smaller.
Option 6*3 m: design with terrace
The design of a 6*3 m bathhouse with a terrace comes in two versions:
- The terrace is not included in the area of the building and its size is planned separately. In this case, the overall size of the building will increase by the area of the veranda.
- The terrace is part of the common building. Then all interior spaces will be smaller.
The small size of the bathhouse will not allow you to equip a full-fledged bathroom. The stove will be heated from the rest room.
Choose a compact stove, perhaps the model will be narrow and elongated upward.
Moving the terrace beyond the foundation of the main building will allow you to allocate a small space from the rest room for a vestibule . Then it is possible to take a steam bath in winter. Approximate dimensions of interior spaces:
- steam room – 3.5 m2;
- shower/washing room – 1.8 m2;
- relaxation room – 8.5 m2;
- vestibule – 2.6 m2;
- outdoor terrace – 11 m2.
To form the frame you will need a beam of 100*150 mm. They are strapped and floor joists are installed. For the roof, use 150*40 mm timber for the ceiling. The rafter system is laid from edged boards. A board with a size of 100*50 mm is suitable for this. The material for cladding and roofing is selected depending on personal preferences and climatic conditions.
Option 4*4 m with terrace
This size of the building assumes only an external, attached terrace, but under a common roof and on a common foundation.
An area of 4*4 m is larger for dry saunas. For Russian baths, this is not the most comfortable option.
The project involves dividing the common space into two parts of 8 m2 each and adding a terrace up to 6 m2 in size:
- A relaxation room after the steam room, also known as a dressing room.
- Steam room and sink.
The steam room should be made larger than a washing room. Then it will be possible to accommodate two people.
Option 5.4*6.3 m
A bathhouse with a total area of 34 m2 may have a built-in terrace. In this case, up to 2/3 of the total area is allocated to the interior. A typical project suggests the following room sizes:
- for relaxation in 11-12 m2;
- for the steam room – 5 m2;
- for sanitary needs - up to 6 m2.
The rest of the space will be occupied by the terrace. It is convenient to make part of the terrace closed so that warm air does not immediately escape into the street.
If a veranda is not planned, then a dressing room with an area of 5.4 m2 is made and the presence of a bathroom can be planned.
Roof construction
Finished roofing for bathhouses and attics
Roofing for the attic requires a special approach, since it must be warm and also stable. You also need to make sure that the location of the rafter legs can be hidden under the lining of the interior partitions. The most common roof option for a 6x6 bathhouse is a gable roof under ondulin. To build it, you need to assemble a template of rafter legs on the ground with the correct angle, which will greatly help with the further construction of the system. Prepare the entire rafter system on the ground. Next, install the 2 outer rafter legs and secure them. Stretch a rope between them, which will become a guide for installing the entire structure. After erecting the rafter system, you can proceed to installing the sheathing.
Ondulin is attached to a lathing made of wooden slats measuring 20x50 mm with a pitch recommended by the manufacturer of the roofing material. Considering that the attic will be insulated with mineral wool, it is necessary to qualitatively strengthen the waterproofing material. It doesn’t matter which one is chosen, the main thing is the reliability of the material. At this stage, it is advisable to install skylights. After the entire structure is ready, all that remains is to lay the floor, complete the internal and external lining of the bathhouse and insert the doors.
Stages of construction work
As can be seen from the project, the bathhouse must have a water supply and sewerage system. These features should be taken into account when choosing the location of the facility; first consider the methods of constructing utilities. In this case, the requirements of building codes and regulations should be taken into account.
Foundation
Shallow foundation for a bathhouse
Installation diagram of a strip shallow foundation
Before starting construction, you need to prepare the site: remove the fertile layer of soil and make a leveling. As we have already said, our foundation will be shallow reinforced strip. The tape must have holes for ventilation and utility systems.
Soil removal process
Vents in strip foundation
Step 1. Mark the ground according to the foundation plan.
Bath foundation plan
Mark the foundation strip. To do this, drive wooden pegs around the perimeter of the building, check the dimensions and angles. Check the angles by measuring the diagonals; the spread in the values of the diagonals should not exceed 2÷3 cm; this error can be easily corrected during the construction of the frame. The site should be as level as possible. The width of the foundation is 40 centimeters. If the soil on the site is dense, there is no need to make internal formwork; you can dig a trench of the same width as according to plan.
Having removed the top fertile layer of soil (10-15 cm), you can begin marking the foundation
DIY strip foundation - marking
If the land is sandy, increase the width of the trench by at least twenty centimeters on each side to install the formwork.
Installation of formwork for strip foundations
Formwork - diagram
Strip foundation formwork
Solve the issue of land disposal. There are two options: level it under the entire bathhouse or take it to another place. It is difficult to give specific advice here; it all depends on the landscape features of the site. In some cases, it is more expedient to backfill waterlogged areas, in other cases it is better to leave the soil under the bathhouse.
Construction of the foundation for the furnace
The foundation for the stove is not connected to the foundation of the bathhouse
At the same time, determine the location of the foundation for the stove and a small septic tank to collect water under the steam room and washing room. Small septic tanks are best located as close as possible to the foundation strip.
Septic tank installation diagram
Step 2. From construction reinforcement of a periodic profile Ø 8÷10 mm, tie a metal frame for concrete reinforcement.
Very important: the frame must be filled on all sides with a layer of concrete at least five centimeters thick. Otherwise, thin concrete may crack due to stress and in these places the strength of the foundation will significantly deteriorate.
The frame can be torn off the ground with ordinary stones; if the mesh falls on its side, insert stones of appropriate thickness between it and the formwork.
Installation of fittings
Prices for fittings
fittings
Video - Reinforcement and formwork of a shallow strip foundation
Step 3. Dig a trench 80 centimeters deep, pour sand up to 30 cm thick at the bottom, level and compact it. The sand cushion will compensate for the rising/lowering of the ground when the ground freezes. Lower the reinforcing mesh into the trench. If you have to make formwork for the earthen part of the strip, then it is advisable to make it immediately to the entire height of the foundation (50 centimeters above the ground). Pay great attention to the fastening of the formwork; one must withstand the weight of the concrete and not change its linearity.
sand cushion
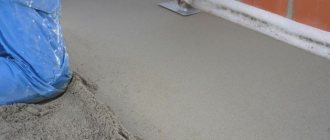
Step 4. Pour concrete evenly around the entire perimeter. The ideal option is to pour the entire foundation in one day. Does not work? Then do not allow large differences in the height of the concrete, level it. Continue pouring the next day. Level the top; at the corners of the bathhouse, the height of the foundation cannot differ by more than a centimeter.
Pouring concrete into strip foundation formwork
Pouring the foundation
Pouring strip foundation
Step 5 . Give the concrete time to set. If the weather is very hot, water it generously every morning. The concrete curing time is at least two weeks. Do not rush to remove the formwork, do not risk the strength of the foundation.
Step 6. Carefully remove the formwork, cover the foundation strip with two layers of roofing material, press it with stones and leave it in this state for some time.
Waterproofing strip foundation
Horizontal waterproofing of the foundation
During this time, clean the lumber of the formwork from any remaining concrete and dirt - all of them will still be useful during the construction of the bathhouse. Prepare materials for construction, deliver the missing ones.
And one more important job. We chose a more “modern” version of a bathhouse with an attic; it included a toilet room. You can, of course, use an outdoor toilet, but today this is already considered obscene, especially for those who have chosen a rather expensive bathhouse option. Construction of a comfortable toilet will increase the total cost of the facility by only a few percent, this is an insignificant amount. Due to the fact that we have not yet considered the topic of the toilet room, we will dwell on it in detail.
Toilet in the bathhouse
Bathroom option
M400 cement prices
cement M400
Construction of a sewer system
The sewer system consists of pipelines and septic tanks. It is more profitable to carry out excavation work simultaneously with the foundations - there are tools and “helpers”, and the sand from the foundation remains. In addition, you can simultaneously carry out all the landscaping work.
Sewerage in the bathhouse
Step 1. Decide on the location of the septic tank, take into account the standards of SNiP 2.04.03–85. When choosing a location for installing a septic tank, try to ensure that the site has a slight slope towards the bathhouse. If this doesn’t work out, no problem; you’ll make a trench to slope the pipe.
Choosing a location for a septic tank
Free download file - BUILDING CODES. SEWER. EXTERNAL NETWORKS AND STRUCTURES.
SNiP 2.04.03–85
Step 2. Stretch a thread from the bathhouse to the installation site of the septic tank, check the horizontal position with a water level. Technical requirements recommend that the sewer pipes be sloped up to 3″. One ppm is a height difference of 1 cm per meter, you need a slope of approximately three centimeters per meter of pipe.
Step 3: Dig a trench. How to check the slope? Drive in pegs at the beginning and end of the trench and mark the horizon level on them. Measure the depth of the trench from the horizon (not from the surface of the earth!), it should be within the recommended values.
Example of sewer pipe slope
Sewer slope
If you plan to use the toilet room only in the summer, the depth of the pipes does not matter. But we do not recommend taking this “easy way”; over time, it is possible to install heating for the bathhouse and use it all year round, and this will require using the toilet in a completely different mode. It is better to immediately lay the sewer system to the freezing depth; this will not complicate the work much, but then you will not have to redo anything.
Step 4. Dig a hole for the septic tank.
Digging a pit for a septic tank
Pit for a septic tank
Practical advice. You should not buy expensive industrial septic tanks. For a family of four, it is enough to use an ordinary two-hundred-liter barrel; it will have to be cleaned at least after ten years.
Metal barrel 200l
And this is with constant use of the toilet room, but what about the bathhouse? Make holes in the barrel around the entire perimeter and at the bottom to drain the liquid fraction. For your information, it takes about a hundred years to form one centimeter of soil. During this time, the rotted vegetation forms a layer of solid humus of the specified thickness. The same time frame is needed for sewage fractions, and the height of the barrel is more than a meter.
Step 5. Pour a small layer of sand onto the bottom of the trench; it will definitely remain after the foundation. Sand is needed only to make the load on the bottom of the plastic pipe more uniform. Place the pipe and connect it to the barrel.
A layer of sand 0.3 meters thick is laid on the leveled bottom of the pit for the septic tank (with a high groundwater level - a concrete slab)
Step 6. If there are no stones in the ground, you can fill the trench right away; if there are stones, you will have to protect the pipe from above with sand. Make any cover for the septic tank.
Trench for sewer pipe
Sewerage
And one more note. Do not believe all sorts of fairy tales on the forums that a large slope of the sewer pipe will cause it to silt. Have you ever seen a river with a fast current and a muddy bottom? While you were working on the sewerage, the foundation was completely “prepared” for further construction work.
Connecting a septic tank to a sewer pipe
Filtration field for septic tank
Insulation of a septic tank
The filtration field is also insulated over the entire area
Backfilling of the filtration field and trenches is done with excess soil
Septic tank prices
Septic tank
Construction of the frame
Frame
The frame will be made of 50x150 mm boards, the insulation will be mineral wool. The steam room and washing room must be carefully insulated; you can use modern non-woven materials, plastic film or aluminum foil. Sheathing - natural lining, OSB boards or plywood. We have given calculations for some materials, but you can take others according to your preferences. This does not change the construction technology, but the cost will increase/decrease significantly.
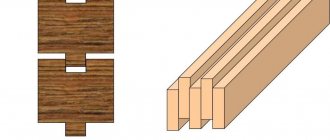
Step 1. Make the bottom trim with 50x150 mm boards. The boards are laid on a layer of waterproofing. The boards have a standard length of six meters, so there is no need to connect them anywhere except at the corners. At the corners, make a half-tree connection. It can be fixed with dowels, nails or self-tapping screws. Immediately install the floor beams, the distance between them is up to 80 centimeters; for the beams you can use 50×150 or 50×100 boards. Specific values depend on what loads the floor will be designed for.
| Job title | Photo |
| Foundation waterproofing | Diagram of horizontal waterproofing device |
| Bottom harness | Bottom harness Fastening the beam of the bottom frame with anchors |
| Corner connection of the bottom trim | Longitudinal half-tree connection Half-timber corner end connection Half-tree binding |
| Floors - installation of logs | Wooden floors - diagram Correct and incorrect placement of joist struts in a frame house Floor joists |
Step 2. Mark the locations of window and door openings. The markings are made according to the dimensions of the window and door frames; leave a gap of 2–3 centimeters to facilitate installation. These cracks will be sealed later.
Doorways
Window hole
Window opening design
Frame design
Window opening in frame wall
In the photo - openings in the frame wall
Step 3. Prepare vertical posts at all corners of the building, check their length and install them on the top frame. Using a water level, check the height again and adjust the supports if necessary. You can fix them at the bottom with metal corners; temporarily strengthen them in height with side struts.
Pitch of racks in a frame house
Exterior walls
Frame construction
Construction of a frame bath
Step 4. Stretch a rope between them and place all the other posts under it. Temporarily fix the position with scraps of boards. Don't forget about windows and doors.
The jibs must rest against something rigid to ensure normal stability. The most correct option is to rest them on the harness at the top and on the floor at the bottom.
The jib should stand like this: the center of the house is the low point, the perimeter of the house is the high point
The jibs increase the rigidity of the structure
Jib brackets (at the corners for fixing the posts)
Step 5. Make the top frame from 50x150 mm boards, check the position again and firmly fix the structure. For fastening, you can use the same metal corners. To increase the stability of the structure, it is very desirable to make inclined supports from boards in several places. The work will take little time, and the entire structure will become more reliable.
Upper harness - photo
Securing the top rails
Second floor ceilings
Step 6 . Install the second floor floor beams and mark the locations of windows and doors on them. Further all operations are similar to those described above. Lay a temporary attic floor right away; this will make installation of the rafter system much easier.
Construction of the first and second floors of a frame house
Partitions of the first floor of the house and frame of the second floor
Roof construction
The attic requires a careful approach to arranging the roof. It should not only be warm (this goes without saying), but also stable. In addition, the vertical posts under the rafter legs (headstocks) should be placed in such places that they can later be hidden in the cladding of the attic interior partitions. We have a gable roof under ondulin. How to do it?
Step 1. On the ground, make a template for rafter legs from boards. Pay attention to the slope angle.
Slope angle
Roof slope in degrees
Another way to determine the angle of the roof slope is to determine the ratio between the height from the ceiling to the ridge and half the width of the ceiling
Too large a slope will require a significant increase in financial costs, and too small an angle will reduce the height of the attic space.
Rafter foot template
Use a template to mark and trim rafters
Full size rafter template
Estimate the dimensions and position of the template along the entire length of the bath, adjust its parameters if necessary. At the same time, make marks for sawing out the support areas of the rafters into the top trim. Very important: the rafters must be located above the vertical posts.
Step 2. Assemble the entire set of rafters on the ground and place them on top of the bathhouse. Install the two outer rafter legs, pull the thread on the ridge, and check all the dimensions and spatial position again. Secure your legs.
Making a gable roof
Method of fastening the rafters and the base of the truss
Ready farms
Start of assembly of rafters for a gable roof
Step 3. Install all the rafters one by one, temporarily support them from below with scraps of boards. Check their position and securely fasten.
Step 4. You can start lathing. We chose ondulin as a roofing covering; it is not very physically stable. Ondulin needs to be attached to a sheathing of 20x50 mm slats; calculate the distance between the slats yourself based on four for each sheet. We cannot give exact advice - various manufacturers change the linear parameters of sheets.
Variant of ondulin plate sizes
Lathing for ondulin
Lathing for ondulin
Step 5 : Cover the roof. Due to the fact that the attic roof is insulated with mineral wool, every effort must be made to prevent it from getting wet. Under the ondulin you should put waterproofing, choose any material, the main thing is reliability. The waterproofing must be laid from bottom to top, with rows overlapping at least ten centimeters.
Waterproofing
Mark the rows of ondulin; if you don’t have enough experience in roofing work, we recommend marking a line for installing the next sheets on the hydrocoating across the row. Use a rope with blue paint; it won’t take much time and will speed up the work significantly.
Install drains, snow retainers, ridge and other additional elements of the drainage system; use special nails to attach the ondulin.
Installation of ondulin
Accurate execution of all ONDULINE installation instructions is a guarantee of your success
The process of laying ondulin sheets on the roof
Fasteners for ondulin
Step 6. At this stage it is better to install skylights. This is a rather “fashionable and comfortable”, but “expensive and complex” element of the attic. If you wish, install it; during work, strictly adhere to the manufacturer’s instructions. While there is no insulation yet, the work is easier to do, the installation will be of higher quality and safer. We chose a simpler project; windows are installed in the gables to illuminate the rooms. One in the middle in the attic hallway and one for each bedroom on the sides.
Roof gable
Step 7. Roof insulation. The thickness of the mineral wool should be at least 15 cm if you plan to use the premises in the winter and up to 10 centimeters if you are planning a summer version of the attic. It is imperative to make a vapor barrier for the insulation; you can use modern rolled materials or ordinary polyethylene film. The main thing is that steam should not condense on the cotton wool; this is fraught not only with a decrease in heat-saving characteristics. Moisture has a very negative effect on all wooden structures that come into contact with wool.
Roof insulation scheme
We carry out roof insulation
Prices for ondulin
ondulin
Wall insulation
Work should begin from the outside of the bathhouse - you need to quickly protect it from precipitation. Proceed with insulation only in dry, warm weather; mineral wool should not be exposed to rain. The thickness of the insulation is within 15 cm, secure wooden shelves between the vertical posts (don’t forget about windows and doors!), insert the cotton wool tightly, it does not leave any gaps or gaps.
Insulation
External walls can be finished with various materials, from cheap profiled sheets to expensive natural lining. What you choose is up to you. The main thing is not to forget to waterproof the insulation. Before you start upholstering the walls, it and the doors must already be installed. To decorate the openings you need to purchase decorative trims. Let us emphasize once again - perform the work very carefully; the penetration of atmospheric moisture under the outer casing must be completely excluded.
Insulation of the frame wall of a bathhouse from the inside
Internal walls are sheathed using the same technology, only instead of waterproofing the insulation, you need to make a vapor barrier. Particular attention is paid to the steam room, as it has the most difficult conditions for building structures.
Floors
There should be two flooring options - for the steam room and for other rooms and the attic.
There are big problems on the ground floor. The fact is that during washing a large amount of warm water will enter the underground space. The vents will not be able to instantly ventilate the space; steam will inevitably rise up and condense on all structures of the building. There is a high probability that the insulation under the floor in the recreation room, hallway and bathroom will absorb moisture with all the extremely negative consequences.
We offer several options to solve the problem:
- Even during the construction of the foundations, you can completely fence off the steam room using an ordinary concrete strip around the perimeter of the steam room. This is quite labor-intensive and time-consuming, but reliable;
- use polystyrene foam as insulation. It is not afraid of moisture, but there are certain safety issues for the health of residents;
- Do not insulate the floors on the first floor of the bathhouse. They can be laid with modern carpeting, thicker floorboards, etc.
Choose a solution yourself, while taking into account the maximum number of existing factors.
In the steam room, provision should be made for water drainage; the floor should be made of tongue-and-groove or ordinary edged boards. Make a slight slope (about 2÷3°) of the floor in the steam room, install a grate to receive water. In other rooms, floors are installed using the usual technology.
Lags in the bathhouse
Laying floorboards
Drain ladder
Ceiling
Another problem with the steam room. In this room, the vapor barrier of the insulation must be carried out especially carefully. To protect the insulation, we recommend using two materials at the same time. First, protect the mineral wool with ordinary plastic film; now you can purchase it in one wide piece, which will allow you to cover the ceiling without seams. It costs a penny, and you will sleep peacefully. You also need to nail aluminum foil on top of it. Coat the joints of the foil with silicate glue, and then seal them with special or ordinary tape. The fact is that tape under the influence of steam and high temperature quickly loses its adhesion properties, and silicate glue will be an additional insurance.
Insulating the ceiling in a bathhouse with your own hands
Ceiling insulation
If there was an ordinary attic above the steam room, then such precautions would be unnecessary. If you have an attic room, it is better to play it safe during the construction phase of the bathhouse than to later make expensive major repairs with the replacement of load-bearing structures.
Interior wall cladding
It is better to sheathe the first floor of the bathhouse with natural clapboard. This option may not be considered a “budget” option, but in all respects, natural lining leaves far behind all other modern materials. The lining must be attached to wooden slats 20×50 mm, the distance between the slats is 40÷50 centimeters. How to make clapboard cladding?
Step 1. Make a mark on the wall, check it for large irregularities.
Step 2. Nail two vertical slats on the extreme sides of the room, stretch a rope between them and install the rest. If problems arise, place pads under the slats or level the wall a little.
Wooden sheathing diagram
Step 3 : Check the wall dimensions. It may have different heights at the corners of the room, which means that the last panel needs to be cut at an angle. Our advice: cut not the last (upper) but the first (lower) paneling - the cut near the floor will be invisible.
Step 4. Nail the lining with small nails no more than two centimeters long, hold the nail at an angle, hammer it into the groove of the lining.
Fastening process using nails
Step 5. Repeat these operations on all walls of the room.
Very important: do not forget to provide a vapor barrier in the steam room. It is highly advisable to make it double, but you can get by with just aluminum foil.
Step 6. Nail the ceiling (baguettes) and floor skirting boards, install decorative profile wooden slats in the corners. The baguette in the corners needs to be sawed, but the sawing angle is not always exactly 90°. For cutting at right angles, there are special tools in stores. If you don’t have one, then it’s not difficult to make one yourself.
Cutting plinth in a miter box
But what to do if the corners of the rooms do not have 90°, how to make the junction of the baseboards or moldings smooth and beautiful?
- Align the ends of the baseboards strictly at an angle of 90°. The fact is that during transportation or manufacturing these angles may be violated.
- Place the baseboard against one wall and press it firmly against the ceiling, the baseboard should rest against the adjacent wall. Draw a line along the edge of the plinth on the ceiling slightly longer than the width of the plinth.
- Do the same operation near the other wall. There will be two lines on the ceiling, at the point of their intersection there should be the beginning of the cut, and the end in the center of the corner of the walls. Place the plinth on each side one by one, draw a cut line and cut along it.
This simple method will allow you to tightly connect decorative elements on walls with different angles. If you do not have practice in performing such operations, then we advise you to practice on segments, and only then take the whole element. If there are any gaps left, no problem, fill them with putty. Just keep in mind that a professional master will notice any putty.
Installation of wooden skirting boards
Prices for wooden skirting boards
wooden baseboard
Video - Trimming baguette or skirting boards
Installation of windows and doors
We recommend using plastic windows and doors; they look pretty good even in a bathhouse. During installation, remember to leave a few centimeters of clearance at the top for shrinkage. A frame bath does not shrink much; minor changes in size can only occur as a result of shrinkage of load-bearing wooden structures. Then you can begin installing the stove, finishing the bathroom, finishing the walls, sanding the floor, etc.
Video - Windows in a frame house
Flaws
Despite the large list of advantages, frame baths are also characterized by their small disadvantages. First of all, these are the costs of insulation, as well as finishing. The construction of a frame bathhouse itself can be cheaper than a brick bathhouse, but the price increases due to the fact that there is insulation.
Therefore, additional plastering will be required, which also costs a lot of money. The next disadvantage is that it is quite difficult to choose high-quality insulation for such a bath. It is impossible to save in this case, but even among the expensive insulation options, choosing the appropriate option will not be so easy.
Frame construction
Construction of the bathhouse frame
The construction of the frame is made of boards insulated with mineral wool. Make the bottom trim from boards measuring 50x150 mm. Typically, the standard boards are 6 m long, so you won’t have to connect anywhere except the corner parts. To fix them, you can use nails or screws. Immediately install the floor beams in 80 cm increments. After this, mark the window and door openings. Next, prepare vertical posts in all corners of the room and install them on the top frame. Using a water level, check the height again and, if necessary, level the supports. They can be fixed at the bottom with metal corners, and at the top with temporary side struts. After completing the top frame, check the strength of the structure, install the floor beams of the second floor and do not forget to mark the openings for windows and doors. After this, you need to lay a temporary attic floor, which will help facilitate the installation of the rafter system.
Construction stages
The construction of a frame bath takes place in several stages, following which you can quickly and easily build a bathhouse. In general, three stages can be distinguished:
- The first stage involves the beginning of the construction of the foundation. At this time, it is worth deciding on the required type of foundation, since it is he who will be responsible for the cargo, equipment and interior. To begin with, it is worth choosing a foundation, namely the type of its structure. To do this, you should definitely take into account all the technical aspects of lighting and furniture, including the nature of the soil. Very often, a columnar foundation is installed for this type of building. To ensure reliable installation of asbestos pipes, wells are created, the depth of which is up to one and a half meters. A pipe is inserted into each of the holes, which is buried tightly, and cement along with sand is poured inside.
- The second stage is the strapping. For this device it is already necessary to use wooden beams 50x100 mm. Markings are applied to them for further construction, after which the boards are laid along the outer contour of the structure. To carry out such work, you can use any type of wood that would not be able to rot in the future. But, nevertheless, before laying, the timber must be treated with special mixtures that could prevent the occurrence of rotting and fire.
- The third stage is the installation of floors, frames and walls. In the place where the walls will be installed, it is necessary to install additional racks made of beams, which have a cross-section of 10x10. After which it will be possible to begin arranging the floors. At the first stage, logs are laid. They can be either in the form of beams or in the form of paired boards. They can lie on the waterproofing of the foundation. Roofing felt is applied to the black coating, which can resist moisture entering the room. This is what is considered the main feature of the third stage.
Construction options
After determining the option of the bathhouse, as well as the place in which it will be located, it is necessary to draw up a drawing or project. Thanks to modern technologies for building baths, they have now turned into comfortable steam rooms. The appearance of the bath structure will directly depend on the personal wishes of the customers.
Regardless of the type of bath, it is characterized by its own design features, having strengths and weaknesses. You need to know about them in advance so that serious problems do not arise in the future. Many people are interested in the question of how to build a frame bathhouse, and at the same time avoid the formation of condensation when using it in winter. As a rule, condensation only causes great damage to the structure, which is why, in order to preserve the frame structure, you need to take care of good vapor barrier.
Ordering a bathhouse project with an attic
The most correct and optimal intention would be to order a standard design solution that is consistent with all technical requirements from a company that is engaged in the construction of frame buildings.
This is the best choice because:
- standard solutions for frame-type bathhouses with an attic are by no means considered exotic; on the contrary, customers often first choose small buildings, such as country houses or bathhouses, and then begin the construction of fundamental residential estates;
- Professional builders undoubtedly have more experience in constructing standard solutions for bathhouse complex buildings than in constructing non-standard buildings;
- a specialized company calculates building materials based on standard dimensions, which can significantly reduce the amount of unusable waste compared to independent calculations;
- The use of modern software systems makes it possible during design to track all accepted changes and introduce them into design documentation, recalculating the volume of construction and finishing materials.