Flexible tiles are one of the most common types of roofing in Western countries. In articles "Flexible roofing: review" And “Overview of components for flexible roofing” You can read more about the features of this material and its components.
In this article we will take a closer look at the installation of soft roofing.
- Tools and accessories
- Preparing the base
- Installation of underlay carpet
- Installation of planks
- Installation of flexible roofing
- Connecting to a wall
- Installation of ridge and ventilation
Tools and accessories
To install bitumen shingles, you will need a certain list of tools.
- A hammer is a percussion instrument with a fiberglass or wooden handle and a steel head. Needed for nailing roof elements using nails.
- A roofing knife is a type of construction knife used for cutting soft materials.
The roofing knife has a curved blade for easy cutting of various materials
- A spatula is used to apply mastic to the seams. A tool with a small blade (100 mm) is suitable for these purposes. Alternatively, brushes or trowels can be used to apply mastic to surfaces.
The spatula is convenient for coating seams with mastic
- A construction hair dryer may be required if installation is carried out in subzero temperatures. A hair dryer allows you to heat the mastic and the back adhesive side of the shingles.
The optimal temperature for working with flexible tiles is considered to be from +5 to +25 degrees.
When working in temperatures below +5, you will need to keep the shingles indoors for a day. In addition to tools, the work will require components, which we wrote about in the article . ” The list of necessary items includes underlay carpet, valley carpet, roofing nails, bitumen mastic, metal strips and ridge tiles.
Layout and drawing creation
Preparatory activities are the most important stage in creating a high-quality roof. They include drawing up a project and translating it into a drawing, as well as calculating the necessary materials. Even if you clearly and in every detail imagine the future roof, you will still need a drawing - if drawn up correctly, it will allow you to accurately calculate the amount of materials needed.
Most often, bitumen shingles are sold in packages of 3 m². The required number of packages depends on the size and shape of the roof. The easiest way is to calculate the area of a gable roof (two rectangles), and, accordingly, the required number of product packages. If, for example, you consider that the roof area of your gazebo is 12 m², it is better to buy not 4 packages, but 5. Unforeseen situations may arise in the process - overspending or some area will be damaged and the material will need to be replaced.
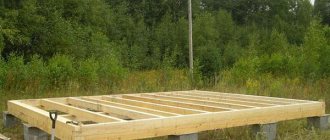
Preparing the base
The soft roof is laid on a continuous flooring, which is made of OSB or plywood. Before starting work, it is necessary to prepare the rafter system.
- Wooden rafters must be coated with antiseptic agents to protect them from the proliferation of fungal microorganisms in order to prevent the appearance of mold.
- A layer of vapor barrier film is installed under the rafter system. The film is secured using wooden blocks, which are installed in 60 cm increments. The coating is attached to the rafters using nails or staples. The films are overlapped with each other using double-sided tape.
Using double tape to join two sheets
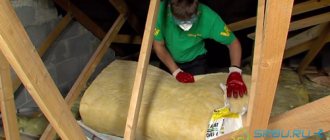
- Insulation is installed in the spaces between the rafters. If laying in two layers is required, then the slabs must be laid offset to cover the seams, which will become “cold bridges”.
Laying thermal insulation
- A layer of windproof film is laid on top of the insulation.
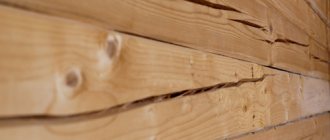
- The next step is to proceed to the installation of a rigid base - flooring under the soft roof. The first layer is laid with a 25 mm thick coniferous board. Laying is done in random increments. The humidity of the material should not exceed 20%.
The photo shows a layer of wind protection, after which there is a plank sheathing covered with OSB sheets
Flooring for a soft roof, made entirely of boards, although allowed by roofing SNiPs, in practice this is done only as a last resort. The reasons for this are quite clear - the board has unpredictable shrinkage, and its deformation changes can damage the roofing.
- After the board, the main covering is laid. The most common decking material is OSB (oriented strand board). The grade of particle board material must be no less than OSB-3; for this type of work, sheets with a thickness of 9 or 12 mm are usually used. It is also possible to use moisture-resistant plywood (FSF) of similar thickness. The humidity of slab materials cannot exceed 12%. The gap between the sheets should be 3 - 4 mm. The sheets are fastened to the sheathing of boards using self-tapping screws. The result should be a flat surface, so it is important that there are no height differences (more than 2 mm) at the joints. When laying sheets, it is important to ensure that the seams are offset (staggered).
The gap between the sheets is called deformation (compensation). Any wood materials tend to change their volume (swell) under the influence of environmental humidity. The gap gives the material the opportunity to change geometry without damaging the entire structure.
Secrets of laying flexible tiles
Many articles have been written about how to lay flexible tiles. The technology is understandable and accessible for independent repetition.
However, there are points that you should pay attention to, regardless of whether you install the roof yourself or hire a construction team to do it. And, of course, manufacturers can tell you the best about technology.
, technical director of the “Pitched Roofing” direction TechnoNIKOL Company .
So, from our material you will learn:
- Where does the installation of flexible tiles begin?
- Why do you need vapor barrier and roof ventilation?
- How to lay insulation and wind/waterproof film?
- What is the secret of the counter beam and sheathing?
- How to install a base under flexible tiles?
- How to lay flexible tiles?
- How to care for a soft roof?
1. Where does the installation of flexible tiles begin?
The overall service life of the house largely depends on the reliability of the roof. Flexible tiles are a durable and strong material, and, as in any stage of construction, 50% of success depends on high-quality installation or correctly calculated roofing.
Rafael Serazhetdinov:
– Before you begin installing flexible tiles, it is necessary to develop a project and carry out a whole range of preparatory work. This is the only way to guarantee that the roof will last a long time.
To install a high-quality and reliable roof, you must adhere to the following plan:
- Project development.
- Preparatory work.
- Installation of base and roofing.
- Control of completed work.
- Periodic roof maintenance.
Strict adherence to these points guarantees a long service life of the soft roof. Moreover, this approach can be used for any construction work.
2. Requirements for the rafter system
The service life of a soft roof completely depends on the thoroughness of the preparatory work. For clarity, the stages of installing flexible tiles can be divided into points.
So, first you need to mount:
- rafter system;
- thermal insulation;
- steam and waterproofing;
- base for the roof (lathing and continuous flooring).
Only after completing the preparatory work can you begin laying flexible tiles.
Rafael Serazhetdinov:
- Because rafters bear the main load from the roofing, and special requirements are placed on them. An important point is the reliable fastening of the rafter legs. I also recommend treating the wood with protective compounds.
The rafter system is not built “by eye”, and not according to the principle “like a neighbor’s”, but on the basis of a careful calculation, which includes collecting data on wind and snow loads and the weight of the roofing material.
Because Because flexible tiles are light in weight, they do not require a powerful rafter system, such as, for example, natural tiles.
After installing the rafter system, we begin installing the vapor barrier film.
FORUMHOUSE users know well how to properly install a vapor barrier, and what negative consequences its absence can lead to.
Let us note such a point as laying the vapor barrier film overlapping, with the obligatory gluing of the seams with double-sided tape.
3. How to lay insulation and fill the counter-lattice?
After installing the vapor barrier, we proceed to laying the insulation. Before laying the insulation between the rafters, we nail a wooden block that will hold the insulation boards.
Rafael Serazhetdinov:
– The thickness of the insulation is determined on the basis of thermal engineering calculations.
Insulation boards should be laid staggered, after which they are covered with a moisture- and wind-proof film. We fix the film with a counter block, which is stuffed over the rafter legs.
In addition to holding the windproof film, the counterburst forms a ventilation channel, which is necessary for ventilation of the under-roof space and removal of excess moisture.
To do this, the block is nailed parallel to the top of the rafters. If you fill the counter beam perpendicular to the rafter legs (and this happens), then in the future it will turn into an obstacle to the natural flow of air (from the eaves to the ridge) in the under-roof space.
The height of the counter beam is 50-75 mm, and its width is equal to the width of the rafters. The height of the ventilation duct depends on the length and angle of the roof. So, with gentle slopes below 20 degrees, the height of the channel is at least 75 mm, above 20 degrees - at least 50 mm. If this is not done, the natural flow of air will be hampered.
After installing the counter beam, a sheathing is placed on top of it, perpendicularly, which is necessary for attaching a continuous flooring under the flexible tiles. This sheathing allows for free flow of air in the space between the rafters and ensures savings on large-panel flooring on the edge and thickness of the latter.
For lathing, edged or unedged boards with a thickness of 16 mm or more are used.
All boards are nailed together. It is important to remember that the length of the nail must be such that, having pierced the sheathing and counter-lattice, its point enters the rafter leg at least 2-3 cm.
Rafael Serazhetdinov:
– All wooden structural elements are necessarily treated with fire-bioprotective compounds to protect them from rotting and burning.
4. How to prepare the base for laying flexible tiles?
Flexible tiles are laid on a solid, hard, even and dry flooring. The most common flooring is OSB-3, and to a lesser extent, FSF plywood. The thickness is selected according to engineering calculations depending on the construction area, roof shape, etc. For single-layer and two-layer tiles, the thickness of the large-panel flooring must be at least 9 mm, for three-layer tiles - at least 12 mm. As an alternative type of flooring under the tiles, tongue and groove boards with a relative humidity of no more than 20% are used.
Rafael Serazhetdinov:
– To compensate for thermal expansion, OSB-3 boards and FSF plywood are laid with a gap of 3-5 mm and secured with self-tapping screws or rough nails. After preparing the flooring, it is necessary to install two types of underlay carpets: self-adhesive - in places where leaks are most likely, these include the eaves overhang and valley; along the rest of the surface of the slope there is a regular lining carpet with mechanical fixation.
Because The material is produced in rolls, then it is rolled out from bottom to top, with an overlap in the transverse direction of 10 cm, and in the longitudinal direction - 15 cm. The carpet is nailed to the flooring with special galvanized nails (3x30 mm), with a wide head, every 15-20 cm. Overlapping areas in a regular carpet are coated with bitumen mastic. .
After laying the underlayment, the gable strips are installed. The cornice strip is mounted on a wooden flooring. They are nailed (in a checkerboard pattern with a pitch of 150-200 mm) with the same nails as the lining carpet. At the joints, the planks are laid with an overlap of 150 mm and nailed with 2 nails.
5. How to lay flexible tiles?
Flexible tiles are small-piece roofing materials of light weight; you can install them yourself, without resorting to outside help. To do this, ridge-eaves tiles are laid on the eaves overhang, on top of the lining carpet. Instead, you can use ordinary ordinary tiles, having previously cut off its petals.
Ridge-eaves tiles are nailed to the base with galvanized nails with a wide head at a distance of 2.5 cm from the edge.
Rafael Serazhetdinov:
- Because The color of flexible tiles may vary slightly from batch to batch; I recommend installing 5-6 packs - this is a feature of all manufacturers of flexible tiles.
Laying the first row of flexible tiles begins from the middle of the slope. Installation is carried out parallel to the ridge-eaves tiles. The second row is laid from the center. In this case, it is necessary to shift the shingles to the left and to the right by half a blade. The tiles are nailed so that the lower edge of the petals is flush with the upper edge of the cutouts of the first row.
To control the straightness of laying subsequent rows, you can mark the base by pulling the threads or tapping with a cord.
Nails should be driven in so that the body of the nail enters the base strictly at a right angle, and the head does not recess into the shingle, but is flush with the surface of the flexible tile. You can find out how many nails and where to hammer them on the SHINGLAS website.
Rafael Serazhetdinov:
– The soft roof should be installed at an ambient temperature of at least - 20 degrees. If the temperature is below +5 degrees, it is necessary to keep the packages in a warm room for at least a day and apply 5-6 packs to the roof. In extreme heat, you need to move across the surface of already laid tiles on special scaffolding. If this is not done, then dents or shoe marks may remain on the surface of the flexible tiles. If it is not possible to build a scaffolding, then the working day is divided into two parts, excluding the part of the day when the sun is at its zenith.
Particular attention should be paid to the penetration of ventilation elements through the soft roof.
The passage element must be coated with bitumen mastic and nailed to the base. Then the installation site is coated with mastic, and the flexible tiles are laid. The tiles are cut on site to ensure a tight fit to the passage element.
6. Why do you need a ridge aerator, and how to care for your soft roof?
The final stage of laying flexible tiles is the installation of a continuous ridge aerator on the roof ridge. A ridge aerator is necessary for the free release of air from the under-roof space.
Rafael Serazhetdinov:
– Cut a 3 to 8 cm wide slot in the wooden deck along the ridge. The aerator is secured with galvanized screws.
After installing the aerator, ridge-eaves tiles are laid on top of it.
In order for a roof made of flexible tiles to serve for a long time, it is necessary to follow a number of rules for caring for it:
- In spring and autumn, you need to clean the roof with a soft brush to remove debris, leaves, branches, etc. Do not use brushes with metal bristles or sharp objects.
- To ensure free flow of water, gutters and funnels are cleaned in advance.
- If too much snow has accumulated on the roof in winter, it must be removed with wooden shovels, layer by layer, leaving a layer no more than 10 cm thick at the end of the work.
- It is also recommended to periodically inspect the roof for preventive purposes and, if necessary, repair it.
It should be noted that with two-layer tiles there are fewer such installation problems.
You can find out everything about installing flexible tiles on the SHINGLAS website. This topic tells you how to properly install the base under flexible tiles. And from this video, FORUMHOUSE users can learn about the features of modern roofing materials.
As an advertisement
Installation of underlay carpet
Underlayment carpet creates an additional layer of waterproofing, protecting the OSB or plywood covering. The lining carpet is a rolled material based on bitumen.
Depending on the slope of the roof slope, the cushioning carpet can be rolled out over the entire area of the hard surface or only in places. The first case is assumed when the slope is no more than 18 degrees. If the slope of the slope is greater than this value, then the cushioning carpet is installed only on the valley, ridges, cornices, end parts and in places adjacent to vertical surfaces.
- Rolling out carpet rolls is carried out parallel to the ridge if the slope is small. Vertical rolling is also allowed (from ridge to ridge). The material must be laid with tension.
Rolling out the carpet from ridge to ridge
- The overlap of the lining carpet on horizontal seams should be 10 cm, on vertical seams - 20 cm, while the seams are coated with bitumen mastic. To apply the substance, you can use a spatula or brush. Some manufacturers produce their own adhesive compositions for attaching carpet.
- After treating the seams with mastic, the carpet is nailed down with roofing nails. It is recommended to hammer in hardware in increments of 20–25 cm.
Endow is an internal angle that occurs at the junction of two slopes to each other. The endova requires increased waterproofing, since it is in this place that water flows from two slopes. For this reason, some manufacturers recommend laying several layers of underlay carpet, the first layer is laid along the valley, then it is covered with horizontal layers on top.
Step-by-step self-installation of bitumen shingles
- Sheathing - If the roof pitch is 9-20 degrees, continuous sheathing is required. If the slope is more than 20 degrees, a distance of 32 cm is allowed between the boards/bars.
- Waterproofing - when using continuous lathing in the form of OSB boards, lining bitumen waterproofing is used. It is sold in rolls.
- Protection from birds and insects - installation of ventilated infills is recommended.
- Getting started - the first sheets are placed with an overhang of 35 mm.
- The second row - it must start from half a sheet.
- Driving nails - you need to follow the order of driving nails. Then the possibility of deformation of the tiles is eliminated.
- Installation of gables - additional elements are mounted from the eaves and end at the ridge.
- Design of the ridge - installation of covering aprons with an overlap of 40 mm. The skates are attached to all waves of roofing sheets.
- Decorating the ribs of the slopes - breathable tape is used for this purpose. It provides reliable waterproofing. In its absence, leaks may occur.
- Design of valleys - use of special valleys Ondulin. To complete this stage, additional sheathing is needed.
Installation of planks
Metal strips are an important element of roof construction. They protect the wooden elements of the roof from precipitation and ensure the drainage of water into the gutters.
- The planks are fixed on top of the lining carpet with an indentation of 2 cm. Self-tapping screws or nails can be used as fastenings, which are installed in a zigzag manner at a distance of 10 - 15 cm.
Front strip with a projection for draining water from the gable part of the roof
Drip rails or eaves strips are installed on eaves; frontal strips are used on the roof gable; they have a special protrusion that limits the flow of water. In places where the roof adjoins vertical surfaces, abutment strips are installed. If the roof slope has a curved shape, then the eaves elements are cut into small segments.
- The valley carpet plays the role of additional waterproofing on the valley, and it is made in the form of an additional covering that is installed on top of the lining carpet. The edge of the valley carpet is coated with mastic to insulate the seams, and roofing nails are additionally driven on top in increments of 10 cm. The distance from the valley axis should be at least 50 cm on both sides. From the edges, the valley carpet is laid on top of the drip edges.
Scheme for rolling out a valley carpet
- After this, it is necessary to lay a strip of starting tiles; this strip has a rectangular shape, it is devoid of a pattern and figured cutouts. Its main purpose is to provide uniform coverage on the edges of the roof. The strip is placed at a distance of 1 - 2 cm from the bend of the cornice strip. This element is secured with roofing nails.
The first layer is fixed on the starting strip
Different manufacturers of soft roofing produce special starting elements for specific types of roofing, but you can use ordinary tiles, they are universal and suitable for any model.
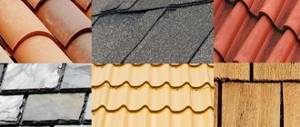
Ceramic tiles: pros and cons
Good day, dear friends!
Among the range of roofing materials offered by modern manufacturers, ceramic tiles are of growing interest among potential buyers. This material is essentially the most ancient. It was actively used back in the days of ancient Rome, then it was forgotten, and here again ceramic tiles are on the list of popular and relevant materials for roofing.
Let's talk about all the pros and cons of ceramic tiles
for roofing houses and outbuildings.
The unique properties of ceramic tiles, plus their availability, have contributed to the emergence of a wide range of fans of this material. Recently, one can observe an increase in the number of house roofs made of tiled roofing. What determines such demand, consumer interest and trust in ceramic material, we will try to find out when considering its advantages, as well as its disadvantages.
Advantages of ceramic tiles
1. The type of roof under consideration does not contain harmful components. Most of the components of ceramic tiles are natural raw materials (clay, water). The remaining small percentage are plasticizers that do not harm the environment. From all this we can conclude that this covering material is environmentally friendly, which is undoubtedly a plus for those living under such a roof.
2. Non-combustibility of the roof. There are no flammable components in the composition of ceramic tiles; on the contrary, in the process of its production there is such a moment as firing. In general, all this affected the fire safety of the tiles.
3. Low heat transfer capacity. The thermal insulation property helps maintain an optimal microclimate in the constructed facility. In the summer, the heat from the street will not penetrate into the room, which will keep it cool. And in winter, the heat of a heated room will be retained longer.
4. Expressive and attractive general background of the roof. A tile roof will give the entire architectural appearance of the building a finished, aesthetically pleasing appearance with a touch of a certain fairytale quality. In general, the object with a roof made of ceramic tiles turns out to be interesting.
5. Durability reaching hundreds of years. This dignity can be evidenced by excavations of ancient settlements, where fragments of tiled roofs are still found to this day.
6. Protection from external sound manifestations. For example, it will not be possible to hear the pattering rain under a roof made of ceramic tiles. This roofing option is clearly not for romantics. For the average person, this property will allow them to save on additional costs associated with roof sound insulation.
7. Low susceptibility to natural influences. Rain, sun, frost, heat are not the sworn enemies of ceramic tiles. With these impacts, the damage caused to the roof is negligibly minimal and only appears slightly over the years. In general, we can safely say that the material does not fade, crack or warp in such weather conditions.
Cons of ceramic tiles
1. Low resistance to mechanical shock manifestations. Transportation, inept installation and natural phenomena such as large hail can damage or completely destroy the tiles.
2. Heavy weight. The disadvantage of ceramic roofing emerges during unloading work, during its installation and design of the roof frame. The heavy total mass of a ceramic roof will require a reinforced roof frame using more elements that increase the strength of the entire structure.
3. For better roof tightness, ceramic tiles require the presence of lining material (film, roofing felt). This disadvantage leads to additional costs and increases the cost of installation.
4. A tile roof turns out to be an expensive pleasure for most developers. Complex production and the use of natural components could not but affect the cost and final price of ceramic tiles.
Taking a look at these pros and cons of ceramic tiles
, now everyone will be able to evaluate its continuity for their own purposes. Some people will be attracted by ceramic tiles due to their elegance and durability, plus their isolation from external noise, while others may be put off by their high price, complexity of installation and their fragility.
In any case, the material is generally recommended on the positive side and has been tested for more than one decade. This makes him a good advertisement, but the final choice is still up to the consumer. See you later, friends!
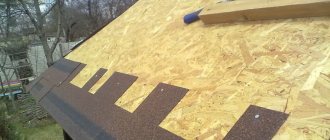
Installation of flexible roofing
When the surface is prepared and all of the above operations are completed, you can begin installing the roof itself.
Please note that it is not recommended to use different batches of tiles on the same slope, as the color shades of the material may differ. It is recommended to take shingles from different packages in a random order.
- Laying a soft roof can begin from the lower or upper part of the slope, and in any case, the laying begins from the central part of the ridge or cornice.
- The first row of starter shingles is laid in such a way that the top layer overlaps the seams and perforated cutouts. Hardware is hammered in at a distance of 20–30 cm from the edge cutout. Depending on the slope, 4 or 6 nails are used to secure one shingle.
- The shingles must be laid staggered to cover the seams, so the second row also starts from the center, but offset. The installation pattern must correspond to the shape of the tiles. Before placing on the roof, the protective film is removed from the back of the tiles.
- The edges of the shingles must be trimmed with a knife, and the side edge should be coated with mastic. This will provide protection from downpours that the wind will blow onto the gable of the roof.
To install shingles at high heights, you will need to install scaffolding
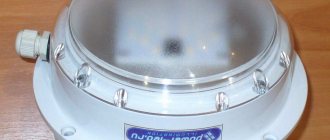
- In places where it is planned to install spot ventilation, at this stage you can make cutouts in the roof. Then a roof point valve (RPV) is installed at these points. After installation, all seams are covered with mastic.
Securing the KTV to the roof using roofing nails
Ventilation holes are inserted one at a time per 50 - 60 sq.m.
- The shingles that meet the chimney and vent pipes are notched to fit the obstruction.
Cutout on soft tiles for connecting to the KTV
- For installation on the valley axis, it is necessary to cut the shingles along the edges so that on the valley carpet the distance between the tiles of different slopes is 15 - 20 cm. The cutting line must be treated with mastic.
Forming tiles
You can make the Dutch or Roman variety using a homemade method, but the flat shape of the tile is best suited for making it at home.
To create a blank, home craftsmen use a special molding frame with a handle (it can be wooden or metal) and a plate that will serve as the bottom.
The plate must fit clearly into the frame and have a cutout in the place where the tile will have a tenon.
Place a frame on a flat working surface (usually a table), a plate in it, then lightly sprinkle everything with dry fine quartz sand. Ash can be used instead of sand.
The crumpled clay is formed into a cube, from which you need to make layers two centimeters thick - the easiest way is to use a stretched thin steel wire, cutting the cube with it.
Each prepared piece is placed in a frame - it must be completely filled, the area where the thorn will be is pressed firmly, and another piece of clay is added.
Using a rolling pin dipped in water, remove excess dough from the frame, after which the frame itself must be carefully lifted. Place a drying board on the tiles, turn it over and carefully remove the plate that served as the bottom.
Connecting to a wall
To properly protect roofing materials from water, it is necessary to correctly connect the shingles to the wall or chimney pipes. This task can be performed in two ways. The differences between them are only in the location of the valley carpet. In the first method, the valley carpet is located under the shingles, while the second method assumes that the carpet is located above the shingles.
- A corner block (50x50 mm) must be laid next to the wall or pipe. A lining carpet is placed on top of it.
Scheme of connections to vertical surfaces of flexible tiles
- Either soft tiles or a valley carpet are laid on the lining carpet, depending on the method of joining. In the first method, the valley carpet is laid on the tiles and glued with mastic.
- The valley carpet must overlap the wall or chimney pipe with an overlap of at least 30 mm. To secure the carpet, you can use mastic or dowel nails. A metal junction strip is installed at the end of the carpet, and the seam is treated with silicone sealant.
Pros and cons of ceramic tiles
Roofing has inherent positive and negative qualities. They must be carefully analyzed before choosing and purchasing material for the roof of your house.
- When considering the advantages of ceramic tiles, the first place is to highlight the environmental friendliness of the material. The main components are clay and water. Non-toxic plasticizers are used as additives.
- Based on the raw materials used, one can judge that the roofing material is 100% resistant to fire. In addition, the manufacturing technology involves firing the tiles, which doubly confirms their fire safety.
- Low thermal conductivity contributes to reduced heat loss in winter. In summer, the roof warms up slightly, keeping the inside of the house cool.
- The tiled roof looks beautiful and adds aesthetics to the entire building.
- In terms of service life, tiles made from natural materials come first. A properly installed roof will last up to 100 years.
- The high sound insulation coefficient of the material manifests itself during rain or hail. There is silence inside the building.
- Roofing ceramic material is slightly exposed to the negative effects of all natural phenomena.
- One of the main disadvantages of ceramic roofing is its heavy weight. It will be necessary to create a reinforced rafter system with additional supporting elements.
- The disadvantage is considered to be weak resistance to impacts. A lot of fight appears from careless transportation or packing.
- To ensure the tightness of the roof, it is necessary to lay lining material under the tiles, which requires additional costs.
- Complex production technology is reflected in the high cost of ceramic roofing.
Having assessed the main pros and cons, it is easier for the developer to decide whether he needs such a roof.
Installation of ridge and ventilation
After completing the installation of the main roofing covering, you can proceed to work on the ridge. For this roof element, ridge-eaves tiles are used. To ventilate the internal space of the roof, it is necessary to install a ridge aerator. Installation of skates without ventilation is carried out as follows.
- The shingles must be bent so that the fold line is at the ridge of the roof. It is recommended to make an overlap between the elements of at least 5 cm. Fastening is done using roofing nails. In this case, the fastening points must be covered by the subsequent element of the ridge.
- A special hole 4–8 cm wide is cut in the ventilated ridge. A ridge aerator, which has a corrugated structure for air circulation, is fixed on top of this gap. The element is isolated from debris and dust from the street. Shingles are laid on top of the aerator in the same way as a ridge without ventilation.
The aerator ridge provides air circulation
What should the clay be like?
The quality of clay is the most important indicator; it determines how durable and beautiful the finished product will be.
To make the roofing covering reliable, you need to use moderately fatty clay that does not contain a lot of sand - just the kind that is used in pottery.
A material that is too fatty is bad because shingles made from it will crack and warp during drying.
If there is a lot of sand in the composition, the finished elements will absorb a lot of water, and accordingly, the tiles will not tolerate frost well.
The “plasticine” from which the tiles will be molded must be viscous, soft, and when crushed, plastic, that is, it must be easy to take and maintain the shape that is given to it.
It is necessary that the raw materials for mixing the future piece roofing are small and clean, without large foreign objects.
VII stage. Firing tiles
Firing is a crucial moment in the production of tiles. It is useful to fire tiles in special kilns called batch kilns. You can see something like this in old Dutch villages, and it is quite possible to design something similar to a city with a similar layout on your own site, albeit of a smaller size.
So, an electric furnace for firing tiles consists of four compartments - a firebox, an ash pan, a firing chamber and a pipe. Behind the firebox there is a shell with holes, which separates it from the firing chamber. Just like the chamber is completely loaded with tiles, the rear part is fully lined with temporary wenmen with holes. Also, a special valve is installed in such a furnace to reduce or increase draft; amen, the electric furnace itself is covered with a vault.
By the way, at the back of such a stove there are always more people for unloading and loading tiles. And at the moment of firing, it is laid with bricks or covered with sand - to reduce heat loss. But a small door is always left to monitor the firing progress and take samples.
The tiles themselves are suitable for firing in different ways: vertically, if they are Dutch or Tatar tiles, and sideways on the edge, if they are flat. But any tiles should stand vertically, at a short distance from each other and without any tilt. To prevent it from tilting, it is good to wedge it with pieces of broken and already burned pieces.
It is useful to burn the tiles to such an extent, fortunately it will not become slightly vitrified on its surface. In general, vitrification is a means of over-burning the tiles, and it is better to overexpose them in the fire than to under-bake them. Usually, the longer a tile lasts in the stove, the stronger it is. And the installation of ceramic tiles with burnout is a bond of special strength and durability of the roof. But without fanaticism, it is possible to completely burn the clay completely.
VIII stage. Sorting tiles
After the tiles have cooled, they are unloaded from the kiln and sorted. So, for the roof, all of it should be straight, clear, without cracks and rhythmically colored. And the rest of the tiles can be safely used to cover canopies. It is useful to store tiles under a canopy, with good protection from snow and rain. And the lower rows should not lie on the ground, amen on the boards.
All tile roofs are durable, easy to maintain and quite beautiful. And installing ceramic tiles will not be difficult even for a novice builder - everything is damn simple. The steeper the slope, the better the unit for the tile itself - the snow will be less likely to linger on it. But in hot areas, tiles are also suitable for covering flat roofs.
Tips and tricks
To build a beautiful and high-quality roof, you should listen to the advice of professionals:
- the weight of 1 m2 of ceramic tile covering must correspond to the load-bearing capacity of the roof in order to avoid its destruction from overload;
- the color of the ceramic tiles is selected so that the roof harmoniously combines with the facade and other buildings of the architectural ensemble;
- ceramic tiles are purchased after accurate calculations, allowing for a 10% margin for trimming and breaking;
- It is better to calculate additional elements with an experienced roofer.
Ceramic tiles made from fired clay are considered an eternal material. After careful dismantling of the old roof, the entire elements are suitable for reuse in small buildings. Old ceramic tiles can be used to cover a canopy, gazebo, or outbuilding.
V stage. Drying clay tiles
The formed ceramic tiles must dry well - lazily and rhythmically over the entire surface, otherwise cracks cannot be avoided. And the drying time depends on how tightly the flint was mixed - the rawer it was, the faster the water will come out.
You can only dry the tiles indoors, or at least under a canopy. To do this, you need to make temporary shelves or bricks or stands in advance. It will be useful to dry for 10 days.
Advantages and disadvantages
Flexible tiles are suitable for installation on single- and multi-slope roofs. Due to its plasticity and small size, it is indispensable on roofs of complex shapes: round, domed, multi-slope. This coating looks good on buildings of any purpose, in a wide variety of architectural styles.
The advantages of flexible bitumen shingles include:
- Durability - the service life of roofing material is about 30 years.
- Wide range of “operating” temperatures. It is used both in the countries of Central Asia and in the North of Canada.
- UV resistance.
- Low maintenance requirements - if flexible tiles are laid well and in compliance with the technology, they do not require attention for years and decades.
- Easy installation, allowing high-quality installation with your own hands without the involvement of specialists.
- The low weight makes it possible to use bars of a smaller cross-section for rafters, making it easier to deliver and work with materials.
One of the advantages of flexible tiles is the ability to be installed on roofs of complex shapes. - Possibility of application on roofs of any shape - bulbs, domes, other shapes on which it is very difficult to use other roofing materials.
- Low amount of waste during installation.
- High maintainability.
- Adapts well to changes in geometry that occur during shrinkage of a building or roof.
- The rough surface makes it possible not to use additional snow retention agents.
- Withstands strong gusts of wind (requires reinforced fastening with 6 nails).
- It has good sound-insulating and heat-saving properties.
- Resistant to acids, not damaged by mosses, fungi and lichens.
- It is waterproof and fireproof, which is very important for bathhouses - burning particles often fly out of the pipe and land on the roof.
Its disadvantages are the following:
- Quite a high cost.
- Increased consumption of materials when installing sheathing (again, increasing the cost of the roof).
Stage VI. Tile processing
Fired natural tiles do not always turn out to be a perfectly even color, which is why they are often subjected to additional processing beforehand. Basically this is glazing. The tiles are covered with a special glassy layer, which makes them more beautiful. But this is quite an expensive pleasure, amen; therefore, most often, glazing is applied to the tiles, which is made from red, pure, fatty clay. It is da-capo dried and ground, then diluted with water like thick milk. Before firing, the clay is dipped into a similar solution and placed again on the drying shelf. After firing, the tiles turn out to be an even red color, with improved qualities and an extended service life.
Stage III. Preparing clay for processing
Before processing, it is useful to soak the frozen clay, and after two or three days you can fully begin to knead it. For this, there is a clay grinder, which can be made independently from a wooden barrel or thick boards in the form of a box. A wooden or iron axle should be inserted inside the clay grinder, and iron knives should be screwed onto it. The mechanism is similar to twisting meat in a meat grinder. And for better mixing, it is advisable to place additional knives on the sides of the clay grinder. It is better to mix the clay itself at least twice.