Repairing wooden windows with your own hands is a very relevant issue. Wooden windows do not retreat even in the age of modern plastic ones. Wood is not only a natural, prestigious material, it also has real advantages: wooden windows are resistant to external influences and provide excellent sound and heat insulation. And most importantly, optimal humidity is automatically maintained in a house with wooden windows.
As the window market declines, they are vying to offer windows made from modified wood. There is nothing bad to say about them, except for the price: not only is it not pleasing, it’s scary. Meanwhile, restoring wooden windows with your own hands is not so difficult, and as a result, a great-grandfather’s killed window can be restored to the appearance of a completely new product.
Technology, tools, materials
Independent and professional restoration of old windows is most often based on the so-called Swedish technology. But if you really look at it, its whole essence comes down to inserting a Euro-strip sealing cord, and fitting and repainting remain in the scope of additional services, the price is from 3,000 rubles/window. And in principle, Euro-strip technology is not restoration, but insulation. (Which we wrote about here on the eve of the cold weather).
Further in the article, the technology for repairing wooden windows will be described, which allows you to make even a rotten window look no worse than a plastic one, and add at least another 40 years of life to it.
In the meantime, let’s find out what tools and materials will be needed for this – there won’t be many of them:
Zenzubel (selector)
- A set of chisels of various widths, from 4 to 30 mm.
- A special plane for selecting and cleaning folds, quarters, grooves and sharpening of perpendicular cuts - zenzubel; in Russian - selector, see picture on the right.
- A fragment of a wide, 4-6 mm and thin, no more than 0.3 mm, hacksaw or jigsaw blade (saw band). If you have a manual jigsaw on your farm, then use a solid band for it.
- A wide shoe knife or palette knife is a special knife used by painters to remove paint from the palette.
- Thin-walled core drill for wood 8-10 mm inside; purchased after inspection of the valves.
- Carpenter's square.
- Reisshin or bubble level 1 m.
You will also need a plumb line, but you can easily make it yourself from thread and a nut. The following materials will be needed:
- Assembly adhesive for wood – “liquid nails”, approximately 0.3 kg.
- Wood putty on sawdust of the desired tone, 0.5 kg, or 0.5 liters of thin sawdust; sold in construction stores.
- Natural drying oil, 3 kg for a two-room apartment of medium size.
- Thickly ground (a dry mixture of pigment with filler, diluted with thinner manually) white, titanium or zinc, 2 kg from the same calculation.
- Flute brushes 40 and 80 mm.
- Kerosene, 2 l.
- Nails, small and 60-80 mm, 0.5 kg each.
- Sandpaper No. 60 or No. 80, 0.7 m.
- A thick plastic bag with a depth of 1.7 m and a width of 0.5 m. Packaging from bedding, etc. is suitable. The holes must be sealed with tape.
- A sheet of plywood or a flat panel of boards slightly larger than the window frame.
- Cuttings of aircraft or waterproof plywood 1-1.5 mm thick or a block of durable small-layer wood - oak, beech, walnut, rowan, pear, plum, cherry, acacia.
- Silicone AQUARIUM glue, 10-20 ml.
Note: water-based polymer putties for deep penetration of wood are not suitable for this case: they significantly increase the thermal conductivity of wooden parts.
Additionally, depending on the design of the window, you may need a stain of the desired tone and acrylic clear varnish. If you can use an industrial hair dryer, you won't need kerosene and a large plastic bag. Having stocked up on the above, you can begin a major overhaul of old windows.
Working conditions
It is better to work on windows in dry, warm, even hot weather: the permissible air humidity is no more than 65%, and preferably 40%. In case of bad weather, we cover the window openings for the period of repair with film on a temporary frame made of waste lumber: slabs, waste, old pickets, etc.
Correct and incorrect placement of the dowel
Restoration problems
Quite often people want to update old wooden windows, but this can be expensive. Don’t be upset, because there are several ways to give them a fresh look, in other words, to restore them.
Related article: Starting profile for PVC windows
Quite often people want to update old wooden windows, but this can be expensive. Don’t be upset, because there are several ways to give them a fresh look, in other words, restore them.
There are a number of specialized companies that not only provide their services for the installation and repair of Euro windows, but also restore old ones. The work of a master who knows his business allows you to make new ones. It is worth noting that, having some experience in repair work, you can try to do this yourself.
Before you think about restoring structures, you need to know the problems that you may encounter. Please pay attention to the following details:
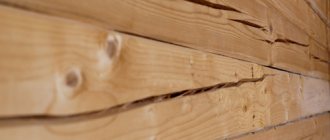
- Aging. With age, the structure may dry out, and therefore the integrity of the structure is compromised. You will need to check the geometry - the frame may sag, due to which the already large gaps may increase.
- The next problem is rot, fungus. On surfaces that are most exposed to water accumulation (the space between the frame, window sills), fungus may develop or some rotten spots may appear.
- Another problem is rust. It is worth checking the fittings - if rain regularly pours into the window, the curtains could have rusted. In addition, the cause of unsatisfactory operation of the sashes can often be old paint streaks that remain from poorly executed painting.
Disassembly and inspection
The most important element of the window design is the wooden pins-pins (“chopiks”) that fasten it at the corners. Sufficient attention will be paid to the description of how to work with them, and window repair begins with the inspection and revision of the pins.
First of all, we remove the sashes, remove the glazing beads or carefully pick out the putty with a chisel and remove the glass. Then we completely remove the fittings (you will still need new ones); We carefully remove the wooden ebbs (teardrops) from the outer sashes: they are on nails, which are probably rusty. We also take out all the other nails, remove the steel angles - for further work, only wood should remain in the frame and sashes.
Next, we place the frame and then the sashes one by one on the panel and level them to rectangularity, measuring the diagonals: they should be equal in length. We especially carefully measure and align the window sashes: they are small and the cost of a mistake is high. 1 mm discrepancy between the diagonals along the length gives a gap of 0.6-0.7 mm.
Example: we made a mistake by 3 mm on the sash, and by the same amount in the opposite direction on the frame. You will get a gap about 4 mm wide, clearly visible, and pulling from it will also be noticeable.
We secure the aligned part of the window with nails, carefully driving them into the panel close to the sash, and check the old pins. If everything sits as it should, approximately in the middle of the corner, carefully drill them out with a drill of a larger diameter, but not more than 0.6 of the width of the rectangular one, without taking into account the grooves, quarters and bevels of solid wood (see Fig. lower part). If there is someone who has left, which is not uncommon, see the figure above, we work like this:
- We drip 3-4 drops of superglue along the contour of the old one, this is necessary so that it does not fall out when drilling and the hole does not go away.
- We wait 5-10 minutes for the glue to set firmly in the depths; it flows far.
- Drill a correctly positioned hole.
- Using a saw blade, inserting it into the cracks between the joint whiskers, we saw through the old dowel.
After the mounting holes are drilled in all the window parts, we disassemble the frames into parts and clean them of old paint.
Painting frames
Before painting, the wooden surface should be primed or treated with natural drying oil. In villages, they try to repair old wooden windows using drying oil, since it creates a durable protective layer and saves from the aggressive influence of the external environment.
Before applying paint, frames should be wiped with a damp cloth and dried so that the coating is even. The perimeter of the glass at the border with the wooden frame must be covered with masking tape to prevent the new glass from being stained with paint or solvent. The paint itself should be thoroughly stirred to prevent lumps from forming. You should also prepare a small jar and solvent in advance. The solvent must be selected according to the instructions on the paint can. You need to start painting the frame from the top, carefully removing any smudges.
Paint removal
There are two ways to remove old paint from windows: thermal and chemical. An industrial hair dryer is used for cleaning with heat treatment. Don’t try to do this at home: it won’t reach 200-250 degrees. And do not set the temperature on the hair dryer to more than 250 - you will get a low-temperature burn of the wood without charring, and it will lose its quality. The same thing happens if you heat it with a blowtorch or propane torch.
The part to be cleaned is placed on the butt and heated in 25-30 cm sections. When the paint begins to bubble, peel it off like plasticine with a shoe knife or palette knife. A spatula with a straight blade, even sharpened, either cuts into the wood or slips across the paint.
Video: removing paint using the thermal method
“Chemical” paint is removed using a plastic bag and kerosene (solvent or nitro solvents are not suitable, they will ruin the wood):
- Each piece of wood is wrapped in rags.
- The entire fart, as much as will fit into the neck of the bag, is stuffed into it; There should be some reserve left for tying the bag.
- Water the wrapped pieces of wood with 0.5 liters of kerosene.
- The bag is tied tightly and left for a day or more until the paint softens.
- Take out the parts one at a time and clean off the paint with the same tool.
Notes:
- Chemical softening of paint is a smelly and fire hazardous operation. It should be carried out on the balcony or on the street.
- If you pull the entire bunch out of the bag at once, the kerosene will quickly evaporate and the paint will harden again.
In both cases, if the window is to be painted with paint, there is no need to pick out small particles of paint in the recesses: it will just be easier to putty and sand. If the window goes under stain and varnish, then you will have to work hard on them.
Impregnation
The next stage of work is impregnation with drying oil. The purpose is to prevent the germs of rot killed by heat or chemicals from developing again, and to restore as much as possible the structure of the old wood. As a quick fix, for several years before the next repair, impregnate the parts with a brush on all sides 3-4 times; the next one - after the previous one is completely absorbed. Before subsequent impregnation, the surface of the part should not be touched.
They are impregnated for centuries in a special device: a piece of 100-120 mm steel pipe welded at one end. It is installed obliquely at about 30 degrees; It is advisable to use a welded goat from a corner so that the pipe does not roll off. The operation is performed only in the open air, away from residential buildings: in the yard, in the country. You should definitely have a burlap or fiberglass mat on hand: drying oil can catch fire. You need to know this in advance, and not be afraid, but immediately throw a felt felt over the neck of the pipe. When it goes out, you can continue.
Drying oil is poured into the pipe 3/4 full and heated from below with a hairdryer or a stream of hot air from an electric stove. As the drying oil heats up, it will begin to bubble: moisture evaporates from it and air comes out. If the smell of drying oil suddenly intensifies, move the heater away, wait a little and continue heating. When there are no more bubbles, you can begin impregnation.
Caution: Never look directly into the neck of the pipe or lean over it! You need to watch the drying oil from the side sideways.
For impregnation you will need a 5-6 mm steel wire hook with a pointed end. The part is placed in a pipe and pressed down with a hook for 3-5 minutes, then, hooked with the tip, it is removed and placed on the table to dry. Do not grab the parts with your hands, even with mittens: hot drying oil with a temperature of over 130 degrees will drain from them.
Parts made from the most common pine treated in this way last outdoors for 150 years or more, while those painted with oil paint require repainting no more than once every 15 years.
How to repair a sash that doesn't close well
Over time, the opening parts of the window sag under their own weight or swell when saturated with moisture. Because of this, the sashes may be difficult to fit into the frame or may stop closing altogether. There can be two ways out of the situation:
- Trim the top layers of wood;
- Tighten or move loops.
The first option is suitable if there are no gaps and the sash fits tightly to the frame around the entire perimeter. You can detect an area that interferes with functionality visually; in this place the paint on the frame will be erased. You need to cut the wood from the sash in thin layers, checking how easily it fits into the opening during the process.
The second option is used if a gap has formed. To correct large sagging, the hinges need to be removed and installed a few millimeters higher. It is also possible that the fastening of the hinges has simply become loose; in this case, you can tighten or replace the screws. If the gap is small, then you can try winding a thin wire around the hinge rods and hanging the sash.
Other reasons can also impair the functionality of the sash, for example, frame misalignment or multiple layers of paint.
Window restoration
Pins and wedges
Drilling out the dowel
Before you begin to actually restore wooden windows, you need to prepare new pins and wedges for them. The dowels are drilled with a core drill from any straight-grain commercial wood. You need to drill ACROSS THE FIBERS, as shown in the figure. Hastily planed “chops” will not hold up the frame for long. For each dowel, you need to prepare in advance a wedge with a length along its diameter, a width of 5-7 mm and a thickness of 1-1.5 mm. The best wedges are oak and rowan. The diameter of the dowel is 0.5-0.7 mm larger than the diameter of the mounting hole for it.
Alignment to the outside
The leveled frame is assembled, without securing anything yet, on a panel-slipway; it must be covered with plastic film in advance. They are aligned diagonally, as before, and also fixed with nails driven in from the sides. Drill through the mounting holes again.
Correct position of the dowel in the wood and the wedge in the dowel
Next, the frame is disassembled, the mustaches and grooves of the joints are coated with liquid nails, quickly (the glue hardens in a few minutes) assembled in a slipway, just as quickly checked with diagonals and, if necessary, trimmed. When the glue sets, begin fixing with dowels. You can’t put it off for another day: in order for the dowels to hold the frame properly, the adhesive joint must still be sufficiently plastic during their installation.
The dowels are lightly lubricated with liquid nails and hammered into the holes with a mallet. THE FIBERS OF THE DOLE MUST BE LOCATED AROSS THE FIBERS OF THE WOOD! This is an indispensable condition for the reliability of the connection, see fig. Finally, the dowels are secured with wedges on both sides, driving them INTO the FIBERS of the dowel, also see figure.
The question may arise: what about the response detail? The fibers of the dowel will follow its fibers.
The fact is that the counter part, after hammering the wedges into the dowels, will fit on the “waist” of the dowel and will not split. And a wedge driven into the dowel before the glue has completely hardened will provide, in addition to lateral, some vertical force, so that the entire joint will compress and the glue will gain strength under pressure. After 3 days of exposure at +25 degrees, such a frame, dropped at an angle from a height of a meter, remains rectangular.
Frame and sashes adjustment
Rectangularity along the outer edge does not guarantee straightness of the installation openings: the wood may dry out unevenly. Therefore, the next stage of work is the alignment of the internal quarters.
First, we adjust the window frame and the vents in the corresponding sash: we put the frame on the butt and use a plumb line to check the quarters one by one. If at least one exactly perpendicular one is found, we take it as a base. If not, we will have to suffer with the square and the crossbar until we find the most “left” corner. From it, then from other corners, we use a pencil along the crossbar to beat off the lines of the new opening and a chisel, and in the corners we select the excess with a chisel (in the figure on the left).
Adjusting window frames and sashes
Next, in the same way, we check and align the sashes OUTSIDE. Then we lay the sashes next to each other and align them in height and width, as shown in the figure on the right. The quarters under the glass can be left untouched: both for the appearance and for the reliability of the window, their slight distortion is insignificant. But if you get the hang of it and want to even them out, it won’t hurt.
After the described operations, the sashes together will be smaller than the landing opening of the frame. To fit it into the frame (precisely into it, otherwise the window will not close later!) we place strips of plywood in quarters on liquid nails. After the glue has hardened, we bring it to precision using a chisel and chisel, and select recesses for the fittings. Next, we grab small nails every 15-25 cm, recessing their caps with a hammer. Then we impregnate the linings with drying oil with a 40 mm flute
Putty and sanding
You can prepare putty for small recesses yourself by mixing sawdust with liquid nails in a ratio of 3:1 by volume. You need to mix quickly, in small portions, and putty just as quickly: the glue sets in a few minutes. Finally, we sand the frame with sandpaper.
Reminder:
Before puttying, do not forget to install the ebb in place, using liquid nails and then using regular nails.
Painting
Wooden windows are painted with oil paint for decades. The best option: buy thickly grated paint and mix it yourself with linseed or “wood” (walnut) oil, as artists do. “Natural” ready-made oil paints on sale are most often based on synthetic or mineral oil thinners, which are much inferior in durability to traditional ones. Glypthal and pentaphthalic enamels are not suitable: after 5 years the window will require repainting, and excess layers of paint will spoil the look.
When purchasing thick paint, make sure that the pigment is mineral and not synthetic. You can test the whitewash by rubbing a pinch between your fingers: there should be no “slippery” feeling and the powder should stick to your fingers. The synthetic pigment almost completely comes off when shaken off.
Tip: the main parts of paint are pigment, filler (dry) and thinner. If you want your windows to shine for a very long time, choose paint with marble flour (microcarbonate) filler.
Mix oil paint in a wide, flat bowl: pour it into a pile, make a hole in the top, pour oil into it and knead. Oil is added in small portions to the desired thickness. For windows you need the consistency of liquid sour cream.
Video: example of painting a wooden window
Finishing
Finishing “naturally” in the described technology is done with stains. Stains change the tone of the wood and emphasize its texture: ordinary commercial pine, after being treated with a suitable stain, can be practically indistinguishable in appearance from stained oak, pandan or mahogany. It is advisable to experiment on old chocks before decorative finishing: select the tone and degree of dilution.
Finishing with stains has additional advantages: the coloring composition penetrates deeply, coloring the wood as a whole, so that after sanding in case of repair there is no need to repaint. In addition, stain increases the resistance of wood to decay and ultraviolet rays.
The decorative finishing of the window is completed by varnishing it with transparent or tinted acrylic varnish, installing fittings and glass. The only competitor to acrylic in terms of quality is Japanese tung varnish, but it is not available to every oligarch.
Glazing
Before installing the glass in the inner corners of the quarters, squeeze out a thin sausage of aquarium silicone glue under them. After fixing the glass with nails, remove the silicone drips with a cloth moistened with vinegar. There is no need to wipe the carnations dry from silicone: it will protect them from corrosion. After the silicone has hardened (2 mm/day), we seal the glass with putty, as usual: chalk mixed with drying oil. If the glass will be fastened with glazing beads, they must be treated in advance, like other wooden parts, and painted.
Bottom line
The ancient technology of restoring wooden windows, supplemented with modern materials, works wonders. A completely shabby window, which has been in the hands of a skillful and careful craftsman, looks no worse than a plastic one, and retains all the useful properties of wood.
How to restore wooden windows: step-by-step instructions
Don't rush to throw away old windows and buy new ones. You can restore old frames with your own hands and with the help of our tips
If you bought an old house with wooden windows that look unattractive as a summer cottage, do not rush to throw them away and buy new ones. You can restore old frames with your own hands and, with the help of our tips and modern finishing materials, turn a frog into a princess. Restoring wooden windows is a labor-intensive process. But it is much cheaper than installing new windows. We will tell you how to restore a wooden window with your own hands.