The selection of grooves and bowls is carried out using an adze - a special carpenter's ax with a convex grooved blade. The method of selecting grooves using shaft blades is also practiced: the boundaries of the future groove and dividing the wood into parts are marked with a chainsaw, then the selection is carried out using a sharpened felling blade.
This careful attitude to the integrity of the wood increases the strength of our log houses. The adze crushes the pores of the wood, due to which the loss of moisture along and across the fibers is balanced, so shrinkage is more uniform. Closing the pores reduces wood cracking.
Interventional insulation
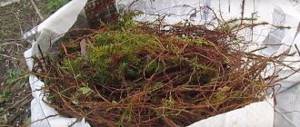
To fill bowls and grooves when assembling log houses, various inter-crown seals can be used. The most famous are jute and Klimalan. Recently, insulation made from polyester fibers “AVATERM” appeared on the market. This is an analogue of the Finnish extra-class insulation “PP-TERMO”.
- Jute
is a tradition. This is an environmentally friendly product with good spring properties. It has been a leader in the insulation market for a very long time, but its service life is a maximum of 15-20 years. Then it cakes and stops performing its functions. - Now “KLIMALAN”
is the No. 1 insulation material for log houses all over the world. It is made of pure sheep wool and comes with a 100-year manufacturer's warranty. When dismantling a house or bathhouse made of logs, this insulation can be reused. It does not get wet, does not rot, and quickly returns to its original shape when it shrinks and naturally increases the inter-crown gaps. Imagine natural sheep wool! What are its advantages? These same qualities are inherent in “CLIMALAN”. Add legendary German meticulousness to every detail and get the perfect insulation! - “AVATERM”
is a polyester fiber insulation that appeared relatively recently in Russia and has caused a lot of talk. Synthetic insulation “did not please” connoisseurs of all things natural. Fans of this material refer to the many years of experience of the Finns, who use polyester fibers to insulate their homes. This material does not rot, is not afraid of moisture and does not wrinkle over time. The only controversial point concerns “breathing” - synthetics do not allow air to pass through, but this is not critical for log houses and bathhouses, where all the walls “breathe”.
Russian cutting
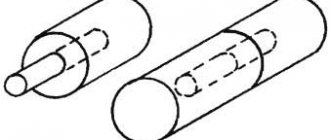
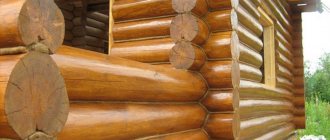
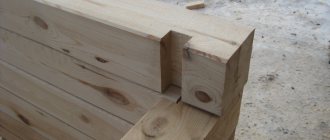
A round log is used, the extensions of the crowns extend beyond the plane of the frame. The logs are connected using semicircular bowls that completely repeat the profile of the adjacent log. Longitudinal grooves in the logs ensure a tight fit of the crowns. Bowls and grooves are located in both the lower and upper crowns.
Cutting "in the oblo"
A bowl and groove in the lower crown is a less labor-intensive option. Log houses are assembled faster because there is no need to turn over logs to complete operations. But this design is the most vulnerable; atmospheric moisture gets into the bowls, the connections diverge over time and large cracks appear. The situation is aggravated when the logs dry out, so constant insulation is required.
Cutting "in a big way" (Siberian bowl)
An improved version of Russian cutting. This is an inverted version of the traditional technology - the bowl and groove are selected in the upper crown and “look” down. This protects against precipitation, but this technology requires great skill, because during operation the logs are constantly turned over.
Cutting "in the tail"
A thorn (“fat tail”) is created in the Russian bowl. A groove in the adjacent log is selected for it. The tongue-and-groove connection is strength and tightness. After shrinkage, the gaps in such log houses are minimal. The bowl with the fat tail is oriented up or down. For the reasons stated above, downward orientation is considered preferable. This is a complex technical solution, but it is in demand due to its high performance characteristics.
Marking and cutting into a bowl for a log bath
First of all, you need to lay the logs so that it is convenient to work with them. The processed log is laid crosswise in relation to the lower logs. To give it stability, it can be secured with brackets - then the log will not spin around its axis.
We take the “line” in our hands and draw the contours of the bowl and longitudinal grooves, observing the following rules:
- One leg of the “devil” always rests on one log, and the second leg on another.
- The size between the points of the legs should be equal to the following values:
- For a bowl in the lower log (method of cutting “into the edge”) – half the diameter of the upper log;
- For a bowl in the upper log (“in the hole”) – half the diameter of the lower one.
- Drawing can begin with marking the bowl, and then move on to the longitudinal groove.
- Another possible option is marking in one pass. It's done like this:
- First, a transverse contour is drawn at the end of the log being processed, when one leg of the line slides along the arc of the end of the template log, and the second draws the corresponding line at the end of the log being processed.
- Then the contour lines of the longitudinal groove, the bowl, and then all other contours of the log to its end are marked, repeating the same actions for the back side of the log.
- When the longitudinal groove is located at the bottom, the processed log is placed on top of the logs of the bathhouse frame and a longitudinal groove is marked. It is necessary to take into account that between them there will be a gap equal to the protruding part of the lower log. Therefore, before marking, it is necessary to further separate the ends of the “line” by its size, adding another 1-2 cm. After cutting out the groove, the log is again rolled onto the frame, and the contours of the bowl are drawn, having previously returned the ends of the “line” to their previous position. When cutting out a bowl, an oval protrusion is made in it for a longitudinal groove of the log being placed.
- The prepared logs are placed in bowls, and the log and its joints are finished by removing wood or placing wedges (for large gaps) and sealing material (moss, tow). When drawing a longitudinal groove, we are guided by the following data (depending on the diameter of the log D
):
| Parameter | Meaning | Example for D=200 mm |
| A | R/ 2max | 50 |
| B | Not less than D/2 | 100 |
| R | D/2 | 100 |
We looked at how marking and cutting into a bowl is done. To build a hand-cut bathhouse, you will also need to learn how to build a log house using the “paw-to-paw” method. But this is already in the article about manual chopping.
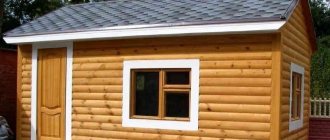
To the main article-content: Starting and building a sauna with your own hands More articles on the topic of how to build a sauna with your own hands:
- What is a log house and its main types
- How to build a sauna from a log house with your own hands
- Bathhouse design. Basic Rules
- Building a bathhouse - combining wooden parts and structures
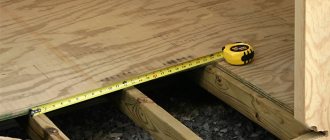
- Flooring device using wooden beams
PS How to process a bowl with a chainsaw
Dear friends! If it’s not difficult, share it on these social networks with your friends. Thank you!
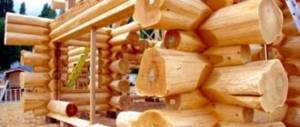
Canadian cabin
Here the bowls and grooves are also selected, and the internal tenon is made. Canadian cutting is more expensive than Russian cutting due to the labor intensity of the work. No moisture gets into the sealed corner, the insulation does not get wet, and its characteristics remain unchanged. The inter-crown seal is not visible on the plane of the walls, which improves aesthetic perception.
Connections are created like this:
a wedge-shaped bowl with a spike is made in the log, which is located below. The upper crown is hewn with an ax at an angle of 45 degrees to obtain a trapezoidal recess with an internal groove for a tenon, which repeats the profile of the lower log. This connection looks unusual due to the hemlines (cheeks).
The main advantage is in the behavior of the log house during shrinkage:
- A round log decreases in size as it shrinks - this is a fact that cannot be doubted.
This leads to the appearance of cracks, depressurization of corners and the need for insulation (“Warm seam” - once, caulking - almost annually). - The Canadian bowl is tightly wedged under the weight of the frame; no gaps are formed between the crowns either immediately after assembly or over time.
Such wooden houses and baths remain airtight and beautiful throughout their operation. But there is only one caveat - only experienced craftsmen, and not amateurs, can achieve this.
Diamond cutting
This is a type of Canadian felling, the difference is in the number of cheeks (cuts). In this case there are not two, but four.
- In one cut, 8 edges intersect (4 for each log), which gives the effect of a diamond.
This method looks beautiful; it can be used to emphasize the texture of the log and indicate the butt relief at the ends. Real virtuosos achieve a tight fit of the logs (deviation of no more than a millimeter is allowed). - This is an airtight and tight connection.
Its only drawback is the reduction in the width of the thermal groove due to the hems. That is why this technology is recommended for the construction of log houses from large-diameter logs (from 400 mm), where this nuance does not matter due to the massiveness of the walls. - Visually, such cuttings look amazing, much more impressive than ordinary Canadian cuttings.
For wild log houses, this is the technology of first choice, then comes the usual Canadian one, and only at the end do they remember the Russian method.
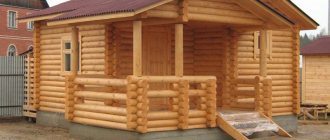
How to cut a log house
A log house is a structure cut from wood, assembled without a floor or roof from treated logs. One row of four elements connected to each other by a notch is called a crown. Felling a house or bathhouse involves three operations: cutting corners, grooves and doweling.
With the correct cutting technology, the logs must be able to withstand the loads transferred to them; their contacting elements fit tightly to each other. When constructing the external walls of a log house, it is necessary to take into account that water should not stagnate in the cuts.
Over the course of many centuries, wooden architecture has developed and improved, and today there are more than a dozen types of log cutting. However, there are only two main connections at the ends of logs: with and without a remainder.
Norwegian cabin
The bowl and all the advantages are like a Canadian loghouse with two cuts. The only difference is in the form of the material used. Norwegian felling is realized in the construction of a carriage - a round log hewn on both sides.
- The carriage is made like this:
a round piece is cut or sawed off on opposite sides. The hewn parts are located parallel, the log takes the shape of an oval. - When assembling a log house, the straight parts are oriented in and out of the log house, the rounded parts are “hidden” inside the wall: a bowl with a spike is made here.
Smooth walls look amazing due to the original wood pattern. The operation of a house with smooth walls is more convenient, and the internal space increases compared to log houses made of round logs. - The roof structure and walls are a single whole:
logs are cut into the gables. There is no ordinary ceiling; massive logs (“wasps”) are visible on it, which look unusual. The remaining wood after cutting the logs is used to create a roofing system and other elements of the house.
Each log house will look unusual and last a long time if you do not skimp on the professionalism of the builders, the quality of the logs and all the component materials. Cutting maps and specifications for all lumber that are used in professional projects will help reduce construction costs!
Chopping without residue
This is the most economical option for building a house. The advantage, of course, is the low cost of work and materials in general, and the availability of spacious premises. However, such a house is well ventilated and loses heat, so it will need additional cladding on the outside. Most often, logs are joined using straight or oblique paw methods.
The layout method should be selected taking into account the features of the future home. Operating conditions, required usable area, climate, etc. all this needs to be considered. This is the only way to choose the right type of connection and build a quality house.