The comfort and safety of your family will depend on how you make the floors in your house made of wood. Therefore, before starting this stage of work on building a house, it is necessary to carefully study all the existing nuances and features. And the information below on how to make a floor will help you with this.
If the house does not have a concrete foundation, then the floor for the log house is built on joists or pillars.
So, what is a log floor? This is the overlap, or more precisely, its top layer. It is this that divides the house into premises for different purposes, residential and domestic. This is the basement, rooms, attic. Even if there are several floors in the house, the functions and essence of the floors remain unchanged. Installing a log floor on the ceiling is considered the optimal, logical and correct solution.
But despite all its advantages, there are other ways to arrange the floor in a log house. For example, floors made using beams located on supporting pillars, or a floor built on the ground. The question of how to make floors in a log house is relevant for many inexperienced builders. But let's talk about everything in order.
Brief characteristics of a wooden floor for a log house
Wooden floors can be divided into 2 types: single-layer and double-layer.
The best way to lay a single-layer floor in a log house is to use joists.
The installation of a single-layer floor, in turn, is divided into methods using logs or without their participation. The choice will depend on the thickness of the board you will use. And in this case, the step between the beams is important. When building a house whose floors are built on joists, the boards are laid directly on the beams. And the interbeam step in this case should not exceed 0.6 m.
The two-layer version of the floor in a log house implies the presence of a subfloor in its design. It is carried out simultaneously with the fastening of beams on rough boards. A layer of thermal insulation is laid on top of the rough boards. You can use any sheet heat-insulating material or expanded clay as it. Professionals recommend not to exceed the thickness of this layer; the maximum possible option is 80 mm.
Wooden floor insulation scheme.
It is necessary to insulate the floors of a log house regardless of what it is made of. Both wooden and concrete options require this procedure. Various types of modern insulation materials can be used as thermal insulation. These include: mineral wool, polyurethane material.
And some builders also use methods that are considered outdated today. This is the use of shavings or sawdust as a heat-insulating material; there are even options with dry leaves.
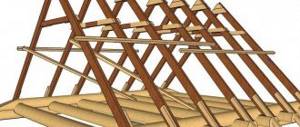
Methods for installing joists in the house
Options for fastening joists in a wooden house
Installing joists in a wooden house opens up a fairly wide range of options for attaching beams to beams. According to the installation method, they can be divided into two types:
- Wall mounting. This method is often used when installing joists on the second floor of a house. The construction of the floor involves laying the beams “in a spacer”. A special cut is made in the wall along the width of the beams, after which they are inserted into the formed grooves and fixed with fasteners. The advantage of this method is that the beam itself lies completely on the beam and does not create a large load on the anchors and brackets with which it is secured. That is why fixing the joists in the wall is optimal when arranging the floor of the second floor of the house;
- Attaching to timber. In this case, the elements can be attached to the first crown of the strapping “end-to-end” using fasteners. In this case, the timber is not sawed, but simply joined to the logs and secured with anchors or horseshoe-shaped profiles. Also, to install the floor of the first and second floors of the house, a cut is made in the beam itself for fastening to the frame. Technically, it is quite difficult to embed logs into the strapping material, but such structures have a long service life.
Log floors on floor beams
When building a wooden house, the most logical and optimal option for the floor is its construction along the floor beams. This is the most common option and professionals don’t see the point in looking for a replacement. This method will help raise the floor to the desired height and allow you to leave room for a basement, as well as eliminate possible contact between the floor and groundwater.
The construction of the floor along the floor beams raises the flooring to the required height, completely eliminating its contact with groundwater.
Depending on the specifics of the construction of the house, the beams are placed either in the frame of the house behind the ground floor, made of brick (concrete), or at the level of the 3rd or 4th crown, counting from the ground, in the case of using only wooden building materials.
The placement of beams, or rather their end parts, can be in the bulk of the log house or through. The through arrangement is more reliable, since the resulting condensate will be able to escape through the end of the beam. Please note that the ends of the beams must be treated with an antiseptic composition, which will protect them from exposure to moisture and various types of bacterial infections.
If the beams in the structure of your house are more than 3 m long, then they need additional support. These can be beams placed on the end, or brick columns, or wooden ridges. Just like the ends of the beams, all wooden parts in contact with the soil must be treated with an antiseptic composition without fail.
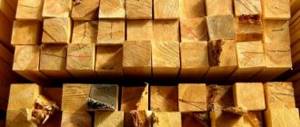
It is recommended to use timber with flat end sides as floor beams.
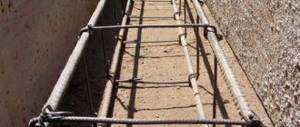
If you choose pillars made of brick as support, then you need to build them on a fairly solid foundation. It would be better if it were concrete slabs. You can fill these with your own hands or purchase ready-made factory-made ones. Under the base of these slabs it is necessary to lay roofing material, which will serve as a waterproofing layer.
Experts recommend using building materials that have flat end sides as floor beams: beams, half-beams, and so on. Its cross-section must fully correspond to the cross-section of the material from which the permanent walls are made.
Installation of logs
Laying the floor on joists is carried out not only on the soil base, but also on the floors of structures.
Installation of logs on wooden floors
In this case, the products are fixed to the beams, but due to the fact that they rarely have an ideal level of evenness, it is better to attach them to their sides. In such a situation, the horizontal position of the joist must be checked using a control rod without using the underlay.
To fix them, it is better to use screws with a diameter of 6 mm and so that they have a length exceeding the width of the joists by 2.5 times.
Note! To avoid splitting the boards in the beams and joists, it is necessary to first make holes, using a drill with a diameter 0.5-1 mm smaller than the fasteners themselves.
In the case of a significant distance between the beams and each other, the need arises for the construction of double logs. Initially, it is necessary to lay the first row on beams, on top of which it is necessary to lay another one again, but with a decrease in the distance between them.
Installing joists on a concrete base
Their installation on this surface can be done in two ways.
In the first case, between the joists and the concrete base, it is necessary to place cuttings of boards, OSB or other similar materials of suitable thickness to level their level. This method is used most often, but its effectiveness is not the highest, since after a certain period of time they can dry out, undergo deformation or fly out, which will lead to creaking, sagging and other defects.
In the second situation, a cement screed is poured, through which the surface is leveled. After complete hardening, the lag should be installed on the resulting base. The concrete screed does not lend itself to deformation and acts as a reliable and strong support along the entire length of the floor.
Before laying these elements on a leveled floor, you also need to perform several actions:
- Due to the significant level of moisture absorption by concrete, it must be waterproofed. As a material, you can resort to using 200 mm polyethylene film.
- Place a waterproofing and soundproofing layer. Soundproofing pads are necessary to dampen impact noise. They must be placed under the logs. In their quality, you can resort to using substrates made of cork or foamed polyethylene, the thickness of which reaches 1-4 cm.
- Pour dry or cement screed.
At the end of all stages, you can begin laying the logs, for which it is recommended to use beams that have the same length as the room. In the absence of suitable products, it is advisable not to lay those that have a length of less than 2 m. If the beams do not have the required length, then they can be ground together at the ends. The installation process itself must be performed as follows:
- Pre-prepared logs must be laid throughout the room, leaving a small gap between the outer beams and the walls, which should not exceed 20 cm. The remaining elements should be evenly placed around the entire perimeter of the floor, depending on needs, at a distance of 30 to 80 cm.
- First of all, it is necessary to fix the outer lags, between which you need to pull the thread, which will act as a guideline for maintaining the level.
- Elements with a short length should be built end-to-end, keeping in mind the displacement of seams in adjacent products. If the cross-section of the beams is significant, the connection of the logs must be made in half a tree.
- Next, you need to make holes under the fastening elements in the floor and joists, and then install dowels or anchor bolts in them, through which you then need to secure the products to the base. They should be screwed into the beams at a distance of about 60 cm from each other.
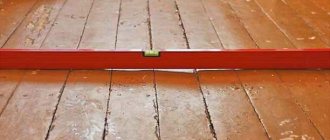
- Before final fastening, you need to make sure that the laid joists are horizontal using a level. Then you should screw in the fasteners until they stop.
Note! When laying connected logs, the joints of adjacent rows must be placed at different levels with an offset of 0.5-1 m.
It is strictly forbidden to lay joists on soft insulating material, since in this case they will not have the required stability. If there are free cracks or cells, they can be filled with the remaining scraps of insulation.
Laying logs on the ground
In this case, the sequence of work is as follows:
- Initially, it is necessary to level and compact the soil. This process can be done manually or by using a large log, to which you need to nail a board from below. Next, they need to be moved along the surface, tamping. The board should be at least 5 cm thick. The diameter of the log should be slightly larger. In addition, you can use a vibrating plate.
- Then you need to fill the soil with a layer of granite chips 5 cm thick, which acts as drainage. After this, it also needs to be compacted.
- Next you need to take measurements and markings for the support columns for the logs. If the bars of the lower trim are used as them, then marks can be made directly on the bars using a pencil. If you give preference to a grillage with a layer of roofing felt, marks should be placed on it.
Note! The distance between the first joist and the wall should reach 3-20 cm.
- Before erecting support pillars for the products, it is necessary to pour the foundation for them. It can be done for each structural element separately, as well as for a row. The smallest dimensions of the foundation for one pillar should reach 0.4 x 0.4 m. Their height should not be less than 20 cm, of which 5 cm should be above the soil surface.
- After hardening, the concrete must be covered with roofing felt. Then you can begin building brick pillars.
- On top of them, 2 layers of roofing material should be laid and opened with bitumen-based mastic.
- Next, it is necessary to fix the lags on the erected columns, between which it is necessary to install the cranial beams.
- As a subfloor, you can resort to using unedged boards that do not need to be secured to the joists.
- Roofing felt or plastic film must be laid on the boards, which provide protection from dampness. In this case, it is necessary to spread the material 15-20 cm onto the walls.
- At the next stage, you need to lay the selected insulation, for example, mineral wool, expanded clay, polystyrene foam or another.
- Next, a vapor barrier layer must be laid between the finishing coating and the insulating material.
Note! If a double-sided membrane is preferred as a vapor barrier, then the finishing floor can be laid directly on it. When using other suitable materials, a gap of at least 2 cm should be maintained between them and the floor covering.
Upon completion of the described steps, you can lay the boards or other purchased material.
Having learned how to install wooden floor joists on different types of bases, you will be able to choose the most suitable option for yourself depending on your needs or personal preferences, which, if you follow the steps and recommendations described above, will be quite easy to put into practice correctly with your own hands.
Video:
Design, nuances, features
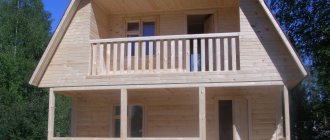
Once the base is ready and meets all the requirements for reliability and strength, you can proceed directly to installing the floor in the log house. Professionals advise making a horizontal level formed with the help of floor beams immediately after placing them in the walls of the log house. The floor covering, located along the beams, is performed either in 1 layer or with a rough floor. A two-layer version of the floor in a log house will be much warmer than a single-layer one.
Finished floor plan.
To ensure high-quality floors, it is best to use boards that are completely dry and rest in a sparse stack. This procedure takes at least 6 months. This method will help you prevent the process of warping of the floorboards.
If there is such a need and it is necessary to lay raw building materials (boards), then they cannot be nailed to the surface of the beams immediately.
- First, they are simply pressed against the beams using boards secured in several places (3-4).
- The boards are laid in the direction from the edge to the center. Please note that you need to leave a gap of about 5 cm in the center and drive the wedges into it. As the boards dry, you will need to tap the wedges several times. Typically, this procedure lasts approximately 3 months.
- And only after this time can the floorboards be finally fixed. And also, regarding the thickness of the subfloor boards, this value should be no less than 40 mm.
A tongue and groove board is the optimal choice of material for a finished floor.
The finished floor is laid in a direction perpendicular to the subfloor. For these purposes, a tongue and groove board is usually used. It is important that it is dry. Kitchen floors need an additional layer of insulation between the subfloor and the finished floor. Roofing material is well suited for these purposes.
Using a tongue and groove board to construct a finished floor is the best option. Its appearance is aesthetically pleasing, and high-quality painting will help to significantly extend its service life.
Please note that this building material, recommended for installing a finished floor, is also suitable as a base for other floor coverings. If desired, you can lay laminate, linoleum, and carpet on it. The choice is practically unlimited.
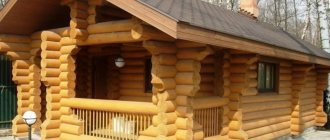
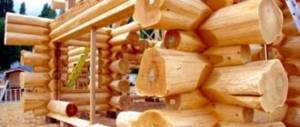
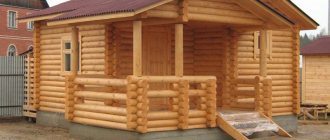
Types of modern log houses
- Made from rounded logs. If previously logs for log houses were hewn by hand, now they are more often made on machines. This is how milled or rounded logs with the same diameter appear. This makes it easier to assemble a wooden house and reduces the cost of construction. The disadvantage of this method is the removal of a significant part of the sapwood - the “protective” layer of wood, which increases wear and tear of the finished house.
- Lezhen or Norwegian cutting. Lezhen are not rounded logs, but a two-edged beam, that is, turned on two sides, and sloping on the remaining two. Sometimes a bench is also called a carriage, but this is a mistake. The crowns are fastened using a “Norwegian lock”, a special secret wedge-shaped recess. It is believed that during shrinkage and shrinkage, such a lock is held together more closely, providing the structure with special strength.
- Canadian cabin. Canadian logging is distinguished by high-precision fitting of logs one to another. There are no gaps at all - that is, the log house looks as if it was made from a solid solid mass. This is achieved by using a marking device, while the insulation is placed in the internal channels. Interestingly, the wood retains its natural and unique color.
Why install a subfloor?
The main requirements for the quality of a log floor are: strength, reliability and good ventilation. It is for their implementation that subfloors are installed. In addition to the properties listed above, they perform a number of significant functions:
Subfloor installation diagram.
- play the role of a stiffening frame;
- serve as a base for placing thermal insulation and waterproofing;
- provide the opportunity to provide high-quality ventilation, since with their help an air layer is formed, which, in turn, maintains heat in the room, prevents rotting processes and possible distortions of the structure.
In order to make rough floors, you will need unedged boards with a width of 15-50 cm. All of them must be carefully treated with an antiseptic composition.
Construction of a rough insulated floor in a log house
First you need to think about ventilation. This is a mandatory condition, since only in this case will you avoid possible exposure to moisture and rotting processes. The simplest way to install it involves drilling holes in the corner joints of the house (log house). The size of such holes corresponds to a value of 50 mm. Subsequently, they must be disguised using decorative elements (grids).
At the next stage, you need to take care of waterproofing the foundation. This can be either a blind area, or the use of roofing material, or the use of coating-type waterproofing materials.
Next, the lower crowns and joists are treated with a high-quality antiseptic composition in order to prevent the occurrence of a fungal infection and its subsequent destruction.
Installation of the floor in a log house can be done in several ways. This:
- a method that uses beam shoulders (their appearance resembles an inverted “T”);
- a method that involves the use of cranial beams (note that they must be pre-attached to the beams);
- a method that involves preliminary preparation of grooves in beams (the appearance of which resembles “H”).
Which wood species to choose?
To build a wooden frame for a house or bathhouse, the following types of coniferous trees are most often used:
- Pine is the most durable and unpretentious material that is very easy to work with. The tree is practically not subject to deformation when drying out.
- Larch - quite often you can find a log house made from timber of this tree, since it retains its properties just like pine and is a strong and durable material. However, larch is difficult to process and does not rot, which is a fairly significant factor when choosing.
- Cedar has softer wood compared to previous options and is similar in properties to pine. Cedar is best used for finishing the interior of a house, as it has a very beautiful texture and a pleasant smell.
- Aspen has a beautiful white wood tone and is easy to use. It is durable and moisture-resistant, but has a serious drawback - it emits an unpleasant odor at high temperatures.
Concrete floor option in a log house
As for the installation of a concrete floor in a log house, it has a number of undeniable advantages, which include:
- long service life;
- reliability and guarantees of strength;
- the possibility of covering a concrete floor with any type of floor covering (tiles, linoleum, laminate, and so on).
If you're looking to tile your floor, check out the new tile collection.
Concrete floors in a log house can be installed using 2 methods. The first of them is placing concrete on the joists, the second is laying it on the ground.
Basically, it doesn't matter which option you choose. The main thing is to follow the sequence of your actions and adhere to the rules of the technological process. Good luck!
What are logs and what are their advantages?
Joists are transverse beams on which the flooring is laid. They look like bars or boards. Insulation is often placed in the free space between them, and cables and communication pipes are also hidden. A floor with this design has high thermal insulation properties and high reliability.
In addition, their advantages include a number of the following qualities:
- Due to their high strength, logs are able to withstand significant loads.
- By filling the free space between the beams, it is possible to increase not only the thermal insulation, but also the sound insulating properties of the floor.
- Floors with joists are much easier to repair. This requires removing the floor covering and replacing damaged elements.
- On top of them you can lay numerous types of materials, which can be wood, tiles and a number of others. It is important to follow the correct technology.
- Using lag it is quite easy to level the surface, even if there are significant level differences on it. Unlike concrete floors, the material consumption increases quite slightly.
- The structure created from these elements creates minor loads on the base. For the same floor height, poured concrete is an order of magnitude heavier.
- When installed correctly, the floor on the joists is ventilated, so the floor covering laid on them is well preserved over a long period of operation.