Repair and decoration
06/10/2018 Anastasia Prozheva
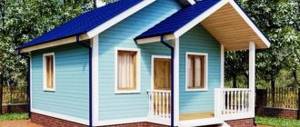
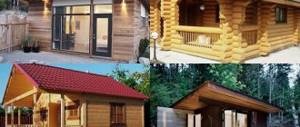
Today there is great interest in the construction of wooden houses, including using ancient log house technology. This is explained by the desire of people to live in environmentally friendly housing.
Log houses are popular due to their environmental friendliness.
Meanwhile, to satisfy such a desire, we have to remember the architectural and construction secrets of our ancestors. There are quite a few of these secrets, and one of them is knowing how to cut a log into a bowl.
In practice, there is nothing particularly difficult in mastering this technique, although carelessness and arrogance are unacceptable here. You need to carefully understand some of the subtleties and understand what a log house in a bowl is and why it is good.
How to cut a log house into a bowl? Below we will try to answer this thematic question?
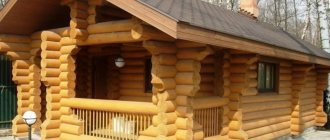
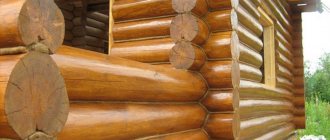
When building from solid logs, several cutting methods are used. They depend on the purpose of the structure being built. When constructing houses for permanent residence and baths, carpenters use cutting into a bowl or into a paw. Experienced experts recommend that when constructing a permanent structure, use the cutting method, in which the excavation is made in such a way that the bowl rests on the log, and not vice versa - the log into the bowl. This kind of felling is also called “in the okhlop” or “Siberian”. Whereas, the reverse excavation is “into the oblo” or “Russian” cutting. The Siberian cutting method better protects the log house from moisture penetration. Its use, compared to Russian cutting, requires a smaller number of technological operations. When making log houses using Siberian technology, logs are released outwards up to 60 cm, obtaining a warm corner.
What wood is best to use for the construction of a log house?
In order to successfully cut a frame into a bowl, a good tool and the appropriate skill of a builder-carpenter are not enough. It is necessary to decide on the best material for this, which will resist infection by fungus and attacks by bark beetles.
Types of cuttings "in the hole".
Carpenters recognize pine as an almost ideal type of wood for this. It is valued for its smooth, almost knot-free trunk, characterized by a high degree of hardness. At the same time, this circumstance does not at all interfere with the convenient processing that pine is characterized by. On the other hand, as an integral element of the wall of a building, it impresses with its reliability and durability, good resistance to rotting and the absence of cracking as a result of drying.
Related article: Building a balcony with your own hands: technology, features, arrangement
To cut a log house confidently and quickly enough, it is recommended to select logs of approximately the same length and diameter. At the same time, according to the experience of using this technology, the most practical diameter is considered to be 22-24 cm.
As for the time of harvesting logs for a future log house, experts advise doing this in the winter. It is at this time that the tree trunk contains the least amount of sap. Therefore, during subsequent drying of the winter wood, it will be minimally warped and destructive cracks will appear in the trunk.
Tools required for making a log house
The process of making a log house involves carrying out work on marking the logs and the felling itself. Without special tools, it is impossible to perform quality work.
Therefore, after consulting with professionals, purchase:
- carpenter's axe;
- chainsaw (or an electric saw);
- chisel;
carpenter's line (you can make it yourself).
The procedure for assembling a log house
Two layers of waterproofing are laid on the foundation. It may be ordinary roofing felt, but in its modern version it is very unreliable and breaks after just a few years. To waterproof a log house, it is better to use a more modern version, something like Gidroizol. In areas with high water levels or large amounts of precipitation, it is advisable to do a combined waterproofing: first coat the foundation with bitumen mastic, and stick waterproofing on it. For reliability, you can use two layers (the second one is also for bitumen mastic).
Example of waterproofing
Before laying logs or beams, they must be treated with antiseptics and fire retardants. But the fact is that if you then plan to sand the log house, it is better not to treat it: treated wood requires many times more effort when sanding. On the other hand, there are parts that will be inaccessible after the frame is assembled. If they are not treated until the wood is dry, fungi may develop or it will darken. Darkening is not scary, it can be bleached, but fungi are worse. Especially for a log bathhouse, where there will be periodically high humidity. The solution then is to coat with impregnation only those parts that are closed, and impregnate the free surfaces after grinding.
After the logs/beams are soaked and dried, the actual assembly of the log house begins. The first crown is laid on the waterproofing, its geometry is checked - the diagonals are measured, the angles are checked. Then it is secured to the foundation with previously laid studs. If there are no studs, drill holes and install anchor bolts (holes are drilled under the caps so that they are recessed). Next - on technology. If you are assembling on dowels, then install them in two rows.
Anchors must be driven to a depth not less than the height of the beam/log
The first crowns can be laid by hand without any problems. As you gain height, it becomes increasingly difficult to lift logs. The problem is solved simply: two inclined beams are installed. Two slings are nailed from the inside to the lower rims of the frame and thrown over the wall. They are threaded under the log/beam that needs to be lifted, and pulled up along the inclined bars (see photo).
This is how logs or beams are lifted onto a log house
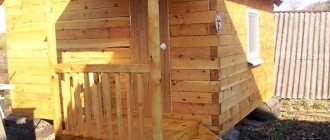
The log house is built with solid walls - no windows or doors. They are cut out after the walls are completely removed and the roof is installed. If the log house is left to spend the winter without a roof, you don’t have to cut out the windows/doors: there will be enough ventilation anyway. But if the log house is placed under a roof, then window and door openings are necessary for normal drying.
Before cutting them out, the frame is fastened (a fixing bursa is nailed in, which holds the crowns in a stationary state). After the opening is cut, a frame is installed (a beam that holds the opening and to which the door or window frame is then attached). The beam is held in the groove only due to the force of friction; it is not fixed by anything else. So the logs/beams remain in place and the log house can shrink.
A groove is cut out into which the timber is driven. It is no longer held in place by anything - no nails, no self-tapping screws.
If you cut openings, be sure to install a window frame. At least in this version, as in the photo above - a block driven into a groove. Just pay attention once again: it is not attached to anything. It is held in place only by friction. That is, it is simply driven into the groove. If you leave the openings unsecured, the logs/beams will most likely go in different directions and you will become the owner of walls like the one in the photo below. It is possible to level them, but it is long and difficult.
What happens if you don’t put the sapling in place for the winter?
In this case, the doors and windows themselves are not installed: a draft is necessary. If you want to prevent visits, cover the doors with mesh, membrane, and cross the openings with boards, but air must pass through.
After the walls are kicked out, the assembly of the roof truss system begins. The upper crown is used as a Mauerlat. If necessary, holes are cut in it for installing rafter legs. Roofing material does not need to be installed. You can leave the rafters with sheathing covered with a helicopter-protective membrane over the winter. You just need to fasten the membrane according to all the rules: start from the bottom, move up, lay the sheets overlapping one on top of the other, gluing the joints with double-sided tape. Fasten with wide-backed staples from a powerful stapler.
The log house is ready for wintering
Next, caulking of the log house awaits you and you can calm down on this until spring. In the spring - secondary caulking, if the main shrinkage is already completed, by the summer it will be possible to begin finishing work.
How to mark logs for cutting into a bowl?
To prepare for cutting out bowls, they use a special tool - a carpenter's line, which is similar to a compass, only of a rigid design.
The span between the extreme points of the line is set in accordance with the diameter of the logs used and is equal to half of the lower or upper log.
The marking process consists of marking the contours of future cutting. When marking, follow several rules:
- install the logs the way they will be laid when assembling the log house (cross to cross);
- place the pointed ends of the bar on the parts to be connected;
- draw lines for the wood notch on both logs at the same time.
DIY sauna log house
You can build a log bathhouse with your own hands if you prepare a construction plan, the necessary materials and tools in advance, and have some free time. First you need to prepare the log house itself. When choosing a tree, it is recommended to take into account the region in which it grew, what its humidity is, its density, and whether it is spoiled by pests. It is important to pay attention to the number of knots. There shouldn't be too many of them.
Important: it is best to harvest logs in the cold season, since at sub-zero temperatures there will be the least amount of moisture in the wood.
Preparation of round timber
Once you have decided on the construction material, you can proceed to work. The first step is preparing the round timber. In order for the building to be durable and strong, it is necessary to select certain sections of logs for its construction, which start from the rhizome and end at the crown. This tree is denser and has practically no knots. When choosing a log house, preference is given to round logs without curvature.
The type of wood is especially important. It is best if it is pine, spruce or larch.
Attention: if spruce is used in construction, the material must be treated with an antiseptic several times.
After preparing the round timber, you can begin construction according to the project.
Log processing consists of the following steps:
- Once the fresh log is brought to the construction site, it will need to rest for 30 days.
- Next, the material is carefully inspected and sorted. Logs with defects should be removed.
- We begin processing, the logs are processed and cleared of bark - 15 cm on each side.
- The material is stacked at a height of 25 cm from the ground. In this case, it is necessary to maintain a distance of 10 cm between the logs.
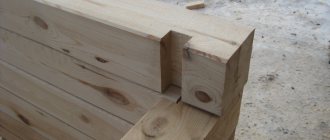
How to efficiently and quickly cut down?
The term “cutting” has been preserved historically, although modern craftsmen, when building houses from logs, more often use a chainsaw instead of an ax. Highly professional carpenters also perform the lines for the notches with a saw. After marking the cutting areas, cut down or saw out the bowl in such a way that when assembling the log house, the log will lie down, embedded exactly halfway into the adjacent bottom row.
To ensure a tight fit of the crowns to each other, lengthen the selected bowl by choosing a longitudinal oval with a groove. Select the size of the additional notch depending on the local weather. The colder the winter, the wider it should be. To ensure a tight fit, equalize the depth and volume of the wood cut for the oval.
Check the correctness and accuracy of the work performed by test laying the logs. The precisely processed surface of the upper log should fit tightly onto the lower log with its entire plane. The laid part should not have any gaps or cracks. If they form, mark again and adjust the cutting until the logs fit snugly.
Photo: a lot of interesting things on this topic can be gleaned from old books written with the participation of experienced carpentry masters.
To seal the connections, use an additional cutting element - a tenon. If you are cutting a warm building, take into account the location of the annual rings, since the looser southern parts of the rings should be inside the log house. To maintain the level of the rows in the horizontal direction, do not miss an important point. In log houses, the butt of the log is alternated with its narrower part. To align the crowns, cut down alternately - first in the wide part of the log, then in the narrow one.
Main types of log material
The severity of the problems described above can largely be reduced at the stage of procurement of materials. The question of how to make a log house with your own hands is preceded by the question of what to make it from.
The options are as follows:
- log house made of natural logs;
- timber frame;
- log house made of factory-processed logs (rounded).
In turn, when deciding how to make a log house from timber, you have to make a choice between ordinary construction timber (1), profiled timber (2) and laminated timber (3).
Beam: construction (1), profiled (2), laminated veneer (3).
From the point of view of convenience and manufacturability of work, timber is noticeably superior to ordinary (natural) logs. A rounded log is fundamentally no different from timber, except, perhaps, for higher expressiveness and originality of building design.
I recommend: Types of metal fasteners and their applications
The disadvantage of treated construction wood will be a noticeably higher cost, to some extent offset by higher quality and reduced labor costs during operation. And, in addition, the absence of that very spirit of “naturalness” of the log house.
It must be remembered that a log house usually only has external walls and (not always) partitions. To fully answer the question of how to make a log house, you will need a number of additional materials, in particular:
- timber for logs;
- boards for floors, cladding of gables, ceilings, ceilings, etc.;
- timber and boards for roof structures;
- window and door fillings (blocks);
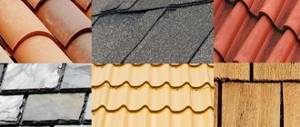
- roofing material.
Final Tips
Having mastered the craft of a carpenter, you will save significantly on construction. Start learning the basics by making a log gazebo for the garden. Then, build a small bathhouse on your site. The experience gained will allow you to master the construction of a house. A technologically precisely manufactured log house will be warm and will give the building durability and reliability and provide exceptional environmental friendliness, especially if you use cedar lining for internal cladding.
On other pages of our website you can see a lot of interesting things about log houses and log baths.
Nuances of work
To cut down a log house and make it resistant to bad weather, the logs are oriented with thin annual rings towards the street, and with thick rings - inside the future house.
To facilitate this process, the building can be built in parts. The crossbars (as these parts are called) are usually tied on the ground, aligned upward to the size of human height. Then each of them is disassembled and reinstalled on the base frame.
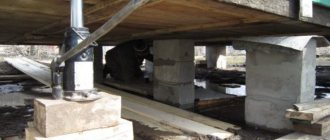
The optimal choice for a foundation for a wooden frame would be a pile option. It is lightweight and quite easy to install.
In the absence of the necessary experience, it is recommended to start the production of log cabins with the construction of something small and not very significant, for example, a garden gazebo or a small bathhouse. This will give you experience and develop the skills necessary to build a full-fledged house.
Having gradually learned the intricacies of construction, the master will be able to create something not only suitable for habitation, but also causing enthusiastic responses with its exquisite appearance.
Caulk and some construction nuances
Construction, of course, is not finished.
The log needs at least a year for final shrinkage.
Caulking a house made of timber.
After laying the crowns, you can carry out preliminary caulking, but you shouldn’t get too carried away with this. Due to inexperience, you can overdo it, and then the house will turn out crooked, with protruding elements. However, without preliminary caulking, you may subsequently not see construction flaws.
What is caulk? This is the sealing of inter-crown gaps with suitable material. For this purpose, moss, tow, jute, flax and rope are used. Tow is considered the worst. After time, it will turn into dust. In addition, birds love it very much and will pull it out even before the owners start using the house. When purchasing jute, you need to be careful not to purchase jute felt instead. No matter how much the seller assures that its properties are the same as those of the above-mentioned material, it is worth knowing that felt is a favorite delicacy of moths. For beautiful rounded logs, you can use a rope so that the aesthetic appearance of the log house is complete.
Caulking is carried out with special tools: a spatula, a mallet and a hammer. The essence of the process comes down to plugging all the cracks and gaps between the logs, even if they are not visible at first glance.
There are two methods: dialing and stretching. The first one is good for thread seals. A thread is twisted from the material and pushed into the cracks by a set of loops. The second is faster and of better quality: the material spreads along the entire length of the log, and one edge is tightly tucked into the gap. The second one is rolled up and sent there. It is worth knowing that caulking is carried out from the bottom up and from both sides of the log house. After another 3-5 years, the process must be repeated.
After caulking, you can erect the roof and begin internal insulation and finishing.
The described process of how to make a high-quality log house yourself is simple only on paper. Wooden construction has a lot of nuances. You can comply with them provided you take a responsible approach to the matter and study the supporting information. Only then will the operation of a home built by oneself fully please the owners and make them proud of themselves.
Making a log house from a gun carriage
Carriage installation diagram.
The block is placed on the block below, which lies “on the edge”. Thus, a future groove is drawn on the trunk, which is selected manually using a special ax. This action allows you to ensure a tight fit of the carriages to each other. It is worth observing the following ratio: the width of the groove should not be greater than the thickness of the carriage. If the carriage has a thickness of 150-180 mm, the groove should be slightly smaller. In the place where the corner joint is located, a complex system is drawn that forms the outline of the future paw. After completing the process of taking numerous measurements, serifs are applied, selecting the rough work.
Then, in the same way, the lock is selected manually using an ax. To complete the joining process, a secret tenon is made inside, which fits into a secret groove from the bottom log. This action is usually performed, as a rule, in the external corner joints of the building to provide additional thermal insulation and increase strength. Nevertheless, cutting “in the paw” can be done without hidden spikes.
There are several ways to build log houses. These methods differ in execution and cost. As practice shows, when work is done manually, painstakingly and overcoming many difficulties, then the result of the work is more expensive in terms of finances and effort, but at the same time pleases with reliability and quality, although combined with a not entirely attractive appearance. Ultimately, the choice of log building method depends on the desired end result. And of course, it is the future owner who decides how to make the log house.