To build something similar, if you are constantly on your own plot outside the city, the desire will definitely come sooner or later. But in what form, and at what cost? A bathhouse, a real Russian one, with a dressing room, a washing room and a steam room, when you cannot do without a solid stove - it is too cumbersome, costly and time-consuming.
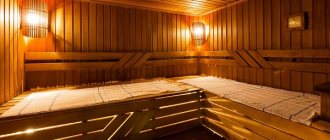
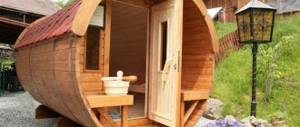
But there is an excellent alternative, which, while in no way inferior in comfort to a Russian bathhouse, and maybe even superior to it, without in any way reducing the pleasure of taking bath procedures, nevertheless, allows you to significantly reduce construction costs. This alternative is called a Finnish sauna or simply a sauna.
>
Setting up a sauna with your own hands is very similar to setting up a Russian bath, although there are fundamental differences
Benefits of a homemade sauna
Building a sauna with your own hands in your home or at your summer cottage is a great way to save money on going to a private company. In addition, the advantages of choosing include:
- The ability to independently choose the type of sauna and heating device (electric model or installation with infrared radiation).
- Ease of installation work, especially when using detailed instructions and manuals from experienced craftsmen.
- Useful properties of a sauna. Regardless of the type of radiation used in the sauna, the owner receives a lot of beneficial effects (relaxing, bactericidal, immunostimulating effect).
- The ability to use a variety of available materials for construction.
No special skills or abilities are required from the master. It is enough to have experience working with tools, and the electrical wiring can be entrusted to a specialist of the appropriate profile. If necessary, you can watch video lessons on construction work.
Selecting a base type
There are quite a few requirements that apply to the foundations of a bathhouse or other similar structures. To avoid various problems, attention should be paid to already developed technologies that have long been used in the construction of such structures. Let's take the list below as an example:
- Columnar foundation. This structure has quite a few advantages, among which we note the relatively low cost and sufficient reliability. Features of the technology lie in the location of the pillars at the corners of the structure. The recommended spacing of the pillars is 2 meters. This element of the structure can be erected using brick, but wooden or metal poles are also used. The space between the pillars can also be filled with brickwork, which will distribute pressure more efficiently.
- Strip type foundation. This type of foundation is most widespread. Among the design features, we note quite high strength and relatively high cost. The tape type of base is represented by a concrete structure, which is reinforced with a special mesh or metal rods. Among the features, we note the depth of the foundation and the width of the tape that takes the load. In most cases, the depth is 55-70 centimeters. You can protect the structure from environmental influences using insulating material.
If the bathhouse has a small area, then you can use a slab as a base. This type of base distributes the load well, but is much more expensive both during installation work and during transportation.
Principles of sauna design
The most optimal location for a sauna is to arrange a steam room and dressing room in a separate building. In private ownership, this can be a separate room in the house (especially for an infrared model). Any sauna has the following structure:
- Entrance corridor. Its size doesn't matter. The corridor is necessary for optimal heat retention in the room, for the location of outerwear and shoes.
- Waiting room. There is a table, sofas or armchairs, shelves and hangers for clothes and a change of linen. In the fullest sense, this is a recreation area. All wires, control panels, and distribution boards are routed to the same area.
- Cabin with heating device. Infrared installations, an electric oven, shelves and sun loungers are installed here.
Some of the premises may be missing if the sauna is installed in the form of a cabin (for example, in an apartment).
Selection of materials
Having developed or downloaded the project, you can proceed to the stage of selecting materials. Selecting bricks or silicate blocks is quite simple, but with wood significant problems can arise. Therefore, we will pay attention to the features of choosing timber or logs.
As previously noted, solid wood can be naturally moist or it can be dried. This indicator has the following features:
- Solid wood with natural moisture is cheaper, but it takes a very long time to shrink. As practice shows, it is necessary to allow at least one year for shrinkage.
- You cannot dry it yourself under natural conditions, since the quality of the material will still not be high.
- Due to drying, the shrinkage time is reduced to 3-4 months. To achieve certain performance qualities, special equipment is used, which increases the cost of the material.
- You cannot leave a tree in the open air not in a folded state, since the timber or logs will be deformed, and due to improper drying, cracks will appear in the structure.
Among other features of the choice, we note that the structure of the tree must be uniform. Severe cracks and serious defects can cause the performance of the structure to significantly decrease.
Main types of saunas
All saunas differ from a traditional bath in the level of humidity and the absence of water vapor (for the model with infrared radiation). The following types of steam rooms are distinguished:
- With electric oven. In the center of the room is a homemade or factory-made stove, inside of which there are specialized stones.
- Sauna with infrared emitter. Only production lamps from trusted supplier companies are used. Installations are located around the perimeter of the room in the recommended order. An infrared sauna can be done very successfully with your own hands.
There are many advantages of each of the presented models. Infrared radiation has a number of pronounced medical and biological effects that are successfully used in medicine and rehabilitation.
Features of the structure of the Finnish bath
The Finnish sauna is also particularly popular now. A characteristic feature is dry air heated to hundreds of degrees. This temperature is maintained by heating specialized electrical appliances. Moreover, it should be noted that you can set up a Finnish sauna not only in special complexes, but even at home - in an apartment. At the same time, the humidity level is quite low – in the range of 10-30%.
The construction of baths using Finnish technology is similar to a Russian bath. The difference is the lower ceilings, which, accordingly, influenced the installation of the top shelf in the steam room (located at a lower level).
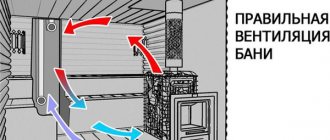
A Finnish sauna must have a good ventilation system . In such a dry air complex it is not customary to create steam or use a broom. The main functional purpose of a sauna is to warm the body.
A Finnish mini-sauna can be installed even at home. To equip a bathhouse in an apartment, it is enough to purchase it at a specialized store. A distinctive feature is their small size, and these saunas heat up quickly enough. The heating device can be either electric stoves or specialized stone stoves. It should be noted that it is better to install the electric furnace in a remote place or near an exit. Stone stoves are usually fenced off with a small wooden “fence”.
Building a sauna with your own hands
To work independently, you need to choose a sauna model, prepare equipment, and select a room for arrangement. The entire construction process consists of several successive stages:
- Preparation of the drawing.
- Preparation of materials and tools.
- Floor finishing.
- Wall decoration and shelf making.
- Installation of central equipment.
There are a number of parameters for which there are certain requirements:
- Safety rules must be strictly observed.
- All materials used are either fire-resistant or coated with antipyretics.
- There should be no slippery floors or walls in the sauna.
- For wiring, wires of sufficient cross-section with the ability to withstand voltage are used.
- Control panels and distribution panels must be placed outside the steam room itself.
- Lighting fixtures are covered with lamps made of fire-resistant material.
- The owner must be able to easily carry out wet cleaning with disinfectants. For this reason, it is necessary to provide coatings that are resistant to chemical agents.
- Heating devices (electric stove or wood boiler) must be covered with protective nets, gratings or wickerwork.
Special requirements must be placed on the premises: the condition of the walls, floors, coverings, communications, and wiring is assessed. If necessary, all repair work is carried out in advance before the interior decoration of the future sauna begins.
Floors and roofing
After the walls have been erected, the creation of floors and roofing is carried out. Considering the purpose of the structure in question, much attention must be paid to such work, since the resulting condensation and sudden changes in humidity and temperature will lead to a rapid loss of strength and reliability. When considering the features of floors, we note the following points:
- Rafters can have different cross sections.
- More attention should be paid to the quality of solid wood, since branches and cracks cause deformation of the timber.
- The rafters are laid in half-meter increments, while they are connected to each other and stiffeners are added.
- In order for solid wood to last for a long time, it is treated with special antiseptic agents that are not flammable and do not allow the wood to rot.
- The attic space is insulated to protect it from high humidity, condensation and high temperatures. It is worth remembering that vapor barrier and heat insulation materials have different performance qualities and purposes.
There are quite a few different roofing materials, and all their performance characteristics should be taken into account. Let's take an example:
- Weight.
- Strength.
- Life time.
- Insulating qualities.
- Difficult to install.
- Price.
Today, ordinary slate is used quite often, since it has a relatively low cost, and you can also find used ones. Soft roofing, which is a modern proposal, has also become widespread. It is light in weight, can be used to cover broken surfaces, and has quite a few other positive qualities.
Preparation of the drawing
A well-designed plan provides absolutely all parameters:
- Room dimensions.
- Location of communications, including electrical wiring, location of sockets, lighting fixtures.
- Design of shelves and their location.
The drawing indicates the finishing features of the floor and walls, the fasteners used and niches for infrared installations. If you do not have the proper artistic skills, you can use the services of a specialist, and find out the required safety parameters from the regulatory literature.
Interior decoration
After the construction of the structure and completion of the roofing work, you can begin interior decoration. In the case of a classic Russian bathhouse, there is not much work; it mainly consists of insulating the walls and other elements of the structure. As for the Finnish sauna, its finishing is represented by high-quality materials. Among the features of interior decoration, attention should be paid to the following points:
- Finishing materials should be solid wood. This material can withstand high humidity and temperature better than others.
- In the steam room, as a rule, there are sun loungers located at different levels. They are represented by benches that are made of solid wood.
- Do not forget that you need to keep a variety of things in the bathhouse, for example, brooms and water containers.
You should pay attention to the choice of solid wood. Some are better able to withstand high humidity and temperature, as well as mechanical stress, while others are more susceptible to such effects. Today, glass is often used in the finishing of such structures, for example, glass doors. They are not only practical to use, but also look very attractive. It is not recommended to place furniture in the steam room, as it will quickly lose its performance.
Materials and tools for work
For successful work, the master needs to prepare the following set of tools:
- Wooden slats.
- Natural stone-plast for finishing the floor.
- Cement, sand, gravel for pouring and mixing the solution.
- Fire-resistant brick for making a protective frame for an electric boiler.
- An old metal container for self-construction of an electric stove or wood-burning boiler.
- Several heating elements (you can make a sauna stove with your own hands).
- Special stone for homemade stoves.
- For decorative finishing you will need paint with fire-resistant properties.
You will also need a grinder, welding, sets of fasteners, a trowel, a tape measure, and a construction pencil. Lighting fixtures, wires, distribution boards can be purchased at any building materials store.
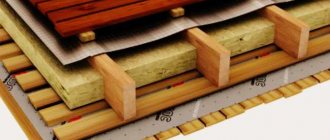
Insulation of ceilings and walls
Insulation must be laid between the frame bars. You can take the cheapest material - mineral wool. Despite its low cost, basalt-based mineral wool has a high thermal insulation ability. The walls are insulated first, and the ceiling is covered with heat-insulating material later, when ventilation is ready.
From the video you will learn how to finish and insulate the ceiling in a bathhouse
After installing the insulation, the walls need to be covered with special foil, turning its mirror surface inward. The joints of the foil are secured with metallized aluminum tape. Due to the reflectivity of this material, most of the heat will be retained in the room. The steam room will warm up quickly and maintain the temperature for a long time.
Finishing the floor in the sauna
Wooden floors are gradually becoming a thing of the past, giving way to traditional stone flooring. This type of finish is the safest and has good resistance to high temperatures. Also in practice, tiles can be used. Instructions on how to make a sauna with your own hands:
- The first step is to prepare the foundation (for individual rooms). For a room or decoration of an already finished room, only the alignment of the underlying base is used.
- After the foundation has hardened or been leveled, they begin laying stone or tiles. Today, craftsmen have the opportunity to use original designs with original design ideas in their work.
- Particular attention is paid to finishing corner joints, crevices, and cracks. The sauna room should be as airtight as possible so that the hot air is evenly distributed throughout the room.
It is necessary to ensure that during construction work there are no protrusions or chips left on the floor, which could lead to injury to sauna visitors.
Installing a stove for a wood-burning sauna
The centerpiece of a Russian bathhouse is a well-made stove.
Its location should ensure heating of all rooms of the bath: steam room, dressing room and washing department. To create a comfortable temperature regime, a metal stove is quite suitable. Its heat output practically corresponds to the power of heat release inside the firebox. The physical properties of a brick oven and fire safety regulations do not allow it to emit more than one hundred degrees of temperature. A separate foundation is installed for the heating device in the bathhouse. The chimney is installed so that the walls of the pipe are at a distance of at least 40 cm from the roof rafters.
You can make a metal stove yourself in this way:
- A one and a half meter pipe with a diameter of 500 mm is cut into two parts - 90 and 60 cm. A stove-stove is made from a long section, and a tank for heating water is made from a short section.
- A 200x50 mm hatch is cut out at the base of the long section. A round plate with a thickness of at least 12 mm is welded above it.
- The grate is made of a metal sheet and installed in a cut-out ash pit.
- A niche is cut out in the pipe to accommodate the combustion chamber. A 250x300 mm door is made from pipe cuttings.
- A blank for the hopper is welded above the chamber. It uses a part of a pipe 350 mm long with a welded back part. The stone hopper is equipped with a door 300 mm wide. Half of its container is filled with pebbles, and the top is closed with a metal circle.
- A coupling 50 mm wide and 5 mm thick is fixed at the top of the stove. It is made of steel tire.
- The coupling is welded to the furnace body so that one half of it protrudes above the device. The tank is attached to this part.
- A container for water is being prepared. A circle 8-10 mm thick is welded to the lower end of the tank. A hole with a diameter of 150 mm for the chimney is cut in advance. The lower part of the chimney is welded to the bottom of the water tank to prevent water from flowing into the firebox.
- The top of the water tank is covered with a steel circle. A chimney is welded to its hole. At the top of the water tank, a hole is made for filling it, which is equipped with a lid with a handle.
- A platform 300 mm wide is welded 350 mm from the water tank.
- A faucet with a valve is welded opposite the hole for filling water.
- The furnace door is installed.
How to build a wood-burning sauna - watch the video:
That's all! Agree, the science is not complicated, and you already understand how to make a wood-burning sauna. By following the rules, the project and our guidance, in the near future you will be able to enjoy the healing power of your own bathhouse. Good luck!
Installation of central equipment
The final and most important stage of the work.
Infrared emitters are located around the perimeter (two on the back wall, two on the front corners, one along the bottom contour of the shelves). The electric oven is placed in the center of the steam room, enclosing the installation with a protective casing.
There are special requirements for the installation of a wood-burning boiler. An old metal container (for example, a frame from an old washing machine) is used as a boiler. The opening for storing firewood can be located either in the steam room itself or brought outside (to the next room).
Laying the crowns
In this article we will consider the work of constructing a bathhouse from solid wood. The initial stage involves performing the work of laying the crowns. Among the features of this stage, we note the following points:
- Quite a lot of attention should be paid to the accuracy of the location of all elements. This is due to the fact that if the main elements are incorrectly positioned, the walls may end up sloping.
- Checking the location of logs or beams is carried out using a level. This measuring instrument can be of various types: water or electric.
That is why, when carrying out work on laying the crowns, you should not rush, as you can make a mistake, and it will be costly.
DIY sauna photo
Installation of equipment and fittings
The equipment is installed only after the sauna is completely built and finished. Since you can build a sauna in a separate room, it is worth considering the option with a real stove. But if the bathhouse will be heated by a wood-burning stove, you first need to install it, and then carry out the finishing work. If you don’t have much experience in building stoves, it’s better to get by with a store-bought electric heater. It is installed so that the lower part is located at a height of 20 cm from the floor.
The boards that were used to construct the seats are used to make a fence around the stove. The distance from the boards to the heating element must be at least 5 cm, and the height of the fence should not exceed the height of the heater by more than 5-6 cm. Stones are placed in the gap between the fence and the heater, trying to keep the air gaps between them as small as possible .
Now you need to install a lighting device, a thermometer, and a device for measuring humidity. If you also want to keep track of time, you can hang an hourglass on the wall with a standard 15-minute scale.
Benches and doors in the steam room
When installing supports for benches (shelves), builders must take into account that the height of the flow in the steam room is no more than 2.1 meters. To make it convenient to climb onto the shelf, a step is installed on the floor. Its height lies within 0.25 m. The lower bench can be located at a height of 0.65 m. The second shelf should be located 1 - 1.1 m from the floor level.
The door leading to the steam room can be made of solid wood. Or specially treated glass can be installed in it, that is, it must be heat-resistant, and preferably tinted.
A standard door has dimensions of 0.7 * 1.9 m. No locks or latches should be installed on it.
Tips and tricks
Before installing a sauna in a wooden house, it is necessary to prepare the floor. All beams and boards that will be used in the construction of the sauna must be treated with water-repellent compounds. By the way, it makes sense to use larch for flooring.
A heat-resistant cable must be laid along the walls - a channel in which the electrical wires will be enclosed. They must be insulated to withstand water.
How does a Russian bath work?
The Russian bathhouse is a place where people have long cleansed their bodies of dirt, received treatment and rested, photo 1. A special feature of the Russian bathhouse is the high temperature in the steam room.
Photo 1. Russian bathhouse: a) general view of the bathhouse; b) plan of the bathhouse; c) heater design: 1 – ventilation outlet; 2 – overlap; 3 – device for releasing steam; 4 – firebox; 5 – grate; 6 – ash pan; 7 – boiler for heating hot water
Construction of a Russian bath
Bath procedures are very beneficial for the human body; they cleanse the body of harmful substances. The Russian bath is very useful for people with low heart pressure.
Be careful! The Russian bath is contraindicated for people with the following diseases:
- diseases of the cardiovascular system (for example, hypertension, heart attack, thrombophlebitis);
- acute viral and inflammatory diseases of the upper respiratory tract;
- malignant tumors;
- acute rheumatism;
- cholelithiasis;
- psoriasis;
- acute eczema;
- tuberculosis and other diseases.
Pregnant women are also prohibited from visiting the Russian bathhouse.
What rooms does a Russian bath consist of?
A Russian bathhouse usually has the following premises:
- steam room (in this room a stove with a coil is usually installed);
- soap room (there is a container with cool water, cabinets with bath accessories)
- dressing room;
- restroom.
The size of the dressing room is calculated according to the number of people who will undergo the procedures - at least 1 m2 per person, photo 2.
In the dressing room there are:
- place for firewood;
- arrangement of benches;
- hanger arrangement;
- furnace firebox;
- It is possible to arrange a table with benches (for relaxation).
Photo 2. Construction of a waiting room for a Russian bath
The steam room is one of the main parts of the Russian bathhouse, photo 3. It is believed that the optimal size of the steam room for 2 people is 1.8x1.8 m. There must be at least 2 people in the steam room (for safety reasons, in case of poor health).
Photo 3. Installation of a steam room in a Russian bath
The steam room must have shelves for lying on. Shelves can have different shapes and sizes depending on the size of the steam room, photo 4.
Photo 4. Options for arranging shelves in the steam room of a Russian bath (type and dimensions)
Since the main place of heat loss in a bathhouse is the ceiling and roof, the construction of the latter is treated with all responsibility.
They try to insulate the ceiling of a Russian bath using the following thermal insulation materials:
- mineral insulation (for example, mineral basalt wool, perlite backfill);
- a layer of sawdust or peat.
The floor in a Russian bathhouse is mainly made of wood.
Short recommendations: how to take a steam bath in a Russian bath
- The duration of the procedure in a Russian bath should not exceed 2…3 hours.
- It is not recommended to take procedures in a Russian bath while hungry or to eat immediately before the bath.
- It is recommended to spend no more than 5...10 minutes in the steam room at first.
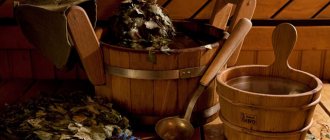
- One of the attributes of the Russian bath is a broom, which, when waved, increases the effect of heat and sweating of the skin.
- After the main procedures in the baths, you should take a cool shower and relax. Showering requires washing the body with soap and a washcloth.
It is not recommended to install devices such as:
- electric heaters;
- gas heaters.
Tips for constructing a Russian wooden bathhouse
- The size of a Russian bathhouse is determined depending on the expected number of people who will use the bathhouse. For one person, 5...6 m2 of usable bath area is taken.
- The best location for a Russian bathhouse is near a river, lake or other body of water.
- It is recommended to make the walls of a Russian bathhouse from a wooden frame, since wood can perform several good functions:
- quickly absorb moisture;
- maintain an almost constant temperature;
- maintain constant humidity.
A log frame made of pine or spruce is especially valuable, as they emit a specific odor and have a bactericidal effect on the room environment, photo 5.
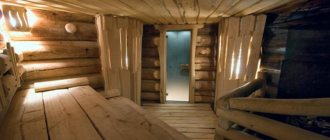
Photo 5. Russian wooden bathhouse. Bathhouse interiors
- They try to install windows in a Russian bathhouse of small size with maximum sealing; a window with triple glazing is usually used.
- Since there is always high air humidity in the premises of a Russian bath, in order to prevent the processes of wood rotting, it must be treated with antiseptic agents, for example, a solution of sodium fluoride with the following proportion - 1: 0.03 (respectively, water and a 3% solution of sodium fluoride). The consumption of this antiseptic is approximately 1 l/m2.
- When building a Russian bathhouse from a wooden frame, the seams between the logs are sealed using the following materials:
- tow;
- hemp;
- moss;
- felt.
Russian bathhouse made of stone
Features of a Russian stone bathhouse:
- One of the main devices of a Russian bath is a heater stove, which, due to its heavy weight, must be installed on a separate foundation made of rubble. Visually, the stove-heater resembles an ordinary rural stove in the kitchen.
- The masonry is carried out using stones with a mortar layer of 2 cm.
- Two types of mortars are used for laying walls:
- cement-lime;
- cement-clay.
To prepare cement-clay masonry mortar, you need to prepare the clay - mix it with water for 24 hours.
- The masonry mortar has the following composition (by volume):
- cement – 10 l;
- sand – 20 l;
- thick solution of clay or lime - 10 l.
- The plaster solution has the following composition:
- cement – 2 parts;
- sand - 3 parts.
If you are interested in bath traditions, then you may like articles about the Turkish hammam, as well as about the Japanese bath tradition.
The author of the publication is an expert from GIDproekt
Konev Alexander Anatolievich