A shower drain or gutter drainage system is a universal design designed to effectively remove non-aggressive liquids, including water, from the floor surface in special rooms.
Shower drain
Long grated shower drain
Structural characteristics and purpose
The shower drain belongs to the category of complex plumbing devices, and is fixed directly to the pipeline through a special floor hole. This design includes:
- funnel-shaped water inlet or housing;
- siphon, responsible for creating an effective hydraulic seal;
- a flange through which the waterproofing membrane part is sealed;
- a grate that prevents clogging and failure of the sewer system;
- outlet coupling part connected to the drain part of the sewer system.
Drain drain assembly diagram
During operation of the drain ladder, the entire device must be securely fixed, and the removable part is represented only by a lattice cover. Most shower drain devices are installed in the floor, but some models are built directly into the wall.
Decorative drain gratings
Despite their apparent simplicity, drainage structures have a wide range of functionality:
- transport the water flow to the sewer riser;
- provide optimal tightness of the joint with the floor;
- carry out primary filtration of wastewater and prevent sewer clogging.
The built-in hydraulic seal prevents all unpleasant sewer odors from entering the room.
Choosing a shower drain
The device for floor drainage is embedded in a concrete screed under the finishing floor covering, so it is difficult to replace. It is worth paying attention to its correct choice.
In addition to matching the intended design solution of the bathroom, you need to take into account the maximum performance of the shower heads and the throughput of the device specified in the manufacturer’s description. It should not be less than 1.2 - 1.5 liters per second .
The choice of drain model is influenced by its dimensions. They should not be greater than the maximum allowable for a particular situation, so that the required slope of the floor does not make the thickness of the screed unacceptably large. The size of the outlet pipe should be taken into account - at least 50 mm with a required slope of approximately 2 cm per linear meter.
The correct choice of the type of seal on the siphon is important. If freezing of the system or long interruptions in the use of the drain are possible (the water in the pipe bend dries out and the water seal does not work), you need to choose a drain with a “dry” seal , in which the access of air from the sewer is blocked by mechanical means.
Recommendations for selection
When choosing a special element of plumbing communications intended for drainage of wastewater into the sewer system, you must first of all pay attention to such a very important parameter as throughput indicators, indicating the amount of water that the drain can consistently discharge per unit of time. As a rule, the standard calculation of the required throughput is based on the following data:
- with a diameter of the upper shower head of 300 mm, the average water supply per hour varies between 30-90 l;
- using a cascade shower requires water consumption in the range of 1500-1800 liters per hour.
When choosing throughput, it is advisable to take into account a small margin of 5-10%, which will prevent emergency situations and flooding.
If you need to perform independent installation and have no experience in plumbing work, it is not advisable to purchase round models. It will be quite problematic to perform a perfectly smooth and beautiful installation of the floor covering when installing such a ladder with your own hands.
Corner round drain
Types of shower drain designs
There are a wide variety of floor shower drains available for this type of tile. Shower drains may differ in shape, design, size (height), and materials of manufacture. Regarding the shape of the gratings, they can be rectangular, square or round.
And according to the design, they distinguish between wall, point and linear devices. Linear structures are installed, most often, in the corner or along the edge of the shower. Point drains can be located anywhere on the floor under the tiles, while wall-mounted devices are mounted mainly at one of the walls. The drains also differ according to the type of outlet: horizontal or vertical. Its location determines in which direction the sewer pipe will be connected to the drain.
As a rule, the design of most drains includes an ordinary water seal located in the siphon. But such a device has one significant drawback - if you do not use the shower for a long time, the water inside evaporates, and unpleasant odors penetrate into the bathroom. In this case, it is better to choose a shower floor drain with a dry seal.
Designs with a dry seal completely isolate the premises from the penetration of odors from the sewer, since in this device, in addition to the water seal, there are several more dampers that block the channel under the influence of its own weight. When water penetrates the drain channel, these valves open, allowing liquid to pass through freely, and then close again.
The drain in the tiled shower floor is installed in the most convenient place for this. The main thing is that the drain is located at the lowest point of the bathroom, ensuring effective collection of the flowing liquid. So, the drain hole can be installed in the following places:
- In the center of the shower stall or with a slight offset to one side. Standard drain location option. In this case, it is necessary to ensure an appropriate slope of the floor from the four walls.
- Near the wall. In this case, the floor slopes from one of the walls towards the drain hole. As a rule, slotted drains with high throughput are located in this way, since such devices become clogged less often.
- In the corner. This type of drain hole looks great on the floor without being noticeable. In this case, the slope of the floor surface is made in two planes to the desired angle, ensuring water flow to a certain place.
It is worth noting that when choosing a shower drain, you must also pay attention to the height of the device. This parameter determines how much you need to raise the level of the floor covering at the drain hole. Of course, everyone wants the floor height to be as low as possible, but keep in mind that the higher the height of the ladder, the higher its capacity. Therefore, there is a special type of ladder with adjustable height; by choosing it, you can adapt the device to any height of the screed.
Installation technology
A properly selected shower drain is resistant to corrosive changes, and is also characterized by reliability and durability. If necessary, this structure can be disassembled and cleaned independently.
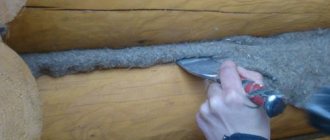
Step 1. Areas of all joints of the floor and walls, as well as corners, are carefully treated with mastic, which prevents the ingress of moisture, as well as the formation of mold and foci of fungal infection.
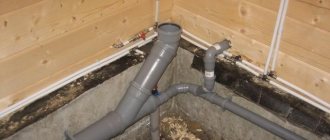
Step 2. Assembling and subsequent installation of the drainage system, which should be located on a straight line between the section where it inserts into the sewerage system and the junction of the floor tile elements.
Step 3. Inserting into the sewer and processing the connection using silicone plumbing sealant. If it is necessary to connect drain pipes from a large number of plumbing fixtures, use a standard adapter for several outlets.
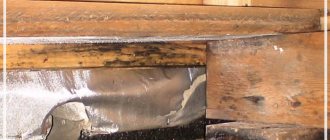
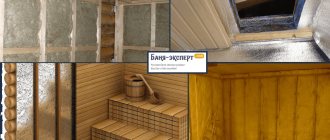
Step 4. Additional thermal insulation of the concrete base using granulated or extruded polystyrene foam sheets. The contours of the installed elements of the drainage system are carefully cut out using a construction knife.
Additional thermal insulation of the concrete base
Laying thermal insulation
Laying insulation and installing a ladder
Installing a siphon
At this stage, it is possible to replace heat-insulating materials with a cement-sand screed.
Step 5. Lay plastic deformation borders or damping self-adhesive tape along all walls.
Step 6. Mixing the cement mortar and applying it to the polystyrene foam surface in a layer of 3.5-4.0 cm. The mixture to be laid should completely hide the installed drain without a flange. Leveling the cement mixture is carried out according to construction rules.
Insulation
Screed
Further work should be carried out approximately three to four days after the concrete screed has hardened well and gained full strength.
Cladding walls while the screed is drying
Step 7. Prepare a gasket with a diameter of 15-20 cm from an isoplastic membrane with a hole in the central part, and then fix it with a screw around the flange.
Step 8. An additional layer of waterproofing should also be provided in the corners, at the joints and along the entire surface under the shower stall. After treatment with the primer, a layer of coating mastic is applied.
Application of primer
Additional layer of waterproofing and installation of a drain pipe
Step 9. Connecting the siphon and the grille with a gasket in the form of a rubber O-ring.
Sealing ring
Waterproofing
When installed correctly, the decorative grille can be easily dismantled, making the inside of the drain accessible for work. The cover must be covered with polyethylene, which will prevent cement mortar from getting into the drain system.
Step 10. Applying another layer of cement screed. When the drain hole is located in the central part of the shower room, guides are installed in a diagonal direction, the lower corner of which should converge at the drain. The resulting triangle is also filled with the mixture.
Guides
Pouring the mixture
Pouring a screed with a slope
The hardening cement mixture must be periodically moistened and thoroughly leveled. At the final stage, the guides are removed, and the freed space is filled with cement mixture.
Required materials and supplies
To install a shower drain pipe yourself, you will need the following materials:
- dismountable siphon with screw fastening, mounted under tiles;
- drain pipe with a diameter of at least 40 mm included;
- silicone sealant;
- 50 mm thick expanded polystyrene boards;
- cement-sand mixture up to 5 kg per 1 m² of floor;
- roofing felt or other sheet waterproof material, laid in 2 layers;
- finishing cement-polymer mixture for waterproofing, 3-4 kg per 1 m²;
- waterproof adhesive for tiles;
- tiles;
- The mixture for grouting tile joints is waterproof.
Tools required for installation:
- hammer;
- chisel;
- trowel, or trowel;
- notched spatula;
- building level;
- tape measure, marker;
- straight correct rack;
- trough or buckets for glue and screed;
- construction mixer;
- grinder saw for cutting tiles;
- blowtorch or hair dryer.
Expert advice
The most convenient, from the point of view of self-assembly, reliability and durability, is the purchase and installation of the most modern, ready-made type-setting structures, represented by perforated metal-plastic. It is recommended to apply red lead to the mounted surface of steel structures.
The ceramic floor covering used in the construction of the drain must meet increased requirements. The surface of the tile should not be slippery or absorb significant amounts of moisture. The moisture absorption level should be 1.5% or less of the weight of the tile itself.
Finishing work
The ladder is installed
Video: Laying tiles on the floor using MAGIC part 1
Video: Laying tiles with a slope under the drain in the shower, part 2
Video: Laying tiles on the floor, with a slope to drain water, part 3
Surface roughness increases operational safety and prevents slipping when water enters. Installation is carried out using special adhesive contact compounds. All seam joints between the elements of the tile covering are sealed exclusively with waterproof grout, which can be the same color as the main coating or have a contrasting color. Learn how to install a heated towel rail in a bathroom using this link.
Floor drain
Installation of a shower with a drain to the floor
The easiest options for sloping bathroom floors to make include installing a drain hole in the shower floor.
First, the location for installation is determined and markings are made.
A prerequisite for arranging the system is the laying of a waterproofing layer based on a special rubber membrane sheet and a drain plate equipped with a drain drain.
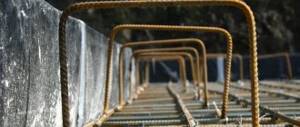
Particular attention is paid to insulation with reinforcing metal mesh and filling the floor with a drainage device with cement-sand mortar, to which special additives are often added, giving the finished coating excellent water-repellent characteristics and durability. As a finishing touch, tiles with a corrugated surface are usually used, which prevents slipping.
When installing a shower with a drain to the floor, experts recommend giving preference to rolled insulation in the form of a self-adhesive sheet, as well as ready-made waterproof coating materials that are applied with a brush or roller.