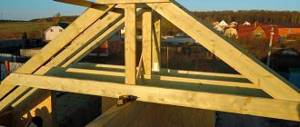
When designing thermal insulation of residential buildings, specialists always calculate the dew point in order to determine its position in the outer wall. This allows you to understand in which place there is a high probability of a significant amount of condensate being released, and thus find out how well the selected fencing material corresponds to operating conditions.
We will not post here the calculation of the dew point using formulas, which is usually done in construction, since it is quite complicated and cumbersome. By the way, many unscrupulous sellers of building materials take advantage of this, telling us about the release of moisture inside certain insulation materials. The purpose of this article is to help the average homeowner determine the dew point in the wall themselves and use it in practice.
Role in the construction process
If the dew point turns out to be too high, then building materials such as cement, wood, metal and others will not produce the desired effect in the building and, even worse, will not last long. And if condensation forms on the surface of polymer materials during laying, this can cause the following defects:
- surface swelling;
- detachment;
- shagreen.
It is unlikely that it will be possible to visually calculate the dew point in the wall, since this will require a table of the corresponding indicators and a non-contact thermometer (we will talk about this procedure in the section “Determining the dew point and making calculations”).
Dew point calculation
Devices
You will need to stock up:
- tape measure;
- an ordinary thermometer;
- non-contact thermometer - pyrometer;
- hygrometer.
The process consists of the following steps:
- 60 cm is measured from the floor covering using a tape measure;
- the temperature in the measured area is measured;
- humidity is measured in the measured area;
- the resulting indicator is located in the above table;
- the temperature of the wall surface is measured with a pyrometer;
- two indicators are compared;
- the result is determined: if the surface temperature differs from the dew point by more than 4 degrees, it means that there is high humidity in the room. Therefore, insulation must be carried out under the supervision of a specialist.
By the way, not only when insulating it is necessary to calculate the dew point. When installing windows, you also need to know the temperature indicator so that they do not “cry”.
Difficult? Of course, there is nothing supernatural.
Remember, you should not neglect such an important indicator, since nothing is easier for water vapor than to destroy the structure and harm your health. Well, not specifically, to him (the couple), but to what he is being reborn into.
An anecdote on the topic: It’s a shame that it turns out: spring, summer, autumn - once a year, and winter twice. Once at the beginning of the year, the second time at the end.
That's all, dear friends! Don’t judge strictly: I explained it as best I could. I hope the article will help the “truly Russian person” not to do anything stupid.
Your home will receive comfort and warmth, and you will enjoy good health and a wonderful mood! See you!
Wisdom Quote: He is foolish who, unable to control himself, wants to control others (Ser Publius).
It will not be possible to perform the calculation during a visual inspection of the wall, since this requires a special table. It defines the parameters of temperature, humidity and other information, from which anyone can determine the approximate location of the dew point. But the table is intended for average data, and for a more accurate calculation, special formulas are used using reliable information for each structure.
Many sites practice calculating the location of the dew point online, where each developer can enter specific information about his own property to obtain calculated data. The concept of dew point is individual for each building, so it must be calculated anew each time. This takes into account:
- climate in the construction region;
- wind frequency and presence of gusts in certain weather conditions;
- wall thickness according to design or in kind;
- wall materials used in construction:
- mode of operation of the premises (permanent or temporary);
- climate in the adjacent space to the wall being examined (presence of a canopy or temporary structure).
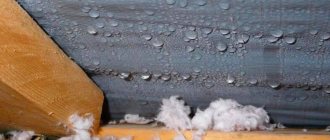
Moisture is always contained within some small limits in any material, but the main concern of designers and builders is to prevent an increase in the amount of liquid and the appearance of unplanned condensation. If the humidity inside the room increases, this indicates an incorrectly selected insulation material or poor-quality installation of it on the walls or ceiling.
When determining the dew point in the fences of a private house, you should decide on the following parameters:
- type and technical characteristics of the insulation, its thickness and installation method;
- choice of heating system in the building and type of ventilation;
- the quality of insulation of other structural elements of the house;
- temperature and humidity inside and outside the room;
- performance characteristics in the next room or premises.
Sometimes in winter, when long frosty periods occur, the dew point shifts towards the interior of the house. If the walls are made of dense materials with low vapor permeability and high resistance to heat transfer, then there is no danger. But in the case of using porous materials with a high permeability threshold as wall materials, especially when combined with similar insulation materials, one should strive to ensure that the condensate boundary moves inward only for a short period of time.
Fencing made from such materials requires a layer of insulation approximately twice as thick as usual. Effective removal of moisture is carried out by organizing a ventilated space between the finishing and the insulation layer.
What factors influence
Determining the dew point in a wall is very simple. Below is an example of how to make the calculation. This can be done by anyone who is interested in the issue of proper insulation.
The dew point is the temperature at which water vapor begins to condense.
What is dew point
The dew point in a wall can move across its thickness as indoor and outdoor temperatures change. For example, if the temperature inside the room is stable, but it gets cold outside, then the dew point will move along the thickness of the wall closer to the room.
The temperature of the object on which steam will begin to condense, i.e. dew point depends mainly on two parameters:
- air temperature;
- air humidity.
For example, if the indoor temperature is 20 degrees and the humidity is 50%, the dew point temperature will be (approximately) 12.9 degrees. If an object with this temperature or lower appears in the room, condensation will form on it.
For example, when a refrigerator is opened, dew from the incoming warm air falls inside it. It looks like "fog coming from the refrigerator."
When insulating walls and house structures, it is useful to calculate the dew point for the highest and lowest values of humidity and temperature in order to know within which boundaries of space the dew point will move when these parameters change.
When calculating the dew point and insulation thickness, some parameters are not taken into account - pressure, air speed, material density... Therefore, we can only talk about approximate values. But this is not critical when it comes to determining the thickness of the insulation.
To determine the dew point in a wall, the easiest way is to use tables of ready-made approximate values, and not try to do the calculations yourself. Moreover, you should not trust homemade programs from the Internet; they often do not take into account parameters and produce false values, and sometimes based on the principle of random numbers.
Below is a table of calculated dew point values depending on air temperature and humidity. These are approximate values, as the influence of other factors is not taken into account.
For example, you can determine that for a room with an internal temperature of 22 degrees and a humidity of 60%, the temperature at which water vapor will condense (dew point) will be 13.9 degrees.
Solving the problem of finding the dew point in a wall is very simple. You need to know:
- wall thermal resistance coefficient, ?1, W/(m•K);
- coefficient of thermal resistance of insulation, ?2, W/(m•K);
- wall thickness, h1, m;
- insulation thickness, h2, m;
- indoor temperature, t1, deg. WITH;
- air humidity that will reach the dew point,%;
- dew point for temperature and humidity data, deg. WITH;
- outside temperature, t2, deg. WITH.
As a rough approximation, it is assumed that the temperature throughout the thickness of each layer will change linearly.
The desired value is the temperature at the boundary of the layers of the wall and insulation. When it is found, you can build a graph of temperature changes in the “wall-insulation” layer and use it to find the position of the dew point.
To do this, the ratio of the thermal resistance of the wall to the thermal resistance of the insulation is found, based on which the change in temperature in one of the layers is determined, which will make it possible to find out the temperature at the boundary.
Let's look at an example.
Calculation example
An example of the conditions is as follows. Reinforced concrete wall h1 = 36 cm, insulated with polystyrene foam h2 = 10 cm. Thermal resistance coefficient of reinforced concrete is ?1 = 1.7 W/cmK, foam plastic - ?2 = 0.04 W/cmK. Temperature inside t1= 20 degrees, outside t2=-10 degrees. Humidity indoors and outdoors is assumed to be the same - 50%. According to the table, the dew point will be 9.3 degrees.
Thermal resistance of the wall and insulation is defined as h/?, W/m2K.
In this example, the thermal resistance of the wall will be 0.36/1.7=0.21 W/m2K, insulation 0.1/0.04=2.5 W/m2K.
The ratio of the thermal resistances of the first layer to the second (walls to foam plastic) will be: n=0.21/2.5=0.084. Then the temperature difference in the first layer (wall) will be, T= t1- t2xn = 20-(-10)x0 .084=2.52 deg.
Accordingly, the temperature at the layer boundary will be equal to t1-T=20-2.52=17.48 degrees.
From approximate calculations and an approximate graph, you can find out the main thing - the dew point is located in the insulation, far from the wall, i.e. even worsening conditions, taking into account the calculation errors, will not lead to harmful moisture in the wall.
The temperature inside is 22 degrees, outside - 15 degrees (region to the north), humidity - 50%, dew point - 11.1 degrees. A wall 38 cm thick is made of brick (1.5 bricks per seam and plaster is taken as “brickwork”).
Thermal resistance coefficient for brickwork is 0.7 W/cmK, for mineral wool - 0.05 W/cmK (taking into account its moisture in real operating conditions). Thermal resistance of the wall: 0.38/0.7=0.54 W/m2K., insulation 0.1/0.05= 2.0 W/m2K.
As we see, the situation is “butt-to-end”. With an increase in humidity, which is a common phenomenon, with a drop in indoor temperature, or in a cold winter, the dew point will “walk” inside the wall.
What can influence this value?
There are several things that can affect this:
- wall thickness, as well as building materials used for insulation;
- humidity (when there is a high concentration of moisture, the dew point rises);
- temperature - it varies greatly and depends on the specific area.
To get a more detailed look at the process, let's look at several common situations.
- If the wall is not insulated, the dew point will begin to fluctuate under the influence of climatic conditions. If the weather is stable, the point will move closer to the outer wall. In this case, the house itself will not be damaged. And if it gets colder sharply, then this point will shift to the inner wall. The room will become saturated with condensation, and the walls will slowly become wet.
- If the wall is insulated from the inside, then the dew point will be located somewhere in the center between it and the insulation. With high humidity, this is hardly the best option, since after a sudden cold snap the point will move closer to the junction with the insulation, which can have a destructive effect on the structure. Note that in a humid climate, insulation from the inside is possible only with an efficient heating system capable of providing the same temperature conditions in all rooms.
- In the case of external wall insulation, the dew point will move inside the insulating layer. When purchasing material for thermal insulation, you need to take this point into account and correctly determine the required thickness.
Note! If climatic conditions were not taken into account during repair work, then if troubles arise, it will be very difficult, almost impossible, to eliminate them. All that remains is to undo everything that has been done and start again (read: additional costs).
Internally insulated wall
A wall insulated from the inside is “fenced off” from the heat that reigns inside the room. Here the dew point moves towards the inside of the wall. As a result, the temperature value under the thermal insulation material decreases. That is, “our heroine” occupies a location where the occurrence of condensation, alas, is almost inevitable.
Next, we look by analogy with the previous options:
- in the thickness of the wall - the structure is dry, but it can get wet with a sharp temperature change (it moves towards the inner surface - into the room);
- on the inner plane of the wall under the heat-insulating material - the structure can be wet throughout the harsh period;
- inside the thermal insulation material - the wall and insulation can be wet all winter.
We determine the dew point and make calculations
We all want to live comfortably, but this is unlikely to be possible in conditions of high humidity. Condensation is harmful not only to the home (particularly to the walls), but also to human health (the risk of asthma increases). Moreover, if the humidity is high, then the walls and ceiling can become covered with mold, which is so harmful to the body and so difficult to remove. Often you even have to change all the finishing coatings to get rid of harmful microorganisms.
And in order to avoid all these troubles, we recommend calculating the dew point in the wall and thereby finding out whether it is advisable in your case to begin repair work, carry out insulation, or even start building a new house. It is worth remembering that the concept of dew point is individual for each specific building, therefore, it has to be calculated differently each time. But before proceeding directly to the calculations, it is necessary to take into account the following factors:
- climatic features of your region;
- presence and frequency of powerful wind;
- wall thickness;
- building material used in construction.
Humidity, although within acceptable limits, is contained in almost every material. You must ensure that it does not rise and condensation does not appear. And even if you call a specialist in case of increased humidity levels, he will most likely say that you have incorrect thermal insulation, the thickness of the building materials is not appropriate, or an error was made during installation. This is partly true, because it is competently carried out repairs that largely influence the location of the dew point and the formation of condensation on the surface of the walls.
Table for calculating dew point
Note! For intermediate numbers that are not indicated in the table, it is necessary to determine the average value.
What kind of animal is this and what is it eaten with?
Concept
So, the dew point is the temperature indicator at which the steam present in the air space is converted into water (condensation is created). As they say: physics is 6th grade.
Remember a simple example - all instructions for household electrical equipment say: before turning on an appliance brought from the cold into a warm room, you need to wait some time before plugging it into the network. This time is needed for condensation formed on electrical circuits and boards to evaporate and not cause a short circuit.
Accommodation
It directly depends on the humidity and temperature in the room and outside, that is, outside. Since the indicators cannot boast of consistency, the dew point is a very capricious lady.
- If the room is +20°C and 60% humidity, then the plane of the wall with a surface temperature of +12°C will already be “decorated” by droplets of water.
- If the room is +20°C and 40%, then condensation will appear on the plane with +6°C.
- If the room is +20°C and 80%, then the plane of the wall at +16°C will be “decorated” by droplets of liquid.
In addition, let's look at how the placement of an extremely important indicator in the wall changes:
- without thermal insulation material;
- with thermal insulation material inside;
- with thermal insulation material on the outside.
Calculating the dew point in a wall using a table - detailed instructions
First, take care of the necessary equipment. You will need:
- thermometer;
- a non-contact thermometer, which, by the way, can be replaced with a regular one;
- hygrometer.
Below is the algorithm of actions.
Step 1.
In the room where you need to determine the dew point, measure approximately 60 centimeters from the floor, no more. After this, determine the air temperature at a given altitude (to do this, you can put a thermometer, say, on a table).
Step 2.
Next, take a hygrometer and determine the humidity at the same point.
Step 3.
In the table we gave above, find your value and then find out the cherished dew point.
Step 4.
Then you should determine whether it is possible to carry out renovation work in a building with similar humidity - for example, pouring a polymer floor or laying thermal insulation. To this end, take a non-contact thermometer and measure the temperature of any surface at the same point 60 centimeters away. In the absence of this device, you can take a simple thermometer, wrap it in a rag and take readings in about fifteen minutes.
Step 5.
Finally, compare both numbers. If the surface is warmer than the air by more than 4? C, then the humidity is high and there is a possibility that the dew point is present. If so, then thermal insulation work should be supervised by an experienced specialist who will take into account the thickness of the building material that will be used for this.
Video - Determining dew point
Possibility of insulation from the inside
It becomes clear that identical options for insulating different buildings; some developers practice installing the layer inside the room. This is the worst option, but in some individual cases such insulation can be considered justified if:
- the premises in the house belong to the place of permanent residence;
- ventilation does the job of cleaning and is designed in accordance with sanitary and technical rules;
- heating complies with standards and works without interruption;
- other structural elements of the structure are insulated in accordance with the requirements of SNiP;
- the insulated wall is of sufficient thickness and does not conduct heat well from the room to the outside, while a discrepancy in heat transfer resistance by a third of the norm is allowed.
If we summarize all of the above, the conclusions follow are that the warmer the estimated climate in the construction region and the wall material is dense and of sufficient thickness, then internal insulation can be done. But to make the right decision, all input calculation data should be taken into account.
How to use the results?
Now let's find out how we can use the results that the calculation of the dew point in the wall gave us. If you know where this point is located, you will be able to correctly determine the thickness of the insulation, thereby preventing condensation from appearing in the wrong place.
But perhaps you are interested in another, no less important question: when should insulation be carried out from the inside, and when from the outside? To answer it correctly, you should take into account those factors that can influence the dew point in one way or another. Here they are:
- climatic conditions;
- presence of insulation;
- permanent/temporary residence;
- indoor/outdoor humidity level;
- what a particular wall is adjacent to (another room or the street);
- indoor/outdoor temperature;
- efficiency of the ventilation system;
- the material from which the walls are built and its thickness;
- efficiency of the heating system.
Of course, there are a number of cases in which it is impossible to insulate walls. These are the cases:
- if they live in the house permanently;
- if the wall thickness is sufficient (in the conditions of a particular region), that is, the thermal insulation layer one way or another should be no thicker than 5 centimeters;
- if the ventilation system operates in accordance with all standards;
- if the heating system also works well.
Simply put, everything said above can be formulated as follows: the higher the temperature in the region, the better the ventilation and heating systems, the greater the likelihood that internal insulation will be used. Although the experience of many builders says that it is often better to insulate a building from the outside - this way the chances that the dew point will be in the required place will increase significantly.
Is it necessary to insulate the bathhouse from the outside?
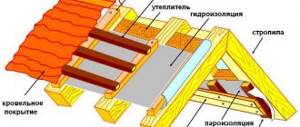
Whether or not to insulate a bathhouse from the outside is up to everyone to decide for themselves. There is still no consensus here. Some are definitely for insulation, while others are categorically against it. But if you decide to insulate the bathhouse from the outside, you need to do this according to the principle of a ventilated facade: leaving a gap between the outer wall finish and the waterproofing layer. In this free space, air masses, due to the difference in atmospheric pressure, actively move upward, carrying with them water vapor. And this is the main task of drying the walls after bath procedures.
The operating principle of a ventilated façade
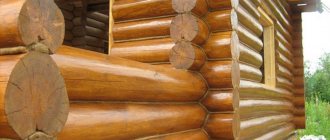
Bathhouses made of wood - from timber or logs - are almost never insulated from the outside . Wood is a unique material that retains heat well and copes with condensation on its own. The main task in such baths is to carefully seal the inter-crown seams. It is better to seal cracks and crevices with materials that have antiseptic properties. It’s not for nothing that our ancestors caulked baths exclusively with moss - it is a wonderful natural antiseptic that successfully fights the development of fungi and mold.
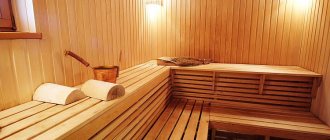
Saunas made of wood and without external insulation cope well with the problem of removing condensation
If the bathhouse is built from cinder block, foam concrete or any other building block (you can build a bathhouse cheaply from expanded clay concrete blocks), then you cannot do without external insulation. But insulation must be done correctly, according to the principle of a ventilated facade, making sure to leave gaps for the fastest and most complete removal of condensation from both the walls and the insulation. If you decide to line a bathhouse made of building blocks with finishing bricks, siding, or a block house, a layer of thermal insulation is required between them.
An option for exterior finishing of a bathhouse made of building blocks, which simultaneously solves the problems of thermal insulation and condensate removal
To avoid premature destruction of a brick bathhouse, most experts advise insulating the walls not from the outside, but from the inside. And the internal insulation should be done according to the principle of a ventilated facade, the layers of insulation should be maximum, the sealing of vapor barrier seams should be thorough, it is desirable to use foil materials as a vapor barrier - for maximum heat reflection into the room.
The fact is that ceramic brick is very hygroscopic and it retains moisture for quite a long time. The walls of a free-standing unheated brick bathhouse will certainly freeze in winter. If, with each visit to the bathhouse, the brick freezes and then freezes again, it will very quickly exhaust its strength limit: and after a year or two or three of regular use of the brick bathhouse in winter, its walls will begin to collapse. Therefore, the main task in a brick bathhouse is to protect the walls from the inside as much as possible from heating, while simultaneously solving the problem of retaining heat in the room.
The walls of a brick bathhouse must be insulated from the inside. External insulation is desirable
External insulation of a brick bathhouse would not be amiss, but the main task here is to protect the walls from precipitation, while achieving good ventilation to quickly remove moisture from the walls.
If you decide to insulate the outside of a bathhouse made of wood (the bathhouse takes a long time to warm up even after caulking the seams), the insulation will be similar. Perhaps the thickness of the heat insulator will be smaller, but the principle is the same - a mandatory ventilation gap. What is the sequence of layers of the insulation cake and the features of insulating baths depending on the wall material, read in the article “How to insulate and what to cover the outside of a bathhouse with.”
Conclusions : calculating the dew point in a bathhouse is almost impossible. When the temperature and humidity in the room changes, it shifts towards the outer wall when heated, and then, when cooled, in the opposite direction. Therefore, it is not important to determine the dew point (although it needs to be taken into account), but the competent selection of materials and their correct placement in the insulation cake.
What happens if you choose the wrong point?
The air leaving a heated room in winter will become supercooled and form condensation on all surfaces with a lower temperature. This is why the walls will be wet all the time, resulting in the appearance of harmful microorganisms and mold. And this, therefore, can cause asthma.
And the building itself will not last long - its destruction will significantly accelerate. Buildings with fungus and mold cannot last long. In this regard, the dew point should be correctly determined at the design stage. You must choose:
- material for construction;
- thermal insulation material;
- type of heating and ventilation systems;
- insulation technology.
Results
You can calculate the dew point on your own, the main thing is that the climatic conditions of the area are taken into account. If you are not confident in yourself, contact a specialized company - for a fee they will take measurements for you!
How to properly insulate a house: from the inside or the outside?
Are you planning to insulate your cozy “nest”? Do you want to sheathe with raw materials intended for insulating walls from the inside? What is the problem? Are you worried about experts' statements that this idea should be abandoned? Of course, it is advisable to insulate the walls from the outside. Why?
Yes, because the dew point shifts towards the street. As a result, condensation does not form in the thickness of the wall. The same can be said about the insulation of the ceiling and roof. When insulating an attic, it is also worth taking into account the accumulation of water vapor in the roofing pie.
What's the conclusion?
Still want to insulate the walls from the inside? OK. This means you need to find out when this can be done and when it is strictly prohibited. And the conclusions here are as follows:
- if in winter the wall of the house is consistently dry, you can insulate it from the inside;
- the wall is usually dry, but with sudden temperature changes it can become damp - it is advisable not to take risks and not do insulation;
- if the wall is constantly wet, insulation should only be done from the outside, not from the inside.
Features of bath ceiling vapor barrier
Vapor barrier of the ceiling in a bathhouse, along with the application of generally accepted rules for vapor barrier, also has a number of technical features.
Attention! Even if the structure of the bathhouse is built in the form of a log house from a solid log, and as a result, the walls are not insulated, the vapor barrier of the bathhouse ceiling is the naturally necessary tool that significantly extends the service life of the entire ceiling structure.
Vapor barrier on the bathhouse ceiling is made using three main types of materials:
- Film - the simplest and most affordable materials, created on the basis of an array of homogeneous polymer material with the necessary insulating properties. Films can be seamless or reinforced. Reinforced ones contain synthetic fibers arranged in the correct geometric overlay, square or rectangular, and radically increase the linear tensile strength of the material;
- Membrane materials are more advanced in terms of insulating qualities, allowing gas exchange to occur between the insulating layer and the external environment. At the same time, the size of the pores prevents water and steam molecules from penetrating into the protected space;
- Foil - made on the basis of metallized lavsan film or the thinnest aluminum foil. Such materials, in addition to the vapor barrier function, are also endowed with serious capabilities for thermal insulation of the room, due to the reflection of radiant thermal energy;
- Ersatz materials are certain types of general construction materials that have a set of vapor barrier qualities and, under certain conditions, can be used in this role. First of all, these include polyethylene films, roofing felt, glassine and kraft paper.
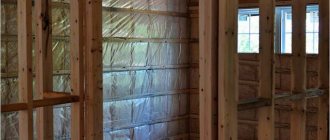
Insulation of walls inside structures
By choosing cellulose insulation Ecowool and insulating wooden structures with it, you can avoid a conflict of materials, since the fibrous structure of wood and similar ecowool will “breathe” evenly, regulating air humidity naturally - drawing in moisture and releasing it in one algorithm. In such a tandem there will be no sharp temperature limit, and therefore no prerequisites for the structures to get wet. For a frame house, filling the walls with ecowool along the width of the studs using the wet-glue method or by injection, under the pressure of fluffed ecowool in the cavity - that is, insulating the inner layer is a reliable protection of wooden structures from getting wet caused by the dew point. Unfortunately, this effect is difficult to achieve with insulation materials that do not absorb moisture - polyurethane foam, polypropylene foam, or cannot remove it. Mineral wool, having excellent declared properties, loses them when wet, and it is quite difficult to dry it.
Another point negates the insulation of cavities with roll and sheet insulation: the presence of seams. Even super-high-quality installation does not guarantee that there will be no cold bridges in the joints - cracks that deliver cold air to warm internal surfaces or warm and humid air to external ones. This is where an unplanned dew point may appear, nullifying all insulation efforts.