Flexible tiles, also called bitumen tiles, are the undisputed leader among modern roofing materials. Being very popular in low-rise construction, it is perfect for finishing the roof of a residential building or any other building on the site. Bituminous shingles have many advantages due to their performance. So, in today’s article we will tell you why flexible tiles are good - how to lay this roofing material, how to do everything correctly and not make mistakes. But first things first.
Flexible tiles - how to install?
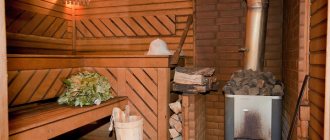
Bitumen roofing
Important information about flexible tiles
This is a soft roofing material that is durable and quite strong . Its base is fiberglass, coated on both sides with a bitumen layer. The front side - the outer side - usually has a special coating of mineral chips. This coating is designed to protect against external negative influences such as wind and precipitation. In addition, with such a topping, flexible tiles look beautiful and unusual.
The advantages of flexible tiles include durability and strength
The bottom surface of the tiles has a sticky layer, thanks to which the material adheres securely to the previously prepared base. The sticky layer increases the tightness of the roof and its resistance to weather conditions.
Fixing flexible tiles with a pneumatic gun
Note! Flexible tiles first appeared on sale at the beginning of the last century in the USA. Its creator is Henry Reynolds, an employee of the Grand Rapids company. Half a century later, almost half of all private homes in America were covered with this material.
What to consider when laying flexible tiles
If bitumen shingles are laid correctly and operated in accordance with all the rules, then they will last at least 30 years. The material can be used to finish any roof, including those with complex geometric shapes. The tiles hardly load the foundation and rafters, but are very strong; in terms of its characteristics, it is no worse than metal tiles. Laying flexible tiles is not difficult at all, and the variety of shapes/shades allows you to choose them for a home in any style.
Laying flexible tiles is quite simple
Do-it-yourself bitumen shingle roofing
Video - How to determine the quality of flexible tiles
Video - Bituminous shingles: how to choose, installation of asphalt shingles, tools and requirements
Features of installing tile eaves
In order to create guidelines, it is better to first mark the roof with coated construction cord. Horizontal lines are applied along five rows of flexible tiles. Verticals are taken in steps of one screw.
After preparing and marking the roof surface, you can safely continue installing flexible slabs, following the algorithm:
- The first row of tiles is mounted suspended. You can take a special ridge-cornice tile or cut out the initial element with your own hands by trimming the petals of ordinary tiles. It is necessary to retreat 0.8-1 cm from the edge of the metal rod and glue bitumen shingles to the cornice. For gluing, it is necessary to remove the protective tape from the adhesive layer and treat the areas with mastic.
- The tiles are secured with roofing nails with a layer equal to the width of the petal. The wide cap should be purely parallel to the surface of the continuous frame. Curvatures are unacceptable.
- The nails are driven in 2-3 cm from the top edge. The attachment points should overlap the next line of the roof.
- Suitable for the first row. It's best to start at the center of the frame to make horizontal alignment easier. You need to retreat 1-2 cm from the bottom line of the starting line and glue it in the proven way. Fasten four nails at a distance of 2-3 cm from the groove between the petals.
- It is also more convenient to start installing the second row from the inside. But the shingles must be offset so that the tab is above the groove of the first row of tiles and the anchor points are completely covered.
- The upper corner of the tile, installed next to the pediment, trimmed in the form of an equilateral triangle with sides of 1.5−2 cm. Trimming is needed to cut off water.
Continue installing the tiles in a linear manner, that is, laying the whole series one after another. You can do it in a pyramidal manner with “accumulation” from the middle of the frame towards the edge or diagonally.
What should you know before installation?
Flexible tiles are very demanding regarding the quality of the base. It is important that the base is well leveled and continuous. It can be made from different materials - OSB boards, wood, plywood, etc. It should also be remembered that when laying tiles between the elements there should be a slight gap necessary for compensatory expansion (with increasing temperature/humidity the material will increase in size). If you don’t leave gaps, the coating will simply go in waves. The sheets are attached to the sheathing with nails or self-tapping screws - in any case, the caps should be recessed into the material.
Prices for flexible tiles
flexible tiles
Installation of sheathing under flexible tiles
Roof angle depending on material
On a note! The larger the pitch of the sheathing for flexible tiles, the greater the thickness of the material should be.
Table. The pitch of the lathing and the corresponding thickness of the material.
| Laying step, cm | OSB boards, cm | Plywood, cm | Boards, cm |
| 60 | 1,2 | 1,2 | 2 |
| 90 | 1,8 | 1,8 | 2,3 |
| 120 | 2,1 | 2,1 | 3 |
| 150 | 2,7 | 2,7 | 3,7 |
Sheathing pitch for flexible tiles
Another important point is the arrangement of ventilation. It is necessary to have vents, holes for the exit and entry of air from/to the roof.
Calculator for calculating lumber for continuous sheathing
Go to calculations
Calculation of flexible tiles for a gable roof
Preparatory work
If flexible tiles are included in the roofing project, do-it-yourself installation should begin with determining the amount of facing, additional, and consumable materials. It should be ensured that the lower part of the roofing pie is assembled in accordance with the requirements for this covering.
Calculation
Before purchasing the required number of shingles, planks, single carpets, ridges, other additional elements, and fasteners, a calculation is required to ensure a supply of materials. Approximate consumption is:
- shingles - a box contains 1.5 - 3 m2 depending on the size, taking into account overlaps (indicated by the manufacturer on each box), a 5% margin is usually required;
- mastic - 200 g/m for the valley carpet, 100 g/m for the ends, 750 g/m for the junction units;
- nails - 80 g/m2 when choosing hardware with a 3 mm rod, 9 mm head, 3 cm long, galvanized.
Consumption of materials
Helpful information! The underlay is necessary to create a continuous underlay carpet with slopes of slopes less than 18 degrees or to process the perimeter of slopes with slopes greater than the specified value. It is made from 2 mm polyester with a bitumen coating or is produced in the form of a 2 mm OS GC hydraulic barrier without powder.
The valley carpet has a stone coating similar to shingles; the abutment strips, cornice overhangs, and gable overhangs are made of special steel. The websites of leading manufacturers must have calculators for calculating the amount of materials for single-, multi-slope, hip, hip, and mansard roofs.
Tools
To lay the roofing material in question, a hand tool that is present in the arsenal of a home craftsman is sufficient:
- knife – for cutting bitumen materials;
- scissors – for cutting metal strips;
- hammer - for fastening with nails;
- brush - for coating with mastics.
Tools for shingles
Helpful information! In the off-season, in winter, a burner may be required to heat the bitumen layer. Strength decreases and labor intensity increases, so warm weather without precipitation is recommended for self-installation.
Laying theory
To make it easier to work at height, the shingles have a small format. They are laid from the overhang to the ridge with a ledge so that each upper row overlaps the lower one. Valleys, chimney passages and ventilation pipes are processed first. Then the cornice and pediment strips are fixed, and the drainage brackets are attached. After that, all that remains is to fill the surfaces of the slopes with shingles, cutting them to width and length as necessary.
How to cut flexible tiles
There are a lot of cuts when laying this roofing material, as you will see for yourself by reading the instructions below. How to cut it? Some advise using metal scissors, others - a painting knife, others - ordinary scissors... What to use?
It is advisable to cut flexible tiles and other materials (underlayment carpet, for example) with a special roofing knife that has a hook blade - approximately the same as in the photo below.
Roofing knife
These knives come with trapezoidal blades (there can be from 3 to 5 pieces), and therefore hook blades must be purchased separately. The photo shows a double-sided blade, which is most suitable for flexible tiles.
Double sided hook blade
Note! When the hook blade no longer cuts well, it needs to be turned over or replaced with another one.
Give preference to a knife with a metal body (plastic, if dropped from a height, may break). Another selection criterion is the blade, which can be retractable or fixed, but decide for yourself here.
Roofing knife with fixed blade
Roofing knife with retractable blade
Roof ridge location
Once you have completed installing soft shingles on slopes, move on to the ridge location. The ventilation channels in the frame body must remain open, so a gap of 0.5-2 cm remains between the tops of the skates. To ensure ventilation, the skate is equipped with a plastic aerator. It's not very attractive, so it's decorated with generic skate eaves tiles or chopped tiles for aesthetics.
Asphalt shingles with 4 nails. Each subsequent element must be closed with the clasp of the previous one. Lift the tile on the ridge from bottom to top. The ridge is positioned in the direction of the prevailing winds, so that the exposed areas go in the opposite direction.
No particular difficulties were found during the installation of the flexible roof. There are technological features. If they are strictly observed, then the masonry can be done by hand with remarkable results.
Rules for preparing for installation
To lay flexible tiles, prepare the following tools:
- construction hair dryer;
- scissors designed for cutting metal;
- small spatula;
- screwdriver;
- hammer.
Construction hairdryer
As for the materials, you will need the flexible tiles themselves, self-tapping screws, a special lining (you can use roofing felt), roofing nails (diameter 8-12 mm, length from 25 to 40 mm; approximate consumption of nails - 10 kg per 100 m sq. area), mastic for sealing joints, hydro-, steam- and heat-insulating material, as well as adhesive tape (double-sided is required).
Fragment of a roofing pie
Do-it-yourself soft roof installation
Before starting installation, be sure to check whether the roof slopes are level. If there are deviations, it is necessary to draw a strictly vertical line - you will be guided by it when centering the sheets.
When carrying out work, do not stretch the sheets by more than 10 mm and carefully follow the instructions with step-by-step photos.
Stage 1
Installation should begin on the side of the roof opposite the prevailing winds. Mark the overhang of the first row with a stretched rope. The optimal length is 3.5-5 cm. Secure the first strip by driving nails into the upper part of the wave strictly at an angle of 90 degrees.
Follow a specific hammering order.
Use special filler to protect eaves clearances from birds, snow drifts and debris. If necessary, the holes can be easily pressed with a handy tool of a suitable diameter.
Stage 2
Lay the second row, starting with half the sheet. There should be 3, not 4 overlaps at the corner joint - otherwise the roof may become deformed. Drive in nails, fixing both sheets at the same time. Install the following panels in the sequence shown in the figure. Make sure the locks match. To mark the sheets, you can use an ordinary colored pencil.
Important! Installation of Onduvilla is possible at temperatures from −5 to +30 degrees. In the cold season, the speed of work depends on the condition of the repair trains. With strong cooling, the adhesive properties of mounting tapes are lost, and sealants become more viscous. Therefore, consumables should be stored in a heated room, and during installation - kept in clothing pockets.
Using a nailer to attach shingles
Instead of a hammer, you can use a tool such as a nailer for installation, in other words, a pneumatic hammer for driving nails. Such instruments can be drum and rack.
Nailer for fastening flexible tiles
Carbon steel is used to make nails for the pneumatic hammer; in addition, they are nickel-plated. In our case, obviously, they must have a large cap.
Nails for nailers
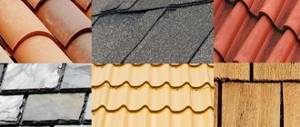
Types of roofing coverings
The most common types of soft roofing used in housing construction are:
:
- rolled, produced on the basis of rubber-bitumen materials, for example, isol, brizol, polymers, which increase its resistance to warping, rotting, and exposure to atmospheric phenomena;
- bitumen shingles, on the inside of which a self-adhesive bitumen composition is applied, and on the outside - basalt and shale granules, giving it strength and resistance to adverse external weather conditions;
- glass elastomer, has increased elasticity, and is distinguished by the presence of additional heat resistance;
- uniflex, technoelast, etc.
composite layers of fiberglass
If it is not planned to remove the top layer when repairing the roof, then when purchasing polymer-bitumen materials, you should clarify whether the bitumen coating and the material from which the roof is made are compatible.
TOP 10 best manufacturers of flexible tiles
| Photo | Name | Rating | Price | |
| #1 | Katepal | ⭐ 100 / 1001 – voice | Find out more | |
| #2 | Siplast | ⭐ 98 / 100 | Find out more | |
| #3 | CertainTeed | ⭐ 98 / 100 | Find out more | |
| #4 | Kerabit | ⭐ 97 / 100 | Find out more | |
| #5 | Tegola | ⭐ 96 / 100 | Find out more | |
| #6 | Icopal | ⭐ 96 / 100 | Find out more | |
| #7 | Ruflex | ⭐ 94 / 100 | Find out more | |
| #8 | Shinglas TECHNONICOL | ⭐ 94 / 1001 – voice | Find out more | |
| #9 | Dock | ⭐ 92 / 1001 - voice | Find out more | |
| #10 | Onduline | ⭐ 91 / 100 | Find out more |
Which tile manufacturer would you choose or recommend?
Take the survey
Soft roof technology
When installing a soft roof, step-by-step instructions from the manufacturer will tell the home craftsman how to do it:
- Before installation begins, the wooden surface is treated with a mixture of bitumen and diesel fuel.
- Next, the base is slowly covered with mastic, glassine and roofing felt are laid. The work is carried out starting from the middle of the cornice and moving towards the ends. Before installing soft tiles, the film protecting the adhesive side of the roofing material is removed from the shingles.
- After applying a layer of cold mastic, wait 12 hours and cover the base with another layer. When hot mastic is used, the layers can be built one after another. Each tile is nailed with 4 to 6 nails.
- When laying rolls, an overlap of 7–10 centimeters wide must be observed. Each subsequent top row is positioned so that the installation joints of the previous one are covered. In this case, the new layer being laid is displaced.
- Excess material is cut off along the edges of the slopes.
Instructions for laying flexible tiles
The installation of this roofing material is well known to many craftsmen, since it has been used for a long time in low-rise construction. The installation process itself consists of several stages; let’s get acquainted with the features of each of them.
Stage No. 1. Installation of eaves overhang
To install the eaves overhang (or eaves trim as it is also called), follow the instructions below.
Step 1. Attach the strip to the edge of the roof with a small (10 cm) overhang beyond the border. Thanks to this, the part fits correctly with the gable strip. Both elements are necessary in order to protect the roof from the negative effects of environmental factors.
The cornice strip is applied to the installation site
Step 2. Secure the strip in place using roofing nails. Hammer them in a checkerboard pattern in increments of 15 cm. When connecting individual elements of the eaves overhang, be sure to do this with a slight overlap (from 10 to 15 cm).
The cornice strip is nailed
Roofing nails are used for fastening
The plank is nailed in a checkerboard pattern
Step 3. After this, trim the edge of the plank extending beyond the gable. Using tin snips, trim the piece to where it meets the edge (as in the photo).
The edge of the cornice strip is trimmed
Step 4. Take a hammer (preferably rubber) and bend the upper/lower edges of the overhang along the pediment. Additionally, secure the folded edges using a roofing nail.
It is better to use a rubber hammer to bend the edges of the strip.
Nail the folded edges
Stage No. 2. Laying underlay carpet
Thanks to the lining layer, better waterproofing of the material will be ensured.
Step 1. Lay the self-adhesive carpet parallel to the eaves strip, placing it on it and retreating from the edge of the strip approximately 2-3 cm. Glue the material so that each new section overlaps (at least 10 cm) with the previous one. Glue the strips from bottom to top to provide better protection against leaks. Carefully roll out the roll, simultaneously removing the protective film from it.
Rolling out the underlay carpet on the base
Step 2. Where the chimney pipe is located, cut the carpet according to its shape and glue it, moving it slightly over it.
Tile prices
tiles
How to cut underlayment in the chimney area
On a note! On the eaves overhang and in the valley, the lining carpet must be installed without fail! If the roof slope is 18 degrees or more, then the rest of the area need not be covered. If it is from 12 to 18 degrees, then the entire surface must be covered, otherwise the roof may leak.
Step 3. But above the self-adhesive lining, you can use a carpet that has mechanical fixation. Roll it out along the base with a 15cm overlap between the strips; a similar overlap is left between the material and the self-adhesive carpet laid earlier.
Individual strips are laid with an overlap of 15 cm
Step 4: Use a thermoset strip to overlap between the adhesive and mechanical fixing materials. This way the joints will be as tight as possible.
Longitudinal overlap of the carpet - 10 cm
Step 5. Fix the underlay carpet using a hammer and nails, driving them in at 20 cm intervals. It is recommended to use nails with a wide head.
Nails are used to secure the underlay carpet
Step 6. Coat all overlaps with a layer of bitumen-based mastic to improve the sealing of the joints. To do this, it is most convenient to use a metal spatula. The layer should be no more than 1 mm thick.
Application of bitumen mastic
The thickness of the mastic layer should be no more than 1 mm
Step 7: After installing the underlay rugs, cover the gable using a gable strip.
The gable strip is installed
Step 8. Trim the edge of the strip to match the shape of the roof.
This is how you need to trim the edge of the plank
Step 9. Secure the plank with nails, driving them in 15 cm increments in a checkerboard pattern.
Nails are also used to secure the gable strip.
Step 10. Lay the lining in the valley area so that it extends half a meter in each direction from the axial part. At the bottom, make a tongue on the carpet (as in the photo), through which rainwater will be drained.
An underlayment carpet is laid in the valley area
Stage No. 3. Laying directly flexible tiles
Now proceed to the most important stage - laying the bitumen shingles themselves. Apply markings in advance, thanks to which the coating will be laid evenly and neatly. Marking is especially important in the case of an unusual geometric roof shape.
Step 1. Start laying the first row of shingles 15 cm from the bend of the eaves strip. Trim the corner of the first sheet in advance - this will ensure the drainage of rainwater.
The first row of flexible tiles is being laid
The corner of the first sheet needs to be trimmed
Step 2. Apply a thin layer of mastic along the edge of the wrong side of the material. Also, apply it to the area that will be located on the gable trim.
Mastic is applied to the reverse side
The edge of the shingle is coated
Step 3. Glue coated shingles in the desired location. Be sure to leave 1.5 cm free on both slats to ensure efficient and proper drainage of precipitation.
The edge of the shingle does not fit flush with the end strip.
Step 4: Nail the material in place using wide-headed roofing nails. When driving a nail, step back 2 cm from the edge.
The distance from the edge of the shingle is 2 cm
Step 5. Use 5 nails to secure each shingle of material (2 at the edges, 3 more evenly in the middle of the sheet).
The material is secured with nails
Step 6. Where the shingles meet the gable portion, coat each shingle in the remaining courses with asphalt mastic.
The mastic is applied in areas adjacent to the gable part of the roof
Step 7. When laying the second row, maintain a slight offset (from 15 cm to 85 cm) of the elements relative to the first. Also, when laying the second row, make a slight overlap on the first.
Then the second row of tiles is laid
Step 8. For the valley, use a special valley carpet. Roll it out to cover the entire valley. Coat the inside edges of the carpet with mastic approximately 10 cm from the edge.
Special valley carpet
Fixing the valley carpet
Step 9. Also secure the carpet with nails - drive them around the perimeter, observing a step of 20 cm.
Nails are driven in increments of 20 cm
Step 10. Lay shingles in the valley area in the same way as you did on the slopes.
Then flexible tiles are laid in the valley area
Step 11. Cut the material along the axis of the valley to approximately 10 cm, using a sharp knife.
The material is cut along the axis of the valley
Step 12. Also cut the corners along the axis of the valley, which is required to remove precipitation. Apply mastic to each shingle.
Prices for metal tiles
metal tiles
The corners of the material are cut off
Step 13. Design the second part of the valley in the same way. The result will be a gutter, the width of which will be 10-15 cm. Through this gutter, water will easily flow into the drainage system.
The other part of the valley is designed in a similar way.
Leave a groove of 5-15 cm
Step 14. Finish the external break of the roof (the so-called rib) with ridge-eaves flexible tiles. Break several shingles into individual pieces.
Shingles need to be broken
Step 15. On the back of these elements there is a self-adhesive strip. Lay them along the edge of the roof with an overlap of several centimeters. Additionally, secure each of the elements with nails (a pair per side of the slope). Design the roof ridge in the same way.
Ridge-eaves flexible tiles
Laying elements overlapping
Video - How to lay shingles
Installation of slope ribs
The edges of the slopes are formed by shingles with special ridge-eaves tiles. Laying is done from bottom to top, and is attached to the base with four nails - two on each side.
TECHNONICOL
These places are subsequently covered with 3-5 cm long overlaps from the upper shingles. The back part of the ridge tiles in places where there is no self-adhesive layer is coated with mastic.
Cement-sand tiles
Cement-sand tiles are also a natural roofing material.
Natural tiles are another type of roofing material: cement-sand tiles. It is also called concrete, cement or CPU tiles. As the name implies, it consists of cement and quartz sand, to which a coloring pigment is added. That is, these are products made of lightweight concrete. The peculiarity of the technology makes it possible to achieve high density and strength: the service life of a roof with cement-sand tiles is 100 years.
Its technical characteristics and consumer properties are very close to those of ceramic. Even the weight is almost the same: a square meter of cement-sand tiles weighs 42-45 kg.
But there are also differences. Since the pigment is added directly to the solution, there is no difference when chips form: all of it, both outside and inside, is the same color.
There is one not very good point: the edges of the concrete tiles seem to be chopped off. This somewhat worsens the appearance of the roof from above, but when viewed from the side you will not see much of a difference.
The attractiveness of this material is its lower price. For example, products of the German-Russian enterprise Braas start from 36 rubles per tile. Compared to ceramic prices, the difference is noticeable.
The construction of a roof with concrete tiles is no different from ceramic tiles. Everything comes together down to the smallest detail. So there's no news here.
Metal roofing: waterproofing and vapor barrier
Metal roofing is installed using two technologies - warm or cold. The choice of option depends on the purpose of the attic space. For a living space, slopes and gables are insulated; if it is unheated, thermal insulation is laid along the ceiling. Installation of roofing pie in each case has its own characteristics.
Warm roof
The installation of a warm metal roof begins with the installation of waterproofing. It protects the insulation and wooden structure of the roof from condensation and accidentally leaking water. At the same time, it performs the function of wind protection - it prevents the insulating fibers from blowing out through the cracks.
Waterproofing is laid on top of the rafters. For this use:
- inexpensive polyethylene or propylene films that do not allow steam to pass through;
- diffuse breathable membranes.
For warm roofs, vapor-permeable materials are recommended. Thanks to their cone-shaped pores, they allow steam to pass through, but create a barrier to dripping moisture.
If polyethylene films are used, then a ventilation gap is arranged between them and the insulation. This will allow the moisture to evaporate.
The film or membrane is mounted with a stapler to the rafters without sagging. At the joints, the panels are overlapped to a width of 15 cm. They are glued with tape to prevent the wind from blowing. The direction of installation is from bottom to top for free flow of water over the surface of the waterproofing.
When laying the membranes, they are oriented according to the instructions. Since the passage of vapor is provided in one direction, you need to be careful. Otherwise the result will be the opposite. Usually the manufacturer prints a logo or a bright stripe on the outside.
Counter battens 40-50 mm thick are mounted on top of the waterproofing. This provides the necessary ventilation gap between the film and the metal tile.
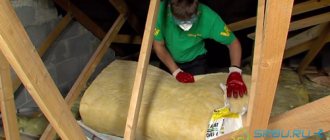
Basalt wool mats are placed between the rafters. On the underside, the thermal insulation is protected with vapor-proof films. If this is not done, condensation will form in the thickness of the material. This worsens the properties of the insulation and creates a source of constant dampness in the premises.
Vapor barrier is made from films, membranes, reflective foil materials with vapor permeability in the range of 0-90 g/m²*day. They are attached to the rafters from the inside, trying to maintain the tightness of the coating. To do this, the joints are carefully glued, the places where the communications pass are duplicated with overlays with cut holes.
Important. Foil films are laid with the metal layer facing the inside of the room. Heat waves are reflected from the barrier without being emitted into the atmosphere. For gluing, choose adhesive tape with a metallized layer.
Cold roof
In cold roofs, insulation is laid on the ceiling of the upper floor. At the same time, it is also protected from moisture penetration by insulating materials.
Only a layer of waterproofing is placed under the metal tiles. It protects the under-roof space and rafter system from condensation formed on the inner surface of the profile sheet.
Films or membranes are used for waterproofing. Their selection is quite large. The materials are fastened in the same way as the insulated version. A small 20 mm slack is left between the rafters to allow condensation to drain into the drainage system. All joints are sealed with adhesive tape.
Even though the attic is cold, it is recommended to install a counter-lattice. In addition to air circulation, this structural element will eliminate unevenness in the rafter system and create an additional layer for thermal insulation.
To reduce the noise that occurs during rain or hail, waterproofing is combined with sound insulation. Dense heavy membranes, barriers based on acoustic felt or rubber, penofol, and mineral wool are used.