A cold floor in a bathhouse is a common problem when using this room. This situation is explained by the extremely unfavorable operating conditions of the coating and, accordingly, of all building materials and architectural structures. The floor is always wet, which increases the thermal conductivity of surfaces. How to fix this problem? Read more below.
Cold floor in the bathhouse, how to fix it
Bathroom floor insulation
Reasons for a cold floor in a bathhouse
There are several factors that negatively affect the floor temperature in a bathhouse:
- lack of thermal insulation or its thickness is incorrectly selected;
- violation of thermal insulation sealing;
- non-compliance with flooring technology in the bathhouse.
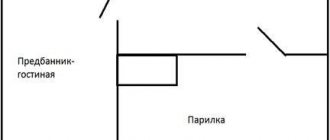
In the photo - there should always be a drain in the steam room, but often the floor is so cold that it is necessary to lay wooden walkways
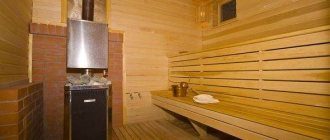
The steam room is the main section of the bath and has special requirements. The room must retain heat well and not be afraid of dampness and high temperature. To arrange the floor in the steam room, you should familiarize yourself with all the possible options, choose the type, materials, and suitable design. You can familiarize yourself with the material in more detail in a special article.
These are just a few reasons, each building may have its own nuances. Before specifically considering the problem of a cold floor in a bathhouse, you need to learn a little about the specific requirements for coatings. This knowledge will allow you to avoid mistakes at the construction stage (and this is the most optimal way to solve the problem of a cold floor) or make the right decisions on insulation already during the operation of the bathhouse.
Schemes for installing floors for bath structures
Table. Specific requirements for the construction of the floor in the bathhouse.
| Name, photo | Short description |
| Maximum moisture resistance | The floors in the bathhouse have long-term direct contact with water at elevated temperatures. These conditions are the most favorable for the development of putrefactive processes and fungi. It should be borne in mind that currently there are no impregnations that can completely protect lumber for a long period of time. Only the integrated use of various construction and technological measures guarantees long-term use of the bathhouse. |
| The underground must have natural ventilation | There is no point in hoping that problems with rotting lumber can be solved only by impregnation with antiseptics or sealing; even theoretically, they cannot guarantee a long-term positive result. Natural ventilation, accordingly, cools the floors, this must be taken into account during their installation. But there is no way to do without it. |
| Water drainage issues should be addressed | To do this, it is necessary to install drainage sewer pipes, make receivers or settling tanks, etc. All these utilities make the arrangement of floors in the bathhouse even more complicated. |
Floor ventilation in the bathhouse
It is very difficult to make a high-quality, durable and at the same time warm floor in a bathhouse, even using the most modern building materials and technologies. What did our ancestors do? Very simple. For the floors, coniferous logs sawn in half were used; the thickness of the coating reached 15–20 cm . Due to this, they did not freeze, were not afraid of underground ventilation, and remained strong for several decades. After 30–50 years, the frame was raised, the rotten floorboards and lower crowns were replaced with new ones. After such repairs, the bathhouse again served regularly for several decades. Currently, this technology is not used for various reasons. What to do if you need to insulate the floor of a bathhouse in use?
Insulation of floors in the bathhouse
What problems may arise when using a wooden sauna?
All problems are directly related to the materials that are used to build it.
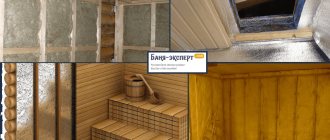
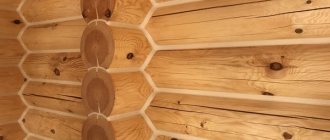
Wood for a bath should be easy to process and maintain, moisture-resistant, not prone to cracking, and not emitting resin. But for walls, doors and furniture (in rare cases) in a Russian steam room, where the temperature is lower than in a sauna, coniferous wood is also suitable. A log house made from rounded pine and spruce logs will release resin under constant exposure to temperature.
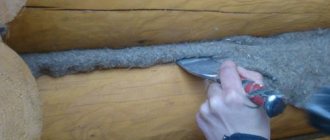
The only way to get rid of it is to methodically clean it off with a spatula every time the bath is fired. Then after a few months there will be less resin, and after a year of operation it will cease to be released at all.
Resin release from pine ceiling board is a natural phenomenon
After some time, bath furniture, headrests, wall and ceiling cladding will darken, become porous, and ingrained dirt will appear - human waste products (dead cells, sweat, fat), traces of bath perfumes and essential oils. The same applies to the outer walls of the bathhouse, only there the cause is atmospheric phenomena: rain, snow, wind, carrying with them dirt and dust.
A traditional old bathhouse has a dressing room without cosmetic treatment
In village bathhouses, the interior walls used to be regularly scraped with a knife, removing the top, dirty layer. But this is a very labor-intensive task that does not give full results. The outer walls of the bathhouse had not been cleaned at all before.
The traditional old steam room implied the use of wood without treatment
Nowadays, after each use, bathhouses must be thoroughly washed using special modern detergents.
But not all of them are suitable for this, because some of them cannot be washed off, and they can give off unwanted fumes. There is a wide range of detergents specifically for baths.
Step-by-step instructions for repairing a cold floor
First, let's consider the most labor-intensive option for floor repair; it requires not only a loss of time, but also money. With a properly organized process and practical experience, it will take approximately two to three days to complete the work. The floor was made without insulation from edged boards; water drained through the cracks between them. In winter, cold air entered through the cracks, which created inconvenience during water procedures. Insulation work is carried out in several stages.
How to insulate the floor in a bathhouse
The first stage is the dismantling of old coatings
Step 1. Remove the old floor. If the boards are screwed to the load-bearing beams with self-tapping screws, they will have to be unscrewed. Use an electric drill or cordless screwdriver. Hardware can be reused; use a handkerchief cup to collect them. If the floor is on nails, then use a nail puller. To reduce damage to the boards, place pieces of boards under the metal part of the tool when pulling out nails.
Dismantling the floor - unscrewing the screws
Expert opinion
Afanasyev E.V.
Chief editor of the pol-exp.com project Engineer.
When unscrewing the screws, firmly press the sprocket against the heads; do not be afraid that the hardware will turn on the threads. Problems arise when the tool is not pressed against the head enough. The star rotates in the recesses of the cap and smoothes its edges. It becomes very difficult to unscrew such a self-tapping screw, and it is impossible to pull out the threaded part using a nail puller without damaging the wooden elements. In the best case, the head will tear out a piece of the board; in the worst case, the joists or supporting beams will have to be changed.
The boards have been removed
Step 2. Remove the boards and inspect the condition of the wooden floor structures. In most cases, problem areas will be visible, eliminate them before starting work. If serious damage to the beams is discovered, they will have to be replaced with new ones.
If there are problem areas, they need to be eliminated
Step 3: Unscrew the floor joists. They are fixed with metal squares and self-tapping screws; removing the structures is not difficult. As before, collect old screws in a container; the hardware will come in handy in the future, and you won’t need to buy new ones.
The logs are unscrewing
Step 4. Using an electric planer, remove the top damaged layer from the beams, process the lumber until completely healthy wood appears. There is no need to specifically control the thickness of the logs; lumber may differ slightly in size. All the same, in the future their planes will not be located on the same line, but will lie at an angle.
Removing the damaged layer from beams
Step 5. Remove mold from the wall trim boards around the perimeter of the bathhouse. To do this, you can use toilet cleaners that contain acid. It perfectly disinfects lumber and destroys mold roots. To enhance the effect, you can repeatedly wipe the surfaces of the boards with ordinary table vinegar.
Mold around the perimeter needs to be removed
Step 6. Install a heat gun and thoroughly dry the surface of the floor and walls. If desired, dry boards can be soaked again with factory-made antiseptics and dried.
Heat gun
Everything is coated with used antiseptic.
After repairs, it is recommended to drain the water into the sewer; this method prevents the surfaces of the lumber from getting wet and is strongly recommended by professional builders. Do not rush to start repairs, give time for all surfaces to dry. If everything is normal, then you can lay a new, now insulated floor.
Stage two – laying a new floor
The floor will be laid with a slight slope, the water will be drained into a special tray located at the far wall.
Step 1. Determine the angle of the floor. To do this, use a long, flat board. Place it along the room from the bathhouse door to the drain tray. First, determine the position of the skirting boards; you can use ordinary cheap plastic elements with flexible rubber sides at the bottom. The sides will prevent water from getting onto the wooden cladding of the walls of the bathhouse.
The position of the plinth is determined
Practical advice. It is much easier to work with a laser level. If it is not there, then the markings can be made with a water level, but you will have to work with an assistant and lose more time.
It is more convenient to use a laser level for work.
The upper plane of the skirting boards should be 1–1.5 cm below the threshold level, otherwise they may be damaged when walking. Find these lines and subtract the height of the baseboard from them. This will be the floor level at the front door. The slope of the floor should be within a centimeter per meter. There is no need to do more; too much of a slope creates inconvenience when walking on the floor.
Step 2. Decide on the installation location of the tray, measure its length and cut the adjacent boards to size.
The installation location of the tray is determined
Step 3. Install the logs with an inclination towards the tray. To do this, first put the two outer ones in place, stretch the rope between them and secure all the remaining ones along it. Instead of a rope, you can use a long, flat strip or board, but it is more difficult to work with them. Fix the logs not only to the lower rim, but also to the concrete strip of the foundation; use metal corners and dowels for this. The optimal mounting option is two corners on each side of the joist and one at the bottom. If the design does not allow the logs to be lowered for tilting, then they need to be sawed at the bottom; the depth of the cut must correspond to the angle of inclination of the floor. If deviations from the plane are detected, you can use shims. There is no need to worry that they will sag over time; the logs are firmly held in place by three metal corners.
The joists are fixed using metal corners
The logs must also be attached to the concrete foundation strip
Practical advice. If you do not have a special tray for floors, then you can use an ordinary street one. To do this, before installing the grinder with a metal disc, remove the vertical stiffening ribs, this will make it possible to place the boards under the tray.
Removing vertical stiffeners from a street tray
Step 4. Place the prepared tray in place. If its width is less than the distance between the joists, then the gap should be closed. You can use boards or durable extruded polystyrene foam for this. The second material is much easier to work with, and great strength is not needed to fix the tray. Check the slope and position of all joists again with a laser level. If all parameters are within normal limits, then you can continue working on flooring.
The tray is put in place
To install the tray on the boards, their ends should be prepared and chamfered. The width and depth depend on the size of the sides of the trays. Before installation, the ends of the boards and all fresh cuts must be treated with antiseptics; you can soak them several times in sunflower oil. Before fixing the boards, coat the landing sites with a high-quality sealant. The fact is that it is very difficult to make perfectly even seats; it is much easier to use sealant for these purposes. The tray is screwed to the boards with small self-tapping screws. After fixing, it is also recommended to seal the drain perimeter. Pay great attention to these places. This is where water accumulates and lingers for a long time. Getting the boards wet at the ends is a very unpleasant situation. Moisture travels through capillaries to great depths, drying takes a long time, and there are not enough breaks between bath procedures. As a result, the boards rot, the tray collapses, and the floor in the bathhouse requires repair.
The slope of the future floor is shown
Practical advice. It is strongly recommended to insulate the side surfaces of the foundation along the perimeter; fix polystyrene foam on them using any method available to you. Do not forget to leave holes for ventilation, this is a prerequisite for the long life of the bath.
The foundation is insulated with polystyrene foam, a hole was left
Step 5. Attach drain pipes to drainage containers. These can be metal barrels with a capacity of 100–200 liters dug upside down. Use a grinder to cut holes on the sides of the barrels to allow water to drain out. In order to completely prevent freezing of water in pipelines, insulate them with soft polystyrene foam. But it is not necessary to do this; warm water and pipes do not have time to freeze during water procedures. Moreover, the angle of inclination of the pipelines is large and the water quickly goes into the barrels.
Example of a prepared drain
Connect drain pipes to drainage containers
The third stage - floor insulation
To insulate the floor in a bathhouse, it is better to use expanded polystyrene rather than mineral wool. The fact is that mineral wool is very afraid of increased humidity, a wet heat insulator sharply increases thermal conductivity, and the insulation efficiency approaches zero. In addition, wet wool takes a long time to dry; all this time, wooden structures are operated in very difficult conditions. As a result, the appearance of mold and rot, the need for extraordinary repairs not only of the flooring, but also of nearby wooden architectural elements.
Extruded polystyrene foam for floor insulation
Expanded polystyrene does not have the above disadvantages; it does not absorb moisture at all, even with direct, prolonged contact with water. The only problem with polystyrene foam is that the material is damaged by rodents, but to prevent damage there is a simple way - to cover the ventilation holes with metal grilles.
Step 1. Nail any pieces of boards, slats or OSB boards of appropriate sizes to the bottom plane of the log; the insulation will lie on them. The distance between the boards does not matter, the main thing is that the boards have a stop in at least four places.
There are slats nailed to the bottom of the joists for installing insulation.
Important. The thickness of the insulation layer should be at least ten centimeters; if it is less, the effect of insulation will be minimal. Professionals recommend laying two layers of slabs, each 5 cm thick. To minimize heat loss, joints should be placed in a checkerboard pattern.
Using polyurethane foam, seal all gaps between the slabs and walls. After hardening, it must be carefully cut with a mounting knife.
Insulation is laid, joints are sealed with polyurethane foam
Step 2. After all layers of thermal insulation have been laid, you can continue laying the floor. You should start with one of the walls, fasten each board with self-tapping screws that remained after dismantling the old flooring. The thickness of the floorboards is approximately 20 mm, specific values are selected taking into account the distance between the joists. The boards must be tongue-and-groove and as even as possible.
Laying boards
Step 3. Seal the gaps between the floor and wall trim around the perimeter of the bathhouse with foam. Once hardened, trim off excess.
Excess foam is removed
Practical advice. If the walls in the bathhouse are covered with clapboard, then there is no need to remove foam from the profiled grooves. In any case, these cracks need to be sealed with silicone, and foam will significantly save the amount of silicone. The baseboard must be hermetically sealed not only to the floor, but also to the walls. Remember that water that gets into the gap will never dry out, and the lumber will inevitably begin to deteriorate prematurely.
Step 4: Sand the floor using an electric sander. Be sure to connect it to a vacuum cleaner, this will reduce the amount of dust and make final cleaning of the bathhouse much easier. During sanding, make sure that sharp protrusions between adjacent boards are removed; as for the evenness of the surface, there are no strict requirements. If there is no special tool, then you can grind it manually, especially since the bathhouse floor area is small. Prepare the device, attach sanding paper number 25-N or more to a medium-sized smoother. According to the international classification, sandpaper must be class P60 or less.
Floor sanding
Alternatively, you can sand the floor by hand.
Step 5. Clean the floor from dust, cover the surface with durable acrylic varnish. Buy only high-quality material; the varnish should not be afraid of high humidity and release harmful chemical compounds into the air. You can cover the boards with an ordinary brush. The number of layers is at least three, each subsequent one is applied only after the previous one has completely dried.
The floor is covered with wear-resistant acrylic varnish
Step 6. Along the perimeter of the bath, treat the cut foam with sealant, try to completely close all open pores. Give the sealant time to set.
The foam around the perimeter must be treated with sealant
Step 7: Install baseboards. They are fixed with self-tapping screws, first a mounting plastic plate is attached, and a decorative plinth is snapped onto it. Carefully seal all gaps between the baseboard and wall trim with sealant. The sealant should be matched to the color of the boards.
Skirting boards installed
Sealing cracks with sealant
At this point, the repair of the cold floor is completed, give the materials time to dry and you can use the bathhouse.
We looked at the most complex, expensive and time-consuming option for floor insulation, but there are also very simple, but no less effective, methods of dealing with a cold floor.
- Make an ordinary wooden grate about 10 cm high on the cold floor. After each wash, you can lift it for better drying. Such a simple device will significantly increase the comfort of staying in the bathhouse at minimal cost. The grate can be made only under the feet, and not over the entire surface area of the floor. True, if the floor in the bathhouse is not only cold, but also made with gross violations, has begun to rot, etc., then it is better to redo it. And the faster, the fewer negative consequences will have to be eliminated. Accordingly, the cheaper it will be to repair the bathhouse.
Wooden grates on the floor in the bathhouse
- Install a fan in the room, mount it as close to the ceiling as possible. It will direct hot air to the floor, the boards will warm up perfectly. During the water procedures, the floor will not have time to cool down. The fan can be turned on only during the flow of the room, and then turned off, which will eliminate the appearance of uncomfortable zones. Keep in mind that the fan housing must have reliable protection against moisture penetration.
Installed fan
You may find recommendations to close the underground ventilation holes during cleaning. This method can be used to solve the problem, but do not forget to open the vents again immediately after washing. Lack of ventilation is the main problem with bathhouse flooring.
Another misconception. To improve the microclimate in the bathhouse, there are experts who recommend taking air into the stove firebox from the underground space. They are sure that in this way the movement of warm air is improved, it is drawn from the underground into the oven, and warm air is lowered in its place. This is not true, there is no need to do such experiments. The fact is that new air in the underground will not come from the room, but from the vents in the foundation, that is, from the street. As a result, the floor will not warm up, but will cool down even more.
Homemade metal stove in the bathhouse
Real insulation due to the blower can be done only when the stove is located directly in the bathhouse. Place it in such a way that the air vent is as close to the floor as possible. In this case, the effect will be that instead of the used cold air, warm air will fall and warm the floor. But moving the stove just for this effect is not economically feasible. And the increase in floor temperature is not so significant as to break the stove for the sake of it. Above we have given examples of more effective and less expensive methods.
Stove in the bathhouse
Prices for the Ballu BKX-3 heat gun range
heat gun ballu bkx-3
Cameron Gallery
The “Cameron Gallery” with an elegant colonnade and a spectacular terrace with arched slopes into the park is part of the complex ensemble of Cameron Baths. A generally recognized world masterpiece of strict classicism architecture, it was erected in 1780-1787. architect Charles Cameron. The baths overlook the Bolshoy Pond and Ramp Alley and are the most important compositional dominant linking the regular and landscape areas of the Catherine Park.
The Thermal Ensemble consists of two buildings and the Hanging Garden, connected on the second floor level by a Mirror Platform in front of the apartments of Catherine II in the Catherine Palace. On the ground floor of the building there were Cold Baths, built by Cameron on the model of Roman baths, above them were the Agate Rooms, and under the Colonnade were living quarters for the ladies-in-waiting. The gallery and the Hanging Garden were intended for walking - from here the most wonderful views of the park opened up.
According to Cameron's plan, by the end of construction in 1787, three colossal bronze sculptures were placed on the Colonnade. Hercules of Farnese and Flora of Farnese - the work of sculptor F.G. Gordeev and foundry master V.B. Mozhalov was decorated with pylons of the staircase, and in the grotto under the stairs there was a bronze statue of the sleeping Ariadne (or Cleopatra, as previously believed). The Empress, implementing her program of a landscape garden, decided to collect a collection of busts in the Colonnade, presenting it as an antechamber leading from the park to the royal apartments. The busts were selected according to the tastes of Catherine II, who sought to surround herself with images of heroes of the ancient world and Roman emperors for a sublime intellectual and philosophical pastime on vacation and often showed her portrait gallery to guests.
The first busts began to appear four years after the completion of the gallery. Gradually, as they were made, the busts were placed on high granite pedestals along the axes of the gallery columns. The colonnade gradually turned into a pantheon of ancient heroes and a gallery of classical sculpture. Of his contemporaries, busts of the Russian scientist Mikhail Lomonosov and the head of the opposition party in England, Charles Fox, were installed in the gallery.
From the site of the Hanging Garden to the park on Ramp Alley you can go down a gentle ramp, which is also part of the architectural ensemble of Thermal Baths. The ramp was erected by Cameron later than the main ensemble. In 1792, Catherine II ordered the construction of an additional descent from the Hanging Garden to Catherine Park, along which she could go down on a special chair. Cameron proposed not to repeat the staircase that already existed on the Cameron Gallery, but to build a gentle descent, and his proposal was accepted. Before the construction of the Ramp, it was necessary to dismantle the slope of the Katalnaya Mountain that approached the palace, but the dismantling took a long time, so the construction of the ramp was postponed for a long time, to the displeasure of the Empress. In 1793, the Empress could already go down the Ramp directly from the mirror platform into her magnificent garden, although the decoration was still ongoing.
Initially, the axis of the Ramp did not coincide with the direction of Ramp Alley and in 1811, simultaneously with the construction of the Granite Terrace, it was moved to its current location. The sides of the ramp are decorated with preserved tripod vases installed by V.P. Stasov in 1826. The giant bronze vases that decorated the entrance to the Ramp were lost during the war. A visit to the Cameron Gallery, as well as other exhibitions at the Tsarskoe Selo State Museum, is paid, and in winter the gallery is closed to the public.
Cold bath (Agate rooms)
The idea of creating the “Antique House” appeared to Catherine II back in 1773. The house was supposed to become the main decoration of the English Park, and in decoration and design it was supposed to resemble the palaces of the Roman emperors. However, after unsuccessful negotiations with the European Academy of Painting and the search for a performer capable of offering a worthy project, the empress temporarily abandoned her plans. In 1779, the implementation of the project was proposed to Charles Cameron, who proposed several options, and already in the spring of 1780, construction of the Tsarskoye Selo baths ensemble began. This was the first
, its implementation took eight whole years (1780-1787).
In the Cold Bath project, the architect tried to reproduce the layout and functional purpose of Roman baths. The first floor housed the thermal baths themselves: a bathing room, a cold bath, a steam room and a Russian steam bath. In the second there are six richly decorated rooms for relaxation and entertainment, called the Agate Rooms.
During the war, in comparison with the rest of the buildings, the thermal baths complex was practically not damaged; it preserved the original interiors of Catherine’s time. For a long time, restoration work was carried out in the Agate Rooms, which was completed only in September 2013. Now all seven halls of the Agate Rooms are open, but restoration is still ongoing.
Cost of visiting the Agate Rooms (2020)
Currently, in the restored interiors of the Agate Rooms, the exhibition “Agate Rooms. The path to revival." Cost of visiting the exhibition: Adults – 300 rubles; pensioners and students – 150 rubles; for visitors under 16 years old – free!
Agate Rooms opening hours (2020)
The Agate Rooms are open from 10:00 to 18:00 (from April 11 to September 12). Day off is Thursday. Visiting the exhibition is carried out in sessions (every 20 minutes) in groups of 15 people. There are no excursions in rainy weather, please be careful. In winter, the Agate Rooms are closed.
The current schedule of the Catherine Palace and museum exhibitions can be found on the website of the State Museum of Tsarskoe Selo
Conclusion
A cold floor in a bathhouse can only exist if it was built by illiterate and irresponsible builders. It is much easier, cheaper and smarter to prevent problems from occurring than to correct them later with heroic efforts. This rule, by the way, applies not only to floors, but also to all elements of a bathhouse or any structure or building.
Even in a steam room, where fragrant wood is an indispensable attribute, tiles can be found in the design of the floor and plinth under wooden through flooring. This material is not afraid of temperature changes and high humidity, it is easy to care for and is highly decorative. In a special article we will tell you how to make a floor in a bathhouse from tiles.
Video - Cold underground in the bathhouse
Decoration of the walls of the Agate rooms
The walls of the Agate Rooms are lavishly decorated with gems, jasper, marble, bronze and other precious materials. The ornaments on the walls are made mainly of gilded bronze. The vaults of the rooms are lavishly decorated with stucco and picturesque ornaments. The flooring was made from exotic wood species. In addition to jasper, ophiocalcite was used on the walls of these rooms. This is a mineral that is classified as marble, but in fact it is softer, with a pleasant green color characteristic of this mineral.
Projects for facing the rooms on the second floor were prepared by the architect in the spring of 1783 and were presented to Empress Catherine for consideration. After some changes made to the proposed project by the empress herself, the walls of two offices were decorated with jasper.
Cold sauna: principle of operation
Cooling is an extreme situation for the body, to which it reacts holistically. However, stress hormones are not released, but happiness hormones - endorphins - are produced. They provide a positive mood and well-being, and also have an analgesic effect.
Warm clothes are not needed in the cryosauna. Patients wear only underwear, possibly gloves, socks and slippers. During the entire session, visitors are under the supervision of medical personnel. If someone becomes ill during the procedure, he or she can leave the machine immediately.
The massive cold stimulus activates self-healing powers. Supercooling does not affect the internal organs, but only the surface of the skin. The blood vessels contract and the muscles relax. Antibody production increases, which boosts and strengthens the immune system.
To eliminate chronic pain, it is recommended to undergo regular treatments of one to three sessions per day for several weeks. Studies show that patients were able to significantly reduce their pain medication intake after visiting a cryosauna.
After the procedure, the following changes occur:
- body tissues are better supplied with blood and oxygen;
- metabolism is stimulated and waste and toxins are effectively removed;
- It should be noted that a three-minute session burns between 600 and 700 calories, which can be a welcome side effect for those looking to lose weight.
Applications include:
- chronic pain;
- mental illness;
- allergies;
- skin diseases such as atopic dermatitis or psoriasis;
- increasing performance and regeneration in sports;
- wound healing and scar regeneration;
- skin tightening.