How to sew up a roof gable: types of materials for sewing
Pediment-end wall of a house under the roof eaves
The roof is done, the gables can be sewn up.
How to sew up the gables of the roof so that they last a long time, so that they do not require annual maintenance or repairs, and so that the appearance is attractive?!
First, let’s remember what gables were sewn up with in the old days:
- unedged board
- edged board
- clapboard
The last option was the most scarce in Soviet times, and people with good salaries and great connections could afford to cover the gables with clapboard.
In the villages, no one bothered with beauty and design: they covered it with a simple unedged board or slab. The attic space is closed from wind and snow, which means everything is fine.
The lining with boards was done vertically, horizontally or diagonally. The herringbone looked good: short boards diagonally towards each other.
It is clear that over time the wood turned black from moisture and lost its natural color, so the townspeople who looked after the appearance of a house or bathhouse tried to paint wooden surfaces. But previously there were no special antiseptic compounds, so it was often lime or oil paint, which needed to be updated from time to time.
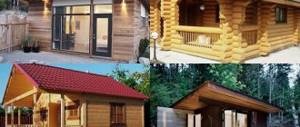
Now, with the advent of modern wooden and plastic materials, as well as new various painting compositions for wood, various options for lining gables are possible:
- edged board
- wooden clapboard
- block house
- plastic lining
- vinyl siding
Finishing the pediment with planken
Finishing the pediment with a facade board, which is also called planken, will last longer than the lining, as it is made of hard wood. This is actually a profiled board that is given different shapes.
We invite you to familiarize yourself with Vinyl siding for exterior decoration of bathhouses
Its installation differs from other types of finishing with wooden parts in that a gap is left between the boards. This allows you to avoid creating stress when the wood is deformed, provides additional ventilation to the wooden parts, and also makes it easier to replace damaged boards.
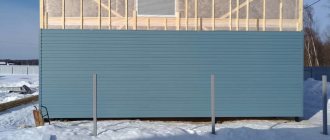
You can sew up the pediment with a lining made of PVC material
Plastic materials (lining or siding) are attractive because once you do the siding correctly and then forget about it. Covering the pediment with PVC clapboard guarantees the absence of any further painting work, which is usually necessary for wood every one to two years to maintain its antiseptic properties. PVC materials under normal operating conditions do not lose their attractive appearance for many, many years.
Correct installation of PVC materials is:
- mandatory gaps for linear expansion of PVC elements in hot weather
- mandatory gap between the sheathing and the main wooden structures for ventilation
But PVC lining or siding are afraid of open fire. Therefore, you cannot place a barbecue close or carry out any work using a gas burner: the siding loses its shape, melts and shrinks.
This is an extreme case due to negligence. And under normal conditions, PVC materials have proven themselves to be excellent. Their use is especially popular when renovating old buildings: country houses, baths. Old buildings receive a second youth. Their appearance improves by an order of magnitude.
If you choose between plastic lining and siding?
Plastic lining is intended for interior finishing work. But it has long been used in the outer cladding of old country houses and bathhouses, as the most acceptable budget option.
Considering that it is not intended for facades or for constant exposure to precipitation and ultraviolet radiation, then its “good behavior” has already been proven by many years of practice.
Indeed, compared to siding, the financial costs for materials will be 2-3 times less.
It’s just that the lining is narrower (115 mm) and has a smooth surface. And the siding is wider (244 mm) and has a certain surface relief. Including, there is siding in the form of a block house. By the way, from a distance you can’t tell it from natural wood. Only up close you can see that it’s plastic.
Covering the pediment with PVC clapboard in the vertical direction
A slight disadvantage of these materials is that they are too light and thin compared to their wooden counterparts, so they require a more frequent frame or solid base.
The range of wooden products for cladding is extensive enough to choose the appropriate material for covering gables in accordance with the design of a house or bathhouse.
For example, if a wooden frame made from logs does not require any special chic, then it is enough to simply sew up the roof gables and eaves with an edged board. Careful and high-quality work and the boards will look good. If the boards are also coated with an antiseptic composition with protection from ultraviolet rays, then they will serve for a long time without losing their attractive appearance.
Wooden lining is preferable to edged boards because of the quarters it has. If the lining is dry, then the lining will be of better quality due to the tight joining of the lining to each other. The result is a dense, gapless gable wall that will not be blown by the wind.
If the lining has not been sufficiently dried, then later, as it dries out, cracks will appear.
And yet, when covering the pediments with clapboard, the look will be much more attractive compared to an edged board, because the clapboard still has relief and a rhythmic pattern is obtained on the pediment.
If the appearance of a wooden building is subject to increased requirements such as European standards, then it would be more natural to sheathe the gables of the block with a house block.
The pediment from the block house will look like a continuation of the log house.
By the way, if finances allow, then the best option is to immediately make the gables when assembling the log house from the same material as the log house itself: logs or timber. Then you won’t have to decide how to sew up the roof gable...
Actually, a block house is a type of lining, only thicker and more voluminous in shape, imitating the surface of a rounded log. And the pediment from a block house looks very beautiful, in the same style as a log house.
Covering the gables of a bath house with a block house
The choice of material for lining the gables of a bathhouse or house (any building) depends on:
- appearance of the log house
- purpose
- developer requirements
- financial opportunities
Based on the cost of purchasing the material, you can arrange the materials discussed above in the following order (from lower price to higher):
- plastic lining (115-140 rub/m2 with components)
- wooden eurolining pine needles (150-240 rub/m2 depending on the grade)
- vinyl siding (200-300 rub/m2)
- edged board dry needles t=20mm (360-450 rub/m2)
- wooden block house (460-550 rub/m2)
You can calculate the costs required for the gables and finally choose what to sew up the roof gable, depending on your financial capabilities.
Any of the options considered has its advantages:
- plastic lining is the cheapest
- vinyl siding - easy to install and versatile
- block house - magnificent appearance
Main pros and cons ↑
The advantages of this design are:
- aesthetics,
- ensuring the uniformity of the facade,
- no need for additional finishing.
- Their main drawback lies in the frequently used expression: “led.” Let's figure out the cause of this problem and how to eliminate the hanging of the profiled timber on the pediment.
Due to the natural shrinkage of the profiled material, the size of the rows decreases by about 20 mm/m. In this way, the height of the structure is also reduced, which increases the pressure on the upper rows of the log house. This is fraught with destruction of the roof structure, and in extreme cases, even the house. The problem could be resolved if it is possible to concentrate the weight of the roof structure on the ridge crossbar, from which the load will be distributed to the gable walls.
It should also be taken into account that the rafters almost do not change in length, that is, if you install a system with a rigid fastening of the upper point, then the opposite one “crawls” down and, conversely, if the lower point is rigidly fixed, the ridge beams will “hang” in the air.
The problem is solved as follows: instead of a rigid classical rafter system, a special roof with a sliding rafter system is needed. The latter differs in the way the rafters are attached to the mauerlat - direct fastening is completely eliminated, they are placed on sliding fastenings. In the area of the ridge, the rafter legs are fixed with an overlap, allowing the angle between the slopes to change. At the same time, the slides allow the rafters to lie smoothly along the walls.
On a note
A gable roof of this design resembles a tome, the spine of which is a ridge. When it shrinks, it acts like a big open book.
The gaps between the crowns are eliminated with caulk. A twisted linen rope will look more attractive. As for the leading corners, jute is placed in the right places. Since the formation of cold bridges is possible, the corners must then be carefully sheathed.
How to trim (sheath) gables
Although the outer cladding is often called decorative, first of all, of course, it is needed to reliably protect the structural elements of the building. I'll tell you how we sheathed the gables of our bathhouse.
In late autumn, having completed the installation of the metal tile roof, they decided not to start covering the gables, since this work is delicate and quite labor-intensive, and besides, the materials for it had not yet been purchased. However, I didn’t want to leave the roof overhangs unlined underneath for the winter: there was a high probability of snow getting under the roof during a snowstorm. Although the insulation on the roof slopes is protected by a durable waterproofing film, when the snow that has fallen under the roof melts, excess moisture will damage the sheathing.
According to the rules, it would be necessary to first sheathe the gables, and only then hem the overhangs so that the gaps between the sheathing elements on adjacent surfaces are minimal. But we decided, based on the current situation, to deliberately deviate from accepted building codes and prepare at least the overhangs for winter. 16 pre-painted tongue and groove boards were stored under a shed for this purpose.
The first stage - waterproofing the gables
It wasn't until the following summer that we returned to the gables. It would be possible to first dismantle the tongue-and-groove boards from the eaves, and then begin cladding the gables, but this path seemed to us to be unnecessarily troublesome. Therefore, we immediately began installing the waterproofing of the gable from the outside. For this purpose, we used vapor-permeable Tyvek film, which is also needed for reliable wind protection in the attic space. The film was attached to the plank gable with wide staples using a Novus electric stapler. We started with the bottom fabric cut with an allowance. Having nailed its upper edge in the middle, they began to fix this edge with staples,
TOOLS FOR HOME AND GARDEN, HANDCRAFTS, ETC. PRICES VERY LOW
gradually shifting first in one direction and then in the other. The lower edge of the canvas was nailed to the log of the second crown from the top to close the joint of the pediment with the frame, after which the allowances of the canvas were cut in place.
The second canvas was attached above the first so as to provide an overlap of 15 cm. The lower edge of the second canvas was glued to the first using double-sided self-adhesive tape, after which it was also nailed to the base with staples.
When the installation of waterproofing on the gable was completed, the free ends of the films protecting the insulation under the roof were glued to the gable waterproofing, thereby creating a closed protective “cap”.
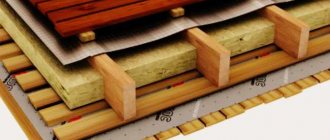
Methods for insulating the attic gable
Due to severe frosts in winter in different areas, the owner of the house thinks about high-quality insulation of its parts. The attic is no exception, because many home owners use this room as a living room, so proper thermal insulation should be carried out. Let's consider the external and internal insulation of attic gables.
Today, country cottages in which you can live every day are widely popular. Therefore, often in such cottages, the attic is a living space. The main thing is to achieve a comfortable and cozy temperature. This article will answer the question: how to insulate a pediment?
Pediment cladding “imitation timber”
From the tongue-and-groove boards (“imitation timber” 150 mm wide) pre-painted with Pinotex, we chose the smoothest one for the lower base sheathing element. We sawed it down to length so that it would certainly cover the ends of the sheathing boards at both side overhangs. Having secured the support bars under the boards of the side overhangs, we laid this basic element on them with the tenon facing up and marked the areas on it that needed to be sawed off.
Based on the length of the upper edge (with the tenon) of the fitted first sheathing element, we determined the length of the next element and measured it on the edge with the groove. Using a small tool, the bevels of the ends were marked on it, which should exactly correspond to the slope of the roof slopes. To make the cut as clean as possible, a circular saw was used when cutting.
When marking the boards (“imitation timber”), 10 mm gaps were provided between the finished sheathing elements and the gable roof overhangs on each side. Otherwise, it will simply not be possible to place the next element on the tenon of the previous one without damage.
If the next element of the sheathing turned out to be not very smooth, it was pressed with a nail puller in the area of fixation with self-tapping screws on the sheathing. The support beam was attached to the sheathing above the sheathing element in such a way that a lining could also be used to protect the tenon of the element. A sheathing element was attached to each sheathing board with two self-tapping screws, and the top ones were screwed in completely only after installing the next element - this makes it easier to join adjacent elements.
Application of practical siding
Vinyl siding was purposefully created to significantly alleviate the plight of façade finishers, who are very familiar with the segment of sealing gable walls. The weather-resistant material is easy to install and has virtually no effect on the weight of the building structure.
Facade siding is produced in a wide variety of species. They imitate herringbone trim, laying stone tiles, plank and log surfaces, etc. The panels include two or three elements of standard cladding, which significantly reduces the time required for finishing work.
Lightweight, durable panels are connected by clicking locks located on the long edges. Vinyl sheathing is attached to the wall or sheathing with screws, nails or staples.
To form connections, corners, and decorate the edges of the trim, a number of additional elements are produced: starting, connecting and finishing profiles, moldings, corner parts, near-window strips, etc. Note that the cladding material and additional elements must be purchased from the same brand, so that there are no offensive discrepancies in standard sizes .
Rules for fastening vinyl panels
Those who want to know how to cover the gables of a house with siding panels need information about the specific features of the material. Because the polymer substitute for stone tiles and lumber has the ability to expand when heated and return to its original size when cooled. Rigid fastening is strictly prohibited, otherwise the casing will warp or burst.
At connection points, siding panels must be left with reserve to allow easy movement:
- The siding panel should be 1.0 - 1.5 cm shorter than the actual dimensions of the gable. The approximate value of the indicated indentation applies to panels up to 3 m in length. It is advisable to calculate the indentation yourself, focusing on the linear expansion parameters specified by the “native” manufacturer of the material.
- There should be a gap of at least 1 mm between the head of the nail or screw and the vinyl sheathing. A tightly tightened screw should be loosened half a turn. Staples and nails should not be driven to the limit.
- The fastening is made exactly in the center of the oval holes intended for fixing the panels.
The fastening of vertically installed panels and additional parts of horizontal cladding is carried out according to different rules. The upper fastening points are installed close to the upper boundary of the hole, the rest - as usual.
It is believed that vertically located parts expand upward by only 1/3 of the normal linear expansion. This means that with a total expansion of 1.5 cm, only 0.5 cm will need to be retreated at the top, leaving a gap of 1.0 cm at the bottom.
Lathing for polymer cladding
Siding can be attached to the walls of a frame structure without prior preparation. True, provided that they are built impeccably.
When attaching polymer panels to brick, log, or foam concrete walls, a sheathing is installed before sheathing the roof gables. It will level imperfect surfaces and form a ventilation gap, significantly extending the life cycle of the building materials used in the construction of the box.
The sheathing device uses:
- Dry timber with a moisture content of at least 12%. Siding manufacturers recommend that one side of the bar be 60 mm so that the fastening points fall exactly in the center of the holes intended for them. The second side of the bar is from 25 to 50 mm, depending on individual strength requirements.
- Galvanized profiles produced for fastening plasterboard slabs. The size is similar to a bar.
The construction of the lathing begins with the installation of the outer laths, between which a control cord is stretched. In accordance with the readings of the tensioned guide, ordinary bars are mounted.
The direction of installation of the laths is traditionally perpendicular to the direction of installation of the panels. The optimal step is 40 cm; in areas with a characteristic wind load, the distance between the laths can be reduced to 20 cm. The sheathing elements are attached to the gable wall after 50 - 70 cm.
Future plans
We will someday cover the remaining gaps at the junction of the sheathing with the gable overhangs with wooden corner profiles, but even now they are not at all noticeable. And the likelihood of snow and rain getting into these gaps is low. In addition, behind the sheathing they are covered with sheathing boards.
Sheathing the pediment with the window would not have been much more difficult if we had not decided to build a canopy on it, which should cover the planned porch and the main entrance to the bathhouse (we are currently using a temporary entrance with a plywood door). But making a canopy is another story.
The boards must be painted before installation.
Most often, in order to speed up work and save paint, wooden cladding is painted after installation. But after some time this leads to increased warping of the boards. In addition, when the wood dries out, the tenons come out of the grooves and their unpainted areas appear. Paint applied to the assembled skin glues the tenons in the grooves, which complicates subsequent repairs. Therefore, you need to paint tongue and groove boards before installation.
Long tongue-and-groove boards (for example, “imitation timber”) are best painted in an open space. To work, you need a container to pour paint into. By carefully cutting off the bottom of a strong plastic canister, for example, from a car windshield washer, we get a good device that can be placed on a horizontal surface (if there is no strong wind), convenient to hold by the existing handle, and during a break in work there will be somewhere to put it brush.
You will need a lot of boards for the sheathing. Finding a place to dry everything painted is not easy. But if you make supports for them by driving nails into the stands in two rows at a slight angle (the length of the nails and the pitch between them are chosen depending on the width of the boards), then the painted boards will take up very little space.
Preparation of materials for insulation
Residents want to insulate the entire attic area and at the same time do all the work themselves in order to save their money. It is possible to do the work yourself if you follow all the rules for insulation. Insulation of this living space can be carried out outside and inside.
In most cases, only two methods are used - thermal insulation from the outer and inner parts under the siding. Typically, the attic is a frame structure. Therefore, it is necessary to use those materials that are suitable specifically for such a design.
First of all, it is necessary to make a choice of thermal insulation, which will be intended for finishing the pediment. Then you need to calculate the thickness of the thermal insulation layer. Also calculate the amount of material required. The materials intended for waterproofing and vapor barrier of the gable also need to be taken care of. For this procedure, special membranes are used. Additionally, you need to impregnate the wooden structure with an antiseptic.
Cutting out the sheathing elements
Having fitted the first sheathing element made of painted tongue-and-groove boards into place, we tightly joined the blank for the next element to it. Using the beveled end of the finished element as a base surface, the markings were transferred using a ruler, first to one edge of the workpiece, then to the other. A guide bar for the circular saw was attached along the marking line applied to the workpiece. The correct installation of the tire was additionally controlled by a tuned small scale.
The edges of the workpiece were filed with a circular saw to make the cut even and smooth. In addition, on the working edge of the guide bar there is an anti-splinter clamp made of elastic plastic, thanks to which no unnecessary processing marks remain on the front side. All cladding elements were manufactured using this technology, starting from the second. It turned out pretty quickly.
Do-it-yourself cladding of bathhouse gables photo
- We hemmed the roof overhangs - side and gable - in the fall. The free ends of the protective films were temporarily secured with staples so that the wind would not fray them.
- By spring, the gable boards turned blue, but this had virtually no effect on their strength. However, the sight of them did not please us.
- First of all, the pediment needs waterproofing, and the entire structure, especially the bathhouse, also needs wind protection.
- The vertical lathing will allow moisture, for any reason formed on the surface of the protective film, to flow down unhindered.
- Heavy sheathing will hold securely on a strong sheathing.
- The lining of the side overhangs and the lower inserts of the sheathing were adjusted to each other.
- When installing the first sheathing element, a bulge in the bottom board of the gable frame became evident. I had to pull it out with bolts and fix it with metal corners, attaching it to the upper crown of the frame.
- The sheathing elements were attached to the sheathing with anodized screws. To ensure a tight connection, the elements were tightened with a nail puller using a temporary stop.
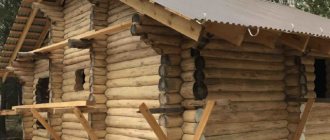
How to make a gable for a bathhouse roof yourself
Gables are the part of the roof located between the two parts of the gable structure. This element plays an important role when finishing a bathhouse, since how well it is equipped determines how long the roof of the building will last and what it will look like in a few years.
Types of pediments
A special feature of a gable roof is that it allows you to equip an additional room under the roof, so the quality of the gable affects the convenience and visual appeal of the resulting living room.
There are several types of pediments:
- keeled. This name is not accidental: the pediment looks like an inverted keel of a ship. By choosing this type, the bath attendant will give his premises the sophistication of the ancient Russian culture of house building;
- onion. The pediment is shaped like a bow;
- circular It turns out if you enlarge the segment of the circle of the arched pediment;
- semicircular. Pediment obtained by dividing the circular in half;
- torn. Outwardly, it resembles a circular pediment, but at the top the arcs do not converge, as a result of which there is space for placing some object, for example, a horseshoe;
- uninhibited. Pediment having convex elements;
- male. The pediment is made of logs and the crown end wall finds its continuation in it;
- trapezoidal. The pediment has the shape of a trapezoid;
- triangular. This roof element is presented in the shape of an isosceles triangle.
How and why to make a pediment
Building a pediment is not an ordinary whim of a bathhouse owner. Most often it is erected by bathhouse attendants living in middle climatic zones. This element is quite practical, however, with all its advantages, the pediment cannot be mounted under conditions of a pitched roof. Plus, if the region is characterized by frequent hurricanes, it will have to be abandoned.
It is not difficult to build a pediment if you calculate in advance the angle of inclination of the roof, what distance should be between its edges and what material to choose for covering this element. The load-bearing capacity of the house will also have to be taken into account.
The advantage of building a gable is that, unlike other roof elements, it can be built at almost any time. If it is equipped in advance, then there will be no problems with the construction of the roof. However, if the rafter system is attached to the pediment, then in any case it will have to be installed first.
If the owner erects this element when the roof is almost ready, then its finishing will take place with some difficulties, since the attic is already ready. However, this also has a significant advantage: errors in calculations are eliminated.
Construction of the pediment
The pediment is a functional element that provides an attractive appearance to the bathhouse, so a variety of materials are used for its cladding: wood, plasterboard, metal profiles, siding, brick.
In order to avoid problems during the construction of this roof element, it is necessary to determine the sequence of actions. So, many builders determine the following plan:
- calculate the height and shape of the pediment;
- calculate the size of the ends using the formula: S=(h*a)/2, where h is the height of the end, and its width;
- when fixing the pediment, install a mast located vertically at its top;
- tie a nylon cord to the mast, secured along the roof slopes;
- build a pediment.
The height of this element depends, of course, on the wishes of the bathhouse owner, but such luxury is possible if the roof has not yet been installed. If the roof is ready, the height will depend on the dimensions of the attic. Since the bathhouse is a room that is not intended for permanent residence, the height of the pediment should not exceed 0.7 m. In order to give the additional room solidity, you can equip it with a roof window and use it as a recreation room.
When erecting a pediment, it is important to remember that it must be strong and durable, since you have to experience the impact of:
- roof weight;
- wind speed and strength.
Therefore, before starting construction, it is important to take into account the characteristics of the region in which the bathhouse is located, the altitude above sea level, etc.
In order to determine the permissible loads on the pediment, it is important to take time to calculate it and calculate the indicators of the entire bathhouse. It is worth noting that the constructed bathhouse must have an aerodynamic load coefficient of 0.7. This indicator is relevant for buildings with a gable roof; for a four-slope roof it can reach 1.6.
Self-construction
The construction of a pediment is carried out in several main steps:
- Frontal or cornice boards are fixed to the end side of the rafters;
- When hemming the cornice, it is important to leave a gap for air to penetrate into the structure;
- the material is fixed to the sheathing, it is better if these are elements treated with varnish or special paint;
- Upon completion, it is recommended to install a grille that will create an obstacle to the penetration of insects into the structure.
Options for installing gables
The pediment is the upper part of the wall of a building, bounded below by the ceiling, and above by the planes of one of the pitched structures. These are inevitable companions to the construction of a gable, sloping, single-pitched or Danish hipped roof.
They are constructed in a strictly vertical direction, most often have a triangular or trapezoidal shape, less often round or polygonal.
The gable walls limit the ends of a non-residential attic or attic space equipped for housing. Depending on the conditions of planned operation, they may be insulated or not. Thermal insulation is laid between the gable posts of cold roofs or placed between the sheathing bars of heated attics.
In general, according to house-building terminology, gables are considered to be the triangular tops of load-bearing walls made of stone, foam concrete or brick. Similar elements made of wood are called gables, which is why roofs are called “gable roofs.”
However, in low-rise construction, both of these categories are unofficially combined into the class of pediments. Similar materials are used in their arrangement, although there are differences in construction technologies.
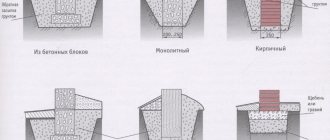
Based on technological characteristics, methods for installing pediments can be divided into two groups:
- Covering the posts of a gable wall built according to the frame principle. The easiest to implement and budget method, accessible to an inexperienced performer. It is actively in demand in private construction as the most acceptable option for constructing a light, practical roof.
- Sheathing of a solid pediment wall, erected during the construction of a house made of brick, foam blocks, timber, logs. A method that requires at least basic carpenter or mason skills. It is mainly used during building reconstruction and repair work. It is sometimes used to improve the status of a house built from inexpensive building materials.
In the field of cladding the gables of a house, there are a lot of different materials. These include sheets of moisture-resistant plywood and drywall with subsequent painting, polymer finishing panels, corrugated sheets and even opaque polycarbonate.
However, the list is confidently headed by the good old board and vinyl siding, which is displacing lumber from the market with enviable persistence.