The beds in a greenhouse 3 by 6 meters have their own design nuances. Today we will look at all the features in more detail, we will pay attention to the arrangement of beds in two and three rows, their location in the greenhouse. Then, taking into account all the advice, gardeners will be able to place the plantings in the most successful way. It will be comfortable to work in the greenhouse.
Beds in a greenhouse 3 by 6
Living room 3 by 6: design and layout features
The design of a living room of 3x6 square meters largely determines the layout of the room: a rectangular, elongated shape requires a visual expansion of the space. Therefore, pieces of furniture should be placed both along the walls and perpendicular to them. Some elements, such as chairs, can be placed diagonally.
You should avoid placing furniture along one wall or piling elements in only one corner.
Light, pastel colors of the walls, wide curtains, and mirror elements will allow you to visually expand the space. Bring distant walls closer to or dark colors in the decoration.
For example, the farthest wall can be painted terracotta, while leaving the adjacent walls white: this will not only make the shape of the room more square, but will also become a stylish and fashionable element of decor.
The 3x6 living room, due to its shape, is ideal for organizing a relaxation area and a dining area in one room. A place to relax can be equipped with soft corners, a fireplace, and a home theater. The eating area should contain a dining table, chairs, and furniture for storing cutlery.
It is recommended to organize a dining area away from the entrance to the room: this way, guests will not need to go through the dining room in order to get to the recreation area.
Features of the construction of a 6 by 3 bathhouse
You can build a bathhouse with your own hands. Unlimited access to information will help you combine opportunities with wishes, as well as show your creativity. The greatest interest may be aroused by a simple and proven 3x6 bathhouse project.
Before you get down to business, think about what the layout of the bathhouse will be and where on the site it is most convenient to place such a structure.
Subtleties of the preparatory stage of construction
There are several rules for placing a building that will facilitate the operation of the bathhouse in the future.
Bathhouse layout
The bathhouse can be installed separately or combined with another structure: make it part of the house, connect it with a summer kitchen or workshop. But experience shows that such a neighborhood can lead to dampness and an unpleasant odor. Proper planning of sewerage, ventilation and waterproofing systems will help avoid such a situation.
When building a bathhouse, it is necessary to lay the foundation to the depth of soil freezing. Depending on the soil moisture, you can make a simplified version of the base. But, as practice shows, a 6x3 bathhouse is built on a strong foundation of stone, brick or concrete. After about 2-3 months, as soon as the base has dried and settled, you can begin construction.
The building is constructed from environmentally friendly materials that “breathe” and retain and release heat well. Wood is rightfully considered one of the best. Sometimes 3x6 baths are built from natural stone and brick, which are durable and more fireproof.
Advice from the master!
In terms of construction, the entrance is usually located on the south side: in winter there are not such large snowdrifts and in spring the snow melts much faster. A 6x3 bathhouse is built at a distance of 5 m from other buildings and is located no closer than 15-20 m from reservoirs, slopes, on a flat surface. Use the ready-made 6x3 bath plan.
The lifespan of a 3 by 6 bathhouse depends on proper logging and drying of wood. Wood should be harvested from December to early March. The felled trees should lie down for several months, only after that can you begin to make logs and beams for building a bathhouse.
To preserve this building material, you must adhere to several rules.
- The log is cleared of bark. To prevent it from cracking at the edges, a strip of bark 15 cm wide is left at its ends.
- To prevent spoilage, logs are stored in stacks. In this case, the distance between the logs should be 5 cm, between the rows of the stack - 10 cm, between the ground and the first stack - 20 cm.
- The logs should be covered with some kind of roofing material, such as slate, so that they are not exposed to precipitation. There should be at least 5 cm between the slate and the logs.
- Protect logs from direct sunlight. Place the material in a well-ventilated place.
Filling the bathhouse with a good mood
A 6 x 3 sauna will help improve health, cleanse the body, and bring spiritual peace. You can arrange your temple of purity according to your personal preferences and include in the bathhouse design the size of the steam room, options for placing shelves, their shape, and width.
Consider how the steam room of a 6x3 bath will be heated: a stove, electrical appliances or pipes with hot water or gas. The best option, undoubtedly, is a heater stove, which is located in the corner of the steam room.
Bath layout options
The bathhouse must have a shower room. Here you can install a shower for three people and hang a wooden bucket into which cold water will be poured. You can equip the shower with a small table or shelf to put personal hygiene products there. Make sure you have hooks for towels.
Advice from the master!
If funds allow, you can install a 6x3 shower stall in the bathhouse. It is advisable to equip the relaxation room with a table, armchairs and other necessary bath interior items.
poparimsya.com>
Features of designing a living room combined with a kitchen
The kitchen-living room has many advantages: it is a comfortable, modern room that allows you to profitably expand the space. Organizing a kitchen-living room involves dividing the space into zones for preparing and eating food, places for comfortable communication and hanging out, and receiving guests.
Zoning can be implemented using:
- Colors. Designers advise using one color in different shades and with different saturations. For example, the kitchen may have bright orange furniture and textile elements, while the living room may have muted colors of caramel, toffee and cinnamon.
- Various textures. The principle of separation of different materials in the decoration of walls and floors is not only effective, but also practical. For example, easy-to-maintain tiles are ideal for the kitchen floor, and parquet is ideal for the living room, where a comfortable, warm floor is important.
- Lighting. Lighting fixtures of different sizes and intensities will help you create the right accents: in the living room it would be more appropriate to use soft wall or floor lighting, in the kitchen with a dining table - central chandeliers.
- Partitions. Bar counters are most often used as a delimiter. Such an element is both functional and decorative, allowing you to easily and effectively separate zones. In addition, roller shutter doors can be used as partitions.
Advice: if you are just planning to combine two rooms by remodeling, you should leave a fragment of the wall as an arch or decorative partition to solve the zoning problem.
Methods for zoning a bedroom-living room
The layout and design of the bedroom-living room is a pressing issue for absolutely all owners of one-room apartments. After all, the only living room should include areas for recreation and leisure, and receiving guests.
The issue of organizing a full-fledged sleeping area is especially acute if residents, for example, for medical reasons, cannot sleep on functional folding sofas. In this case, a bedroom-living room with a bed is the only way out.
Expert opinion
Mikhailova Maria Vasilievna
Furniture store manager. Knows everything about comfort and interior design
Today, there are several universal ways to combine a common and individual area, even in a small room:
- Partitions. These are unique room zoning systems. The modern market for decorative elements offers a wide variety of stylish partitions made of glass, wood, and textiles. Shelves and high cabinets can be used as partitions. A literary wall for storing books is also suitable for these purposes.
- Curtains and carpets. A soft carpet under the bed in the sleeping area in tandem with a thick, transparent or fringed curtain will effectively and efficiently separate the relaxation area from the main one.
- Zoning with various materials for finishing walls and ceilings. The main thing here is to adhere to a single color scheme and style of the room. Ideas for such a design can be gleaned from photos on the Internet.
In addition, if the parameters of the apartment allow, the bed can be taken out onto a glazed and insulated balcony or loggia, or raised onto a specially designed second tier (suitable for apartments with high ceilings).
When organizing a living room-bedroom, it is important that the seating area is closed and located away from the entrance to the room.
The interior of the hall is 18 square meters. m: budget option for an ordinary apartment
Every person dreams of comfortable housing, where it will be cozy, spacious, and warm. But the apartments built in the second half of the 20th century pleased few people with a truly large area.
Hall design 18 sq. m.
- one of those tasks that often seem difficult within the confines of the most ordinary Khrushchev. But successful combinations of color, furniture and layout significantly change the idea of such apartments.
Layout and division of the total area into functional zones
In a 3x6 building without a second floor, there are usually 3 rooms: a steam room, a relaxation area, and a washroom. More space gives you more options. The 6x8 bathhouse layout has several bedrooms, a kitchen, and a billiard room. If the customer wishes, a swimming pool with dimensions comfortable for swimming – 5.5 x 2.25 – can be accommodated here.
The design of the bathhouse should be selected for the maximum number of people who use it. Otherwise, heating the excess volume of the steam room will lead to waste. Main stages of planning:
- Placement of the building in the site plan. Drawings of water supply and sewerage wiring.
- Calculation of steam room volume, selection of stove.
- Foundation project.
- Layout of premises.
- Selection of power supply and heating systems.
Laying pipes from an existing water supply or well to a bathhouse should be convenient. It is advisable to place the building on the site plan based on the location of communications. Saunas are built on land with low groundwater levels. The minimum distance to the well is 5 square meters. m, to a residential building – 8 sq. m. m.
When planning, allocate 1 sq. m. per person. m steam room. The minimum recommended length and width are 1000x1700. Optimal – 2000x2000. Depending on the volume, type of doors leading to the sauna and type of vapor barrier, the stove is selected. It is advantageous to place it in the middle of the building to reduce heating costs.
Stoves can be metal or stone. The weight of a brick firebox is impressive and requires a reliable foundation. Otherwise, the floor, which is made of timber, will bend and crack under the weight of the heavy stove. Swimming pools also need a foundation.
A kitchen, billiard room or additional bedrooms are arranged at the request of the building owner. Possible room options in 3x6, 4x6, 6x6 baths and their dimensions:
- Shower or washroom. Minimum size – 0.5 sq. m. Optimal – 2–3 sq. m.
- Restroom. To place a bench with a table, 5 square meters is enough. m. The optimal zone area is 10–15 sq. m. m.
- Bathroom. It is possible to install a toilet for 1 sq. m. The toilet will have to be located in the corner, otherwise there will not be enough space to sit down. The comfortable dimensions of the bathroom are 1300 x 1000.
- Tambour. Its dimensions usually do not exceed 1–2 square meters. m.
- Pool. It should be taken into account that the length and width of an artificial reservoir that is comfortable for swimming is 5.5x2.25 m. In saunas with dimensions of 6x6, 6x4, 6x3 it is easier and simpler to install a font.
3x6
The compact bathhouse is easy to place on the site. It does not take up much space and looks harmonious with other buildings. A 3x6 building requires a minimum of fuel to heat. Proper planning will ensure a comfortable stay for people indoors.
You may be interested in: Designing baths 7x7, 3x7 - 7x9: room layout
The 6x3 bathhouse has a total area of approximately 16 square meters. m. Possible arrangement of premises:
- washing;
- steam room;
- restroom.
This is one of the simplest 3x6 bath layouts. The width of the rest room along the axes is 2500 mm. After finishing the walls, this value will be 2300 mm, which is enough to install a sofa. The steam room is equipped for 4–5 people. It is advantageous to place the stove closer to the center of the building, then it will heat all the rooms. The space can be divided into 4 zones by additionally including a dressing room. Firewood and brooms will be stored here. A shower stall with drainage is installed in the washing room. It is possible to install a compact font.
The second option is a 3x6 bath. Features of the layout - the presence of a dressing room where you can put a hanger for outerwear. The vestibule was created by reducing the living room (5.18 sq. m) and washing room (3.7 sq. m) to a minimum.
4x6
These are the most popular sizes. The building is suitable for a company of 5–6 people. The layout of the 4x6 bathhouse includes a terrace with a canopy, a sauna, a guest room, a bathroom, and a shower room. Total area – 21.7 sq. m.
The rest room is 5.8 sq. m fits a table with benches and a refrigerator. The terrace is open. The bathhouse has a separate sink and steam room. The sauna is standard, with a bench 60x1900 cm. The washing room is 4, 256 sq. m. m there is a shower with a drain. It is possible to install a font with dimensions of 1000x1700 mm. The layout of the bathroom looks miniature, but it can accommodate a compact sink and toilet.
In one-story 4x6 baths, the attic is used as a storage room. But if you insulate the roof, the space will turn into a usable area. Projects for miniature 4x6 baths with an attic floor are a good solution for small areas. At the top there is usually a place to recuperate after water procedures.
The presented project of a 6x4 bathhouse has a built-in terrace, a vestibule, 2 rooms, a sauna, and a washroom. The area of the bedroom on the attic floor is 16.79 square meters. m. If desired, you can divide the space under the roof into 2 small rooms with partitions. The project does not include a bathroom. The steam room is comfortable for three people.
On the ground floor in the hall with an area of 8 sq. meters a dining area can be arranged. The layout of a 4x6 bathhouse with an attic can be made more convenient if you move the terrace to the place of the porch, increase the sauna to 5 square meters. m, arrange a toilet on the ground floor.
6x6
The total area of a 6 by 6 bathhouse made of timber or rounded logs will be 30–33 square meters. m. This option is suitable for families of up to 8 people. The building contains a shower room with a plunge pool, a bathroom, a kitchen, and a bedroom. One of the layout options for a 6x6 sauna with a large relaxation room.
Usable area – 34.2 sq. m. Steam room 4.8 sq. m is designed for a company of up to 5 people. In the living room you can place a hob, a sofa, and a dining table with chairs. The porch is wide enough to accommodate a table with benches. The bathroom has a minimum size of 1.2 square meters. m. A toilet with a compact sink fits here.
Spacious washing area 6.1 sq. m is equipped with a shower. And here you can install a font for 2 people with a podium and a “waterfall” made of an oak barrel. A simple staircase to the attic is located against the wall between the washroom and the recreation room.
You may be interested in: Bathroom layout with dimensions 3x5, 4x5, 5x5, 6x5: the best solutions
There are options for planning a 6x6 bathhouse with a swimming pool. However, the artificial pond will not be large enough for swimming. To maintain a pool, a filter, pump and chemicals are required, which entails additional costs. It is much easier to replace it with a plastic font. Below is the layout of a 6x6 bathhouse with a swimming pool.
Living room 10, 4 sq. m allows you to place a sofa, minibar and refrigerator. The steam room is designed for 4 people. The shower room is miniature, located next to the toilet. Built-in, closed terrace. The pool room has an area of 6 square meters. m, the dimensions of the reservoir inside it are 1.6x2.4 m. The structure needs a utility room for filters and pumps.
The equipment must be located below the water level. In this layout, the technical room is located in the cellar. If it is not possible to install it in the basement, it is necessary to design a utility room next to the pool for filters and pumps. In general, a 6x6 bathhouse is quite spacious and comfortable if you plan the interior space correctly.
Choosing the right color for the hall
Design of a room of 18 square meters. m. is developed taking into account different parameters - geometry, number and placement of windows, features of functional areas in the living room. Often the big problem of halls in Khrushchev-era buildings and small apartments is the narrow shape of the room, which prevents sufficient natural light.
But this parameter also depends on the choice of color.
- To get the most illuminated, spacious room, you should decorate the room in light colors. On any area, even 18 sq. m. (in particular, in an apartment) it will be much lighter and more comfortable if you choose white, milky, ivory, pastel sand, beige as the main color. The white palette reflects the sun's rays to the greatest extent. For any sq. meters, the interior of the hall turns out to be sparkling and free.
- Many people tend to choose warmer colors in the interior - beige, sand, caramel, ivory, champagne, etc. They combine perfectly with a wide range of other shades.
- The pastel palette of all shades looks luxurious: the interior design of a hall with an area of 18 square meters. m will be more emotional and creative if you choose lilac, blue, turquoise, terracotta, coral in whitened, muted tones. Interior solutions can be both modern and retro, but if there is not enough space for all the ideas, it is better to devote 18 square meters to absolute functionality and impeccable comfort, rather than decorativeness.
The room in which we rest a lot and sometimes for quite a long time cannot be gloomy, flashily bright and annoying, or, conversely, excessively boring. It is important to find a balance here that will allow you to spend time here both actively and lazily, in company and in solitude.
Project of a 6x3 bathhouse made of timber
Figure 1. Layout of a 6x3 timber bath.
The layout of a 6 by 3 bathhouse is approximately as shown in Figure 1. The usable area of such a structure is 16.8 sq.m. The 6 x 3 bath includes:
- rest room - dressing room;
- shower room with shower and toilet;
- steam room with shelves;
- hallway;
- stove-heater.
Almost half of the room is occupied by a relaxation room, in which there is a table, a TV and benches where they drink tea, and a changing room to leave clothes.
The steam room is designed for 4 people, it should be quite spacious. The height and length of the room should allow each visitor to freely steam and relax. A stove-stove is placed in the steam room, which will generate steam.
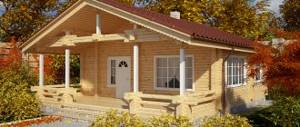
The entrance to the bathhouse is decorated with a porch with a canopy. This will protect the building from precipitation.
A tourniquet must be laid between the crowns of the log house, which will prevent the appearance of cold bridges. The height of the first floor of the bathhouse is 2.25 m. The roof is made of rafters, which are represented by 50 x 100 mm timber, and the sheathing is made of 20 mm unedged boards.
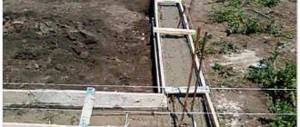
Strip foundation for a bathhouse made of timber.
Roofing material is selected based on the customer’s personal preferences and the scale of material capabilities. Ondulin is best suited.
The floors in the bathhouse are laid according to technology: subfloor, steam-waterproofing and insulation. The surface of the finished floor is made of tongue-and-groove floor boards.
The steam room is finished with clapboard, which has a foil lining.
Why do many people prefer a bathhouse with dimensions that have already become classic? Advantages of a 6 x 3 timber bath:
- a small sauna can be placed on your country property;
- a cozy room will bring a lot of joy to all family members at any time of the year;
- a bathhouse made of profiled timber retains heat for a long time and at the same time creates good ventilation;
- When heated, coniferous wood will delight visitors with the pleasant aromas of healing resins;
- neat appearance;
- simple and quick installation of beams.
Layout and zoning on 18 square meters
Traditionally, zoning of the hall is not required if all 18 square meters. m.
dedicated specifically to the guest area. In this case, there is a regular set of furniture - a sofa, a TV, perhaps cabinets or cabinets for storing personal belongings, books, CDs.
If there is not enough space in the remaining rooms of the apartment, then the living room can have wardrobes for clothes, built-in compartments, and chests of drawers. But still, quite often in the living room of an ordinary apartment it is necessary to equip both a bedroom and a dining room.
The layout of the hall can include different areas, and this is not necessarily a dining room: the living room can have a playroom for kids, a place for communication, for tea drinking or privacy.
When carrying out renovations in an apartment, you should take these features into account and select the minimum cost tools:
- When implementing an interior in a modern style, you can choose a clear graphic design of the hall, in which the division of zones does not require bulky or voluminous solutions . Here it is enough to choose different shades for each zone, and they can lie in the same range - gray or steel, beige, light blue and dark blue, light green and green.
- For living rooms with sleeping places, you can arrange a modern design with podiums and multi-level structures - for games, relaxation, reading, watching TV . Under the elevations you can “hide” a pull-out bed, storage space for toys and other accessories. If the height of the room is not enough for elevations, then you will have to use standard solutions - openwork or glass partitions for part of the opening, visual tint differences in decoration, etc.
- For a one-room apartment, the hall design can be implemented with niches, podiums and multi-level ceilings . Here you can make interesting use of both the bedroom and the nursery - you can hide the parent’s bed in a raised area, and on the podium you can arrange a playroom and sleeping area for a baby or even several children. If initially there are no niches for such a solution, they can be built specially. Although they “steal” space, it will be possible to implement several functional zones at once on a few square meters.
Expert opinion
Mikhailova Maria Vasilievna
Furniture store manager. Knows everything about comfort and interior design
When it is not possible to demolish walls in a panel house, the living room will have to be planned in a limited space. In many ways, the design of the hall in an 18 sq. m.
m. depends on the geometry of the room and the features of the building: in a square room it is easier to arrange an ordinary spacious living room with a small corner for privacy and relaxation, but in a long narrow living room, for example, 6 by 3 m.
there is room for both a new niche and a separate area - an office, a place to study or play.
Bathhouse layout 6x3: advantages, area distribution, internal and external arrangement
Why do many summer residents and owners of private houses choose a 6x3 bath plan? The first, and perhaps the most important advantage of such a structure is its relatively small size. Such a bathhouse does not take up much space on a summer cottage, but at the same time it can give a person all the benefits, namely the opportunity to relax, take a steam bath, get physical and emotional relief, so to speak, relieve the stress that our days are filled with in abundance.
The photo shows two layout options for this design - with an offset steam room and washing room and separate rooms for parka and washing. Everyone has the right to decide which of the proposed bathhouse plans suits them best.
2 options for a do-it-yourself bath made of timber
Advantages of a compact bath
Bathhouse with summer terrace
Any layout of a 6 by 3 bathhouse has a number of features, which we will talk about. This design is cheaper than its larger counterparts. Every time a grandiose construction project is started, we evaluate our financial and time capabilities, and therefore we try to choose the best option - price, deadlines, and maximum quality.
What is good about a small and cozy bath complex?
- It does not take up much space and this structure can be easily erected even in a small area;
- The layout of the 3x6 baths is also advantageous for reasons of ease of maintenance; a small amount of solid fuel is required to light it;
- Financial savings.
Tip: the layout of a 3x6 bathhouse on your site plays an important role, because the safety of the main home depends on its location. Attaching a bathhouse to a house is strictly prohibited by fire safety rules, so it must be located at least ten meters from the main dwelling, and 5 meters from the fence and the red line.
How is the space distributed in the room?
Bath plan
The figure shows the most versatile version of the bathhouse layout, the size of which is 3 by 6 meters. Everything is compact and there is room for a rest room with an area of 6 square meters. m, shower room 4 sq.m., vestibule 2 sq.m. and steam room 6 sq.m. This is the most profitable building on any country plot that has a small area, but you really want to have your own bathhouse.
From the outside, such a building looks like a small country house and it seems that the interior is quite small. But it only seems so. If you look inside, it becomes clear that in such a bathhouse up to 4 people can safely wash at the same time.
In terms of the interior, a 6x3 meter bathhouse resembles a wider layout, such as 6x6. At the same time, the functionality of the bath space was preserved to the same extent.
The diagram shows that upon entering you find yourself in a vestibule, which at the same time can also be a place for burning and storing firewood. To the left there is a relaxation room, which has an area of 6 square meters and in such a room a table, sofa, TV and other pleasures of life can be quite comfortably accommodated.
Next comes the shower room or wash room, as you wish. In it, at the owner’s request, you can install a font and an additional shower, arrange places for washing several people and hang a bucket of water from the ceiling (imitation shower), as in a real Russian bathhouse.
Font in a small bathhouse
After all, it is into this room that the door leads from the large steam room, and since the bathhouse is small in size, there is definitely not enough space for a pool here. It can easily be replaced by a font of any size and volume, and the pleasure from such a procedure is even more pleasant than a regular shower.
The steam room itself may have one or more benches so that at least one adult can calmly lie and steam. Although the area easily allows up to 4 adults to be in the steam room.
Internal and external layout
If the frame of your building is already showing off on the site, then the matter remains small.
What can be done additionally during or after completion of construction work:
- build on a small summer veranda or canopy, which will not only protect from snow and precipitation, but will serve as a summer terrace for relaxing on summer evenings;
- make some additional partitions in the rest room with your own hands, for example, for a locker room;
- Also, during construction, immediately think about a place for a toilet, which can be combined with a rest room or shower - your choice;
- if you are not satisfied with the shower, then instead we install a font where you can take aromatic baths and receive a free therapy session;
- if you have enough imagination, then you can complement the interior and exterior interiors not as the instructions say, as in school, but at your own request - trees and flowers, vines and original decor, painting with eco-friendly paints or stained glass windows, straw panels and other little things.
Advice: don't be afraid to experiment. After all, this is your bathhouse and everything can be redone at any time. And if you don’t have enough imagination, then invite knowledgeable stylists or study our publications on the website.
Interior of a Russian bathhouse
Advice: for beginning craftsmen, it would be better to use the help of professionals and designers. It would be great if you could find such a person in your immediate circle. If not, then it doesn’t matter - there are a great many companies offering this type of service and there is always plenty to choose from.
Bottom line
Original decor of the walls of the bathhouse complex on the site
Building a bathhouse is not a big problem and the price for this building is quite affordable, since today on the building materials market you can easily purchase ready-made projects to order. But before buying, you should plan the premises and know exactly where and what will be located even before the building is erected.
The video in this article will help you study this topic in more detail and learn a lot of new and interesting things for yourself.
9ban.ru>
Finishing materials for the hall
As a rule, furnishing a living room on a budget involves renovating the hall yourself, because it is through the work of craftsmen that you can save money.
For this reason, the choice of finishing materials is based on ease of use:
- The floor is covered with any available materials - linoleum, laminate, less often - boards and especially parquet.
- To decorate the walls, it is better to choose wallpaper, no matter what solutions are chosen for the living room in general . Gluing strips of any width is much easier than plastering and evenly painting vertical surfaces.
Among the entire range of wallpaper for halls, you can choose many options in a wide range of colors - both plain and patterned. In this case, the area does not play any role - at 18 square meters.
m. in the interior of the living room, you can use both large and small patterns, even a budget option can be anything - it is important to choose a harmonious pattern for the chosen style.
An interesting solution would be wallpaper for the living room with macro photography - a current trend that allows even the most modest room to use sophisticated techniques for arranging an elegant interior.
- When decorating walls and ceilings in an ordinary apartment within a small budget, you can choose the simplest paper coverings and paints . But many designers call two-level stretch ceilings the most practical solution today. Of course, it is difficult to install such canvases on your own, but this is perhaps the only surface where you will need help. Moreover, the suspended ceiling in the hall covers an area of 18 square meters. m. will turn out to be the most practical, wear-resistant and durable solution, no matter what design style is chosen.
Of course, you can find many options for decorating the living room and any adjacent rooms, but most of them are beyond the budget. For the comfort of the living room and its harmony, simple solutions in a discreet palette are used, this is how you can achieve organicity and elegance even in the most budget-friendly interior.
Bathhouse 3 by 6: layout, choice of materials, construction tips
How to build a 6x3 sauna from a log with your own hands? What is the best way to plan interior spaces? What to build the floor and foundation from? Do log walls need additional insulation? Let's look for answers together.
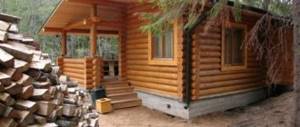
Our hero.
Layout
The dimensions we use are determined by the maximum length of the supplied lumber. Timber and rounded logs longer than 6 meters create serious problems during transportation.
From the point of view of their economy, the size is indeed optimal:
- Longer walls are built from whole logs.
- At the short end of the structure, it is sawn exactly in half, thereby reducing the amount of waste to almost zero.
Let us clarify: nothing, of course, prevents the use of shorter material by splicing it along its length. However, in this case, the amount of waste will inevitably increase.
Due to the thickness of the walls, the useful area of the building will be approximately 15-16 square meters. Our task is to use them with maximum efficiency.
Here are several options for possible building layouts.
A compact steam room is adjacent to a sink equipped with a shower stall or tray. The remaining area is divided approximately equally between the rest room and utility room.
The structure is divided in half by a transverse partition. Half of the area is occupied by a recreation room; on the remaining half, the steam room is adjacent to the shower room.
The steam room continues to increase in size due to the waiting room. The middle of the building contains a warm vestibule, shower and toilet.
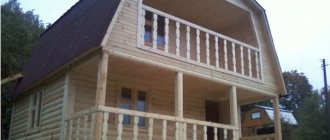
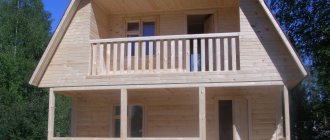
In the photo there is a 6 by 3 bathhouse with an attic and a porch. The presence of an attic allows you to move a recreation room into it. On the ground floor there is a steam room combined with a washroom and a dressing room.
This photo shows another 6x3 bathhouse with an attic, but from the inside. As you can see, the dressing room turned out to be quite spacious, despite the stairs to the second floor.
As you can easily see, the dimensions allow us to use quite a few layout options. Now let's decide on the materials and main points of construction.
Materials and device
We have already decided what to build the walls from: they will be made of rounded logs. The price of the corresponding kit at the time of writing is 100 - 130 thousand rubles.
By the way: it takes a little longer to build a 3x6 panel bathhouse with your own hands than a log house; however, the total cost of lumber in this case will be approximately one and a half times lower. In addition, the panel design allows you to place insulation inside the walls.
What about the rest of the materials?
Foundation
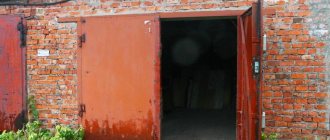
Since the mass of the structure is relatively small, a columnar foundation is generally erected under it. The most affordable material for it is red solid ceramic brick; Larger concrete blocks are often used.
In addition to the actual material for the posts, you will need:
- Sand and cement. A sand bedding and a concrete pad are formed under the foundation columns. In addition, for the pillars themselves you will have to mix the masonry mortar.
- Reinforcement with a cross-section of 14 millimeters. It is laid vertically in the center of the column and serves to anchor the grillage or lower crown.
- Ruberoid for waterproofing pillars.
This is how the beam of the grillage or bottom trim is fixed relative to the foundation pillars.
Roof
There are no restrictions in the choice of roofing material.
The most popular:
- Metal tiles.
- Its cheaper analogue is corrugated sheet.
A caveat: roofs with a slope of less than 15 degrees cannot be covered with corrugated sheets. In heavy rain with a side wind, water will get under the edge. In the case of metal tiles, this problem is solved by a transverse wave.
- Bituminous shingles. It requires the assembly of a solid panel made of boards, plywood or OSB.
In all cases, roll waterproofing is laid under the roofing material. In addition, the insulation layer below is additionally protected by a vapor barrier film.
Floor
What can we assemble the floor of our 3 by 6 bathhouse from?
The most popular solution for a dressing room is plank flooring on joists, which are a 50x150 mm board placed on an edge. Rough flooring is laid between the joists on the cranial bars; on it there is a layer of heat-insulating material covered with waterproofing; The floor is covered with a tongue-and-groove board from above.
Installation of the floor in the dressing room. Mineral or glass wool can be used as thermal insulation.
The floor in the steam room is made taking into account constant contact with water. Below the level of the flooring, its drainage is organized; In addition, polystyrene foam or extruded polystyrene foam is used as thermal insulation.
One of the floor options in the steam room.
For those who have doubts: indeed, it is usually not recommended to use synthetic materials in a steam room. The instruction is related to their limited resistance to heat and the ability to thermally decompose with the release of harmful substances. However, the actual temperature under the steam room flooring never exceeds 30-40C, so you don’t have to worry about either the insulation or your own health.
Furniture arrangement
Furnishing a traditional budget living room usually consists of choosing upholstered furniture, a TV and a cabinet underneath, cabinets for storing things and various items. Depending on the total area of the apartment, the number of cabinet structures can be minimal or, conversely, quite extensive.
Arrangement of furniture in a hall of 18 square meters. m, as a rule, is simple and clear - a sofa is almost in the center of the room, opposite it is a TV, at the end there are wardrobes.
But you can move away from the basic options and choose a more functional and comfortable one:
- The living room itself can be divided into a relaxation area and family time . Then, for example, a compact table and a couple of armchairs are placed near the window, then a sofa and a TV, and closer to the entrance - a playroom for children or cabinets for organizing storage space.
- How to furnish the most ordinary rectangular room ? 18 sq. m. can be represented by 6 by 3 with a three- or, conversely, six-meter side where the window is located. By the way, if the outer wall is 6 meters, there will most likely be two window openings. Then the amount of natural light increases, but the functional area for cabinets decreases.
- A square living room is most often arranged symmetrically - relative to the central axis, which can run diagonally or parallel to the walls . And here you will have to deal with the furniture issue - how to arrange the furniture - based on your own needs and the location of the windows. Between the openings there can also be a fireplace or its imitation - the design of a room with a fireplace will be even more elegant and expensive.
Rectangular hall
In the interior of a rectangular living room, it is easiest to use different design ideas, but usually it is here that you have the opportunity to furnish an 18-meter hall, as in the best design projects - elegantly, stylishly, comfortably. At the same time, an elongated and narrow room can become an ideal space for placing several zones - a dining room, a bedroom, an office, a children's room, and a playroom.
You can divide these eighteen meters quite simply - place a corner sofa not in a corner, but in the middle of the room, and the room will immediately receive several functional areas.
With access to the balcony
In a living room with a balcony, this difficulty arises - the doorway limits the space for placing furniture and especially for a corner sofa. Therefore, here you can put or hang a TV on the wall, arrange a corner for relaxation, a playroom (with safety for the baby).
In a budget room, the window sill can be extended with a table and a place for schoolchildren or students to study.
Bathhouse 3 by 6 made of timber - creating a project yourself
Almost every owner of a dacha or country house dreams of building a bathhouse on his or her own plot. However, in practice, everything is not so simple, and in order to build not only a beautiful, but also a functional building, you should take into account many nuances in your work.
In order not to make any mistakes during construction, any undertaking must be preceded by a carefully drawn up project. We will talk about how to develop a project for a 3x6 bathhouse made of timber in this article.
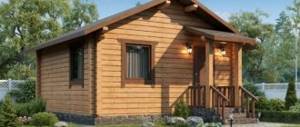
In the photo there is a bathhouse with a terrace 3 by 6 meters.
About wooden baths
Bath buildings made of logs are traditional in Rus'. Wood is not only environmentally friendly and has an attractive appearance, but also creates a unique flavor characteristic of truly Russian baths, which brick analogues cannot boast of. And the reasonable price and relative ease of construction attract a large number of home craftsmen to wooden baths.
Over centuries of practice, bathhouse construction has developed its own traditions regarding the size and layout of the structure, the design of the heater and other nuances. And before you plan anything, you need to have a detailed building plan in hand.
Drawing a plan
Ideally, it is desirable to create an individual building plan that would take into account all the features of the site.
If you have no experience in this matter, you can do the following:
- Take a ready-made plan that best suits your requirements.
- Rework the finished plan, taking into account the features of the site.
Bathhouse construction plan.
Ideally, a bathhouse building measures 6 by 6 meters. This is enough to place everything you need here. But most sites do not have free space to accommodate such a large building. And the most reasonable way out of the situation is a 3x6 sauna made of timber.
Such a building will be half the size of a traditional one. And your task is to make sure that the reduced dimensions do not affect functionality.
A good bathhouse should consist of the following rooms:
- Waiting room.
- Restroom.
- Washing room.
- Steam room.
Successful examples of bathhouse layout with specified dimensions.
Naturally, there are building plans in which there are two or even one room, but still you shouldn’t move too far away from the original.
Layout features
The size of the bath depends on how many people will take bath procedures at the same time.
Advice! To save space, you can combine a dressing room and a rest room.
Let's look at which layout is best suited for a building measuring 6 by 3 meters:
- It is most convenient to create a linear layout of rooms, when all the rooms go one after another. Entering the bathhouse, we find ourselves in the relaxation room. There should be enough space here to place a wardrobe, a place to store firewood and a table with chairs for relaxing in between visits to the steam room.
Plan with an open veranda.
Advice! It is most convenient to load firewood into the steam room heater from the rest room of the bathhouse. The door should be located next to the firewood storage area.
- Along the left wall of the rest room there is a long narrow corridor with entrances to the steam room and washing room. The steam room is the main room in the bathhouse. There is a stove-heater and benches for bathing procedures. The washing room is designed for taking a contrast shower in between visits to the steam room. A bath font is installed here, which can be either in the form of a wooden, plastic or metal container, or in the form of a small pool.
Calculating the size of the rooms
The following instructions will help you calculate the size of the rooms:
- For a steam room, it is necessary to provide 2-3 m2 for each visitor.
- The rest room is approximately 3 m2 per visitor.
- If you are interested in a bathhouse made of 6x3 timber with your own hands, then you can save on the size of the washing room. It is enough for one person to fit here, and for this a room of 2 by 2 meters is enough.
Choosing material
Profiled laminated timber.
A 6 by 3 bathhouse made of timber may include the following types of building materials:
- Ordinary timber. The simplest and cheapest option. Most often it is delivered to the construction site unpolished and not completely dried.
- Glued laminated timber. Very strong and durable material. Typically, such beams are glued together in three parts and have excellent technical characteristics.
- Profiled timber. The most convenient material to install. Thanks to their profiled base, such beams can be easily adjusted to each other without forming gaps.
The most expensive option is profiled laminated timber - a very durable and easy-to-work material.
Choosing a foundation
A 3x6 meter do-it-yourself timber bathhouse may require the following types of foundation:
- Columnar. Today it is very popular in the construction of baths. It consists of pillars that are connected at the top by a grillage. Main advantages: simplicity and speed of arrangement, low cost. Disadvantages: low load-bearing capacity, impossibility of installation on unstable soils.
Columnar foundation made of building blocks.
- Tape. It is a universal type of base. It is poured under both massive and light wooden buildings. Allows the arrangement of the basement.
Sectional view of the strip base.
Conclusion
In this article, we figured out how to correctly create a bathhouse construction project. As you can see, there are a large number of nuances that should be taken into account at the rudimentary stage of planning, otherwise you will not be able to build a bathhouse that would meet all the requirements.
In addition to the plan, the project must also take into account the characteristics of the material and foundation. If the stages of preparation and calculations are thorough and thoughtful, then you will be able to build a high-quality bathhouse. The video in this article provides a lot of additional information on this topic.
9ban.ru>
Lighting: which chandelier and lamps to choose for an 18-meter hall
To choose a chandelier for a hall of 18 square meters. m, it should be taken into account that here you will need different “scenarios” for relaxation and pastime. In addition, it is necessary to ensure a sufficient level of illumination at any time of the day.
When choosing a chandelier for such a room, pay attention to:
- Depending on the number of light bulbs, you can and should choose a model in which you can use several of them separately.
- Considering the massiveness of the lamp - you should not choose bulky products that will take up space.
- Regarding the transparency of the lampshades - it is advisable to find transparent or simply frame models that match the style so that the chandelier is visually light.
The central lamp must be supplemented with floor lamps, sconces or spotlights in a multi-level ceiling.
Decor
Budget arrangement of the living room does not exclude the use of decorative elements that are necessary both for harmony in the interior and for comfort. It is best to choose wall decorations - paintings or photos, use lamps as decor and sofa cushions.
In this case, such elements will not make the atmosphere oversaturated, but will simply pleasantly dilute the functional solutions.
Narrow room design: 100 best ideas
In the ranking of complex, inconvenient premises, narrow spaces confidently take first place. The owners of such rooms often have to choose one of two things: aesthetics or convenience.
To fully arrange the furniture and not overload the room is, at first glance, an impossible task. Let's see how designers deal with this problem and take the best ideas.
Narrow room: ideas for optimal organization of space
To make a narrow, elongated room as attractive and cozy as possible, you should take a closer look at some design techniques that visually expand the room. By correctly arranging pieces of furniture, choosing the type and color of wall, ceiling and floor coverings, you can significantly change the geometry of the room, while simultaneously filling it with stylish and beautiful decor.