Leveling a wooden floor under plywood
First you need to determine the condition of the wooden floors, whether there are large differences in height between the boards.
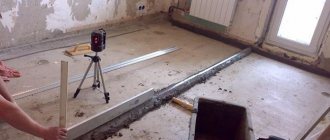
To do this, you need to divide the perimeter of the room into segments and measure the height in the corners, in the center, at the centers of contact of walls and floors with a level gauge.
If the height differences are insignificant, up to 2 mm per square meter, then plywood is not needed.
It is enough to treat the floors with acrylic sealant or make your own leveling mixture from sawdust and PVA.
In other cases, plywood flooring is required. If the height level is 5 mm per square meter, then the plywood must be screwed to the board covering with self-tapping screws.
If the height differences range from 1 to 8 cm, then it is necessary to create strip or point supports to level the plywood.
You need to check not only the height levels, but also the condition of the wooden surface. If any boards become unusable, they need to be replaced. Place the heads of nails and screws inside the wood, and fill the recesses with plaster or mastic.
If the floors squeak, you need to pour graphite powder with talc into the cracks or drive wooden wedges into them.
If this does not help, then secure the defective boards with self-tapping screws or dowels with screws.
If you cannot level out significant differences in height with your own hands, then you need to dismantle the rotten structure, replacing the destroyed boards with freshly planed ones.
Technology selection
To choose a certain leveling method, you need to assess the condition of the floor and find out how much the relief deviates from the desired norm. If the height differences are about 2 mm, and the area does not exceed 1 sq. meter, no need to level the floor. It is enough to use acrylic sealant on the surface or use the putty method. In the latter case, you can make the mixture yourself by mixing moistened sawdust and PVA.
Small unevenness can be smoothed out with ordinary putty
Having the correct laying of the floorboards, where differences are uniform up to 5 mm, you can attach the plywood directly to the floor. When differences reach 8 cm or more, you need to make point or strip supports. What are boards/thick plywood used for?
how to attach plywood to wood floor
how to attach plywood to wood floor
IMPORTANT: for a board whose width is from 10 to 20 cm, a thickness of 10 mm is sufficient. When the width exceeds 20 cm, use thicker plywood sheets.
When the differences are too large, the structure will have to be disassembled and rebuilt by purchasing new materials. In addition, under such deformation there are usually some serious reasons that need to be clarified.
IMPORTANT: plywood is used for leveling only if the technical parameters of the shelf meet the standards.
Table. Characteristics of plywood and plywood boards made from birch veneer sheets
| Index | Regular plywood | Bakelized plywood | Plywood boards |
| Thickness, mm | 4 | 16 | 20 |
| Density, kg/m3 | 696 | 1190 | 749 |
| Water absorption in 24 hours,% | 24-32 | 0,92 | — |
| Tensile strength (MPa) along the fibers of the outer layers | 101,1 | 113,4 | 104,0 |
| Tensile strength (MPa) across the fibers of the outer layers | 65,9 | 120,0 | 94,4 |
| Ultimate strength (MPa) during static bending across the fibers of the outer layers | — | 112,0 | 85,7 |
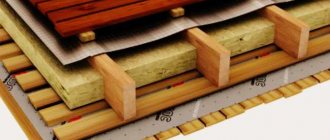
Do-it-yourself leveling of a wooden floor with plywood
The plywood needs to be kept on edge for two days in a heated room.
Where there is no constant heating, smooth sheets of plywood should be left for a day to get used to the room conditions. Before doing this, you need to walk over them with a cloth soaked in warm water so that they thaw from the frost. There are several ways to level a wooden floor with plywood.
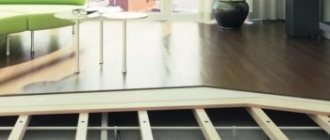
Leveling the floor with plywood without joists
The easiest method is considered to be leveling without lags.
In this case, the support points will be the boards that have risen over time. If their width is up to 20 cm, then use plywood 8-10 cm thick, if it is more than 20 cm and the boards rise unevenly, then it should be thicker - 18-20 cm.
To begin work, you need to cut a large plywood sheet into 4 small squares to reduce its deformation. We lay out the plywood, retreating 2-3 cm from the walls. Leave a gap of 3-8 mm between the plywood sheets.
Under the influence of temperature changes and water, plywood is deformed and can increase in size, filling the gaps.
To prevent changes in the area of the plywood sheet from having a negative impact on the top floor covering, additional distances are left between them.
They begin to lay the material from the center to the corners of the room in a checkerboard pattern, securing them with self-tapping screws. The fasteners are installed from the center to the edges of the plywood sheet, 2 cm from its edges, no less.
When installing sheets, you need to remember that their offset relative to each other should be at least a quarter, no more than half a square.
It is not necessary to lay from the center if there is some kind of floor covering on top.
You can start laying from the corner of the room and move towards the door.
Fastening should be done evenly to the protruding boards.
It is recommended to drill holes for them before tightening the screws. One of them is for the screw barrel, the other is one and a half centimeters larger than the screw head in order to drown it in the plywood sheet. Do not hammer nails or dowels into plywood; it will crack.
If plywood is coated with varnish, the rough surface of the sheet is laid down. If there is some kind of covering on top, then the roughness set outward will favor the adhesion of the materials: plywood and floor covering to each other.
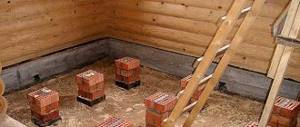
Installation of plywood on a strip base
The second way to level the floor is to install plywood on a strip base.
First of all, we lay out plywood sheets on a wooden base in a checkerboard pattern for fitting and determining the guide joists. Let's draw these lines.
We already have an outline of the location of the horizontal bars.
Number the plywood sheets and the floor so as not to be confused during installation.
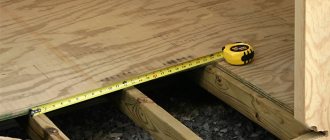
The logs are square bars with a long side of 40-60 cm. Instead of bars, you can use boards or plywood sheets cut into strips.
Transverse strips are attached to the logs in approximately 40-50 cm increments. Metal corners make the connection of the longitudinal and transverse strips strong and reliable.
Using a level gauge, we level the lattice base. To ensure that the logs are at the same level, we place wooden spacers under them. And then, using metal corners and self-tapping screws, we attach the logs to the plank floor. You can also use dowels as lag fasteners, which are 3 times the thickness of the lag.
Between the lags we fill the free surface with sand or a homemade mixture consisting of sawdust and PVA glue.
We spread it in two layers and leave it for the leveling compound to harden.
If the logs are low or in the form of slats, then we use roofing felt or roofing felt. Only after this we begin to attach the plywood.
Installation of plywood on mini joists
Another method of leveling the floor with plywood in a wooden house is to use mini-lags.
This method is very accurate. It is carried out only by masters of their craft and engineers. The slightest inaccuracy in the calculations will make the design unreliable. Each element of the building is calculated separately using special instruments.
Mini-logs (slats) are laid lengthwise and crosswise in the form of a lattice. This method is used when there is a large slope of floors and significant differences in height - up to 8 cm. First, sheets of plywood are laid out for fitting to make markings. The thickness of the supports and the angle of inclination are calculated using formulas and programs.
Installation of plywood on the sheathing of point supports
The fourth way to lay plywood sheets is by lathing point supports. The blocks are cut from boards or plywood and laid in the form of a grid. The step between them is much smaller than with strip supports. This method is less accurate than using a lag.
Why plywood?
Plywood is one of the most popular and convenient materials that can be used in renovation work. Let us highlight the main advantages of plywood sheets:
- easy to handle and install;
- high-quality grinding of the material;
- no unpleasant odor;
- hard surface;
- lightness of the material;
- high strength;
- moisture resistance and water resistance.
It is worth noting the technical characteristics of the material.
| Type of plywood | Description |
| Plywood FC | moisture-resistant appearance; urea resin is used for gluing veneer sheets. This plywood is intended for indoor use. |
| FKM plywood | has increased water resistance and is made on the basis of melamine resins. This type of plywood is unique, since environmentally friendly melamine resins are used for its production. Due to its environmental characteristics, plywood is used in furniture production and for interior finishing work. |
| Plywood FSF | Veneer sheets are glued together using phenolic resin. This type of plywood also has increased water resistance. It is not recommended for interior decoration, as phenolic resins are harmful to health. Typically used for exterior finishing work |
| Laminated plywood | It is based on FSF plywood, which is covered on both sides with a special film. Laminated plywood is used for the manufacture of formwork. This type can be used repeatedly |
| Bakelized plywood | Bakelite resin is used to glue veneer sheets together. This type of plywood is used in aggressive climates, sea water, aggressive environments, and sometimes for monolithic work. |
| Marine plywood | similar to bakelized, but less durable. Made from foreign wood species |
| Plywood Flexible | foreign version. A distinctive feature is the ability to bend well in the transverse and longitudinal directions |
During operation, plywood can be bent, without cracks appearing on the material and it will not break. The strength of plywood allows you not to worry that the floor will not withstand the load. In addition, regular plywood sheets have a larger area, which means you can cover the desired surface faster. And finally, the material is quite unpretentious, and due to this and its low weight it is convenient to transport and lift to the upper floors.
Plywood varieties
The use of plywood sheets also allows you to achieve high quality and reliability of the new floor. As a result, instead of the old coating, you will get a smooth and durable surface. In this case, the height of the floor will rise only a few centimeters, which will be almost unnoticeable. At the same time, the plywood floor provides ample space for implementing various design solutions.
What are the sizes of plywood sheets?
When purchasing material, pay attention to the grade. Plywood comes in four grades:
- first grade - the best quality, absence of external defects;
- second grade - plywood with wood inserts, sometimes with dents or scratches;
- third grade - material with devil holes or fallen knots;
- fourth grade - the worst quality, many defects.
IMPORTANT: when buying low-grade plywood, you can be sure that the material is perfect for rough work - this will help keep high-quality plywood intact and not make mistakes in the calculations.
Leveling a wooden covering with plywood under linoleum
Linoleum is a capricious coating; all roughness, unevenness and debris will be visible on it. Over time, due to its elasticity, it will take the shape of the base, enveloping the protrusions and recesses. Therefore, a perfectly flat surface is required for linoleum flooring.
Preparing the wooden covering. It is best to sand a wooden floor.
To protect yourself from dust, you need to wear a respirator and headphones to protect yourself from noise.
You need to work with a looping machine, starting from the corner of the room, moving like a snake to the other end of the room. The corners are processed manually.
Putty is needed to treat cracks and cracks in wooden floors. When the mixture dries, you should repeat the scraping.
Collect dust after the process with a vacuum cleaner.
The wooden covering is treated with antiseptic agents. The top is varnished.
You can also scrape floors using a planer. But this is a more complex process. Floor scraping is carried out if the height differences are insignificant. In this case, plywood is not needed. It is also not needed when leveling a wooden floor with dry mixtures, which are applied to a sanded floor.
If the floors are located on a slope, plywood panels are required.
We take self-tapping screws and screw them into the wooden floor at a distance of 20-30 cm from each other. These are our beacons on which logs and plywood sheets will be placed. The screw heads must be at the same level.
We cut the plywood sheets into squares with a side of 60 cm. It is very important to check the sheets so that there are no cracks or chips.
We lay out plywood beams 3-4 cm wide. These are logs. They serve as support for plywood panels. If there is a gap between the joists and the floor, you can place a thin piece of plywood. Attach the joists to the floor using wood glue or self-tapping screws. Expanded clay can be poured between the joists. It will be a kind of insulation for the floors.
We begin the installation of plywood sheets. We lay out the plywood in a checkerboard pattern with an offset. We strengthen it with screws inserted into dowels. To ensure a neat finish, it would be a good idea to drill holes for the dowels before laying the plywood panels.
When laying plywood, the screws are simply screwed into the dowels. Plywood sheets are fixed to the joists. It is very important to step back 2 cm from the wall and leave a gap between the plywood panels. Then seal the seams with putty or mastic. When laying plywood, you need to remember that only three edges of plywood sheets can converge at one point, no more. After leveling the floor with plywood, you need to sand the floor and varnish it. You can lay a backing and linoleum on top.
Pros and cons of laying plywood on the floor
First, let's talk about the positive aspects of leveling the floor with plywood.
- You can do it yourself.
- A quick way to level floors.
- Provides a strong and even base for any finishing coat.
But, like every technology, plywood flooring has its drawbacks, which you need to know and try to minimize.
- Incorrect selection of plywood can lead to sagging and creaking floors.
- Without taking appropriate measures, you can end up with a booming floor with a drum effect.
Pros and cons of laying plywood on the floor