A dacha with its own bathhouse can probably be called the dream of every city dweller. The bathhouse is the most comfortable place to relax, for friendly meetings and family celebrations. You can build a bathhouse yourself or order one. In any case, for work you will need a project for a bathhouse with a diagram and drawings.
Photos of the best bathhouse projects can be found on the pages of practical design and construction magazines.
Brief overview of the article
Project creation options
A project for a bathhouse is a high-quality display of a number of parameters, not only sizes, but also structural features. All parameters can be divided into the following groups:
- Safety indicators.
- Technical capabilities.
- Design features.
Depending on the specified characteristics, the design of the bathhouse can vary dramatically.
Technology for constructing a village bathhouse
Construction of a village bathhouse will not take much effort and time if you strictly follow the instructions given here and carry out the construction of the bathhouse in stages. Let us briefly list all the stages of preparation and construction of village baths, here they are:
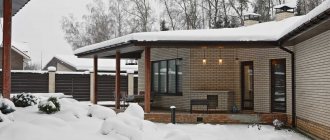
- choosing a place for a bathhouse (usually such a place is a flat “platform” near an open reservoir or in an area next to the owner’s house, not adjacent to it, which reduces the risk of a fire);
- choice of material (usually natural coniferous wood is chosen for baths);
- creating an initial design for a future bathhouse (in which it is necessary to take into account all the features of the structure being built: material, size of buildings, installation of electricity and sewerage);
- preparation of tools (the full list of tools necessary for construction includes: an angle grinder, a router, a grinder, a circular saw, an axe, a plane, a hacksaw, a hammer, a chisel, an electric drill, a sledgehammer, a screwdriver, scissors, a knife, a plumb line, a construction level and a tape measure);
- creating a foundation (its type is determined depending on the dimensions of the bathhouse being built and can be either a concrete strip or a column);
- laying a log house or timber (with or without insulation);
- construction of a roof (single or gable);
- installation of communications (it involves supplying electricity to the bathhouse and installing a water supply with a drainage system);
- insulation of the walls, roof and floor of the future bathhouse (the selection of specific materials for insulation depends both on the construction budget and on the features of the village bathhouse structure being built);
- interior decoration (insulation, waterproofing).
The construction of a village bathhouse, like any other house construction, begins with the creation of a foundation. Most often, such a foundation has a strip structure and is installed using a concrete solution (which consists of 1 part concrete, 5 parts crushed stone and 3 parts sand). Its depth is about 70 cm, its height above ground level is no more than 15-20 cm, and its width is calculated depending on the thickness of the future walls made of logs or timber (20 cm thicker than the wall). Inside, such a foundation has 2 layers of reinforcement, fastened to steel rods lying transversely and vertically, on which the first turn of a log house or bath wall beam is mounted on top.
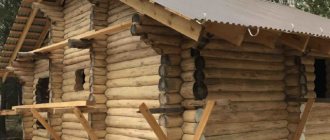
To build the walls of village baths, they use felled trees of deciduous or coniferous species with a diameter of 20 to 40 cm. Before laying, the logs are processed with a plane, giving them an even cylindrical shape and a smooth surface. A longitudinal groove is cut out in each log, due to which the logs are stacked one above the other. Immediately before installing the walls, a layer of roofing felt waterproofing is installed on the foundation of the future bathhouse, on top of which logs are laid. When constructing log masonry walls, the gaps of window and door openings are taken into account.
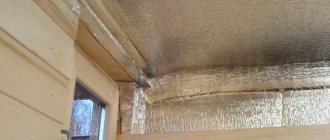
Most often, a lean-to type of roof is used for village baths. When installing such a roof, a mauerlat is fixed under the top crown of the log house, onto which the roofing rafters are subsequently laid. A sheathing with insulation is laid over the rafters. The roof is covered with slate or metal tiles on top of the insulation. When insulating, the spaces between the wall logs are filled with moss or tow, and the ceiling is covered with fiberglass or mineral wool.
To supply electricity to the bathhouse, special underground channels are dug, in which a cable is laid or an “overhead line” is installed. Similar channels are dug for laying water pipes. Drainage is ensured by a drain pipe, one end of which goes to a collection gutter on the floor of the steam room, and the other to a storage well.
Safety indicators
Any construction project must be drawn up taking into account the requirements of GOST and sanitary rules. The entire regulatory framework can be easily found in the public domain or you can seek help from specialists.
Safety indicators for the bathhouse project:
- Distance from latrines, fences and residential buildings. A bathhouse is a place with high temperatures and open fire, which is a source of increased danger.
- Construction requirements. The project necessarily takes into account the permissible dimensions, the location of load-bearing walls and the stove. The most common projects are bathhouses made of timber, widely known among construction specialists.
- Requirements for electrical wiring and electrical devices.
- Possibility of connecting communications to the building.
The project must indicate the main working material acceptable for use in construction.
Technical capabilities
The construction of a bathhouse is always associated with a number of technical parameters:
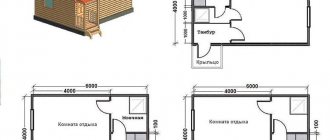
- The ratio of the size of the bathhouse and the available area on the dacha plot. The minimum acceptable size for a traditional bathhouse is a 4 by 4 bathhouse. For a more advanced option, you can prepare a 6 by 6 bathhouse project.
- Soil condition (preliminary analysis for the presence of karst voids and underground flows).
- Location of the future building (on a slope, on a relief terrain).
- Approximate weight of the future building.
Taking into account all technical characteristics is necessary to ensure that the bathhouse pleases its owners for a long time.
Design Features
A well-prepared project should also reflect the structural features of the bathhouse:
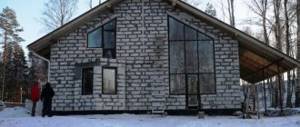
- Material for building a bathhouse. Today you can find bathhouse designs made from foam blocks, wooden beams, and solid logs.
- Availability and type of foundation.
- Number of rooms and their relative location.
- Firebox format and design.
The bathhouse can be combined with other rooms, for example, with a terrace or recreation area. This data must also be displayed in the project.
Device
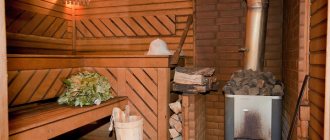
To get the maximum effect and pleasure from visiting the steam room, it is important to build the building correctly and zone the interior space. A classic country bathhouse is characterized by three functional rooms:
- Dressing room - rest room, locker room. There can be a closet for things, a table and benches for visitors to rest here. Often a furnace duct with a firebox is located in the dressing room.
- The washing room is an intermediate room in which you can wash yourself before visiting the steam room or rinse your body after bathing procedures. Here you can install a shower stall, a plunge pool, or a swimming pool.
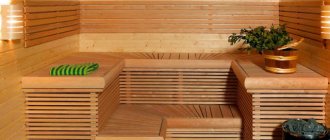
- Steam room - a room for bathing procedures. Here a certain temperature regime and humidity level are achieved. The inside is finished with clapboard, and shelves for visitors are installed along the walls.
Additional zones:
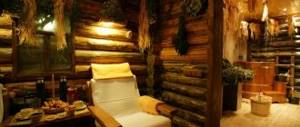
- An attic is an inferior second floor, inside of which a recreation room or living space is located.
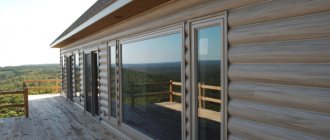
- A terrace or veranda is an addition to the main building. Here you can make an additional recreation area or kitchen. To protect against precipitation and cold, the verandas are completely glazed.
- Additional room for visitors to relax.
It is recommended to make a small vestibule in front of the dressing room.
Steam room (Photo: Instagram / ideiipodelkidliadachi)
Main types of baths
Based on the specified groups of parameters, baths can be presented in several variations:
- Traditional village bathhouse.
- Project of a bathhouse with a terrace.
- With a firewood rack.
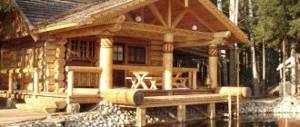
- Baths with canopy.
- Buildings on stilts.
- Model with built-in gazebo and barbecue.
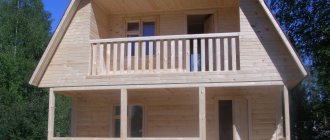
- Project of a bathhouse with an attic.
Today, there are original individual projects that differ in form, arrangement, and material used in the work.
Compact bath project
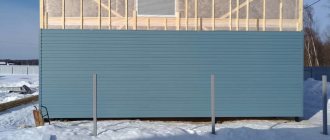
Village baths today come in many varieties. However, if you want to save money, it is better to choose a compact bathhouse project, the foundation of which will be columnar. To do this, prepare a two-meter auger drill. 110 mm sewer pipes must be used as the casing pipe. The reinforcement will be inserted from two rods.
The next step is to carry out the strapping. 500 mm studs are laid under it. The harness is assembled from square timber with a side of 150 mm. You will need frame posts; their height should be 2200 mm. The frame is treated with Neomid-440 or another composition suitable for these purposes. Village bathhouses are quite often built using this technology. At the next stage, it involves the construction of walls. They can be assembled directly onto the harness and simply lifted.
Sheathing is carried out using DSP. To do this, you need to drill the plates, and then screw them with self-tapping screws with a semicircular head. The roof is covered with 8-wave slate, this is done to save money. When insulating, you can use any heat insulator that is suitable for a bath; Linerock Light is used for this project.
Traditional village sauna
The classic version, presented in the form of a small house without a porch, canopy or outbuildings. Most often, such structures are made from profiled timber; they are distinguished by their compact size and maximum practicality. The internal structure is as follows:
- A small dressing room for clothes, shoes and auxiliary materials (cleaning equipment, brooms, basins). Is an optional element.
- Steam room.
In a traditional village bathhouse, a steam room is combined with a relaxation area. There are shelves for steaming, a stove with a firebox, and water tanks (built-in or located separately). For the structure, a small foundation is used, on which a frame made of timber or logs is built.
Kinds
There are two types of village steam rooms, which differ in design, method of kindling, and bath procedures:
- In black. The first bath buildings did not have chimneys. Inside there was a hearth, which was covered with stones. The room was first heated for several hours, and then the smoke was released and bathing procedures began. The name came from the fact that soot settled on all surfaces, turning them black. Childbirth took place in such steam rooms, since the sterility of the room after heating could be compared to an operating room.
- In white. Standard modern Russian bathhouse. The differences are the presence of a full-fledged stove with a chimney, the distribution of the internal space into separate rooms.
Baths in white are more comfortable than buildings heated in black. They came from wealthy peasants, rich merchants, and rulers.
Bathhouse project with terrace
This type of building also does not have a dressing room (or its role is insignificant), but is presented with a built-in terrace. The summer terrace is a modernized recreation area where you can place a dining table and sofas for sleeping.
Such a structure is a real decoration of a summer cottage, often made of natural wood, the decor is designed at the discretion of the owner.
Differences between a country bath and a classic sauna
Despite the antiquity of Russian traditions, today more and more city residents confuse concepts such as “bathhouse” and “sauna”, not noticing any difference between them. Especially for them, we will provide a small list of differences between the first and second. These are the differences:
- different ventilation systems (a special ventilation system can be installed in the sauna, but there is none in the bathhouse and the air changes due to cracks and vestibule);
- different temperature conditions (the dry air of the sauna warms up to 110-130 degrees, while in the bath it is usually heated by no more than 70 degrees);
- different humidity (in the sauna it is no more than 15-20%, and in the bath it stays at 60-70%);
- high temperatures in the sauna do not allow the use of brooms, which in this case can cause burns;
- different designs and materials of the stoves used (the heater stove of the Russian village bathhouse in the sauna was replaced by an iron electric stove);
- steam stones in a village bathhouse usually lie inside the stove, but in a sauna they are always on the surface;
- the sauna does not have a “dressing room” (instead there are one or more relaxation rooms), and the bathhouse does not have a swimming pool or shower;
- The bathhouse has a pouring floor (the water does not stagnate, but instantly passes through the floor boards to the gutter).
Looking at these differences, you may wonder what is better: a sauna or a bathhouse? No one will give you a definite answer to this question. Everything here is individual: everyone chooses what they like best. Therefore, let’s leave this topic and move on to the technology of building an ordinary Russian bathhouse.
Baths with canopy
A canopy attached to a frame bathhouse allows you to optimally organize a relaxation area. Under the canopy you can place tables, chairs, or arrange a green hedge or trellis with climbing plants for the summer season.
To arrange a canopy, you will need a concrete platform or a foundation lined with natural stone. The racks are made of stone or metal, and the roof is made of profile sheets.
The practical use of equipped canopies allows you to increase the available space for a bathhouse (place firewood, shelves for auxiliary parts, washing equipment, barrels of water under the canopy).
Bathhouse project on a light frame
For the frame, the beams can even be made from collected firewood. The main requirement is that the material does not have knots or defects; in addition, it should be treated with an antiseptic. The first step will be to make beams for the frame, which need to be processed and dried. The building will stand on a pile-rubble foundation, and for its construction it is necessary to level the soil surface with a drill and hammer in thick pine stakes.
The top is backfilled with stone and concrete. At the next stage, the pillars are filled to the top. Now you can start assembling the frame. A hole should be prepared for draining by placing a barrel with crushed stone and broken bricks inside. There is a ladder leading out there. This option cannot be called insulated, so it will be summer. For winter, thermal insulation or heating cable should be laid.
The floor in the bathhouse must be insulated, as well as the ceiling. A film is laid over the insulation. Finnish sauna paper should be placed on the ceiling and walls. The next step is to install the stove. You need to use a model with a register, since you will need to heat the water for washing, so as not to purchase a boiler.
Buildings on stilts
A model that is quite difficult to implement is bathhouses on stilts. The use of piles instead of the usual rigid foundation is more reliable and practical for the owner. Technical and fire safety rules are fully complied with, and the building is given a beautiful design.
However, for such a design it is necessary to follow a number of rules:
- Optimal calculation of the weight of the entire bath and stove, especially taking into account the permissible load.
- During construction, special attention should be paid to the type of supports and their maximum strengthening.
A separate issue of construction is the installation of the furnace with its optimal operation in the future.
Detailed description of the construction of a rustic bathhouse made of timber
If you are building a Russian bathhouse, then you can choose one of the types of foundation that were described above. Molten bitumen should be applied to the surface of the base, on which a strip of roofing felt should be laid. After hardening, this procedure must be repeated.
To ensure additional insulation of the wood, before laying the first crown, one of the sides of the beams should be treated with impregnation from waste machine oil or an antiseptic. The slats, the thickness of which is 15 mm, are laid on the prepared foundation. The distance between them will vary from 25 to 30 cm. The first layer of beams is laid on top of them.
The Russian bath requires the use of slats to ensure that the timber does not come into contact with the foundation. This will additionally protect it from rotting. The free space between the embedded crown and the base should be filled with polyurethane foam. After laying the first crown, make sure that it forms a horizontal surface. Only now can you begin to fasten the beams and fill the space between the crown and the base.
A rustic wood-fired bathhouse does not provide for fastening the first crown. This is also good for when there is a need to replace the lower crown. A layer of insulation is laid on top, which can be:
- jute;
- moss;
- tow.
If you use one of the last two options, then the insulation is laid out with an overlap around the edges. These protruding edges will later be used for caulking. Once you have completed laying the second crown, it should be secured. For this, metal pins or wooden dowels are used. The two upper crowns of the beams are also not fixed. This is due to the fact that the log house will shrink, only then should you begin laying the ceiling beams. To do this, the two upper crowns are removed.
Model with gazebo and barbecue
An excellent solution for a summer cottage is the construction of a bathhouse with a built-in gazebo and barbecue. This structure will allow you to take a steam bath and barbecue on any weekend or holiday.
For work, a project is being prepared with two designs: a traditional bathhouse and a closed gazebo (an open version can also be used, at the discretion of the owner).
Bathhouse with attic
Some of the most difficult projects to do independently are arranging a bathhouse with an additional room, for example, an attic.
The development of the project should be entrusted only to a specialist of the appropriate profile or use a ready-made project for work. Particular attention is paid to pouring the foundation, strengthening the walls and ceilings.
Today there are quite a lot of options for building a bathhouse. A steam room and dressing room can be built into a residential building, but for this you will need to carefully prepare a project plan for subsequent work.
There are full-fledged bathhouses with two floors, with a swimming pool, and a games room. The practical implementation of a particular project depends entirely on the capabilities of the master, his financial investments and the purpose of the future bathhouse.