In the last century, a shingle roof was the most popular and widespread type of roofing due to the lack of more practical and reliable waterproofing materials than wood. More than 100 years later, wood flooring has not lost its relevance and is still used by people who value, first of all, the environmental friendliness and safety of the material. The technology for making a shingle roof is the heritage of ancient Russian architects, which was preserved for a long time and passed on from mouth to mouth by craftsmen, so that now we can make a light, strong and durable covering for our home with our own hands.
Methods for making shingles
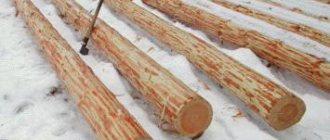
Shingles are plates made of aspen, cedar or oak, used for installing roofing and cladding facades. Do-it-yourself roofing shingles can be made from inexpensive coniferous trees, such as spruce and pine. The resin found in trees prevents the growth of bacteria and fungi because it is a good antiseptic. Also, plates made from softwood can withstand different temperatures.
Choose wood with straight trunks without knots or cracks. The diameter of the trunk may not be large, the main thing is that after cutting the length of the logs is 40-45 cm. The core of the tree must be cut out, since it is susceptible to cracking. To make the roof last longer, the bark, which is susceptible to rapid rotting, is also removed from the logs.
Then the logs are manually chopped into wedge-shaped or rectangular plates with a thickness of 3 to 8 mm and a width of 8-18 cm.
Shingles are also produced mechanically. The log is sawn into logs about 80 cm long, from which timber is made the same width as shingles, and cut into plates. It is convenient to cover large roofs with such shingles; for smaller ones, they are sawed.
Splitting timber into plates
The disadvantage of sawn shingles is their shorter service life. The fact is that wood, when cut, does not retain its fibrous structure, as happens with the split method, where the wood splits naturally. Thus, the cut affects the structure of its integrity.
To extend the life of shingles, as well as preserve its original appearance, special impregnations for wood are used.
Artificial shingles for roofing
In order to make a roof that matches the tone and color of a roofing covering made of natural shingles, it is not necessary to buy a machine or expensive material made of cedar or oak. Already today, signs and shingles pressed from a mixture of polyvinyl chloride, polypropylene and wood flour are increasingly used instead of natural wood.
Essentially, this is the same decking board, but designed in the form of a shingle board. The color and texture of the roofing material can be anything, from freshly cut cedar to old bog oak. The material does not require maintenance, is not afraid of sunlight, frost and does not absorb moisture at all, which means there are no problems with condensation and rainwater.
The only serious drawback of artificial shingles is its flammability. Despite the fact that American roofing manufacturers assure that the material is not afraid of heat and does not support combustion, in practice a slightly different picture emerges. When an attic or roof rafter catches fire in a fire, synthetic PVC wood releases huge amounts of chlorinated ethylene, an extremely dangerous and poisonous gas.
That is why polyvinyl chloride in its pure form is not used for roofing work; most often the polymer is used as protective coatings of small thickness.
Shingle roofing
A more complex type of wooden roofing is shingles - plates 40-70 cm long, produced by chipping or sawing.
It is made mainly from coniferous trees, although it can be oak or aspen. The cut of the plates can be trapezoidal, rectangular or dovetail shaped. In the latter version, the plates, in addition to being secured to the sheathing, are connected to each other with special grooves and tenons.
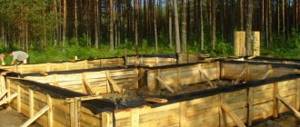
The sheathing should be of good quality, but not heavy, with steps that allow each plate to be attached to the beam. The cross-section of the timber is 5 by 5 centimeters.
Shingles are usually laid in three layers, but for utility rooms they can be laid in two layers. The roof is covered from bottom to top. The top row of plates is laid so as to cover the joints and nails of the bottom row.
The shingle is nailed to the sheathing with one nail, penetrating 20-25mm. Copper or galvanized nails are used depending on the type of wood.
At home, shingles are made by cutting a log with a diameter of 30-40 cm into several pieces of 40 cm each. The pieces are then cut with an ax on a block 8-10 cm thick. The blanks are clamped in a vice and, using a mallet and blade, are split into plates of 0. 8-1 cm.
Proper care of a wooden roof is the key to its long-term use
Like any structure, roofing shingles need proper maintenance, which even a novice master can handle:
- As the layer of snow accumulates, it is swept away with a broom, starting from the top - from the ridge element, ending with the edge of the slope.
- The lower rows of shingles are subject to displacement and require timely identification and repair.
- Fallen leaves in the fall are washed away by precipitation or fly off on their own, but you should not neglect cleaning the roof from branches and remaining leaves.
- Moss can grow on a wooden roof, so it is important to detect it in time and remove it by weeding or cutting it off with a spatula.
- Prolonged use of shingles can lead to clogging of drains with accumulated resin. The problem can be easily fixed by cleaning them inside.
Installation features
Placing shingles on sheathing
The first row of shingles is placed so that the shutter is located 4 cm from the sheathing on the leeward side. If you install the first row differently, the eaves will begin to dry out prematurely and turn black from environmental influences.
The bars for the sheathing are hewn into two edges. The sheathing is installed from the eaves overhang to the ridge. A board is attached along the overhang, after the sheathing strip. Each plank is fixed at the intersection with the rafter beam.
Laying diagram with guide
Roofing shingles are laid using boards, one of which serves as a guide for laying the base material, and the purpose of the others is to hold the guide.
There must be at least two auxiliary boards. A guide moves along them during the process of laying shingles.
In places where roofs slope down, it is recommended that instead of bars, the shingles be fastened to a board having a width of 350 mm for installing a three-layer covering, 400 mm for laying a four-layer covering.
For the outer row, a board with a width of 100-250 mm is used.
Boards for roofing are treated with oil paint in 2 layers and covered with hot bitumen. Thanks to the treatment, the board will not absorb water if it flows through the shingles.
In places where the roof slopes, the roof covering wears out faster, so the coating layer on the slopes increases by one time, compared to the thickness of the main coating. For example, when laying shingles on the roof surface in three layers, four must be laid at the descent site.
Laying the boards on the slope is carried out so that when arranging a three-layer covering, the shingles are located at the same level in relation to the sheathing strip, which is laid above the boards. The second row of shingles is attached to this plan. This promotes tight abutment of the rows of shingles to the previously laid layers.
It is highly undesirable to use valleys on a natural roof. They are longer than the slopes, so when installing them it is necessary to lay auxiliary sheathing strips every two rows of shingles.
Row laying scheme
To make the roof waterproof, the ridge and eaves of the roof are laid with shortened plates, and full-length shingles are used for the main covering. In the first row at the eaves, the shingles are laid in the direction of the pile on the surface downwards, in the remaining rows the fleecy side is directed upwards.
Shingled roofing requires maintenance.
It is as follows:
- snow from the roof is removed with a broom from the ridge of the roof to the overhang;
- The coating is checked for defects.
Working with shingles is quite easy, so it is not surprising that they began to use it not only on roofs, but also as a finishing material for facades and interiors.
How to determine the required number of layers
Wood is an environmentally friendly material, but, unfortunately, it is still somewhat moisture permeable. The shingles themselves have little thickness. Therefore, to more reliably protect the interior of the house, shingles are laid on the roof in several layers. The number of the latter is determined by the angle of inclination of the roof slopes:
- up to 45 degrees - in 3-5 layers;
- more than 45 degrees - in 2-3 layers.
It is not recommended to cover roofs with slope angles less than 14 degrees.
DIY shingle machine
Today, buying a machine for the production of shingles is not a problem, the problem is the price, which is very high, for such woodworking equipment.
For this reason, many home craftsmen who do not need mass production of shingles, but only need a small amount of it, for example, for plastering a wooden wall, prefer a homemade shingle machine with their own hands.
A do-it-yourself shingle machine is a metal box, inside of which discs for cutting wood are located in one row at a certain distance from each other. The material for sawing is fed into the box from above, and the output from below is shingles.
How to make chipped shingles at home
Chopped shingles, in contrast to sawn shingles on a homemade machine, differ significantly in their manufacturing technology. In order to chop shingles at home, you will need a plow or a piece of spring from an old car.
Moreover, before making shingles at home, the wood is first soaked. You can use pine, spruce, aspen or cedar for this. The main requirement is that the material be free of knots. Otherwise, it will not be possible to split it exactly to the required thickness.
The dimensions of roofing shingles, as a rule, do not exceed 0.5 cm in thickness and 5 cm in width. In this case, the length of the roofing shingles can be different. The thickness of the plaster shingles should not exceed 7 mm, and its length varies on average about 1 meter.
For making shingles with your own hands, the most commonly used power tool is a circular saw. And as the main raw material for sawn shingles, “forty” edged boards or boards 25 millimeters thick are mainly used.
In this case, the material to be cut is securely fixed to the table surface using clamps. As necessary, the clamps are moved to the side, after which a new batch of shingles is cut with a circular saw.
Wooden roofing attracts many people with its beauty, durability and presentability. But at the same time, it is quite expensive, so special, increased requirements are imposed on the construction of a wooden roof. Centuries of experience in using wood helps to make the best use of its unique characteristics. A wooden roof today is considered elite. The raw material for thin wooden plates is wood, for example, pine, spruce or larch. Roof shingles have various manufacturing options.
How to make shingles yourself
The requirements for raw materials have already been described, do not neglect them. Otherwise, you will waste time, and the whole chock will be scrapped. Before starting work, check the knife, it must be perfectly sharp and in the correct position.
Important. The machine is homemade, you need to work on it very carefully and not forget about safety rules.
How to make shingles
The shingles need to be planed from the selected material; we have already mentioned what criteria to choose it by.
Practical advice. The selection process must be approached creatively; the size of the shingles depends on the size of the workpieces. You shouldn’t try to make everything exactly the same, but you shouldn’t allow a large variation in width either. The length should be as uniform as possible within 35–45 cm.
Step 1. Split a large block of wood in half, and then into several cylinder sectors. In this case, you need to ensure that the length of the arc of the cylinder sector is 5–10 cm greater than the desired width of the shingles. It is worth remembering what a cylinder sector is. This is a part of a cylinder (in our case, a log), limited by two radii and a part of a circle between them.
Preparing a block
Step 2. Check the length of the sector, cut a little if necessary. The workpiece must fit freely into the supports of the working movable table.
The workpiece must fit freely into the supports
Step 3: Clean up your work area. There should be no production waste, pieces of wood, cuttings, etc. lying under your feet. Always remember safety precautions.
Step 4. Turn on the machine and place the workpiece on the work table in one of the corners of the sector. Remove a section of wood until a flat section is approximately 10cm long.
A piece of wood is removed from the workpiece
Step 5. Turn the workpiece over to the other side and remove the same section of the workpiece. Turn it with the other one towards the knife and remove the entire arc of the sector, at the same time the tree bark is removed. After this, the cross-section of the workpiece should look like a sector with parallel side edges, the distance between them equal to the width of the shingles. Unfortunately, it is impossible to describe all practical situations. The more experience you have, the faster the work will go, the less waste there will be. Theoretical knowledge is nothing without practice; you have to try to do everything yourself . There is no need to believe those who claim that making shingles is easy and simple, this is not so. You must have sufficient experience working with wood to make the right decisions in each specific case. During preparation of the segment, it must be constantly kept in one position.
The same steps are repeated for the other side of the workpiece.
Important. Safety regulations recommend wearing mittens when working with wood; they protect against splinters. That's right, mittens protect your hands from splinters. But safety precautions were developed for industrial equipment and are not written separately for each homemade machine. Industrial woodworking machines have a protected area of the cutting tools, which cannot be reached by gloved hands. There is no such protection on a homemade machine. If you work on it with gloves on, then there is a big risk that they can be grabbed by a knife. It moves relatively slowly and will not cut off a piece of a thick mitten, but will pull the entire hand under the workpiece. The consequences will be very unpleasant. It is better to work without mittens and risk splinters than to wear them and suffer a serious injury to your entire hand.
Step 6. Remove waste from under the machine and begin planing the shingles.
Practical advice. When aligning the arc, pay attention to how the knife cuts the wood - along or across the grain. You only need to cut lengthwise; in the opposite direction they rise, the surface is rough, and explosions are possible. If the direction is incorrect, then while planing the shingles, turn the workpiece to the other side.
Hold the sector by the upper corner, this is the core of the tree, shingles are not made from it. There are recommendations to chop the wood at an angle of 30° or 40°. It's all nonsense. You need to chop in such a way as to increase the amount of high-quality shingles and reduce waste. The decision is made by the master depending on the diameter of the log, its condition and the required width of the shingles. There are no general universal recommendations, which is why practical experience is important, and not just theoretical knowledge. Theory can be explained in a few minutes, but experience is gained through years of work.
Collection of planed shingles
Step 7. Collect the planed shingles in a stack and sort by width. The fact is that the workpiece was planed by eye, the less experience, the greater the dispersion in size, it is advisable to even it out a little. Select 8-10 shingles of approximately the same width, align the bends, lay them on a level table and install all the lower side edges in the same plane. The top ones will be at different heights.
The shingles are sorted by width
Step 8. Turn on the machine and align the shingles to the width. This should be done several times for each batch of shingles. They need to be selected in such a way as to reduce the amount of waste; you should not put shingles with a large difference in height into one pile.
Stack width is measured
Aligning the shingles in width
The next stack is aligned
This operation may not be necessary; the width of the shingles can vary widely. But some developers want to have a more or less symmetrical roof, and for this they need shingles of the same size.
Laying shingles on the roof
When arranging wooden roofs, the slope should not exceed 15 degrees. The sheathing is made continuous or in increments equal to a third of the length of the shingles. The sheathing beams must have a cross-section of 50*50 mm or 60*60 mm.
But according to some recommendations, continuous sheathing is regarded as an unnecessary element. This opinion is explained by the fact that the ventilation gap in this case will be insufficient, and this can cause the material to quickly deteriorate. A similar situation exists for arranging waterproofing. Some sources claim that it is simply necessary, others simply deny it. If you follow the canonical rules for laying shingles, then waterproofing is not applied at all. Such roofs can easily last 20, 30, or even 50 years.
Previously, larch shingles were fastened using the method of installing grooves and ridges. Now it is fixed with nails, which must first be boiled in drying oil.
The shingles are installed in several layers. On the eaves, it is additionally necessary to nail boards up to 40 cm wide and increase the number of layers of shingles by one. This is due to the greater exposure of overhangs to moisture.
The total number of layers of material can vary from 2 to 5, and it depends on the functional purpose of the building:
- for non-residential premises, 2 layers of material are sufficient;
- for residential it is necessary to lay 3-4 layers. They allow you to provide reliable protection for your home;
- if the roof has a slope of more than 45 degrees, then the shingles are laid in 2 layers.
The installation of wooden shingles begins at the eaves overhang. As already mentioned, for this area use one more layer. The top row should completely overlap the bottom row, while protruding a few centimeters beyond it. The third row is placed in a similar way - larger than the previous one, with a protrusion of several centimeters. And only the last fourth row does not reach the end of the previous one by a third of the length of the shingles (if the roof is laid using the 3-layer method). This installation scheme allows you to completely protect the eaves overhang from the action of moisture that flows from the roof slopes.
The shingle roofing technology itself is very reminiscent of a fir cone. Most likely, the builders borrowed the arrangement of its scales for roofing work, thanks to this they were able to develop a reliable roof structure that does not leak and protects well from cold and wind.
Lathing requirements
Finished wooden roofing is a multi-layer waterproofing coating consisting of individual elements that overlap each other. Although shingle flooring is very lightweight, its installation requires a strong and secure base. There are two types of lathing for decking a wooden roof:
- Solid. Continuous sheathing consists of individual slats or square-section wooden blocks laid without gaps.
- Sparse. Sparse lathing is also made from slats, boards or wooden blocks, however, they are fixed in increments of 5-10 cm, which makes the structure lighter and saves materials.
Experienced craftsmen argue that it is necessary to lay vapor-permeable waterproofing on top of the rafters to protect the roof frame from water penetration, but at the same time not to make it impossible for the structure to “breathe.”
Sheathing for shingle roofing
How to cover a roof
The slope of the shingled roof cannot be less than 15⁰. The lathing underneath is laid either solid or with a maximum distance between the slats of 100 mm. Considering the low weight of wooden plates, poles ø 60–70 or bars with a square cross-section with a side of 50 mm are more often used for lathing. Roofing material is laid, as a rule, in 2–5 layers, with each of the plates overlapped by the next one:
- for two layers – half; three - two thirds; four - three-quarters, five - four-fifths.
The issue of waterproofing such a roof raises a lot of controversy. Opinions, by the way, are mutually exclusive:
- according to one, a layer of waterproofing is spread on the sheathing, according to the other, such insulation is not required at all.
Old masters in Rus' preferred not to use continuous lathing and insulation, since for the normal functioning of a natural building material it is necessary for it to “breathe”. Under these conditions, the roof not only does not allow this to be done, but over time it begins to rot.
The weakest point is the slopes of the roof, so in these areas additional boards are laid, the width of which is about 350–400 mm. Note also that here the number of layers of material increases by one.
To fix the boards, special nails 40–60 mm long are used. They are thinner than regular ones, and when used, the wooden plates do not split. Before work, they must be boiled in drying oil. Fasteners are made in the upper corners of the boards, departing from the edge by at least 2 cm.
When using the technology of making shingles by splitting, the plate is formed in such a way that when slightly bent, the fibers - “pins” - rise. When laying the first row of planks from the bottom, the “pins” should look up; as for the rest, in this case the “pins” should look down. If you do not follow these recommendations, once moisture gets into the fibers of the boards, it begins to oxidize them, and eventually the entire coating may collapse.
The most difficult is considered to be laying in the valley. In these areas it is necessary to lay additional layers of material with the installation of auxiliary sheathing strips. The valley and convex corners are covered in a fan pattern.
Installation of shingles begins from the eaves overhang and rises layer by layer to the ridge. The initial layer must be laid, extending 3-5 cm beyond the sheathing. Otherwise, the roof will dry out prematurely, and the roof will turn black due to precipitation.
In the 1930s, shingles were the most common roofing material. As time passed and slate came into use, its sheets began to be attached directly to the old coating. Therefore, when dismantling old roofs, the question often arises of how to remove the slats from the roof. They are removed using small installation tools.
Installation
Only pitched roofs can be covered with shingles; flat roofs are completely unsuitable for this material. Snow and rain will destroy them very quickly. The tilt angle should be about 15°. It will ensure moisture drainage and withstand wind loads. The maximum slope slope allowed for wooden tiles is no more than 45° .
First, a sheathing of beams or thin poles 5–6 cm thick is nailed. Its pitch can be up to 10 cm. A solid sheet can be used, but gaps of about 5 mm must be left between the slats to ensure air circulation.
A layer of waterproofing is laid on the roof frame. Ruberoid is usually used. In residential premises, you can additionally insulate the future roof using light porous foam, covering it with film on top.
The planks are secured in layers, overlapping . With a two-layer coating, the overlap is ½ the length of the dies, with a larger number of layers it decreases proportionally: with three layers it is ⅓ of the length, with four – ¼. The dies are laid so that the fibers of the material are directed downwards.
For outbuildings, two layers of shingles are sufficient, for residential premises - at least three. The thickest is considered to be a five-layer roof.
The shingles on the roof are laid from the bottom up, from the eaves overhang towards the ridge. This is usually done from left to right. It is necessary to ensure that the row lies evenly, without distortions. There should be no gaps or cracks between the rows. To fasten the boards, use special shingled nails treated with drying oil. After the covering has been laid, the overhang is additionally covered with boards around the entire perimeter and another row of dies is laid. The ridge is also fixed with boards or special wooden tiles.
Additionally, the wooden roof is covered with several layers of paint. It is updated from time to time. If you want to preserve the natural pattern and color of the material, you can use water-repellent transparent varnishes.
With proper installation and timely renewal, a wooden roof can last about 30–40 years.
How to make shingles production technology
Shingles are made both manually and industrially from lumps of wood. The core poses the greatest risk of cracking, so this is removed first. Each piece of log must be split into parts - 2 or 4, and, accordingly, the core must be cut out, and all that remains - into thin planks. They are prepared, one might say, all year round, with the exception of the winter period.
The industrial production of plates occurs somewhat differently: the logs must first be sawn into logs of double length, after which, in accordance with the width of the product, a beam is prepared, which is cut into plates approximately 800 mm long. This makes it possible to cover roofs with a large area with similar material. Obviously, for standard roofs, the plates are first sawn into two equal parts.
Sawn plates are less durable compared to chipped ones. This is due to the fact that when cut, the fibers are not preserved, since their splitting does not occur naturally. Obviously, this violates the integrity of the structure. That is why many who prefer to make shingles themselves often use splitting technologies that have come to us from time immemorial.
The log pieces are peeled using a special plow. This is a knife equipped with two handles, although preparing roofing material in this way is too time-consuming and labor-intensive.
The industrial shingle machine was invented in 1939, although this is not the first invention of its kind. The simplest and oldest version of it was called “mahalo”.
What is a mahalo ↑
- They take a log with a length of three to four meters and a diameter of 120–160 mm. Stepping back 200 mm from the end, drill a hole ø 3 mm into which a metal pin is inserted. The length of the rod should be sufficient to secure the log in the wooden block. He must also move calmly. Approximately one meter from the end with the hole for the pivot, a 60 cm staple knife with a blade sharpened on one side is attached along the length of the log.
- The angle of attachment should allow plates of the required thickness to be removed when the master and assistant pull the log by the free end. It is necessary that the “waving” during work does not pull the block out of place, the dimensions of which allow raw materials to be placed on it under wooden plates.
- The second end is equipped with a 400 mm wooden handle. It helps move the log if necessary. You can attach a rope to the handle, then the shoulder will increase, which will make the work much easier. After chopping, the finished plates are placed in a “block bag”.
How is shingles made and how much does it cost?
Nowadays, shingles are usually purchased ready-made. At enterprises, this material is produced using special machines.
Laying shingles on a roof these days is considered quite prestigious. Accordingly, such material, in comparison with many modern ones, is quite expensive. In order to buy a square meter of such cladding, the owner of the house will have to spend about 600-700 rubles. In most cases, shingles are laid on the roof in 3-5 layers. That is, in fact, a square meter of such cladding will cost 1800-3500 rubles.
Laying technology
Shingled roofing differs from other coverings not only in its properties, but also in its installation technology, which is determined by the nature of the material. The shingles are placed on the roof in the same way as the scales of a fir cone are laid.
When exposed to precipitation and high humidity, wooden plates swell slightly and increase in size. Thanks to this, the material closes on the roof.
The roof looks like a bump. During the drying process, the plates, bending, are raised by a dome, which ensures the removal of moisture from under the roof of the house.
This natural coating exhibits its unique properties in sunny weather. If we compare materials such as metal and tiles, then a wooden surface does not transfer heat. This keeps the house cool during the hot season.
The outer surface of this coating is characterized by a relief structure.
This circumstance protects the under-roof space from noise resulting from:
- hail;
- rain;
- gusty wind.
Shingled roof care
There is a widespread belief among amateur builders that roofing made of larch or cedar does not require special care, since due to the large amount of resinous substances the material is not afraid of water and sun.
In fact, a shingle roof will require periodic cleaning and treatment. The roof needs to be cleaned of debris and large amounts of seeds and grass. Birds like to hide supplies under the roof of a shingle, and in the spring or summer, shoots of green grass sometimes appear on the roof.
In addition, the roofing covering must be treated annually with antipyrene compounds, and if pine or spruce was used, then with antiseptic and antifungal solutions.
A new roof is usually always light-colored, almost white; this is a good reason to cover the shingles with an impregnation with a toner similar to old wood, which will protect the wood from ultraviolet radiation and give the building a more respectable look.
Methods for producing shingles
Wooden braka plates are produced by splitting small logs. This makes it possible to obtain boards with a thickness of only 3-8 mm and a length of 35 to 50 cm. The width of such material depends on the initial diameter of the logs.
The wood is selected of the highest quality, that is, without flaws, knots or rot, the trunks must be straight. Before starting the production of shingles, the bark must be removed from the wood and the core cut out (this element is most prone to cracking). Blocks up to 50 cm long are cut from halves or quarters of the trunk. It is from these that shingles are produced.
Today, this manual method of producing material is used quite rarely, since the process is highly labor-intensive. In industrial quantities, shingles are made by sawing trunks on special machines.
Manufacturing and installation of aspen shingles, details in the video:
Features of material selection
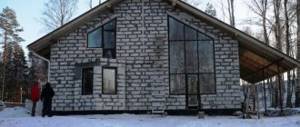
Effective attic protection and long service life are, of course, what distinguishes a roof covered with shingles. In the photos presented on the page you can see how reliable such a roof looks.
However, in order for a roof of this type to be durable, you, of course, need to choose a good material. Only the highest quality wood should be used for shingles. For example, it is not allowed to make planks from the middle of logs. Also, wood with knots, signs of rot or cracks is not suitable for shingles.
In ancient times, shingles were made mainly from oak or larch. Today this material is also used quite often. The popularity of shingles made from such wood is explained by its excellent performance qualities and very long service life. However, oak and larch are, unfortunately, quite expensive these days. Therefore, in most cases, country house owners still use cheaper pine to make shingles. Shingles made from this material are also quite reliable and durable. But its service life is shorter than that of oak or larch.
In addition, aspen shingles are very popular among owners of country houses. This material, like oak, is also durable.
Modern materials imitating shingles
Some manufacturers produce analogues of natural shingles. For example, siding shingles and copper roofing shingles.
Copper shingles have high performance characteristics. They are different in size and shape. They are attached thanks to specially made “ears”. Copper shingles are made almost by hand, so their cost is approximately the same compared to wooden shingles.
PVC siding looks like wooden shingles in color and shape. Siding panels can create the illusion of natural wood. They add resins and mineral additives that provide resistance to impact. Basement siding shingles are also produced, intended for cladding the bottom of the walls of a house.
Wall cladding in shingle style
If the shingles were manufactured in compliance with all standards and were installed correctly, then they will not only last a long time, but will also become an original decoration of the house.
Things to know
When installing a shingle roof, among other things, the following rules should be observed:
- the first and last rows on the slope should be laid from planks that are shorter than the main material;
- It is not recommended to cover edges along gables and cornices with tin when using shingles for cladding.
On the ridge of a roof finished with shingles, shingles are often laid. It is a log covering the entire length of the roof with a longitudinal groove under which the ends of the planks of the top row are inserted.
The advantage of natural coating
Wooden plates are breathable, so the roof is ventilated naturally. If you create a roof according to the shingle-roof scheme - an additional ventilated gap, then the covering itself and the supporting structures will last much longer.
Basically, shingles as a roofing covering have the following advantages:
- ensures long-term roof tightness;
- the coating is completely in harmony with the environment;
- lightness of the material (per 1 sq.m. load ranges from 14 to 18 kg);
- without a doubt, this is an environmentally friendly coating;
- During installation work, virtually waste-free production is observed;
- the coating does not accumulate static voltage;
- no condensation forms under the wooden plates;
- resistance to sudden temperature changes, precipitation and wind loads;
- Possibility of use in various climatic conditions, at temperatures from +40 to -70 degrees.
The listed advantages of shingles allow you to create durable and comfortable living in your home using this material.
Benefits of wood shingles
Installation of wooden shingles is based on careful fastening of each individual component. If you need a budget wooden roof, you will also need to make your own material . But such labor costs will be fully justified, since nothing will disturb the owners of this roof: neither the sound of pouring rain, nor cats running on the roof. In addition, a structure unique in its characteristics will be created.
Any types of roofing coverings, which are called shingles, function on the principle of a fir cone. When the elements get wet, they swell and close together, thereby creating a barrier to atmospheric moisture.
As soon as dry weather sets in, the tree shrinks, allowing air to circulate freely in the resulting space. It turns out that ventilation and waterproofing occur independently due to natural processes. For this reason, wooden structures often do not require the installation of water- and vapor-tight layers if the angle of inclination of the slopes is not lower than the limit specified in modern standards.
Features of shingles
The advantages of wooden shingles compared to artificial roofing composites become obvious in difficult climatic zones with temperature differences from +40 to -60 degrees Celsius, where there is a large amount of precipitation in the form of snow and rain, and strong winds blow.
Air passes freely between the parts of the roofing deck, ventilation is ensured naturally. In addition, shingles can be called the most environmentally friendly roofing material. Its additional advantages are:
- Ease. The load per square meter of roof does not exceed 20 kg.
- Waste-free installation.
- Maintaining impermeability and tightness for a long time.
The shingle roof blends harmoniously into the surrounding landscape. Living in a house with a wooden roof is convenient and comfortable, since the material does not accumulate moisture or residual static electricity. Natural wooden flooring provides excellent sound insulation from falling rain and hail. In hot weather, shingles help keep the room cool and protect from hot sun rays.
The durability of shingles has been tested by time - roofs retain their aesthetic appearance for many decades. Since natural wood has become an expensive material in the modern world, roofing made from it has acquired elite status. It is not easy to lay shingles correctly, so specialists are usually invited to do this work.
How do you get shingles?
Natural roofing shingles are made in the form of plates made of high-quality wood. Coniferous wood needs to be healthy, solid, without knots or damage. Even small-diameter logs up to fifty centimeters long are sawn off from the trunks.
There should be no cracks in the parts. Craftsmen isolate and leave only the core, removing the bark. This ensures that the roof's suitability term is extended. The internal resin-impregnated wood retains antiseptic properties and is protected from rotting over a long period of time.
If the shingle elements are made by hand, the strips of wood are thin, up to 7 mm. The width of the wedge or rectangle does not exceed 10-18 cm. The material comes in three types: chopped, sawn and in the form of a mosaic carpet or “swallow”. After splitting, the wood fibers straighten a little, and “splits” appear.
If the roof area is large, mechanical cutting of logs is often used. Long, up to 85 cm, small-diameter logs are placed on boards, then plates are cut out of them. When sawing a log, the structure of the fibers is disrupted, in contrast to the split method of producing shingles. This affects the durability of the natural covering, so the manual method of chopping wood into complex shingles, or shingles, is considered the best.
Factory quick-production shingles are available in all types. You can order it in an unusual geometric shape and decorate the product with artistic carvings. Manufacturers carry out installation with a guarantee. For reliability and protection from moisture, as well as to preserve the original appearance, roof shingles are impregnated with reinforcing compounds.
Analogues of wooden shingles
There are analogues of natural shingles. The records are made, as a rule, from polyvinyl chloride and copper. Copper shingles are no different in cost from coniferous shingles, since the metal elements are fastened almost by hand. The shape and size are selected individually; such parts serve very reliably.
PVC siding externally replicates the shingle covering. It is made with resin impregnation; a number of mineral substances are added to the panels to achieve an anti-shock effect. You can cover not only the roof with a stable coating of siding, but also the basement of the walls.
Roof installation
In non-residential premises, shingles can be laid in two layers; for residential premises, three or more layers are needed. The material is laid overlapping, at an angle of up to 10-15 degrees, in a horizontal or vertical direction. Previously, boards up to 45 cm wide are reinforced on the slopes; you can put roofing felt to protect them from moisture.
Installation is carried out in increments of 10 cm, starting from the bottom; the plates are fixed to the sheathing with self-tapping screws boiled in drying oil up to 7 cm long. For arranging the sheathing, bars and poles with dimensions of approximately 5x5 and 6x7 cm are suitable.
The old manual method excludes waterproofing, since the wood must breathe.
The roof resembles a fir cone. The parts absorb moisture and swell if it rains or snows. When the temperature rises, under the sun, the wood dries, allowing air to pass through.
On roofs of complex shapes with curved parts, the technology of using both roofing and shingles has proven itself well. The coating is made in several layers. The roof acquires an increased density and relief configuration, due to which it repels and does not absorb moisture from precipitation of any intensity. Creating a gap for ventilation further increases the service life of such a roof in a private building.
Calculation of the amount of material required for laying the roof
Before you begin roofing work, you should correctly calculate the amount of material that will be required. After all, you don’t really want to face a shortage of shingles during the work process.
Experts recommend purchasing roofing material with a reserve of approximately 5%. Sometimes it happens that a nail is driven in incorrectly and the element is replaced. To perform calculations of the finished roofing material, you can use special tables where many parameters are taken into account. Not only the size of the shingles and the roof itself, but also the angle of inclination.
.And for those who plan to make shingles themselves, you should first first calculate the volume of material that is needed to complete the work on one square meter. A log 4 meters long can be divided into a maximum of 10 logs. From each of them you can make 3-4 elements, the width of which will be about 15 cm. And the calculation of the number of elements for completing the roof should be made taking into account the slope of the roof, layers of roofing and the area of work.