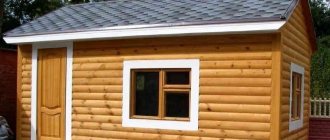
What owner of a country plot has not dreamed of building his own bathhouse, where you can have fun with family and friends, relax and gain strength after hard working days.
Layout of a bathhouse with an attic 5x5 meters
The layout of the bathhouse for the average citizen of our country, who does not own a huge piece of land, is standard: a dressing room and a steam room. However, after some time, opportunities and funds may appear to modernize the original bathhouse design. Naturally, it is very impractical to build a new bathhouse and demolish the old one. What to do? The wisest option is to build an attic.
A bathhouse with an attic is a very functional solution that allows you to place both the bathhouse itself and auxiliary rooms in a small area. The construction of such a bathhouse will be less expensive than the construction of a two-story steam room, and such a structure will look no worse. Most often in the attic there is a recreation room in which you can put billiards, karaoke and other things.
Project of a bathhouse with an attic built from timber
Advantages
- The layout of the steam room with a built-on attic will allow you to get additional usable space. You can get twice as much space in the same area.
- The construction of an attic is more profitable than the construction of a full second floor. The savings are about thirty percent. If you build on an attic without deviating from certain building rules, you can end up with an additional floor, which will hardly differ from a full-fledged residential floor.
- The space above the bathhouse is a very versatile space; you can arrange anything here. The attic will perfectly accommodate a recreation room, a billiard room, a home spa, and even a bedroom for use in the summer. Also, if the owner does not plan to use the attic in any way, something like a storage room or warehouse can be placed on it.
Layout of a bathhouse with an attic measuring 4x4 meters - Heat from the ground floor will help minimize heating costs.
What will we use to heat it? Let’s think over the heating features
Without a stove, even a bathhouse with an attic room loses its charm. Nowadays, electric and gas models are popular and very convenient to use. Installing them is easy to do on your own and heating them is not difficult. It's another matter if a real stove is preferred. It would be right to entrust its masonry to professionals. After all, the life and health of you and your loved ones depends on it.
Follow all recommendations, take into account the nuances and strive for the ideal result. With the right approach, you will get an excellent residential bathhouse that will warm you for a long time and give you positive emotions.
- Author: Mikhail Malofeev
Rate this article:
- 5
- 4
- 3
- 2
- 1
(0 votes, average: 0 out of 5)
Share with your friends!
Flaws
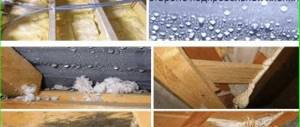
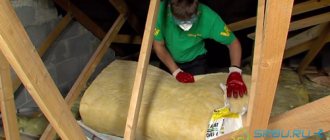
- The layout of bathhouses with a built-on attic requires special attention to be paid to hydro- and vapor barriers between floors, since the ground floor is constantly high in temperature and humidity. The microclimate in the steam room, with its heat and fumes, should not affect the attic, otherwise the second floor will “bloom” and fungus and mold will appear. Baths in which the insulation between the attic and the steam room is poorly done require repairs very soon after construction. Therefore, when carrying out the plan for building a bathhouse, you need to install only high-quality insulating materials.
- Mandatory insulation of the attic floor significantly increases the cost of construction. However, this is only necessary if the owners plan to use the superstructure in the winter. Otherwise, there is no need for insulation, because the first floor is already protected.
The project of a bathhouse with an attic and a veranda is ready - It is not difficult to guess that the installation of the roof of a bathhouse with an attic will be more labor-intensive. For such buildings the roof area will be larger than for simple baths.
- In the summer, being on the second floor under a hot steam room will not be very comfortable. Therefore, you will have to think about air conditioning.
- For such baths, additional work is necessary to ensure fire safety.
General information
Advantages
The main advantage of a two-level bathhouse is that it makes it possible to save space on the site. If, for example, home owners want a spacious bathhouse with a comfortable seating area, they will get this by allocating a minimum space for construction. In addition, the recreation area is partially or fully located in the attic of the building. Often such baths are built in order to avoid building any objects separately. For example, in the attic there may be:
- Workshop.
- Winter Garden.
- Billiard room.
- Guest House.
- Summer cuisine.
The attic above the bathhouse can be designed as a veranda with glazing, in which case it will act as a gazebo. In some cases, the upper level of a garage or bathhouse is equipped as a separate home for a family member. If you have 2 objects under one roof, you can save a lot of money on construction, communications, heating and room maintenance. Another plus is that such bathhouses made of logs or beams look much more impressive than one-story ones. The high-type roof slopes give them elegance. A beautiful bathhouse with an attic can become a beautiful centerpiece of a landscape design composition on a site.
Materials
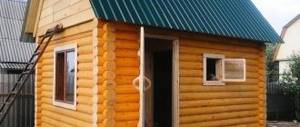
The specifics of operating a bathhouse require the use of materials with characteristics for its construction, the main one of which is environmental friendliness. Bath walls should not emit harmful substances even under conditions of high humidity and sudden temperature changes. Under such conditions they should not be deformed or destroyed. Moreover, for a bathhouse it is extremely difficult to choose the option of interior and exterior decoration. For this reason, it is better to build it from materials that need finishing. Modern wood for construction meets all conditions. It is made using advanced technologies, which makes the material ideal for embedding bath complexes. At the moment, you can quickly and inexpensively build a timber or log bathhouse from coniferous wood (larch, cedar, fir, pine) or deciduous wood (oak, birch, aspen or linden).
Log sauna
At the moment, logs are a popular material. Based on the type of processing, it is divided into several types, here are the main ones.
- Planed - this type of wood is made by processing it with an electric planer. In this case, a small layer of wood is removed, and the fiber system remains unharmed, which provides the material with high performance properties. But the shape of such a log will not be ideal, but conical - like the real shape of a tree trunk.
- Rounded - when creating this log, most of the top layer is cut off on a machine to give the log an ideal cylinder shape. Because of this, the characteristics of the material are reduced, but it becomes as convenient as possible for construction.
- Scraped - this processing involves removing a minimum layer of bark. Such a tree will retain its natural resin content, which will make it as durable as possible. But its shape is not ideal, and it is difficult to lay out walls from it without noticeable gaps between the crowns.
For a bathhouse project with an attic and a terrace, rounded material is usually chosen, which allows you to make very high-quality log houses without cracks and gaps. There is an opinion that it is better to choose wood with natural humidity for a bath, rather than dried wood. But not all masters agree with this opinion. It is still worth trusting that the purchase of logs should be done by professional builders who have experience in selecting high quality wood. The peculiarity of such a bathhouse is that it will shrink, and it is important to begin its operation a year after the completion of the construction process. After the walls are laid, the log frame needs to be sanded and caulked a couple of times.
timber
When creating timber from an ordinary log by sawing, a tree with a rectangular or square cross-section is obtained. There are also several types of timber.
- Classic (non-profiled) - a simple beam with smooth edges is cut from solid wood.
- Profiled - the edges have specialized grooves (ridges) for the most accurate fastening of the timber to each other.
- Glued laminated timber - when creating it, several thin lamellas are glued together under pressure, which is why a high-tech wood material is obtained.
- Half-beam - during manufacturing, the log is processed only on two opposite sides, which are needed for the crown connection. The other two sides will remain semicircular. Buildings made from this material have the appearance of a log house, but retain the technical parameters for a timber frame.
Such a bathhouse can be used almost immediately upon completion of construction. Shrinkage is 1-10% depending on the type of material. Glued laminated timber has a low percentage of shrinkage. Non-profiled bars will give maximum shrinkage and upon completion of the construction of the walls, caulking and finishing are needed. Other types of timber can be used without caulking.
The nuances of constructing baths with a built-on attic
If the presence of an attic in the bathhouse was planned at the stage of creating the plan and drawing of the building, this will allow the construction to be carried out more correctly. In such cases, a frame system is used. The frame consists of horizontal and vertical beams that will serve as the ceiling and walls in the future structure.
Basically, the bathhouse is used both in the warm season and in winter. Particular attention must be paid to ensuring that it is comfortable to stay in the attic in the summer. It is best to choose slate as a roofing material.
Original project of a bathhouse with an attic 4x4
The angle of inclination of the roof frame system is also important. A roof with slope angles from 30 to 60 degrees is considered optimal.
If the angle is made larger than the specified values, the usable space in the attic will be significantly reduced. If funds allow, it is best to provide a sloping roof, with a multi-layer roof structure (internal lining, vapor and waterproofing, insulation, roofing material).
It will be much more difficult to build on the attic when the bathhouse was built before. In such cases, it is necessary to decide on the location of the stairs.
If the building plan does not allow it to be located inside, you can move it outside the bathhouse, or construct a compact spiral staircase.
Typically, such baths are built from timber, but installation can be done by combining several building materials. There are bathhouses, both brick and frame type, lined with siding material.
Do-it-yourself brick bath: step-by-step instructions
As already mentioned, brick baths are reliable and durable buildings that have a long service life. But in order for the bathhouse to truly delight you for many years, it is important to choose the right material for construction.
Solid clay (red) or silicate (white) bricks are perfect for laying walls. They have a high level of heat resistance and are slightly susceptible to mechanical stress. Clay bricks are more durable, but they are more expensive. To save money, you can use hollow bricks to install partitions; they are cheaper and lighter in weight.
The bright scarlet color of the brick indicates that it has not been in the oven long enough. A violet-brown color, on the contrary, indicates that the building material was overexposed in the oven. Such violations of brick manufacturing technology lead to the material becoming fragile and unreliable. Such bricks are not suitable for building a bathhouse.
After the materials have been selected, you can begin building a brick bathhouse.
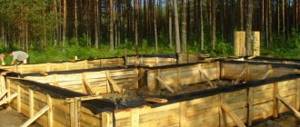
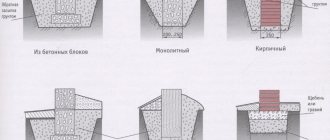
Step 1: Installing the Foundation
As already mentioned, a brick bathhouse is a heavy building that requires a high-quality foundation. You cannot save on the foundation and limit yourself to a lightweight option, since such an approach will lead to the building quickly collapsing.
For the construction of a brick bathhouse, a strip foundation is best suited. It must be buried at least 1 m, the depth depends on the type of soil.
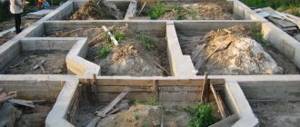
First you need to dig a pit, cover it with a 15-20 cm layer of sand, water it and compact it. The top of the sand is covered with a 10 cm layer of crushed stone, followed by sand again.
Afterwards you need to make the formwork, install the reinforcement cage, prepare the drain holes and fill it with cement mortar.
For thermal insulation, it is necessary to cover the base with two layers of roofing felt.
A more complex option would be a pile foundation. But in some cases you cannot do without it, for example, if you are going to build a bathhouse on a slope.
Step 2. Construction of walls
Wall masonry can be continuous and lightweight. In the first case, the bricks are laid in several rows (at least two), without voids. The second option involves the construction of two brick walls, between which there will be voids filled with heat-insulating material, for example, basalt wool.
With continuous masonry, the walls are more durable. But for a bathhouse, the second option is often chosen, because it provides sufficient strength, the walls put less pressure on the foundation, and building a bathhouse is cheaper because brick consumption is reduced.
As already mentioned, it is better to build external walls, as well as the basement, from solid bricks, and internal partitions from hollow bricks.
Laying walls should start from the corners. For the work you will need a mortar, which is made from sand and cement. You need to apply the mortar in a layer of 2 cm and lay the bricks in the corners in several layers.
Below are diagrams for laying corners with bricks:
Next you can move on to laying the walls. Please note that the first row must be completely laid out over the entire foundation, even if you plan to do lightweight masonry.
From the second row you can make lightweight masonry; you need to start the rows of walls with the outer bricks. When laying, the material must be wetted, especially if construction is carried out in hot weather.
Bricks must be laid strictly in rows. Broken bricks should not be used for the construction of supporting structures.
When laying walls, you need to ensure that all seams are even. They should not be too thick or thin, the recommended width is 1-1.2 cm.
Don't forget to leave door and window openings.
With a lightweight type of masonry, you need to cover the empty space with heat-insulating materials: a mixture of sawdust, light slag, fluff lime, mineral wool, etc.
You can make external insulation of the bathhouse with polystyrene foam, but in this case you will need to do external finishing.
Step 3. Roof installation
The roof for a bathhouse can be made single- or gable, depending on personal preferences and the chosen project. Most often they make a gable roof.
To install it, you need to make a mauerlat, attach a rafter system to it, cover it with lathing and roofing material.
We talked in more detail about how to make a roof in a bathhouse with your own hands in another article.
Step 4. Interior and exterior decoration
For interior decoration, lining is traditionally used - this is the best material with many advantages. The sink can be covered with ceramic tiles.
It is not necessary to do external finishing, of course, if you have not done external insulation. If you are still going to do the finishing, you can plaster the walls with cement-lime mortar, cover them with siding, etc.
Now you know how to build a brick bathhouse with your own hands. With this the main work is completed, you can move on to arranging the furniture and operating the bathhouse.
A brick bathhouse is a reliable and strong building that will serve you for many years. But in order for the bathhouse to be comfortable and practical, it is important to choose the right project. At the stage of drawing up a project, there is no need to rush; it is important to correctly draw up a drawing, indicate all the sizes and locations of partitions, doors, windows, and think through ventilation, lighting, water supply and drainage systems.
Bathhouse projects with an attic
Projects and drawings of bathhouses with a built-on room, created in our time, include the most modern and progressive technologies that make it possible to create a very functional structure and at the same time save a lot. The plan of a standard Russian bathhouse, as we are used to seeing it, consists of a dressing room and a steam room.
Project of a wooden bathhouse with an attic measuring 6 by 6 meters
However, modern solutions make it possible to achieve more from the bathhouse, combining in it both a place for water procedures and a room where you can relax and have fun. One of these solutions is the attic. There are a huge number of bathhouse projects with a built-on attic. You can choose a project suitable for a plot of any size. Let's look at the most popular standard sizes for baths with an attic, drawings of which can be easily found on the Internet.
Details
Construction stages
Let's consider the process of building a bathhouse step by step from profiled timber. First of all, it is important to choose a place to place it. According to the norms and rules, it must stand at a distance of at least 3 meters from the fence, 8 meters from the house, 12 meters from the well, 8 meters from the neighboring plot. By choosing a suitable site for construction, the planning and construction process can begin.
Project
To build a bathhouse, you can use one of the typical projects developed by professional architects. If you wish, you can order an individual 6*6 bath project, the layout of which will fully meet all the requirements. When designing a compact bathhouse, you need to conveniently place all the necessary rooms. It should have a washing room, a steam room, a sanitary unit, and a rest room. It is also worth having a small vestibule to effectively maintain the temperature and a room where things can be stored.
Base
A simple bathhouse can be built on a lightweight strip foundation. But for the construction of a bathhouse with an attic, in certain cases they opt for a strip-pile foundation. The choice will depend on the soil conditions at the site. The weaker the earth, the more justified the use of a strip-pile foundation will be.
How to assemble a log house
Timber can be purchased as a simple material in accordance with the designer’s calculations. Or you can buy a ready-made house kit, which is an unusual construction set with elements of the required parameters. Assembling a house kit is quick and simple, but when building a bathhouse with an attic and a 6*6 terrace, working with ordinary beams is also not difficult, because their length is exactly 6 meters. Before the process begins, additional slats must be laid on the base of the foundation. They should be placed at a distance of 0.25 meters, and the thickness should be 5-10 cm. After installation, such a structure must be filled with foam or other insulating material. Before laying, it is important to carefully treat all timbers with an antiseptic, which protects them from the influence of moisture and insects, and also gives the wood fire-fighting qualities. If linden or pine is used for the log house, for the first crown, which is in contact with the base of the building, it is worth using aspen or larch bars.
Insulation
To make log walls very warm, when building them, it is necessary to lay seams using jute. You can use other types of insulation, but using jute is much less expensive and can be done as quickly as possible.
Ventilation
It is very important to cover it with a roof as soon as possible after building a log house. The roofing pie must be made of all the layers that are needed to build the attic. It must be insulated, insulated from moisture, and it must also have a roof ventilation system.
How to set up a steam room
In the steam room, all surfaces should be additionally insulated, and the walls can be lined with moisture-resistant and fire-resistant mineral moisture. The walls must be insulated with foil material for vapor insulation. The floor in the steam room must be made higher than the installation level of the stove. This is required in order to protect wooden floors from excess moisture, and also for speedy and high-quality heating.
Options
A bathhouse with an attic room can have different types of layout. There really aren’t that many options, because there are certain rules for designing a bathhouse complex. But it is the presence of an attic that will reveal wider possibilities for the distribution of space in the building. What are the features of building hand-cut houses and bathhouses? How to choose wisely, and what else is important to pay attention to?
Bathhouse project 6*6 with attic
A variant of the bathhouse layout, where the entire premises of the bathhouse complex are located on the lower level, is shown in the photo. The attic will have two rooms that can be arranged at the discretion of the owners. At the first stage there is a small corner terrace, but there is enough space for all architectural elements. As you can see from the example, the layout of the bathhouse can include not just the required, but also additional architectural details.
Project with an isolated attic
In this option, the staircase for the second floor is located in the hall. This kind of planning allows you to use an attic without entering the bathhouse complex. There will be 3 rooms on the second floor, and if one of them is organized as a living room combined with a kitchen, and the second as a sanitary unit, the bathhouse attic will become a separate isolated housing.
Bathhouse project 6*6 with dressing room
This project provides a walk-through room, which will serve as a dressing room. There are 3 rooms allocated for a recreation area, 2 of which are located in the attic. One of the attic rooms can be turned into a home bar or billiard room. A bathhouse measuring 6*6 meters with a design that has several rooms for relaxation, extremely convenient for large companies.
Project with terrace and balcony
An example of such a development with dimensions of 5 * 8 meters will show how, by changing the proportions of the building, you can place additional elements of architectural significance - a balcony and a terrace. The originality of the project lies in the fact that the terrace here is slightly “recessed” into the structure of the building, which will make it possible to have a fairly large room in the attic floor.
Bathhouse project 6*8
Such a bathhouse with an attic and a terrace can also be a summer kitchen, for which there is definitely a place. On the second floor, the balcony is a great place to have tea with guests or family. An isolated room in the attic is ideal for setting up a workshop, office or launching other ideas for using the attic floor.
Bathhouse with attic dimensions 6x4
For those who do not have enough free space on the site, or do not consider it necessary to build a large bathhouse, there is a suitable option - a bathhouse measuring 6x4 meters, with an attic. Despite its modest size, everything you need for a good rest can fit here. The design of such a bath usually involves a roof with two slopes, covered with roofing material produced by the French company ONDULINE.
Bathroom and attic floor layout 6×4
Gable roofs can increase the usable space in the attic due to their design. It is best to make interior walls of the frame type, followed by covering them. It is recommended to use aspen sheathing material for the steam room.
Technology of interior decoration of the attic bathhouse
In most design projects for finishing this room above the bathhouse, preference is given to natural materials.
Of these, wood is the most popular. Finishing surfaces with wooden materials makes it possible to create a relaxation room in almost any style. Brief instructions for interior decoration of the attic above the bathhouse:
- We treat the floorboard with antiseptic compounds and fire retardants in several layers, and install the wooden flooring.
- We attach the sheathing to the ceiling, covering it with wooden clapboard. We place the panels along the length of the room.
- We cover the surfaces of the roof slopes and struts with edged boards.
- We attach the lining to the walls of the attic, having previously secured the sheathing.
Please note that it is better to make the floor in one plane. Podium structures are an unsuccessful solution for an attic space.
Bathhouse with attic dimensions 6x6
The most popular version of 6x6 meter baths are baths made of profiled timber.
Layout of a bathhouse and attic measuring 6 by 6 meters
Let's consider the main advantages of buildings of this type:
- Low cost, which is achieved due to reasonable consumption of materials;
- Low labor intensity of the bathhouse construction process;
- Great opportunities when designing or creating a plan with drawings of the future structure. Profiled timber lends itself well to cutting, thanks to which you can add individuality to a standard 6x6 bathhouse;
- There is no need for finishing, which allows you not to waste your time and money.
The price for the construction of such turnkey baths in Russia is about half a million.
Layout features
The choice of dimensions for each room consists of:
- developer requirements;
- sanitary standards;
- fire safety rules.
Note.When using a building only in summer, it is permissible to add a spacious attic, but for year-round use, it is necessary to reduce its area in order to equip other rooms.
Inside you need to place:
- hallway;
- Gym;
- dining area;
- home cinema;
- rest room;
- steam room;
- dressing room;
- bathroom;
- shower room
For the dressing room you need to consider:
- There should be enough space to place a hanger for clothes removed before entering the steam room, for example, a robe, underwear, slippers, towels, as well as for a supply of firewood.
- A distance of 1 m should be maintained from the top shelf in the steam room to the ceiling, and its width and length are 0.7 m-2.5 m.
- From the dressing room the door should lead to the shower room, and only then to the steam room.
- In the washing room, place a tank with hot water and a shower with a drain.
- The steam room contains a fireplace stove that heats the relaxation room, into which a door leads from the dressing room, which helps prevent strong humidity where people will rest after bathing procedures.
For the last two rooms, 7m2 is enough, since they can be visited by a large number of people at the same time. A bathroom is necessary in the building, and no more than 2 m2 is left for it. In order for a facility to be complete and comfortable for use, windows and doors must be installed.
In the shower and steam room you need to install small windows, for example, 50*50cm, but in the rest room we can install a classic opening of 120*100cm. This will allow a lot of light to penetrate inside, which will create additional comfort. The result is a sufficient amount of natural light, a beautiful view from the window and energy savings.
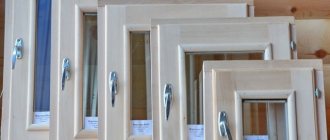
The door size is selected depending on the height of the ceilings. The main thing is to choose the material wisely, which should be:
- durable;
- environmentally friendly;
- retaining heat;
- heat resistant;
- moisture resistant.
It is advisable to choose a door for a steam room that is smaller in height compared to classic designs. This will retain a large amount of heat in the room. The optimal choice is 180cm*70cm.
Note.If the project involves the subsequent construction of a second floor, then it is necessary to leave space for the installation of the staircase, and the area occupied by it depends on its type and type.
How to add an attic to an existing bathhouse?
A bathhouse with an attic can be built in three ways:
- On a finished bathhouse that has been in use for a long time, the side walls are added to the height.
- The existing attic space of the bathhouse is being converted into living space.
- The attic is equipped with a special roof shape.
The easiest way to build a bathhouse from scratch is from timber - with an attic of a wooden structure, it practically does not change its weight, and the ideal rectangular layout allows you to avoid unnecessary costs. In addition, if the second floor will also be used constantly, then it makes sense, after laying the interfloor ceiling, to add walls 1-1.2 meters in height, and only after that erect the gables.