Preparation of material for bath doors
If a door structure needs to be installed in someone else’s room, then the first thing you need to do is look at the scope of work, assess the location and size of the future entrance to the room, and measure the thickness of the walls. And most importantly, before making a door to a bathhouse, it is extremely important to check the quality of the material from which you plan to assemble the door leaf and frame. Timber and boards are almost always crooked, but worst of all, if there are already cracks or chips on the surface, such wood needs to be disposed of.
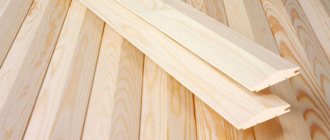
Before starting work, boards prepared by the customer are subjected to additional processing:
- The ends are cut using a circular saw, a hand router or any other tool so that the side surface of the boards is perfectly flat and the folded door leaf does not even have micro-cracks;
- Boards are calibrated and selected according to thickness. If there is a supply of material, then it is best to select the required number of defect-free boards and adjust them to the same size with a jointer;
- Additionally, they are dried under a canopy to avoid shrinkage after assembling the door leaf.
For example, the thickness of a standard magpie board after finishing is reduced to 35 mm, the width of the material becomes 10 mm smaller due to the leveling of the plane. As a result, it turns out that in order to make wooden doors to a bathhouse with dimensions of 180x80 cm with your own hands, you will need at least five boards, 160 mm wide, without taking into account the dimensions of the door frame.
Disadvantages and advantages
There are few disadvantages to glass doors, but they exist.
These include:
- High price compared to wooden counterparts.
- The high thermal conductivity of glass is again compared to wood.
- The products are heavy, which, combined with fragility, can cause installation difficulties.
- It is impossible to make glass doors for the steam room with your own hands.
However, when compared with wooden structures, glass structures have much more advantages.
If you can argue about external attractiveness - here it is who likes what more, then from a practical point of view the advantages are as follows:
- Fire resistance. Often the door is located in close proximity to the stove, so its non-flammability is very important.
- Resistance to moisture and high temperatures - glass does not corrode, does not rot or deform. Does not emit harmful substances when heated.
- Hygienic and easy to care for. Mold will never grow on such a door, and you can wash it as often as you like, using household chemicals, including those with antibacterial properties.
Glass is very easy to care for
- Creating a reliable barrier to cold air masses. Unlike wood, glass does not dry out with the formation of cracks and cracks.
- High light transmittance, which makes it possible to save on electricity or even do without electrical wiring in such a dangerous area as a steam room.
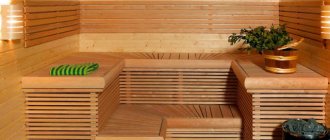
Doors to the sauna, bathhouse
- Long service life.
Dimensions and assembly technology of a bath door
Typically, the dimensions of a door to a bathhouse with a frame, or more precisely, the future opening in the wall for installing a trap, are determined by the number of whole boards laid in the door leaf. To do this, take the width of the processed board, multiply it by five, and adjust it to more or less acceptable dimensions of the bath door. Next, 2x35 mm is added to the required width - the thickness of the two sides of the door opening plus an installation gap of 10 mm. The height of the door for a bathhouse is calculated in the same way, and for the bottom edge you will need to add another 5 mm for shrinkage.
In addition, you need to take into account the peculiarities of the technology for assembling entrance doors for a bathhouse. The door leaf for the entrance to the bathhouse can be assembled in two ways:
- Cut a tenon and groove at the ends of a standard forty, as is done for a tongue and groove board. In this case, the total width of the canvas will decrease by 10x5=50 mm;
- Mill a groove 15 mm deep at the ends of the prepared and cleaned wooden workpiece; the joining of two boards is carried out on an inset dowel. In this case, the width of the doors and the dimensions of the opening in the wall of the bathhouse do not need to be adjusted.
You can make doors for a bathhouse using both methods, there is not much difference, although doors with dowels are more flexible and durable. The question of technology, how to make a door to a bathhouse, depends on the wishes of the customer and the availability of woodworking equipment.
For your information! For a novice carpenter, it is easier to make a door to a bathhouse step by step with your own hands using a doweled connection of the canvas.
Firstly, keyed doors for a bathhouse are considered a classic manufacturing option, and secondly, in the event of an accidental defect, you can always replace the key and redo the joint.
Paneled door design
Making a wooden door with your own hands is possible in a paneled design. This is a more complex method. A person who takes on such work must have certain skills in woodworking.
Paneled doors made of solid pine are the best option for homemade production. Pine is a cheaper material, but at the same time, boards made from it are easy to process and are durable.
Components of paneled fabric: frame or trim, mullions, panels.
- Assembling a paneled wooden door with your own hands begins with making the frame, which is the frame of the entire structure. The strapping bars come in different thicknesses. If their thickness is about 44 mm, then they are connected using the “tenon and groove” method into one tenon. When the thickness of the frame bars is up to 54 mm, the mating is made with two tenons, and with thicker bars - with three. The fastening of the bars is done with glue using round wooden tenons.
- Middle bars are bars of the same thickness as the trim. Their number depends on the design of the canvas and can be from one to three. In some cases, in addition to transverse mullions, a longitudinal mullion is installed. These elements strengthen the door system and, in addition, panels are secured to them. The mullions are also connected to the strapping in the tongue-and-groove version.
- The panels are made from solid wood, multi-layer plywood, and also from special reinforced glass. You can fasten the panels in the trim and mullions in different ways - in a quarter without layouts, using self-tapping screws; in a deeper quarter with layouts that hold the panel in the fabric structure, the layouts are secured with self-tapping screws; into a blind tongue.
Experts recommend that when installing panels in a blind tongue and groove, do not secure them with anything, and determine the size during manufacturing to be several millimeters less than the depth of the tongue.
This is done due to the fact that the wooden door leaf can pick up moisture or dry out, depending on the season.
If the master has artistic skills, then the panels can be made with patterns.
After the final assembly of the paneled door leaf, it should be allowed to rest for several days so that possible errors during assembly can be identified. Then paint the canvas or decorate it in any other accessible way.
Attention! When painting you need to pay attention to one feature. After applying the first layer of paint or varnish, fibers appear on the wooden surface, forming a rough surface. When the paint has dried, go over the wooden surface with fine-grained sandpaper. The door becomes smooth and you can safely apply the second coat.
So, it is quite possible to make a wooden door with your own hands. The main thing is to correctly assess the abilities and capabilities, choose the right raw materials, and exercise care and safety precautions when manufacturing the door structure. Still, wood is a soft material, and the tools used to process it are especially sharp.
Tools for building the entrance door to the bathhouse
It is very important, before making a door to a bathhouse with your own hands, to realistically assess your capabilities, namely, the availability of tools and devices for the job.
If you have at least basic carpentry experience, in order to assemble the entrance door to a bathhouse with your own hands, you will need a minimum set of tools:
- Manual electric router with a set of end trim and through cutters;
- A long metal ruler, you can take a two-meter plaster rule or any aluminum strip at least 200 cm long, fairly even and strong;
- Building level and plumb line for a mason;
- Electric grinder, belt or vibrating;
- Carpenter's chisel, wooden or metal tamping hammer;
- A set of carpentry clamps for clamping boards, 20-60 mm thick;
- Wood glue, you can use PVA-M, one bathhouse door will take at least 7-10 liters, linen or jute tow.
In addition, to install a door in a bathhouse with your own hands, you will need to make cuts in the wall, so you will need to rent an electric or gasoline chain saw for at least one day.
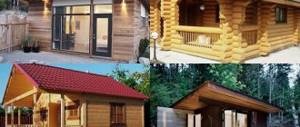
What kind of doors can you make yourself?
Most homeowners prefer to contact specialized organizations, ordering door structures there or purchasing them in construction stores. However, there are situations when you can make a door yourself.
- Entrance or internal doors in a country house and bathhouse.
- Temporary door at the entrance to a private house.
- All types of doors in situations where the budget does not allow turning to professionals.
- This is an option for people who know how to handle tools and wood.
The best material for making a door yourself is wood. Such structures can be frame or made of solid wood.
Making a door leaf for the entrance to the bathhouse
It takes a professional carpenter one day to make a wooden bathhouse door with his own hands. For amateur builders, this period is approximately twice as long, but usually they agree with the customer to make one entrance for the bathhouse and one door for the steam room in three days. It won’t work faster, since before installing the door in the bathhouse, at least a day must pass for the glue to dry and shrink.
If the customer insists on the size and shape of the door to the bathhouse, then it would be correct and far-sighted, before trying to make a bathhouse door with his own hands, familiarize the future owner with the design, discuss the level of rise of the threshold and the method of sealing the cracks in the doorway. As a rule, the customer does not object to your option for entering the bathhouse, but it is still better to inform him in advance.
Cutting grooves and making keys
The first step is to cut a groove on the end surface of the boards for installing the connecting key. The two strongest and most beautiful boards selected and prepared for work are set aside in advance; in these parts the groove will be cut on only one side. These parts will go to the left and right sides of the door leaf.
Milling the groove is performed in the following sequence:
- The board is fixed in a horizontal position using clamps on a carpentry workbench. A milling line is drawn along the end with a ruler and pencil;
- A metal ruler or rule is placed along the marking line and firmly fixed. This will help make the groove and, ultimately, the door leaf of the bathhouse as flat and even as possible;
- The groove is cut using an end mill with a diameter of at least 10 mm; too large a width will weaken the blade, a small cut will not hold the board, and the entire structure may sag in the bathhouse doorway.
The next step is to make the fastening dowels; to assemble the canvas you will need five slats. Fastening material can be cut from the remnants of prepared bath boards or purchased ready-made.
Important! The blank for the key is laid on a workbench and ground so as to obtain the same thickness along the entire length of the lath. It is very important to achieve uniform thickness so that the key does not fall out of the groove at one end of the board and does not jam at the other.
The key-rail should fit into the grooves of adjacent boards with a slight interference, to make it easier to insert it into the groove; small chamfers are removed on the edges with sandpaper.
Assembling the door leaf
The next stage in the manufacture of a bath door is the assembly of the door leaf. Initially, the boards are joined with dowels “dry”, without any gluing of the joints. The assembled door is laid out on a workbench and hammered with a wooden hammer to completely seat the keys in the grooves.
Dry assembly is required to ensure that all parts of the bath door fit correctly. In addition, the protruding ends of the boards and dowels along the upper and lower edges of the canvas are trimmed.
If there are no problems, each joint is disassembled one by one, coated with glue and knocked back together. The glued bathhouse door is laid on a workbench and secured with clamps until the adhesive seams are completely dry. While the glue has not hardened, excess adhesive mass is carefully removed at the joints. This must be done immediately, otherwise within a day the door surface will be covered with irremovable dark spots of adhesive film.
We put horizontal crossbars on the door
The next day, after the glue has completely set, it is necessary to make horizontal crossbars. Essentially, these are two thick wooden blocks laid horizontally or at a slight slope on the sauna door.
Crossbars perform two functions:
- Pull the fabric horizontally;
- They transfer the load from the weight of the structure to the canopies and door frame at the entrance to the bathhouse.
Hinges for doors to the bathhouse are also placed on the crossbars, which allows you to unload the door leaf and transfer most of the weight directly to the door.
The design and method of fastening the crossbars of bathhouse doors differ significantly from similar parts in ordinary doorways used in sheds, garages, warehouses, and summer kitchens. Horizontal bars are installed on the bathhouse door, without any fasteners, and the connection is ensured by a dovetail locking profile.
The sides of each block are cut using an electric milling machine so that the cross-section of the crossbar forms an isosceles trapezoid. The same cutter is used to cut grooves on the sauna door leaf.
To prevent the door from moving horizontally, the grooves of each lock in the door leaf are not cut strictly horizontally, but with their own slight slope. After adjusting the dimensions, the bars are placed in locks, glued and fixed with clamps until completely dry.
The finished, dried assembly must be sanded with an electric grinder; this will remove burrs and make the outer surface as flat and smooth as possible. If the need for additional finishing arises, the door to the bathhouse can always be painted or covered with film.
Features of making a bathhouse door yourself are shown in the video
Making a loot and installing it at the entrance to the bathhouse
After installing the crossbars, the actual dimensions of the doors to the bathhouse become known. You can cut an opening at the entrance to the bathhouse, but first you need to make a door frame.
To make the loot, the same forty board is used as for the door to the bathhouse. For the vertical sides of the door, two boards are cut out, 200 mm wide and 60 mm longer than the door leaf. Similarly, two short horizontal boards are cut for the threshold of the door frame and the top crossbar. We lay out the cut sections along the perimeter of the assembled door leaf and temporarily sew them together at the corners with the remnants of the slats and upholstery nails.
Since the bathhouse door should only swing outward, the panel will need to be recessed into the hole from the entrance side. To do this, mark a strip 10 mm deep along the contour of the inner surface of the box, which will need to be cut with a router or any other available tool.
Next, on the outside of the side posts of the door frame, you will need to cut a groove with which the loot will be held in the doorway of the wooden bathhouse. We connect all the parts of the door frame using self-tapping screws. The side posts should be adjacent to the ends of the door leaf with a gap of 1.2-2 mm; in the area of the threshold the gap is increased to 5 mm. We strengthen the box at the corners with temporary slats and spacers; as soon as the loot is in the doorway of the bathhouse, the stuffed slats will be removed.
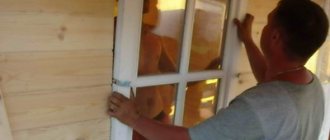
We put the frame and hang the door leaf
The first step is to measure the outer dimensions of the box; using them you will have to mark the contour of the cut of the doorway at the entrance to the bathhouse. This should be done only by practical measurement, and not by calculation, otherwise there is a possibility of making the cut in the bathhouse wall too large.
The opening for the box should be 6-7 cm smaller than the width of the finished canvas. When making a cut in the bathhouse wall, you should also take into account the width of the cut. Initially, mark the height of the threshold in the bathhouse, then measure the height of the box, draw the axial one and set aside the width of the tray. Using a plumb line, markings are applied to the wall of the bathhouse under the cut line.
After an opening has been cut in the bathhouse for installing the frame and the future door, it is necessary to cut a vertical tenon line on the wall using a router or manually with a hammer and chisel. The width and height of the tenon must fully correspond to the dimensions of the groove cut on the sides of the loot.
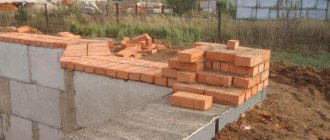
Next comes the assembly of the box. The threshold is installed first, then the side posts are stuffed onto the spikes, and the top cross member is attached last. In the upper ceiling part of the box, between the wall and the crossbar, there should be a free space 5-7 mm high, which is filled with flax or jute fiber and will subsequently be covered with platbands. The gap must be maintained to compensate for the settlement of the bath. If the construction of the bathhouse is made of brick, the gap is simply filled with foam.
Before knocking down the parts of the box, you need to place the finished door leaf in it and align the entire structure horizontally and relative to the facade of the bathhouse and wooden wedges.
Hinges for bath doors
At the last stage of arranging the entrance, the door leaf is hung. Before installing hinges for bathhouse doors, the door leaf is slightly raised in the frame using two small wooden wedges. Gate canopies are the easiest to install; they are located entirely on the outside of the door leaf. The short part is attached to the scuttle, the other side is sewn onto the crossbars.
If, according to the design conditions of the facade of the bathhouse, it is necessary to completely hide the elements of the canopies, then screw-in hinges can be used.
If the entrance room in the bathhouse is well isolated from the dressing room and steam room, then the doors can also be hung on standard butterfly hinges. The main advantage of such canopies is their high strength and reliability; one pair is enough to hang the heaviest door in a bathhouse.
To attach the hinges you will need:
- Mark the contours of the fastening on the slit and on the end of the canvas;
- Use a chisel to cut grooves on both parts and secure the canopies with ordinary self-tapping screws.
All that remains is to hang the canvas on the mating part of the loop and adjust the pressure so that the door to the bathhouse closes without touching the trap. After installing the trim, seal, handle and lock, the door to the bathhouse is considered ready.
Glass door fittings
Despite its apparent lightness, glass is a rather heavy material. To ensure that the door does not sag and opens easily, special hinges are needed. Plus, they must withstand sudden fluctuations in temperature and humidity. Therefore, they are made exclusively from durable and corrosion-resistant alloys and metals.
Loop with decorative overlay
Advice. If the height and width of the door to the steam room exceeds 60x180 cm, it is better to hang it not on two, but on three hinges to reduce the load on each.
The latches should be made from the same materials. Their appearance is worth paying special attention to.
- Ball and roller latches installed on budget doors can jam due to difficult operating conditions.
Roller latch
- Magnetic latches are more reliable and durable.
Magnetic latch
But it is best to choose wooden handles on the door to the steam room, made of hardwood that does not release resin when heated. They themselves do not heat up, unlike metal ones.
Installation
Installation:
- Install the door frame over the opening.
- Use a router to cut out recesses to secure the hinges on the box or canvas.
- Secure the individual components of the hinges with self-tapping screws.
- Hang the door on the hinges of the frame.
All that remains is to secure the handle with a lock (if needed).