In current realities, installing windows in a wooden house with your own hands is considered an “exclusive” operation necessary for creating original interior solutions. This is partly due to the persistent idea of wooden windows as unreliable and ineffective structures, preserved in the memory of the population since Soviet times.
But still, the main reason for the relatively low popularity of wooden double-glazed windows is their high cost and the need for additional protection from atmospheric influences.
Let us immediately emphasize that, despite the similarity of installation methods for plastic and wooden double-glazed windows, a number of additional criteria should be taken into account when choosing and installing wooden windows.
In this review, we will look at how to insert windows from wooden frames and double-glazed windows, taking into account all the features of this process.
Which windows are directly suitable for wooden walls?
The walls of solid wood houses tend to be in a certain movement. This will be affected by the time of year, seasonal changes, humidity of the air and the external environment - the log house swells or shrinks, shrinking. Some of the usual standards for installing windows and doors are applicable for a log house; therefore, a different design of the recess for the frame, popularly known as casing, is needed here. It allows you to minimize the movement of wooden walls of houses, bathhouses and other residential buildings made of logs.
But not everything is so difficult, since the main shrinkage occurs during the first three years - under its weight, the space between the logs becomes compacted and natural drying of the wood occurs. At times, during this period of time, the log house sags by 10-15 cm, and accordingly, the window and door clearance is significantly reduced. Based on this, it is natural that for a new building made of natural wood, log windows are more suitable, and for older houses - plastic ones, then they will be less susceptible to excess pressure and deformation.
If the construction of a house takes several years, step by step, then the unprepared “living” wood will shrink during this period of time, and installing windows in a log house made of wood will not be a problem. In the latter case, it may be possible to install temporary frames with film to prevent precipitation from penetrating into the window opening. And after a while, window frames with double glazing can be installed in the log house to protect against negative weather conditions. These can be frames made from prepared dry wood, or from plastic, which is common to the inhabitants.
Modern plastic windows laminated to look like natural wood will organically fit into the design of the log house, increasing the thermal insulation of the house. The experience of installers from Finland shows that a plastic window in a log house or double wooden frames can be inserted into the frame without any problems, and at the same time it is possible to combine different materials for window frames.
Window
141 votes
+
Vote for!
—
Vote against!
Wooden houses, baths, saunas and cottages have an important advantage - they are completely environmentally friendly, since they are made from natural materials. A wooden frame is “living”, it “breathes”, shrinks and ages, that is, it lives its own life. A house made of natural wood allows air to circulate, simultaneously purifies it and imparts healing properties, thanks to the phytoncides and resinous substances of natural solid pine. These same features of buildings made of lightly treated wood create some difficulties. For example, when it is necessary to install windows in a log house and doorways, as well as when finishing sagging walls, but if the installation technology is followed, all these problems can be solved.
Table of contents:
- Which windows are suitable for wooden walls?
- What is important to know about installation technology
- Basic conditions for using casing
- The main problems when installing doors and windows in a log house
- Instructions for processing a window opening
- Step-by-step installation of windows
- The process of installing plastic windows in a log house
Which windows are suitable for wooden walls?
The walls of solid wood houses tend to be in some movement. This is influenced by the time of year, seasonal changes, air and environmental humidity - the log house swells or shrinks, shrinking. Some of the usual standards for installing windows and doors are acceptable for a log frame, so this requires a different design of the recess for the frame, known as casing. It makes it possible to minimize the movement of wooden walls of houses, bathhouses and other residential buildings made of logs.
However, not everything is so complicated, since the main shrinkage occurs during the first 3 years - under its own weight, the space between the logs is compacted and natural drying of the wood occurs. Sometimes during this time the log house sags by 10-15 cm, and the window and door openings decrease accordingly. Therefore, it is natural that for a new building made of natural wood, wooden windows in a log frame are more suitable, and for older houses - plastic ones, then they will be less susceptible to excess pressure and deformation.
If the construction of a house takes more than one year, stage by stage, then even unprepared “living” wood will shrink during this time, and installing windows in a log house made of wood will not be a problem. As a last resort, you can install temporary frames with film to prevent precipitation from penetrating into the window opening. And after a while, double-glazed window frames can be installed in a wooden frame to protect against adverse weather factors. These can be frames made of specially prepared dry wood, or from plastic, which is familiar to city dwellers.
Modern plastic windows laminated to look like natural wood will organically fit into the design of the log house, increasing the thermal insulation of the house. The experience of installers from Finland shows that a plastic window in a log house or double wooden frames can be inserted into a frame without any problems, and it is possible to combine different materials for window frames.
What is important to know about installation technology
Today, prestigious two-story houses of various types are made from timber. They are built in eco-style according to the traditions of their ancestors and according to the designs of modern architects and designers. Increasingly, they began to offer wooden houses and saunas similar to Finnish ones, and stylizing country houses as Russian towers is also in fashion. No less interesting are large manors in the Scandinavian style - made of wood and glass. It doesn’t matter whether it’s a pompous building or a small do-it-yourself cottage made of wood – the technology for installing wooden windows in a log house is approximately the same.
Of course, damp wood is not very suitable for building the walls of a wooden house. The Finns use only dried and specially prepared wood for export houses, and also develop special technology for houses that are quickly assembled. According to the technology, window frames are not placed in a log house for at least six months after the prepared structures are assembled, and in “living” wood – even later. But even in this case, some shrinkage is taken into account - do not leave the building without windows.
The holding time is required for the shrinkage of the log house and the final formation of wooden walls, and after about a year the log house will reach values close to maximum shrinkage parameters. However, it is impossible to accurately name the technical characteristics of shrinkage (in percentage or in millimeters), since everything depends on the type of wood and the degree of its moisture content.
Today, several options for installing windows in a log house have been worked out:
1. The most reliable method is to install a casing (casing) into which the window is inserted. The casing is a solid rectangular structure made of solid wood up to 40 mm thick, in which the lower strip forms a window sill, and platbands are attached to the ends. For a long time they were made from solid wood, given the required shape, where the grooves for the window frame were formed. Today, casing is made much more technologically advanced and looks more aesthetically pleasing, and glue beams are used to make it. The finished casing design is quite expensive, so they often use a more affordable technology for installing a window in a log house, that is, attaching it to the cranial bars.
2. There is another option - the window frame is attached directly to the beam with special fastening strips. Simple methods are used, most often, in log houses for baths and saunas, and in residential buildings they are more complex and reliable. Using a building level, the window frame is aligned to maintain distances and foamed with sealant. However, the method of installation with sealing in new walls of houses is not used. Foam is recommended to be used to seal the lower part of the frame and window sill - this plane is less susceptible to deformation when a wooden window shrinks in a log house.
3. Special (skull) strips are often used, inserted into grooves that move freely at the ends of the window opening. This prevents jamming during shrinkage without creating cracks. The skull strips are able to slide in the grooves, thanks to the design, so the window will not experience pressure when shrinking. The difference between the method is that the casing is attached to the skull block, and not directly into the opening.
Advice: Remember that even after the initial shrinkage of the frame, the compaction of wooden walls will continue for some time. With significant precipitation and in a climate with a high level of air humidity, the base of the log house will continue to absorb water, increasing the volume of the log house. In hot and dry summers, the tree gives up moisture, causing significant shrinkage. That is, natural changes in the size of a log house, for example, made of pine, will be noticeable up to 5 cm, but this figure also changes depending on the time of the log house. Installing windows using special technology reduces the likelihood of skewing, base displacement and jamming of the sashes and reduces heat loss.
Basic conditions for using casing
1. The casing of the log house makes it possible to prepare the installation of the window in a formed box, which minimizes the pressure of the log frame on the window frame through the natural process of drying the wood.
2. Properly manufactured casing of a log house prevents distortions in the form of the consequences of shrinkage.
3. There should be a small gap above the frame, approximately 50 mm, and this is insulated along with the side gaps.
4. A simplified casing can be made from boards of a smaller thickness of about 20 mm, where the forming slopes will be attached, and the bottom board forms the window sill.
5. The casing is secured with self-tapping screws to the skull beam, and the gap is insulated under the platbands.
6. From the outside, the casing looks quite compact and neat, and you can put another frame inside.
7. Proper use of casing installation technology allows you to counteract window depressurization.
8. Fastening of external platbands allows the use of synthetic seals, including rubber, to prevent the penetration of moisture into the window space.
9. If difficulties or questions arise about how to insert windows into a log house, it is recommended to contact specialists.
The main problems when installing doors and windows in a log house
1. According to the experience of installing houses made of natural wood, even a structure made of specially prepared and well-dried material will shrink up to 5 cm in the first year. In persistently rainy weather, the house will swell again. “Live” or undried wood with a high percentage of moisture gives a much larger amplitude per year.
2. Installation of windows or doors in a wooden frame is a technologically simple process, and specialists do not have any problems. However, difficulties and problems with an unprofessional approach arise much later, when the windows in a bathhouse or in a house begin to warp due to pressure from the natural drying of wood. That is, it is much worse when problems arise during the operation of the building.
3. Increased air humidity can lead to the fact that window sashes or vents do not open due to swelling of the wood with increased pressure from shrinking logs. Sometimes it is enough to slightly trim the adjacent planes of the sashes, and it is worse if the window cannot be opened during its entire service life. This is why a small gap in the casing or the correct sliding structure is important - in order to avoid such troubles.
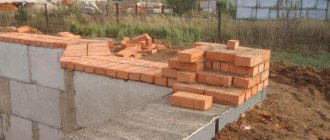
Tip: It is important to use dry and high-quality timber, preferably from softwood. Before cutting out window openings, it is important to strengthen the boards to its sides so that they do not move apart.
Instructions for processing a window opening
To complete the work, you will need a chain saw, nails, studs, timber, edged board, square, plumb line and polyurethane foam.
1. On the wall of the log house, mark the contours of the window (door) opening using 4 strips. In this case, it is important to correctly mark the bottom of the window - approximately 80 cm from the floor.
2. The boards are selected slightly larger than the height of the opening to secure the studs with washers.
3. We make holes in the uncut crowns at the corners of the planned opening, similarly in the fastening boards.
4. Mark the vertical with a level and place boards along it, which we connect to the logs using pins and tighten the boards.
5. We place metal washers under the nuts to prevent the nuts from cutting into the boards; we secure the boards on both sides of the markings.
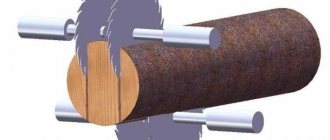
6. Next, you can proceed directly to the process of cutting the opening with a chainsaw, starting from the top log. You can also use another tool.
7. We proceed to processing the sawn logs and fasten the edges together with jumpers.
8. We form a window block from lintels and jambs in pairs, and on the outside we form grooves to the size of the tenons.
9. We begin to form the window block by installing the jambs, using nails to connect the lintels with the holding of the logs.
10. To check the right angles, we use a square, which can be formed before the block is finally secured.
Tip: To dispel doubts, it is advisable to watch a video about installing the pigtail, and only after that proceed to installation.
Step-by-step installation of windows
Today there are several ways to install window frames in a log house, but we will look at a very simple example.
First, you need to visually imagine in a cut what a window looks like in a log house - the diagram for installing a window in a log house is shown in the figure below.
This is a casing with grooves, a shrinkage gap with a seal, an external and internal platband, a tenon with a seal, a window with a drip, and a lower inter-crown seal.
The edging is done after the opening is formed:
- prepare a 150x40 beam for the top of the window opening, it should be the width of the opening, cut 2 rectangular cutouts at both ends for a pre-formed ridge;
- Place the board on top of the gun carriage, securing it with self-tapping screws;
- we make an opening 3-5 cm larger than the height of the inserted window, for filling with sealant or foaming from below;
- the gap between the log and the flashing board in the window opening should be about 5 cm (for shrinkage), which is filled with insulation;
- when the window is inserted and secured, a casing is attached to the frame so that the structure has an aesthetic appearance;
- do not forget to check before installing the trim and final installation both vertical lines of the window frame in a plumb line and horizontal lines in a level, since it will be impossible to correct this later;
- It is necessary to impregnate all wooden surfaces with an antiseptic to prevent the destruction of wood.
The process of installing plastic windows in a log house
The step-by-step process of installing PVC windows looks approximately the same as in the example with natural wood:
- we form a window opening;
- install the pigtail;
- We are completing the installation of a plastic window in a frame using technology.
The optimal distance of the window sill from the floor is 80-90 cm, and if the interior design plans to use a window sill in the form of a tabletop, for example in the kitchen or in a teenager’s room, then it is better to think through its design and installation in advance.
Advice: Remember that wooden frames are also characterized by partial shrinkage, and PVC windows have a rigid and stable base - they cannot be installed in a fresh log house, and it is necessary to use a frame. It will make it possible to maintain sufficient autonomy of the double-glazed window from the log house, so installation on foam and without a jamb is unacceptable in this case!
Two types of pigtail:
1. Simple design - a 50x50 mm groove is formed at the end of the opening for a block (not suitable for installing a PVC window).
2. A more reliable option is when a ridge is formed in the end logs on the window openings, on which a frame with a groove, otherwise called a “carriage,” is subsequently placed, and here, during shrinkage, movement along the guides without deformation will be ensured. This is a structure made of timber 100x150 mm, which exceeds the size of the window by 5-6 cm, in the center of which a groove of 50x50 mm is selected, the carriage is attached to the ridge.
Next, we assemble the frame from a 150x40 board, as described above, respectively, cut out grooves in it that fit onto the ridge - this is the upper part of the opening where we place the PVC window. Be sure to cover the slats with tow (in rolls) and secure the carriages, and secure the top strip of the frame with self-tapping screws to the carriage.
After the right angles, vertical and horizontal lines in the openings have been verified, and the frame has been framed, we proceed to the installation of plastic windows. Monitor the quality of fastening and tightness so as not to damage the thermal insulation of the windows in the log house. Follow all steps according to the instructions included with the PVC windows. When purchasing plastic windows, pay attention to the fasteners that are mounted at the end. The frame is leveled and mounted with fasteners to the frame; do not forget about the space for mounting foam under the window sill. All that remains is to hang the doors and cash out.
Tip: Pay attention to how the window is screwed to the board - in no case to the ridge, otherwise the point of movably fastening the window to counteract shrinkage is lost.
What is important to know about installation technology
At the moment, respectable two-story houses of various types are made from timber. They are built in eco-style according to the traditions of the forefathers and according to the designs of modern architects and designers. Everyone often began to offer wooden houses and saunas similar to Finnish ones, not counting this in the fashion of stylizing suburban houses as Russian towers. Large mansions in the Scandinavian style - made of wood and glass - are no less interesting. It doesn’t matter whether it’s a pompous building or a small do-it-yourself dacha made of wood – the development of installing wooden windows in a log house is approximately the same.
Of course, wet wood is not very suitable for building the walls of a wooden house. The Finns use only dried and prepared wood for export houses, and are developing unusual technology for houses, which they are rapidly planning. In accordance with the technology, window frames are not placed in a log house for at least six months after the assembly of prepared structures is completed, and in “living” wood – even later. And in this case, a certain shrinkage is taken into account - do not leave the building without windows.
The holding time is required for the log house to shrink and the final formation of the wood walls, and after about a year the log house will acquire significant shrinkage characteristics. But it is forbidden to precisely name the technical properties of shrinkage (as a percentage or in millimeters), because everything depends on the type of wood and the degree of its moisture content.
At the moment, a couple of options for installing windows in a log house have been worked out:
1. A more reliable method is to install a casing (casing) into which the window is inserted. The casing is a solid rectangular structure made of solid wood up to 40 mm wide, in which the lower strip forms a window sill, and platbands are attached to the ends. For a long time they were made from solid wood, giving the required shape, where the grooves for the window frame were formed. At the moment, the casing is made much more technologically advanced and looks more aesthetically pleasing, and glue beams are used to make it. The finished casing design is quite expensive, so they often use a more affordable technology for installing a window in a log house, in other words, attaching it to the cranial bars.
2. There is another option - the window frame is strengthened directly to the beam with special fastening strips. Conventional methods are used very often in log baths and saunas, and in residential buildings they are more complex and of high quality. Using a building level, the window frame is set at the correct distances and foamed with sealant. But the method of installation with sealing in new walls of houses is not used. It is recommended to use foam to seal the lower part of the frame and window sill - this plane is less susceptible to deformation when a wooden window shrinks in a log house.
3. Special (cranial) strips are often used, inserted into grooves that move freely at the ends of the window opening. This prevents jamming during shrinkage without creating cracks. The skull strips are able to slide in the grooves, thanks to the design, so the window will not experience pressure when shrinking. The difference between the method is that the casing is attached to the cranial block, and not directly into the lumen.
Advice: Do not forget that even after the initial shrinkage of the log house is completed, the compaction of the wooden walls will continue for some time. During heavy rainfall and in a climate with a high level of air humidity, the base of the log house will continue to absorb water, increasing the volume of the log house. In hot and dry summers, the tree gives up water, causing significant shrinkage. In other words, natural transformations in the size of a log house, for example, from pine, will be noticeable up to 5 cm, and this indicator also changes depending on the time of the log house. Installing windows using special technology reduces the possibility of skewing, base displacement and jamming of the sashes and reduces heat loss.
Preparing the opening for installing a window in a wooden house
Before cutting, we mark the window opening using a level, because the plastic window will be installed strictly level in all planes, therefore the frame must also be installed in the opening as accurately as possible according to the level initially.
The lower crown in the opening needs to be sawed through so that a flat horizontal platform is obtained.
We determine the dimensions of the opening based on the size of the plastic window, the thickness of the casing bars and the size of the required gaps.
We perform all calculations visually. Here is an example of a diagram for calculating the size of the opening for a rough T-shaped frame:
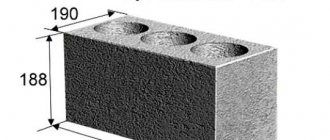
Accordingly, we take a beam with a cross-section of 100x150 mm and cut out a T-shaped profile.
Here is a diagram for calculating the details of a p-type finishing socket:
For a U-shaped window frame, we cut out a U-shaped profile from solid timber.
The size of the shrinkage gap (H shrinkage) is not easy to determine, since the amount of shrinkage of the house, as mentioned above, depends on many factors. If we, for example, roughly calculate, taking everything to the maximum, then for a window with a standard height of 1400 mm (plus the thickness of the casing crossbars, plus installation gaps ~ 245 mm) with 15 percent shrinkage, the top gap will be 24.5 cm - a huge hole , the height of which will most likely end up being too large.
To simplify the task and avoid mistakes, you should not rack your brains over GOSTs that regulate the shrinkage values of building materials of various wood species, comparing this with local climatic conditions, etc. You can do it simpler, namely:
• if you are building a new house, then start installing windows in it no earlier than a year after the construction of the log house in order to wait out the period of the most active shrinkage. Then, when manufacturing and installing the frame, the size of the shrinkage gap (H shrinkage) can be safely made 60-50 mm for a log house, 50-40 mm for a timber house and 40 mm for a house made of laminated veneer lumber;
• if your house has stood for more than five years, then the shrinkage gap (H shrinkage) can be made minimal - 40 millimeters, just to compensate for possible seasonal changes in the geometric dimensions of the opening;
So, we calculated the size of the opening, marked it and cut it out. Now you need to cut out a tenon at the ends of the logs (beams) on the sides of the opening. The tenon is also marked using a level in the center of the log (beam).
We make the tenon size 60 mm - width and 40 mm height.
We cover the sides and bottom of the opening with linen or jute using a stapler.
The main conditions for the introduction of casing
1. The casing of a log house allows you to prepare the installation of a window in a formed box, which minimizes the pressure of the log frame on the window frame through the natural process of drying the wood.
2. Properly made casing of a log house prevents distortions in the form of the consequences of shrinkage.
3. There should be a small gap above the frame, approximately 50 mm, and it is insulated together with the side gaps.
4. Lightweight casing can be made from boards of the smallest thickness of about 20 mm, where the forming slopes will be attached, and the bottom board forms the window sill.
5. The casing is secured with screws to the skull beam, and the gap is insulated under the platbands.
6. The casing from the outside looks completely compact and carefully, and another frame can be installed inside.
7. Proper use of casing installation technology allows you to counteract window depressurization.
8. Fastening external trim allows the use of synthetic seals, including rubber, to prevent water from penetrating into the window area.
9. If you have problems and questions about how to insert windows into a log house, it is recommended to turn to professionals.
How to do
There are quite a few options for constructing a homemade window. But this article can't cover them all and still be specific enough for you to benefit from the description we've given. Therefore, we choose the option that seemed optimal .
Of course, this is not a double-glazed window, but still the thermal insulation in this case is quite sufficient.
So, first, let's look at what the profile window we selected is:
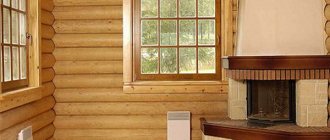
The figure shows that two independent doors , and one of them will be with single glass, and this door will be on the outside of the bathhouse, and the second will be with double glass - the door will face the inside of the bathhouse.
The fact that the doors open in different directions greatly simplifies the work - even a beginner can handle it.
In principle, similar window structures can be installed in all rooms of the bathhouse , taking into account, of course, that the dimensions will be different everywhere.
Tools
- planer/electric planer;
- electric drill;
- milling cutter equipped with molding and groove cutters;
- Sander;
- hacksaw for wood;
- hammer;
- chisel;
- screwdriver;
- bit;
- square;
- roulette.
Material
As a material, you can choose any wood suitable for a bath. You will need standard boards - 100 mm wide and 40 mm thick . Specifically for this example of the window, 6 meters of such boards .
Window glass - both 3 mm and 4 mm You also need a sealant and waterproof wood glue.
Accessories
Buy a pair of window handles with a rotary mechanism and four screw-in hinges.
Process
We start by measuring the window opening, under which four pieces of board are cut corresponding to its dimensions (minus the gaps).
In cut boards, a tongue-and-groove joint is prepared for transverse joining (a cut along the width of the board). This will be a window frame or frame to which the sashes will later be attached. The width of the frame should match the thickness of your walls.
The finished joint is coated with wood glue, drawn up (don’t forget to use a square) and fixed for a day until it dries.
After completing the work with the box, we begin creating the sashes. To do this, cut 8 board fragments.
At the ends of the blanks we again make a tongue-and-groove connection, but this time we cut them along the thickness(!) of the board.
At the next stage, both doors are glued, assembled and fixed in the same way as the box was assembled before.
The dried frames are processed along the outer edge with a moulder. (Only on one side of the sash.)
On the reverse side of each sash, you now need to cut a quarter along the outer perimeter. Its depth is 2 cm, the distance from the edge is 1 cm. To cut it with a cutter, you need to make two passes.
Having finished with the outer perimeters of the sashes, we move on to the inner ones , where the glass will then be inserted. Here, too, you need to cut quarters with a cutter - for an external window only on one side, for an internal window - on both sides of the inner perimeter of the frame.
When you finish working with the router, you will need to finish the corners that turned out to be rounded. To do this, it is best to use a chisel with a sharp edge.
The next stage is grinding all finished parts.
Double-leaf window for a bathhouse step by step (clicking on the picture will open in full size in a new window)
After this, you can begin installing the fittings .
Glass is placed after fittings and before painting with varnish. For greater tightness when installing glass, we recommend using silicone sealant.
At the last stage, the window structure is varnished . However, it is worth warning that in a steam room any coating for wood (be it varnish or impregnation) must be special, intended specifically for the steam room . In other rooms, use regular wood varnish.
seal, , on the sashes around the perimeter of the overlap .
IMPORTANT! Sealant and seal are important elements that help retain heat, do not neglect them.
Let's assume that you have an idea of how to make a window into a bathhouse with your own hands, now we'll tell you about its installation.
The main problems when installing doors and windows in a log house
1. Based on the experience of installing houses made of natural wood, a structure made from prepared and well-dried material will shrink up to 5 cm in the first year. In consistently rainy weather, the house will swell again. “Alive” or undried wood with a huge percentage of water gives a much larger amplitude per year.
2. Installing windows or doors in a log house is a technologically easy process, and professionals do not have any problems. But difficulties and problems with an inexperienced approach arise much later, at a time when the windows in the bathhouse or in the house begin to warp due to pressure from the natural drying of the wood. In other words, it is much worse when problems arise during the operation of the building.
3. High air humidity can lead to the fact that window or window sashes do not open due to swelling of the wood with increased pressure from shrinking logs. At times, it doesn’t take much to trim the adjacent planes of the sashes, and it’s even worse if the window cannot be opened during its entire service life. Just for this purpose, a small gap in the casing or a correct sliding structure is responsible - so that there are no such problems.
Tip: It is important to use dry and high-quality timber, it must be made from coniferous wood. Before cutting out window openings, it is important to strengthen the boards to its sides so that they do not move apart.
Preparing the window opening
In order to correctly understand how to install a wooden window in a log or log house, you need to remember the main difference between wooden building materials and stone ones. It lies in the fact that due to shrinkage, the tree does not have constant dimensions, so all windows and doors in such houses are placed in an additional load-bearing frame - casing.
You can read more about the casing in our other articles, but here we remind you that the casing frame should be made in such a way that there is a compensation gap between the top cut of the log and the frame strip, the width of which depends on the age of the house and the climatic features of the region (from 60 to 100 mm ).
Separately, we note that for wooden windows it is advisable to use a T-shaped or U-shaped frame with a wide inner board, since the frames are fastened using anchor plates.
Note on processing a window opening
To complete the work you will need a chain saw, nails, studs, timber, edged board, square, plumb line and polyurethane foam.
1. The contours of the window (door) opening are marked on the wall of the log house using four strips. At the same time, it is important to correctly mark the lower part of the window - approximately eighty cm from the floor.
2. The boards are selected slightly larger than the height of the opening to secure the studs with washers.
3. We make holes in the uncut crowns at the corners of the planned opening, similarly in the fastening boards.
4. Mark the vertical with a level and place boards along it, which we connect to the logs with the help of pins and tighten the boards.
5. We place steel washers under the nuts to prevent the nuts from cutting into the boards; we fix the boards on both sides of the marking.
6. Later, you can go directly to the process of cutting the opening with a chainsaw, starting with the top log. Maybe use another tool.
7. We move on to processing the sawn logs and fasten the edges together with jumpers.
8. We form a window block from lintels and jambs in pairs, and on the outside we form grooves to the size of the tenons.
9. We begin producing the window block by installing the jambs, using nails to connect the lintels with the clamping of the logs.
10. To check right angles, we use a square, which can be formed before the block is finally secured.
Tip: To dispel doubts, you need to watch a video about installing the pigtail, and only then proceed to installation.
Gradual installation of windows
At the moment, there are a couple of methods for installing window frames in a log house, but we will look at the easiest example.
To begin with, you need to visually imagine in cut what a window in a log house looks like - the diagram for installing a window in a log house is shown in the figure below.
This is a casing with grooves, a shrinkage gap with a seal, an external and internal platband, a tenon with a seal, a window with a drip, and a lower inter-crown seal.
The edging is done after the opening has been formed:
- Prepare a 150x40 beam for the top of the window opening, it should be the width of the opening, cut two rectangular cutouts at both ends for the pre-formed ridge;
- Place the board on top of the carriage beam, securing it with screws;
- We make the gap 3-5 cm larger than the height of the inserted window, for filling with a sealant or foaming from below;
- The gap between the flashing board and the log in the window opening should be about 5 cm (for shrinkage), which is filled with a heat insulator;
- At the time when the window is inserted and secured, a platband is attached to the frame so that the structure has a neat appearance;
- Before installing the trim and final installation, do not forget to check both vertical strips of the window frame for a plumb line and horizontal strips for a level, since it will be impossible to correct this later;
- It is necessary to impregnate all wooden surfaces with an antiseptic to prevent the destruction of wood.
Sealing and waterproofing
Just as for metal-plastic windows, the installation gap between the frame and the casing in wooden window blocks is filled with mounting foam.
To prevent the foam from collapsing under the influence of moisture and ultraviolet radiation, it is covered with a special protective layer that has one-way conductivity for water vapor. When installing wooden windows yourself, waterproofing is done using a special tape glued over the cut seal.
Please note that the adhesion of polyurethane foam to the surface of a wooden frame is much higher than to plastic, so it is recommended to perform this operation in the reverse order:
- stick the tape on the outside (over the installation gap, the direction of vapor permeability is from the frame);
- mount external trims, which will create a stop for the tape;
- prepare tape for sealing the gap from the inside (remove the protective film and stick it to the frame, but do not close the gap);
- blow in the installation gap from the inside of the frame;
- fix the insulating tape in the working position and mount the internal trims.
If the windows being inserted have a classic design (internal and external frames), we recommend creating an additional seal between the glass and the frame. To do this you need to do the following:
- remove the glazing beads;
- take out the glass;
- apply silicone sealant around the perimeter of the installation;
- Place the glass and secure it with a bead.
Also, when installing wooden windows, you need to pay attention to the presence of a seal along the contour of the sashes. In finished wooden double-glazed windows, the seal is already installed, but in classic frames you will have to install it yourself.
accepts orders for all types of work related to finishing logs and timber frames to a state of readiness for finishing, including the manufacture of casings and installation of windows. You can clarify the terms of cooperation and place an order for a specialist to visit you via e-mail or by phone numbers published in the “Contacts” section.
Calculate the cost of painting and insulating your home right now
Select types of work:
Select materials:
The process of installing plastic windows in a log house
The gradual process of installing PVC windows looks approximately the same as in the example with natural wood:
- We form a window opening;
- Install the pigtail;
- We are completing the installation of a plastic window in a frame using technology.
The best distance of the window sill from the floor is 80-90 cm, and if the interior design plans to use a window sill in the form of a tabletop, for example in the kitchen or in a child’s room, then it is better to think about its design and installation in advance.
Advice: Do not forget that wooden frames are also characterized by partial shrinkage, and PVC windows have a solid and measured base - they cannot be installed in a fresh log house, and it is mandatory to use a frame. It will make it possible to maintain sufficient autonomy of the double-glazed window from the log house; therefore, installation on foam and without a jamb is unacceptable in this case!
Two types of pigtail:
1. Lightweight design - a 50x50 mm groove is formed at the end of the opening for a block (not suitable for installing a PVC window).
2. A more reliable option is when a ridge is formed in the end logs on the window openings, on which a frame with a groove is subsequently placed, otherwise called a “carriage”, at this very moment during shrinkage movement along the guides without deformation will be ensured . This is a structure made of 100x150 mm timber, which exceeds the size of the window by 5-6 cm, in the center of which a 50x50 mm groove is chosen, the carriage is attached to the ridge.
Later, we assemble the frame from a 150x40 board, as described above, respectively, cut out grooves in it, which are attached to the ridge - this is the highest part of the opening where we place the PVC window. Be sure to cover the slats with tow (in rolls) and secure the carriages, and secure the top strip of the frame with screws to the carriage.
Once the right angles, vertical and horizontal stripes in the openings have been verified, and the frame has been framed, they move on to installing the plastic windows. Pay attention to the quality of fastening and density, so as not to disturb the thermal insulation of the windows in the log house. Follow all steps according to the instructions included with the PVC windows. When purchasing plastic windows, pay attention to the fastenings that are mounted at the end. The frame is leveled and mounted with fasteners to the frame; do not forget about the space for mounting foam under the window sill. All that remains is to hang the doors and cash out.
Advice: Pay attention to how the window is screwed to the board - never to the ridge, otherwise the essence of the movable fastening of the window to counteract shrinkage is lost.
Installation technology
Regardless of how the window will be inserted into the casing (in the direct or reverse quarter), it must be correctly positioned before fixing. Therefore, before you start installing the window, it is recommended to dismantle the movable frames.
Please note that, unlike PVC windows, double-glazed windows in wooden windows are not designed for quick removal. Therefore, unloading dismantling should be performed by removing the clamps from the rotary fittings.
Wooden window installation diagram
Considering that the weight of a wooden frame can be quite significant, further operations should not be performed independently, but you need to involve at least one assistant for this.
Installation of the frame in the casing is carried out in the following sequence:
- installation of anchor plates;
- frame positioning in all planes, including vertical. The installation gap should not exceed 20 mm, and the vertical line of the window should exactly correspond to the plumb line or level;
- fixing the window in the correct position;
- installation of movable frames and fixing them in the closed position;
- blowing in the installation gap with foam;
- organization of vapor and waterproofing;
- installation of internal and external platbands.
If the frame is installed according to the “blind window” scheme, the assembly will have to be carried out without dismantling the double-glazed windows.
In different bath rooms
Yes, there is a point that windows need to be installed differently in different rooms of the bathhouse.
Installation in a steam room
The steam room is a hot room; many people prefer sauna conditions, plus high humidity. All chemistry, if it stands here, will definitely emit volatile organic matter. On the other hand, polyurethane foam is polyurethane, and it is not recommended for use in a steam room. In general, you just need to remember that it is better not to fix the window in the steam room with polyurethane foam .
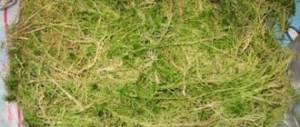
ADVICE! Instead of polyurethane foam, kosher insulation for steam rooms - jute, flax fiber and the like - are quite suitable.
It is best to fix the window in the opening using dowels, dowels, and anchors.
In other rooms
In all other rooms of the bath there is neither such humidity nor temperature. Therefore, the use of polyurethane foam can be considered justified. Just don't rely on foam alone - it's a bad idea. And when choosing plates, do not take those that bend like paper in your hands. Take stiff, reinforced ones.
*** At this point, it’s time for Scheherazade to finish her permitted speeches. If you find something useful, tell your friends. By the way, we now have a channel on Telegram.
E-mail
Article in sections: Windows for baths