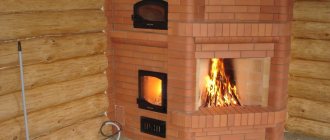
A brick chimney requires more effort than using a metal pipe for this purpose. But this design looks much more prestigious and lasts longer. We will look at three types of brick chimneys: classic single, extended with ventilation holes and simplified. Each type has its own characteristics and advantages. The final solution is chosen by the developers, and the individual characteristics of the bathhouse, design preferences, financial capabilities and the availability of professional skills must be taken into account.
How to build a brick chimney
General rules for the construction of chimneys
For all types of brick chimneys, there are several general provisions that must be followed.
Exit to the roof of a classic chimney
Height above roof covering. It is regulated taking into account the angle of inclination of the slopes, must ensure fire safety and prevent the draft from being blown out by air turbulence from the ridge. If the roof covering is made of non-combustible materials, then the fire height requirements can be ignored, but the chimney should be protected from turbulence. Recommended heights can be seen in the photograph.
Chimney height
Fire safety requirements
Material of manufacture. For most chimneys you can use ordinary red brick. If you want, buy a fireproof one, but it costs much more, and you shouldn’t expect a big positive effect from its use.
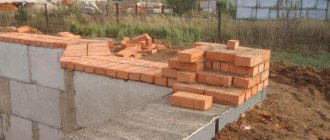
Red brick chimney masonry
We recommend using refractory bricks only for laying the top pipe; this is where the gas temperature is highest. The fact is that red brick can withstand temperatures up to +800°C without problems, and the temperature of the gases in the chimney is much lower. It is strictly forbidden to use sand-lime bricks - when heated, they release toxic chemical compounds into the air. This brick can only be used for external wall decoration.
It is prohibited to use sand-lime brick
An important requirement for all bricks is that the side surfaces must be smooth. The presence of unevenness and roughness increases the deposition of soot in the smoke channel; it will have to be cleaned much more often. A large amount of soot not only impairs traction, but can also cause ignition, and this is a direct risk of fire. When laying the chimney, the internal channel must be immediately cleaned of any mortar protruding in the seams. Use a damp cloth or sponge to do this, ensuring that the internal surfaces of the canal are as smooth as possible.
Prices for fire bricks
fire brick
Masonry mortar. There are two options. Some stove makers use only clay mortar, others add a little cement to it. We are supporters of the second option; cement significantly increases the strength of the structure. But it’s your choice; both types of solutions do their job well.
Ready-made clay mortar for laying a stove
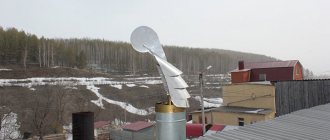
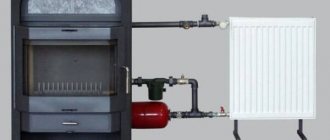
Advantages of a sandwich pipe for a chimney
Switching from a brick pipe to a sandwich is a more attractive renovation option than laying out a new brick pipe.
A stainless steel sandwich pipe has a number of advantages over a brick chimney:
- The round metal pipe heats up quickly and evenly, providing effective draft from the moment the stove is ignited. The same cannot be said about a brick chimney. It warms up more slowly.
- A stainless steel sandwich does not become overgrown with soot. Unlike a brick chimney, a sandwich chimney does not require annual cleaning. The inner surface of the stainless steel pipe is so smooth that soot particles do not linger on it.
- The round cross-section of the sandwich pipe is ideal for unhindered smoke exhaust. In such a pipe, smoke vortices do not form in the corners, as happens in a brick channel.
- Reliable insulation of the inside of the sandwich prevents the formation of condensation. When the fire is rarely fired (for example, in the off-season), the brick condenses moisture, and it takes some time to dry it. At this time, especially in windy weather, some of the smoke enters the room.
- The metal sandwich is easy to install anywhere. It can be removed not only through the roof, but also through the wall of the house. This expands the possibilities for installing a stove in a non-traditional location.
- Installation of a sandwich pipe without any significant losses is possible in a residential building, without eviction of residents, at any time of the year (if necessary).
- Installation of a passage through the attic and roof is facilitated by the presence of ready-made parts for the duct and external waterproofing of the pipe.
- A stainless steel chimney is easy to assemble yourself, without the involvement of a qualified stove maker.
We recommend that you read: How to install a water tank on a stove pipe in a bathhouse yourself
The disadvantages of a sandwich pipe could be its high cost. However, this is compensated by the ease of installation and the opportunity to save on hired specialists.
Note! The chimney of stoves fired with wood or coal requires high-quality stainless steel at least 1 mm thick. Heat resistance up to 1000 degrees.
Conscientious manufacturers label products accordingly. Before purchasing parts for the transition from a brick pipe to a sandwich, you should carefully study the accompanying documentation.
Classic chimney
Let's look at the structural elements of a classic chimney.
Construction of a classic chimney
Bottom part
From the top of the stove to the smoke valve (damper). Accepts very hot gases; fireclay bricks can be used for the channel. It’s better to buy a gate valve ready-made in a store; if it’s not possible, do it yourself. Store structures are more reliable; they are made of malleable cast iron and do not deform during heating. Steel gates can become deformed as a result of steel tempering. The deformed gate jams in the grooves, making opening/closing difficult. For laying the lower part of the chimney, it is recommended to use a clay solution without adding cement.
Steel gate in a brick kiln
Gate prices
gate
Fluff
Performs two tasks: it increases the resistance of the chimney to wind loads - it rests on the floor beams. In addition, the increased size of the fluff serves as fire protection for wooden structures.
Pipe fluffing
Riser
Part of the chimney from the fluff to the otter. The longest section, during laying it is necessary to maintain the vertical position of all rows.
Laying the chimney riser
Otter
Special thickening over the roof covering. Traditional chimneys are made without the use of modern methods of sealing the exit above the roof; the increased dimensions of the otter prevent natural precipitation from entering the attic of the bathhouse. To improve insulation, sheets of galvanized steel can be nailed around the perimeter of the otter.
Otter
Neck and head
The length of the neck depends on the angle of inclination and type of roof; specific dimensions take into account all the features of the structure. The height of the neck affects the stability of traction, regardless of wind strength.
After the neck is formed, you can lay out the head
The cap is a decorative element of the chimney.
Chimney head options
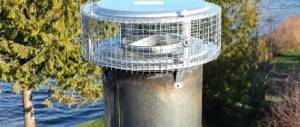
Protective cap
Prevents rain and snow from entering the smoke channel. The cap has one more function. If no one uses the sauna stove for a long time, then birds can build a nest in the channel - the chimney will have to be cleaned. To prevent such situations, it is recommended to cover the exit with a metal mesh.
Installation of a canopy on the chimney
We can only give approximate dimensions of each chimney element; more precise parameters must be calculated taking into account the architectural features of the stove and bathhouse.
How to make a chimney with your own hands
Before starting to build a brick chimney, you need to carry out various calculations to find out what the cross-section of the pipe should be, how high above the roof it should rise, and so on.
This is necessary to ensure sufficient thrust to fully remove the products of fuel combustion, but it is important to make the correct calculations so that the heat does not literally “fly out the chimney.”
Calculation of the height of a brick pipe
When building a chimney with your own hands, the question arises of how high the pipe should be.
The ideal option is the length from the grate to the pipe head - at least 5 m, but this parameter can be changed by increasing or decreasing the cross-section of the brick pipe. Such freedom is allowed so that the chimney not only fulfills its cleaning function, but also looks harmonious with the entire structure.
Note! The recommended minimum height of the roof pipe made of combustible materials is 150 cm, for non-combustible materials - 50 cm.
Another method of calculating the height of the pipe is based on the height of the ridge of a pitched roof or a flat parapet, and is designed to reduce the influence of wind in bad weather:
- a pipe located at a distance of up to 1.5 m from the ridge (parapet) must rise at least 0.5 m above it;
- a pipe located at a distance of 1.5-3 m from a structural element can be at the same height or higher;
- the height of a pipe extending at a distance of more than 3 m is calculated according to the following principle: a conditional inclined line is drawn from the ridge along the roof slope with a slope of 10 ° down relative to the horizontal (these calculations can only be made on the drawing).\
We recommend that you read: Sound insulation methods to reduce noise in a sewer riser
Calculation of the chimney cross-section
The cross-sectional size of the pipe depends on the power of the installed heat generator (indicated in the technical data sheet of the device).
| Heat generator power (kW) | Pipe cross-section dimensions (mm) |
| 140x140 | |
| 3,5-5,2 | 140x200 |
| 5,2-7 | 200x270 |
| >7 | 270x270 |
If the stove is completely homemade, and the power of the generator is unknown, it can be approximately calculated using the following formula:
Important! This formula only applies to stoves and does not apply to fireplaces.
Selecting bricks and preparing mortar for masonry
There are several types of brick, but only red burnt brick is suitable for laying a chimney; the use of sand-lime brick is strictly prohibited. This is due to the fact that the material has to withstand high temperature loads (up to +400 °C).
In no case should you save on brick, since in addition to internal heat, the material has to withstand the influence of sunlight, rain, wind, frost, and so on.
Burnt brick comes in three grades, each with its own characteristics and to varying degrees suitable for chimney installation:
- The first grade is ideal for a chimney. First grade baked brick has the highest clay density, i.e. It has practically no pores, but has smooth edges without cracks and smooth edges without chips. It has excellent frost-resistant qualities and relatively low thermal conductivity. When tapped, it produces a moderate ringing sound. The color is bright red or orange. Ideal for laying chimneys.
- The second grade is acceptable. The second grade brick is called unfired. It has a pale red color and produces a dull sound when tapped. The brick is quite porous, the ribs are often crumbled. This type of brick, in principle, is acceptable for installing a chimney, but requires additional work to align the ribs, and the outer section of the pipe requires additional plastering.
- The third grade is unsatisfactory. Burnt bricks of the third grade are not suitable for laying chimneys! You can recognize it by its rich red or red-brown color. When tapped, it rings very loudly. Its main disadvantage is increased fragility, so in aggressive conditions (heat inside the pipe and frost outside), the brick can simply crack.
As for the mortar for laying bricks, many stove makers have their own recipes for its preparation and use mixtures with different proportions of cement, sand, clay and even lime on different sections of the chimney. If you are going to have a one-time construction of a brick chimney, it is best to buy a ready-made mixture for stoves and fireplaces.
Instructions for laying a chimney
The most popular chimney system design is the mounted chimney. This option is the easiest to install, and also does not require additional space (it is built on top of a brick oven).
- The first row of the chimney is laid out on the top row of the stove, around the chimney opening, according to the calculated cross-sectional size.
- Next, row by row, bricks strictly one above the other, the pipe riser is laid out.
Healthy! The thickness of the cement mortar layer on the brick should be about 10 mm, and after pressing the top brick, it should decrease to 6-7 mm.
- 2 - 3 rows before the attic floor, the formation of fluff begins. To do this, a new row of bricks is extended 30 mm beyond the outer perimeter of the chimney. The internal perimeter must remain unchanged, so it is necessary to lay out fragments of brick from the inside to maintain the given section.
- Then each next row extends another 30 mm beyond the outer perimeter. The internal cross-section remains unchanged.
- Typically, the expansion of the fluff ends when the new perimeter extends beyond the original by a whole brick. Next, laying continues in the new perimeter until the top of the pipe is level with the attic floor or slightly higher. The number of rows of fluff is individual in each individual case.
We recommend that you read: Drainage pipe wrapped in geotextile: features and installation rules
Healthy! It is better to lay a sealant made of non-combustible material, such as asbestos, between the brickwork of the fluff and the attic floor to further increase fire safety.
- As soon as the attic floor is overcome, the chimney returns to its original perimeter and is laid out row by row to the roof. The hole in the roof for the pipe must be prepared in advance.
- Once the riser reaches the bottom edge of the roof, the formation of the otter begins. To do this, the row of bricks located towards the roof slope must be moved ⅓ outwards. The inner perimeter is permanently preserved using brick fragments.
- The second row is laid out along the new perimeter, however, the side facing the roof slope now also extends to the sides beyond the old perimeter, by about ¼ of a brick (60-65 mm). The width of the otter's overhanging row is half a brick.
- The third row repeats the masonry of the second row, but the width of the overhanging row is now a whole brick.
- In the same way, the laying out of the otter continues until it goes beyond the roof from the ridge side.
- Next, a completely overhanging row is laid out: the protrusions towards the slope and the side of the ridge make up ⅓ bricks, to the sides - ¼ bricks. This creates a canopy with a diagonal bottom edge that prevents precipitation from entering the attic. It is advisable to lay a waterproofing apron between the otter and the roof to completely close the hole in the roof through which the chimney passed.
- Once the otter is completed, the pipe returns to its original perimeter and the laying of the pipe neck continues to the calculated height.
- The last 1-2 rows can be laid out with the bricks shifted 30 mm outward, forming the head of the pipe.
- An umbrella cap is mounted on top of the head, protecting the pipe from precipitation and debris. There should be 15-20 cm of free space between the cap and the top brick.
Attention! It is worth taking care of the smoothness of the seams not only outside, but also inside the pipe. This way the outside will look much neater, and less soot will accumulate on the inside surface.
In some cases (for example, when using second-grade baked brick), additional insulation of the chimney is desirable. Usually the pipe is insulated only in the open area. To do this, a metal mesh frame is attached to it, on which mineral wool is laid and covered with a vapor-permeable film on top. At the end, the entire structure is covered with plaster for exterior finishing.
Stages of building a classic chimney
The presence of a brick chimney should be provided for during the design of the bathhouse. The stove must be made of brick and must be on a separate concrete foundation.
Sauna stove at the stage of construction of the firebox
For most sauna stoves, a channel of 250x120 mm is sufficient; these are the standard dimensions of red brick. To lay a chimney, you will need special bricks half the standard size; they can be bought ready-made or carefully cut with a grinder with a diamond blade.
The thickness of the solution is no more than 1 cm; the thicker the solution, the greater the risk of cracking during thermal expansion. We do not recommend making such a complex chimney for a metal stove; installing a pipe is enough for it.
Step 1 . Prepare bricks, tools and mortar. Take measurements down to the gate and fluff.
Step 2. Start laying from the bottom of the chimney from the stove, check each row with a level in all four planes. After three or four rows, clean the channel of excess solution.
Channel type
Practical advice. Chimney laying can be significantly accelerated. After 2-3 rows of bricks have been laid, secure ropes in them at the corners and pull them towards the ceiling. Install the ropes strictly vertically; they are used to control the position of the chimney. No more wasting time checking each row with a level.
Verticality control
Step 3. Attach the frame where the gate is installed. Installation of the frame should not disturb the position of the upper plane of the bricks; to do this, you need to select a recess in them that matches the dimensions of the gate frame.
Step 4. Continue laying until the fluffing begins. Calculate the number of rows that will have to be laid before the fluff reaches the desired size. Please keep in mind that in one row the perimeter of the chimney increases by a quarter of the width of the brick. The fluff should be tightly adjacent to the ceiling beams. If they are located at a large distance from the chimney, it is necessary to make special thrust frame structures.
Fluff
Step 5. Lay out the fluff according to the diagram. Keep in mind that this is only a schematic diagram; the specific number of rows of bricks to reach the maximum fluff width depends on the design of the bathhouse. It is not necessary to make a square profile fluff; you can lay out a rectangular one.
In the photo - fluff
Important. There should be no gaps between the ceiling beams and the fluff, otherwise the chimney will wobble under the influence of sharp gusts of wind. Oscillations will disrupt the tightness of the connection between the pipe and the roof covering, and this will certainly cause leaks. There is no need to explain what a constantly wet rafter system or attic is. Do not use any mineral wool for thermal insulation; the thickness of the fluff completely prevents spontaneous combustion of wooden elements.
Step 6. Gradually, over the same number of rows, move from the fluff to the size of the chimney, pull it towards the roof.
Step 7. On the lower level of the roof, start placing the otter. This element of the chimney is more complex than the fluff; the increase in the width of the chimney should occur gradually, taking into account the slope of the slopes. To increase the stability of the structure, we strongly recommend that you embed metal plates into the otter during masonry and attach them to the rafter system.
Otter
The ends of the bricks need to be trimmed, this will reduce the size of the gap between the roofing and the otter. If you don’t want to trim, we recommend installing metal sheets between the lower part of the otter and the roofing to prevent precipitation from entering the rafter system and the attic.
Joining the passage of a brick pipe. Fluff
Pipe passage through the ceiling
Practical advice. For those who are building a brick chimney for the first time, we strongly advise you to lay bricks on the ground without mortar according to the diagram before laying them. This will allow you to better understand masonry technology and avoid annoying mistakes.
Important. If plastering of the chimney is not planned, then the visible part of the masonry must be done for internal or external jointing. The bricks are smooth and beautiful - open up the seams; the appearance of the materials is unsatisfactory - you will have to plaster. We will talk about plastering technology a little below.
Step 8. Laying the head. A purely decorative element, increase the outer perimeter of the chimney by a quarter of a brick. The head is one row and immediately after it the finishing row. We recommend embedding a metal bird net into the finishing row. Attach the protective cap to the top of the chimney with dowels.
Pipe head
Give it two or three days to dry, and then begin the first heating of the stove. Don’t be alarmed if at the beginning of heating there is little or no traction, over time everything will fall into place.
How is a brick chimney constructed?
A brick chimney consists of several sections, some of which are located indoors, and some in the open air.
The design features are such that when passing through the attic floor, the walls of the pipes must be thickened as much as possible in order to reduce the risk of fire in the rafter system. At the same time, going beyond the roof, the chimney structure itself must cover the hole in the roof so that precipitation does not penetrate into it.
- In most cases, the chimney pipe is a continuation of the stove, i.e. on top of it the required number of rows of bricks are built up to the attic floor.
- The next element is fluff. When fluffed, the width of the pipe is 2-3 times greater than its normal size while maintaining a constant internal cross-section. The thick walls of the pipe are a kind of buffer that protects flammable elements of the attic system from contact with the heat passing through the pipe. At this level the air is still too hot due to the close proximity of the furnace.
- Next comes the riser - a section of pipe from the attic floor to the top of the roof. It is a brick pipe in its usual cross-section.
- According to technology, there should be an “otter” at the place where the pipe exits the roof, but it is often neglected. The element is similar to a fluff, but is installed in such a way that a brick canopy is formed above the roof, repeating the angle of inclination of the roof. The otter is needed to close the hole through which the pipe comes out from precipitation. Usually a special apron (metal or other material) is placed around the otter to provide better protection.
- Next, the neck of the pipe rises above the roof - the external analogue of the riser.
- The entire structure ends with a cap, which is a small visor. This is rather a decorative traditional element of the pipe, since its protective functions are minimal. For this reason, the head is also often neglected.
- A metal cap is installed on top of the head, which protects the chimney from precipitation and debris getting inside.
We recommend that you read: Methods of insulating pipes for external sewerage
Important! The internal cross-section of the brick pipe remains the same throughout its entire length, only the wall thickness changes.
How to plaster the top of a brick chimney
There are two options:
- buy special metal corners in the store;
- make your own universal device.
Plaster profile
We believe that making a universal device is much more profitable.
- Firstly, it's much cheaper.
- Secondly, it can be used when plastering door and window openings, external corners of walls, etc. d. This means that such devices will always be useful at a construction site.
- Thirdly, you can independently adjust the thickness of the plaster layer depending on the condition of the surfaces.
Corner rail
The device is made from pieces of wire rod or construction reinforcement Ø 6÷8 mm. The length of the fittings depends on the width of the chimney or walls. The rod must be bent in a V shape, with the center of the bend located in the middle. The ends are bent again at an angle of approximately 90°. How to use the device?
Step 1. Select even wooden slats; the length of the slats should be equal to the length of the surface. It may be shorter, but then you will have to plaster it in two steps.
Step 2 . Install the slats at the corners of the chimney (or opening) and secure them with two made clamps. The clamps must securely hold the slats in the desired position.
Step 3 . Depending on the condition of the chimney surface, select the thickness of the plaster layer. Try to keep it no more than 1.5 cm; if there are large protrusions, remove them.
Step 4. Using a level, install the slats in a vertical position. There should be two slats on one side of the chimney. Repeat the same operations on the opposite wall.
Step 5. Start plastering the surfaces, usually remove excess mass and level it along the installed slats. Repeat the steps on the opposite side of the chimney.
The next day, carefully remove the clamps and slats. Now the even corners of the plaster will serve as guides for the rule while plastering the two remaining planes of the chimney. Simple, fast, cheap and beautiful. Do not throw away the clamps; they can be used to handle all external corners in buildings.
Example of a plastered pipe
How to make a transition using a steel platform with a pipe
This method combines the advantages of the two previous methods, as it allows you to equip a chimney without a special adapter, and get rid of the labor-intensive filling of a brick opening.
Place of transition to sandwich pipe
Installation includes the following steps:
- Cut a platform from a metal plate so that its size matches the size of the brick part. It is better that the plate does not extend beyond its edges. Mark the places where the platform will be attached to the brick opening. It is necessary to ensure that the fasteners are not located on the seams or on the edges of the brick. In the designated places of the sheet you need to make holes for screws, and in the brickwork - holes for dowels. Insert dowels into the holes made. Apply fireproof, silicone sealant to the surface of the brickwork. Install a metal platform on a layer of sealant. Tighten it evenly to the surface of the brick using self-tapping screws. After the sealant has dried, proceed with the installation of an air exhaust system from a sandwich pipe.
After installing a homemade adapter with a pipe, installation of the system is quick, since the pipes fit well together through holes with a narrowed and widened end.
Laying a simplified chimney
We hope that you have carefully read our tips and already have an idea about laying a traditional chimney. In this case, the simplified version will not create big problems. Let us dwell on its differences and technological features.
Video - Simplified chimney
The chimney has no fluff and no otter. The fluff serves as a fixation element; since it is missing, the structure needs to be secured in a different way. We recommend making a frame around the perimeter of the chimney from a corner and using threaded connections to attach the frame to the chimney at ceiling level. Next, it needs to be fixed to the ceiling beams. It can be fixed with metal plates or building reinforcement, it doesn’t matter. The main thing is that the chimney does not wobble.
The otter was needed to seal the chimney outlet above the roofing. It does not wall up - do the sealing yourself. Use metal sheets for this; the specific sealing technology depends on the type of roof. We will indicate only the main general points.
Laying a simple brick chimney
Brick chimney passage through the ceiling
Pipe outlet through the roof
- Protective aprons must be bent and inserted into a groove cut on the planes of the chimney.
- To completely prevent moisture from entering, it is highly advisable to treat all contact areas with any sealant.
- There is an opportunity - when installing the roofing, purchase factory-made chimney outlet sealing systems.
If the brick used to lay the chimney has already been used, then it is necessary to plaster the internal channel as well. Special angles and straightness should not be observed; the main thing is that the surfaces are as smooth as possible.
How to assemble a chimney correctly?
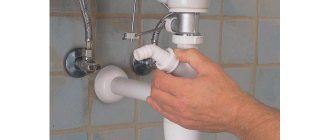
Fire safety rules when installing a chimney require compliance with certain standards. To lay sandwich pipes through wooden structures, high-quality thermal insulation of metal parts from wooden (or any other flammable) parts is required.
In the case of a finished metal pipe, it is possible to purchase ready-made structures that insulate the roof from the effects of heat (pass-through unit) and precipitation (oblique lining and protective corrugated flange).
Rules for assembling a sandwich part of a chimney:
- The assembly of the structure is carried out from the bottom up.
- Metal parts are inserted into one another according to the principle of socket joints. The joints are sealed with a special non-flammable compound and reinforced with clamps (special clamps).
- There should be no joints in the section where the pipe is routed through the floors. This is a fundamental fire safety rule when assembling a chimney structure.
- If the roof is made of flammable material, it is necessary to install a spark arrestor on the head of the pipe. In any case, a protective cap is required.
- To secure the tall structure, I use tension cables.
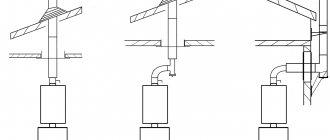
General rules for installing a transition:
- The metal part of the pipe can be partially recessed into the brick part using the sleeve principle.
- It is unacceptable to reduce the internal part of the channel or install mechanical barriers (protrusions, fittings) for the passage of combustion products.
- To ensure tightness, use black oven sealant with resistance up to 1500 degrees. If the pipe is not going to be disassembled, then sealant is applied to the inside of the pipe. If the structure (in the future) needs to be disassembled, then only the outer seam is sealed. Later, during disassembly, the sealant is removed by mechanical force (broken).
- To switch from a square to a round cross-section, you definitely need a support platform (square) and a pipe (cylinder). It is better if it is a one-piece design.
We recommend that you read: How to properly install a chimney in a private house?
There are several options for switching from a brick chimney to a sandwich pipe. Each of them has its own advantages.
How to make a brick chimney with ventilation ducts
The presence of effective ventilation in the steam room and shower is one of the important conditions for the comfort of taking water procedures. In addition, it helps to quickly dry rooms and increase the service life of all wooden structures.
How to make a brick chimney with ventilation ducts
Chimney diagram
It is not advisable to install a brick chimney just for the sake of smoke from the stove. In this case, you will have to make ventilation ducts in the walls. We strongly recommend that you immediately make ventilation ducts in the chimney. If the stove and chimney are placed correctly, then it becomes possible to arrange ventilation not only in the steam room, but also in the shower room. For other rooms of the bathhouse, ventilation may not be provided at all.
Installation of electric fans (forced ventilation) or decorative grilles with adjustable blinds or dampers is allowed in the ducts.
How is the installation of ventilation ducts carried out?
Step 1. Make a preliminary layout of the chimney on the ground using bricks, provide one channel for smoke and two for ventilation. In order to save money, lay the pipe from the stove using aerated concrete blocks, they are much cheaper, use brick only for the smoke channel. The entire chimney made of bricks should be placed only from the opening of the ventilation ducts (under the ceiling of the steam room and shower). After opening the channels, the chimney is made only of ceramic bricks.
Prices for aerated concrete blocks
aerated concrete block
Step 2. Lay the bricks with a bandage; it is enough to make the ventilation holes around the perimeter ≈ 12 cm, which is one width and two thicknesses of a standard red solid brick.
Step 3. If, for technological reasons, the ventilation duct has to be made in the corner of the chimney, then use a grinder to trim the bricks to give them the desired geometric shape. Seal the seams carefully and do not leave gaps. Violation of the tightness of the seams significantly reduces the efficiency of room ventilation.
Step 4. The recommended wall thickness between the channels is half a brick, but you can change it depending on the required distance between the ventilation and smoke channels. Link each new row with the old one at least half a brick. Keep in mind that the size of the chimney with ventilation ducts increases, wind sail loads increase, therefore, its stability needs to be increased.
Step 5. Using the same algorithm, continue laying along the entire length of the chimney. To speed up work between the extreme corners, pull the rope and use it to control the position of the bricks. It doesn’t hurt to check the verticality of the structure from time to time. The head is made in the usual way - with a third of the brick overhanging across the row.
Laying chimneys and ventilation ducts: a) in walls 1.5 bricks thick; b) in walls 2 bricks thick
A simple chimney diagram for removing smoke and gas, as well as for ventilation
Chimney with ventilation ducts
Video - Laying a chimney with ventilation ducts
It is not necessary to do otter and fluff in such chimneys; attach the chimney to the beams and rafters using metal corners and plates.
Installation of the external part of the pipe
The external one can be assembled from other materials. The transition of the “sandwich” pipe to the outer part is assembled taking into account the parts used. The main rule that must be followed is that each joint must be completely sealed. Smoke tends to seep into any crack, which is fraught with negative consequences.
If combustion products are not completely removed from the premises, this will negatively affect the health of all residents. Smoke will also negatively affect the condition of the house, having a destructive effect on all elements with which it interacts.
A “sandwich” on a brick pipe is one of the most common types of joint. This is not surprising, given that such an external chimney has the best durability and is simple to design and construct. The brick is well protected from damaging atmospheric influences and is adapted to work with high temperatures. Now we are talking specifically about heat-resistant bricks, which are used in the construction of fireplaces, stoves and chimneys.
How to calculate the diameter of the chimney channel
You can find statements that the height of the chimney cannot be less than five meters. This is not true, do not pay attention to such statements. Just imagine a bathhouse approximately two meters high, above which a chimney three meters high protrudes.
Accurate calculations are quite complex, you need to know many formulas and take into account a large number of factors: the temperature of the gases at the entrance to the chimney, the speed of the air flow, altitude, combustion rate and type of fuel, wind rose, etc. You should not engage in such complex calculations, we advise use the Swedish method. It takes into account the main indicators, based on them, calculations are made and a schedule is drawn up. As initial data, you only need to know the area of the firebox (F), the chimney (f) and its height (H). Having two parameters, you can always find out the unknown third.
Graph for determining chimney parameters
For example, you know the dimensions of the firebox and chimney, you need to know its height depending on the profile configuration. Find the percentage of these parameters and use the graph to find out the minimum height. Or vice versa, the height of the chimney and the area of the firebox are known, but you need to find out the area of the chimney channel. Again, using the simplest arithmetic operations on the graph, you will find out the dimensions of the channel, taking into account the cross-section configuration.
Chimney calculation
Step-by-step DIY connection technique
When deciding how to install a metal pipe with insulation with your own hands, the condition of the existing brick structure is assessed. If signs of destruction are visible, it is recommended to dismantle it. When you plan to install a metal product using the fitting method, it is necessary not only to dismantle the collapsing section of the chimney, but also to build a new structure afterwards.
Required tools and materials
To work you will need:
- perforator;
- chisel;
- sledgehammer;
- Circular Saw;
- fireproof mixture;
- sealant;
- screwdriver;
- self-tapping screws;
- Master OK.
Installation rules are followed, and components are selected taking into account the chosen mounting method.
Work progress
After dismantling the old structure, a new brick superstructure is erected on the roof. To fix the steel product in the ceiling, a through-type pipe is used. The transition of a brick pipe into a sandwich is made using a sealing material. In this case, a reinforcing platform is used, it is secured with self-tapping screws. Special clamps are used to connect sections of metal pipelines.
Installation features
When you plan to disassemble the chimney close to the stove, then in order to avoid overheating, a thick-walled stainless steel pipe should be used as the first link of the transition structure. There should be no insulation inside. Installing a sandwich pipe can lead to through burning of the metal.
To properly assemble the chimney, it is necessary to carry out the installation sequentially. During the completion of the work, a cap is installed on top of the metal pipe. However, the deflector causes a lot of controversy regarding the installation of this element on top of the sandwich pipe. This measure helps to increase traction. However, an earlier version of the regulatory documentation mentions a ban on the use of such products when installed on chimneys. This is due to a decrease in the pipe lumen and accelerated formation of a soot layer on structural elements.
Transition from a brick chimney to a metal one
In order to switch from a rectangular brick chimney to a round metal one, you will need a flat steel platform with a pipe whose diameter corresponds to the diameter of the steel pipe.
The external dimensions (perimeter) of a brick chimney are 500 x 370 mm.
I purchased a stainless steel platform measuring 500 x 500 mm, in the center of which there is a pipe with a diameter of 200 mm. (that is, with a cross-section equal to the cross-section of a stainless steel pipe).
Now the platform with the pipe needs to be fixed somehow.
We will fix the platform using dowels and self-tapping screws.
| The transition from a brick chimney to a metal one must not only be reliable, but also airtight, that is, there should be no gaps or cracks between the bricks and the stainless steel platform. To achieve the necessary tightness, we will use a special sealant for fireplaces. I used fire-resistant silicate sealant "TYTAN" for stoves and fireplaces. It is intended for long-term repairs, filling joints, cracks, crevices in fireplaces, stoves, fireboxes, chimneys and is distinguished by: — good adhesion (adhesion of surfaces of dissimilar solids and/or liquid bodies) to many building materials: metal, brick, concrete; - high heat resistance - up to +1250°C and good resistance to frost and moisture; — does not crumble or crack after hardening, does not contain asbestos. In general, the fire-resistant silicate sealant “TYTAN” is what is needed in our case. |
Installation of a steel platform with a pipe |
| Now let's talk about installing a steel chimney in order... What we have to do in order to switch from a brick chimney to a metal one: We cut out the platform so that it matches the dimensions of the brick chimney: 500 x 370 mm. (or did not exceed them). We estimate where the platform will be attached to the brick chimney. Be careful: the fastening points should not coincide with the masonry seam or get into the edge of the brick. Now is the time to remind you that to strengthen and give strength to the masonry, I laid out the last two rows of the brick chimney on a complex one. After the attachment points for the steel platform with the pipe have been determined, we drill holes in it for the screws, and in the bricks we drill holes for the dowels. Insert the dowels into the prepared holes. We install the metal platform on a brick base, onto which we first apply fire-resistant sealant. We evenly tighten the platform with self-tapping screws along its entire perimeter. Although the platform is well secured with self-tapping screws (I used a lot of them), I decided to wait until the sealant dried. And only after this can you proceed directly to the installation of a chimney made of stainless steel pipes. |
What do you need to know about sectional shape and waterproofing?
For a brick chimney, a round cross-sectional shape is best suited, since it ensures uniform smoke flows. On the contrary, rectangular and square cross-sectional shapes can create turbulence that interferes with the passage of the main flow and leads to heavy soot accumulation.
An important point is protection from snow and rain getting into it. A layer of waterproofing is mandatory, since without it, accumulated moisture can destroy not only the masonry of the stove, but also the adjacent structures of the house itself.
Basic rules for installing chimneys
Before installing the chimney, it is recommended that you familiarize yourself with the following rules:
- the total height of the chimney pipe from its connection with the heating equipment to the final element of the system, which is the head, must be more than 5 m. Otherwise, the chimney will not have enough natural draft to remove harmful substances formed as a result of combustion;
- the height of the chimney on a flat roof of a building must be at least 0.5 m. For other roofs and methods of placing a chimney on it, there is a specific diagram shown in the figure;
- when arranging chimney pipe transitions through the walls and roof of a building, all joints with the house must be insulated. For this purpose, non-flammable materials that can withstand high temperatures are used. For example, asbestos sheets;
- Before installing the chimney, you should determine the diameter of the pipe, the required length and shape. The diameter of the chimney depends on the power of the heating device and is calculated based on the requirements of GOST. For 1 kW of power it is recommended to use a pipe with a diameter of 8 cm²;
- Correct installation of chimney pipes requires absolute tightness of all existing joints. Additional insulation at joints can be provided using heat-resistant sealant.
All basic rules when installing a chimney must be followed. Otherwise, the system will not operate properly, which may result in a fire.
Features of a brick chimney
A properly installed brick chimney always has excellent draft. If the structure is built in accordance with the rules, it will serve for many years. Destroyed brickwork can block the path of combustion products escaping. To install a new top, you need to purchase a sandwich pipe with a base of the same diameter as the metal pipe, a deflector and a roofing element for the transition with the roof.
But first you need to disassemble the old pipe (its upper part). Dismantling of chimney brick pipes is carried out taking into account the dimensions of the structure and its location. Professional repairmen use circular saws, hammer drills, sledgehammers or hydraulic tools when disassembling the barrel. If a pipe is planned to fall, its angle of inclination and the location of the fall should be calculated.
The main components of the chimney structure: foundation, trunk (part of the pipe up to the roof), cap, tin collar (allows the gas exhaust channel to fit tightly to the roof), otter (part of the pipe extended by 10 cm), neck of the pipe (has the same size as chimney riser), cap (a deflector is installed on it, protecting the structure from snow or rain).
The top part is laid out in a special way, installed directly on the stove and contains a valve. It ends 5-6 rows before the overlap between floors. In the fluff zone, the trunk expands by 25-40 cm, but the cross-sectional area should remain unchanged along the entire length of the structure.
The continuation of the main pipe is made of refractory brick, and at the very top the chimney should narrow to the size of the base of the sandwich pipe.
The order of work is as follows.
- Mortar is applied to the surface of the bricks and masonry is performed. Then the horizontal and vertical planes are checked by level and suspension. Rectangular masonry is the simplest; the evenness of the masonry can be checked with a metal rectangle.
- The inner surface of the chimney is rubbed down so that the joints are airtight.
- Fire-resistant fireclay bricks are ideal for chimneys; they can withstand high temperatures and are frost-resistant. You can also replace it with double sand-lime brick M 150.
- The plug is installed in the first rows of the chimney; a ventilation window is necessary to control draft.
- A window is made closer to the roof to clear soot from the pipe.
- Non-flammable material, for example, mineral wool, is laid between the roof and the chimney.