The option to build a bathhouse from 3x4 timber with your own hands is a reasonable solution to get a place for relaxation and washing procedures in a limited space. Construction from lumber will not cause difficulties even for people without special skills. If you follow the sequence of construction stages, you can complete the work in 1-2 months, depending on the type of foundation.
Advantages of a bathhouse measuring 3x4 m
Building a bathhouse from 3x4 timber with your own hands is an undertaking that does not require large budget expenditures or the involvement of heavy construction equipment. With the help of a competent project and high-quality materials, 1-2 adult men can raise a structure in a few weeks.
Choosing a wooden block as a building material makes the process of assembling the box no more difficult than a children's construction set. The correct geometric shape makes it easy to construct elements into crowns. With reliable fasteners, construction of a high-quality foundation and insulation work, your own bathhouse will last at least 20 years with timely repairs and maintenance.
The construction of a bathhouse with dimensions of 3 by 4 m from timber material is characterized by the following advantages:
- The building area is only 13 sq. m. m with allowances for foundation protrusions and roof slopes;
- possibility of construction in limited space;
- a full-fledged building for washing and resting for 2 adults or 1 adult and 2 children;
- the ability to organize a separate steam room, washing room and dressing room;
- speed of construction;
- low consumption of materials;
- there is no need to install a strong foundation;
- It’s easier and faster to insulate, decorate, warm, and dry a small room.
The wood from which it is planned to build a mini-sauna complex on your own site is an environmentally friendly and affordable material. Thermal procedures in a room built from timber have a beneficial effect on the overall tone of the body, strengthen the immune system, have a healing effect on the pulmonary system and skin, and promote recovery from colds.
Advantages and disadvantages of a 3x3 bath
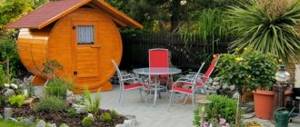
A small bathhouse building has its pros and cons. Despite the limited space, it can accommodate the main premises necessary for the full operation of the bathhouse. The small size of the house helps to save building materials. This is relevant when building a foundation and cladding the walls from the inside. The construction of a small building will take less effort and time, and the area will allow you to place a small place for general recreation. If space allows, over time a terrace will be added to the bathhouse, where you can drink tea in the summer. When organizing a heating system, it is the small bathhouse that creates the least amount of problems: there is no need to buy expensive large-sized stoves.
There are also several disadvantages to a small building. No more than two or three people can steam in it, but if you get used to it, this will not become a big problem for vacationers. Any small bathhouse is a one-story building, in which there is neither a billiard room nor a bedroom upstairs. In small areas, the master’s capabilities are limited, but if you plan everything wisely, the sauna house will become a worthy alternative to larger buildings and will not be inferior to them in terms of efficiency and quality of relaxation.
Peculiarities
When building a compact bathhouse, use standard lumber - planed timber with a length of each product of 6 m. Manufacturers produce wooden products processed on four sides of this particular molding. When erecting walls 3 m wide, the timber will only need to be cut in half, which will speed up the construction process and make the work easier.
Important!
To comply with fire and sanitary safety, ensure the recommended distance from the facility to the adjacent territory and buildings. There must be at least 1 m between the fence and the bathhouse, and at least 15 m from neighboring buildings.
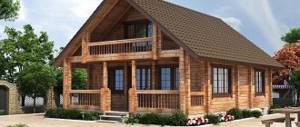
Before starting construction work and design, check out the photos of finished baths measuring 3 by 4 to choose the option that suits you. After choosing a building model, the design and construction stages will not be difficult. Due to the compactness of the bathhouse complex, carefully consider the layout of the premises, the location of the heating stove, window openings, and entrance groups.
Roof of a frame bath
We attach a ridge purlin to the attic floor at a height of 775 mm.
We lay pre-prepared ties for the rafters.
In principle, the truss can be assembled immediately with a tightening, after which it can be installed in place, or separately, as it suits you. You can also put internal ties on the side of the rafters, this will make your work a little easier.
We cut the rafter at the desired angle, to do this we step back from the edge 76 mm, draw a line from the other edge of the rafter to the marked area and cut it off.
We make drank on the inner rafters. How to make such a drink is shown in the photo, where and how much to retreat to.
We install and secure roof trusses. Then we install the end strip. After assembly, the entire structure will become rigid.
To ensure that our rafters do not bend and have rigidity, we make and install a support in the middle of each rafter.
The design should look like this. In this version, we connect the support, tie and rafters with metal plates.
We install jumpers between the rafters.
We use cutting boards to strengthen the roof overhangs. Then we sew up the entire structure with a 2.5*150 mm board.
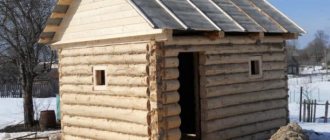
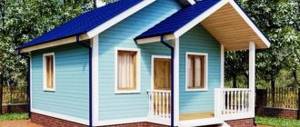
DIY frame bathhouse 3*4
As a result, we should get such a small frame bathhouse, or rather the frame of a future bathhouse. Next, we need to insulate the walls and ceiling, cover the roof, make interior and exterior decoration, and install a stove. But that's a completely different story.
Bathhouse 3x4 m: basic information about the project
The construction of a dacha mini-complex is classified as the construction of outbuildings on a private plot and is regulated by the state-approved document SNiP 30-02-97. Study building and sanitary standards before choosing a place to build a structure to ensure fire and hygienic safety.
You need to build your own bathhouse on the most suitable territory. To do this, you need to analyze the following aspects:
- soil type. Choose non-swampy, flat areas for construction. The choice of type of foundation layer depends on the nature of the soil;
- depth of the aquifer. Assess the area after snow melts and when groundwater levels drop. The foundation must not be washed away;
- climatic features of your region. Analyze the freezing depth of the soil substrate, the threat of flooding and seismic activity to select a reliable foundation for construction that will ensure long-term operation of the building;
- location relative to other objects on a summer cottage or private plot. Draining water from a bathhouse, drawing water, heating requires compliance with sanitary and fire safety;
- electrification. The supply of electricity must be carried out from a common panel that supplies a residential or country house and other objects on your territory;
- harmony with the overall landscape of the site. Ensure that the building fits organically into the overall appearance of the territory, its appearance is combined with neighboring objects.
The architectural aspect of construction in the area where your site is located plays a big role. When constructing a bathhouse on residential land, it is necessary to coordinate the upcoming construction activities and obtain permission from state administrative bodies before the construction process.
Nuances of designing basic elements
A project for the construction of a small-sized bathhouse is one of the most important documents, according to which you can systematically carry out construction processes, calculate the amount of materials, obtain a construction permit, and register the constructed structure for cadastral registration.
Proper planning of a small-sized building will allow you to obtain a large usable area and provide for all the necessary aspects. At the design stage, it is necessary to take into account all the points in order to organize consistent construction without missing deadlines.
Project
Designing your own bathhouse is an important link in the chain of construction processes. Create a competent project yourself or take ready-made options. Complete your sketch using special computer drawing programs or draw it on paper. For the drawing, take millimeter or checkered sheets and draw according to scale.
The project for which construction work is planned will require the following types:
- lateral view;
- front view;
- view from above;
- sectional view;
- view in three planes.
On all projections, indicate the dimensions of all elements - foundation, walls, rafter system, location and dimensions of windows, doors, heating stove, shelves. A well-drawn project will help to accurately calculate the estimate and become a plan for completing the work.
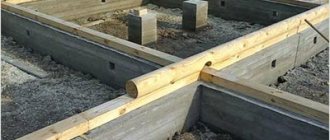
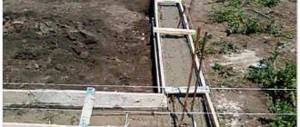
Foundation
A timber structure with dimensions of 3 by 4 m does not require the organization of a powerful foundation. Wooden building with an area of 12 sq. m of timber weighs from 2 to 3 tons, depending on the stage of drying of the lumber and the weight of the roof. The foundation must ensure reliable immobility of the structure. This is the main condition that will increase the service life of the building.
To build a small-sized bathhouse, the following types of foundation are used:
- monolithic filling. Dig a rectangular pit on the site with a depth of 30-40 cm, a length of 4.5 m and a width of 3.5 m. Equip the formwork from boards at a distance of 20-30 cm above the ground surface, fill the bottom with a cushion of stove and gravel, organize drainage , fill the space with concrete using M200 or M250 cement. Depending on weather conditions, it will take from 2 to 4 weeks to dry the base;
- strip base. Organize the excavation of a trench for the bathhouse foundation, repeating the perimeter of the structure being erected, 30-40 cm wide and 30-35 cm deep. Put together a formwork structure from plywood or boards with the walls rising 20-30 cm above the ground surface. Equip a drainage drain or pipe drainage for cleaning water . Fill the formwork space with a mixture of cement, sand and water. Use a cement composition of at least grade M200. To strengthen the structure, use reinforcement, pour broken bricks, stones, and coarse crushed stones into the concrete composition. It will take up to 3 weeks to dry the foundation tape;
- block foundation. Level the site for construction, dig at the planned corners of the bathhouse, as well as in the middle of the length and width of the perimeter, recesses for concrete blocks. Fill the bottom of the holes with a sand and gravel cushion 10-15 cm high, lay stone elements, and compact with soil. Make sure that the level of all block racks is the same;
- pile-screw field. Make markings on the soil substrate for installation of screw support piles. Install screw-type steel supports at the corners of the building, as well as one post under each wall. When planning to build load-bearing walls inside the box, consider installing a screw pile in the middle.
Important!
At the stage of organizing the foundation for the bathhouse, provide for the removal of waste water from the washing compartment. The base must not be washed away.
When building a bathhouse with a heavy brick heating stove, consider pouring a separate foundation. In accordance with the project, make a mark on the ground in the place where the heating unit will be installed, dig a recess, organize pouring concrete formwork or placing blocks.
Walls
After the foundation work, begin constructing the timber box. Make a powerful tier on the base from timber of a larger cross-section than that used for the walls. Place a grillage on the pile-screw field.
Assemble the frame in the following sequence:
- lay a waterproofing layer (for example, roofing felt) on top of the foundation row;
- for the first crown, use a wooden block 200 x 200 mm or 300 x 200 mm. The first row will bear the heaviest load of the log house, so the use of thicker material is required. Treat the laid tier with antiseptics, impregnations that protect against fungus, rodents, and insects;
- lay walls from timber, collecting right angles or organizing removal. Please note that the added corner elements will require more lumber;
- between the tiers, lay insulation - jute tape or moss;
- secure the rows together with dowels;
- To save money, immediately take into account the location of windows and doors.
| Bar height, mm | 150 | 200 | 250 | 300 |
| Number of tiers | 17 | 13 | 10 | 8 |
| Number of bars | 40 | 30 | 23 | 19 |
The standard height of the box must be at least 2.5 m. The number of rows of timber depends on the selected section of lumber. To assemble a 3 x 4 log house you will need at least 6-7 cubes.
Partitions
Partition structures that delimit rooms inside a log house can be made from wooden blocks of a smaller cross-section, boards, or using frame technologies. The bath space should be divided into:
- dressing room or rest room (2 by 2 m);
- washing room (1 by 2 m);
- steam room (2 by 3 m).
There is no need to construct additional load-bearing walls due to the small size of the building. The construction of solid partitions will reduce the usable area. Divide the space inside the bathhouse in compliance with tightness and fire safety to ensure complete washing procedures with rest.
Roofing system
For a small bathhouse, you can build a roof with one or two slopes. For construction, you will need an unedged board with a thickness of at least 5 cm for installing rafters, lumber of at least 2 cm for organizing the sheathing.
Install the roofing system as follows:
- Build rafters above the log house in increments of 0.7-1 m;
- Install a sheathing on top of the rafter elements, laying boards every 25-30 cm;
- secure the rafter spans with crossbars;
- lay a waterproofing layer on the sheathing;
- Lay roofing materials (slate, ondulin, corrugated sheets, tiles, etc.) on top of the waterproofing.
Provide an outlet for the chimney pipe in the roof. Equip all elements of the rafter system with reliable metal fasteners and corners. When installing roofing material, use hardware with polymer washers. After shrinking the frame, sew up the gables with boards or OSB panels.
Floors and ceilings
After assembling the box and erecting the rafter system, proceed to laying the floor. For high-quality insulation and tightness, you will need to build logs, a subfloor and a finishing coating. Provide for drainage of waste water in the washing compartment. Install a drainage ditch or pipeline under the washing area to remove wastewater from the structure.
Assemble the floor in the following sequence:
- on the protrusion of the lower tier, in specially cut recesses, lay logs with a thickness of at least 5-7 cm and a pitch of 0.5-0.7 m;
- lay a rough board under the joists, forming a continuous covering;
- lay waterproofing over the subfloor;
- put insulation (stone wool, polystyrene foam boards, etc.) in the spans between the joists;
- sew up the insulating layer with waterproofing;
- Finish with a planed floorboard.
In the washing compartment, provide a cover that reliably protects wooden materials from waste water. You can make a concrete screed under the final flooring. When covering the floor with washable tiles, arrange a slope of 3-5 degrees with the collection of wastewater into the pipeline.
Construct ceilings immediately with an insulating layer. Place logs on the top crown, and sew them up with clapboard from the inside of the room. Cover the top of the finishing in the attic with a layer of waterproofing, lay fireproof insulation on top, and cover it with a waterproofing layer. Place an unedged board on top of the insulating “pie”. Cover the smoke exhaust pipe with fire-resistant materials.
Windows and doors
Install entrance groups and window frames after shrinking the assembled box. It will take at least 1 year to completely dry the timber and stop deformation processes.
For a small bathhouse, you can install a window only in the washroom with dimensions of 50 x 50 cm or in the recreation room with dimensions of 70 x 70 cm. Due to the low temperature in the washing room, it is possible to use PVC structures. Wooden window elements will need to be treated against moisture. It is not advisable to install windows in a steam room due to the possibility of heat leakage.
Important!
When installing window frames and door structures, use fireproof foam to fill voids.
Install doors between rooms from solid aspen or larch. Use door handles with wooden linings to eliminate the risk of burns when touching metal elements. The bathhouse will require an entrance door (wooden or metal) and two entrance groups for a washing room and a steam room.
Bake
To heat a small wash room and steam room, you will need a small heating stove heated with wood. Choose compact options to get more usable space, ensure fire safety and avoid burns. Provide proper removal of smoke from the room.
For a bath measuring 3 by 4 m, you can install:
- a brick oven with one wall removed to the washing compartment. To build a heating structure made of bricks, the foundation will need to be poured in advance;
- homemade stove from a barrel. The unit inside must be divided into compartments for combustion, smoke removal, water heating, and ash collection. When using bricks inside a structure, consider constructing a free-standing foundation;
- a finished metal stove made of steel or cast iron. Installation of factory models does not require installation of a base.
A sauna stove must perform several functions - heat the room, water, stones to create steam. Depending on the option chosen, provide fire protection for wooden elements. A flood sheet must be installed in front of the stove, and the walls adjacent to the structure must be covered with asbestos or metal. For the chimney, choose stainless steel pipes.
Space layout
The 3 by 3 layout differs from similar buildings only in its dimensions; there is enough space. It should include the following necessary premises:
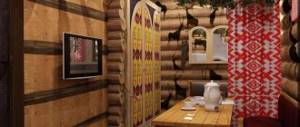
- Waiting room. A dressing room with installed cabinets for visitors and space for storing firewood.
- Restroom. A place where a table and other furniture is installed for collective tea drinking after couples’ procedures. In the layout of miniature baths, this room can be sacrificed in favor of increasing the area of the steam room.
- Washing room. In 3x3 baths, standard-sized shower cabins are sometimes used instead of a separate room.
- Steam room. The main room of the bathhouse, where a stove-heater is installed to heat the steam room.
Layout drawings must be designed in such a way as to supply water and drain waste without additional work. A power supply line needs to be laid to the building. There is always high humidity in the bathhouse, so ventilation in the steam room is required. Otherwise, fungus will appear and the wood will begin to rot.
The steam room is built after all communications have been completed. First, a cellular frame is assembled from 50x50 timber and attached to the walls of the building. Then the internal space of the frame is filled with insulation, at least 50 mm thick. If the walls are external, it is better to make two layers of insulation. The top is covered with metal foil, which is secured with a stapler.
The next step is to cover the walls with linden or aspen clapboard. The ceiling is usually made double to provide natural exhaust ventilation.
The floor in the steam room is concreted. Logs with a thickness of at least 100 mm are installed on top and covered with a floorboard. The shelves are made from aspen or linden slats, leaving gaps of 1-2 cm. The top shelf should be at least 1.8 m long and 70-80 cm wide. This will allow a person of average build to fit comfortably. The lower shelves are arranged in the form of a ladder.
The installation location of the heater, according to the layout, is usually in the corner. It is protected so that accidental contact does not cause a burn. Additionally, it is equipped with a canopy to distribute heat evenly throughout the room.
The door to the steam room must be insulated and not have locking elements. A window of 100x200 mm is provided in the upper part of the canvas.
You may be interested in: Nuances when planning a 6x6, 4x6, 3x6 bath: zoning the space and choosing suitable materials
Saving space on the site offers various solutions. One of them is a two-story bathhouse. In the 3x3 project, the first floor is allocated for a washing room and steam room, the second serves as a relaxation room. In order not to build another level, you can use the design of a bathhouse with an attic.
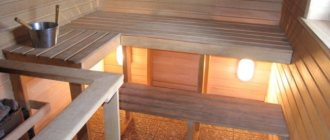
Steam room
The layouts of miniature 3x3 baths cannot surprise you with a large steam room. The minimum recommended size is 1.5x1.5 meters. These dimensions will allow two people to steam at the same time.
Restroom
In small bathhouses there are usually no rest areas. They are installed in built-on attics or attached verandas. The 3x4 layout of the building already allows you to arrange a small recreation room.
Waiting room
If the theater begins with a hanger, then the bathhouse begins with the dressing room. In the layouts of small buildings, it serves as a place to store firewood, a locker room and even a rest room.
Washing room
In bathhouse designs, the washing and steam compartments are located separately from each other. However, the layout of small buildings allows them to be placed together. The functions of a washing room can be performed by a shower cabin installed directly in the steam room.
Materials for building a bathhouse
To build your own mini-sauna complex you will need the following materials:
- materials for the base (concrete, formwork, brick, blocks, screw piles) depending on the selected type;
- a block of wood with a cross section of 20 x 20 or 30 x 30;
- wooden beams for walls with a cross section of 15 cm;
- lumber for partitions - a block with a section of 10 x 10;
- logs for the floor, rafters and ceiling with a thickness of at least 5 cm;
- unedged board for the subfloor, sheathing and ceiling, at least 2 cm thick;
- waterproofing;
- insulation material (stone or mineral wool, polystyrene foam, fiberglass, etc.);
- lining for interior decoration;
- edged boards for floors, ceilings, installation of shelves;
- 1 entrance and 2 internal doors;
- window;
- fittings (hinges, handles, latches, locks);
- fasteners (pins, nails, screws, rubber washers);
- metal sheet for fire safety;
- electrical wiring protected from moisture;
- heat- and moisture-resistant lighting fixtures;
- antiseptic;
- polyurethane foam;
- jute or moss for insulating a log house;
- roofing materials.
Wooden materials for high-temperature rooms should not release resin. Choose aspen lumber for finishing the steam room. Use coniferous wood in the wash room or rest room.
Work order
Consistent execution of construction processes is necessary to obtain a reliable structure that will last at least 20 years. Check out the step-by-step construction of the bathhouse in the video, which shows the main points of the construction of the structure.
The process of building a bathhouse consists of the following important steps:
- drafting;
- obtaining permission to construct a facility (for construction work on urban lands);
- calculation of construction materials estimates;
- purchasing everything necessary;
- preparation and marking of the territory;
- arrangement of a drainage pit or wastewater disposal structures;
- organization of the foundation, including for a heating stove;
- assembling a box from timber;
- construction of a rafter system;
- roof installation;
- building shrinkage;
- installing doors, windows, installing a stove;
- electrification works;
- construction of shelves, static structures;
- finishing activities.
Consistent implementation of all activities will allow you to independently build a small bathhouse for comfortable relaxation and washing procedures in a short time. Pay attention to every step to satisfy all requests. Subsequently, you can add a veranda, porch, or terrace to the structure.