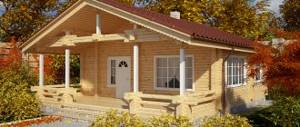
The most common questions that arise when planning a personal plot are related to where and how to place a bathhouse on the site. What requirements must the location of this building meet and what should its owner take into account? It is important to understand that the choice of a place for a bathhouse should initially be taken with the utmost responsibility, because in the future, when it is erected, it will be almost impossible to correct the errors that have been revealed. What aspects should you pay attention to when choosing a suitable corner where you can put a bathhouse?
Basic criteria for choosing a location
When exploring the potential of the area of your dacha and where it is best to place a bathhouse, you need to take into account a number of conditions presented below. These include:
- - type of bath, its design and expected dimensions;
- — features of the shape, size and topography of the site;
- — type of soil, its density, moisture saturation;
- - ground water level;
- — distance from water bodies;
- — location of the object relative to other buildings and plantings;
- — distance from neighbors (neighboring buildings and plots);
- — location of cardinal directions and climatic features of the area (precipitation, temperature, prevailing winds, susceptibility to floods, etc.);
- — additional criteria (see below).
When choosing a place where you plan to install a bathhouse in the future, you should take into account the aesthetic aspect. The building must fit organically into the surrounding landscape, and its appearance must correspond to the style of other objects (country house, outbuilding, gazebo, etc.). At this stage, it is recommended to be patient and draw up a detailed landscape plan for the site yourself or seek help from specialists.
How to place a bathhouse on the site: separately or as an extension?
Often, when there is a shortage of backyard space, owners prefer to build a bathhouse closer to the house or close to it in the form of an extension - especially since this is not prohibited by law. When planning to implement such a solution, it is worth considering that:
- - usually a bathhouse is attached to a house when year-round living is provided at the dacha - due to ease of use (for “seasonal” areas, a separate structure is preferable);
- — in order to avoid dampness, condensation and mold, it is advisable to equip a dry-air version of the bathhouse (with dry steam) in the house;
- — the construction of a bathhouse in the form of an extension to the house requires careful arrangement of waterproofing, sewerage and ventilation systems;
- — combining a bathhouse with a house requires strict and strict compliance with fire safety standards and sanitary and technical requirements for the arrangement of wet rooms.
If the bathhouse is supposed to be combined with a residential building, then it is necessary to involve craftsmen of the appropriate profile - architects, builders, engineers - in the implementation of such a project. Experienced specialists will help you develop a detailed plan for the placement and construction of an extension to the house, taking into account all the above requirements.
How to install a bathhouse next to your house
The most budget-friendly way to cut costs by a quarter is to use one wall of the house together with a bathhouse. But you need to be prepared for additional costs for vapor barrier and fire protection. First of all, you need to protect the house from steam penetration. This is especially true for brick, wooden walls or blocks. If the main house is wooden, then its wall should be protected as much as possible from fire. To do this, a layer of fireproof insulation is mounted on the wall. It is especially important to fulfill all requirements in relation to the entire area of the adjacent wall.
According to fire safety rules, all doors in the bathhouse must open outward.
In some photos of a bathhouse next to the house, you can see that the log house seems to be attached to the house. This is the second method of connecting two buildings. It does not require vapor barrier, but fire safety measures still need to be taken.
Type, design and expected dimensions
Depending on the design features, it is customary to distinguish between baths heated “black” (smoky baths) and “white”. Smoky structures have their own specific requirements for placement, namely:
- — a smoky or “black” bathhouse must be located at a distance of at least 12 m from the boundaries of the site and adjacent buildings;
- - the place for the construction of a “black-style” bathhouse is chosen in the direction where the prevailing winds blow (a place opposite to the locations of residential buildings). This will prevent smoke from entering the house and neighboring residential buildings.
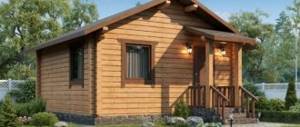
The estimated size of the future facility must be taken into account for the rational use of land area. Calculations of dimensions are made based on the structure and dimensions of the main rooms of the bathhouse - washing room, steam room and changing room, as well as from the condition that 2-3 people will be steaming in the bathhouse at the same time. The minimum recommended dimensions of a bathhouse built separately from other structures is 10-12 sq.m.
Premises in the bathhouse
The parameters of the internal space of the bathhouse are calculated taking into account the number of people washing at the same time. According to GOST standards, 5 m2 of free space is required for 1 person. In a small bathhouse, there is usually no division of space.
If dimensions allow, it is best to arrange 3 compartments in the bathhouse:
- dressing room;
- washing room;
- steam room
In the washing room you can put a bathtub or a small inflatable pool, or arrange a shower.
Comfort, coziness and the quality of relaxation depend on how to properly arrange the rooms in the bathhouse. The dressing room stores the necessary bath equipment, fuel, and brooms. A locker room is also set up here.
In the washing room you can put a bathtub or a small inflatable pool, or equip a shower stall. The mixer for supplying cold and hot water is located in close proximity to the bathtub or sink.
Some bathhouse owners install a washing machine in the washing room. You can also install a bidet and/or toilet, but you need to ensure protection against unpleasant odors.
The main room of the bathhouse has always been considered a steam room. A special stove-heater is installed here. In addition, you need to think about how to arrange the shelves; the bathhouse requires a special area for them.
Shape, size and topography of the garden area
The size and shape of a summer cottage largely determine not only the location of buildings, but also their dimensions, structure, and design features. If the territory has a non-standard (trapezoidal, triangular, U- or L-shaped or other) shape, its planning should be approached with the utmost care - it is possible that at this stage the help of a specialist will be required. Professional calculations will make it possible to determine whether it is possible to build a spacious summer bathhouse with a full set of premises in this area, or whether the owner will have to limit himself to a compact structure consisting only of a steam room and a washing room.
Relief is another important criterion that should be used when choosing a place to install a bathhouse. If conditions permit, it is best to place the building on a small hill - this will ensure a good outflow of dirty water and protection from dampness. A gentle or steep slope (in any direction except north) is also suitable - in this case, one part of the structure will rest on the soil mass, and the other on pillars or piles.
It is undesirable to locate the facility in flood zones (during floods) and lowlands, where snow accumulates in winter and moisture in other seasons. If there are no more suitable options on the site, then the owner will have to worry about the proper organization of drainage systems and disposal of used water into the sewer.
General recommendations for planning a bath
Before starting any construction activities, prepare a bathhouse project.
Bathhouse project
Determine the optimal size of the structure. One vacationer must have at least 5 m2 of the total area of the building. For example, if you are building a bathhouse for 4 people, its area should be at least 20 m2.
We invite you to familiarize yourself with the DIY gas stove drawings
Bathhouse with swimming pool
The standard sauna consists of a steam room, a washing room, a dressing room and a relaxation room. Set the dimensions and spatial arrangement of the listed premises that are convenient for you.
Design of a bathhouse with 3 rooms
Prepare the following drawings:
- general drawing of the bathhouse;
- drawing of each room;
- foundation diagram;
- roof drawing;
- beam fastening diagram;
- floor and ceiling drawings;
- design diagram and indicating the installation features of the sauna stove.
Layout of a small but cozy bathhouse
You can make all these drawings yourself or find them in an open source. In general, timber bathhouse projects remain almost the same. If you have the desire and a sufficient budget, order the preparation of drawings from a professional.
Small bathhouse project
Where to place the bathhouse: taking into account the characteristics of the soil
The type of soil, its density and moisture saturation is especially important to take into account if the construction of a massive structure is planned on the site. Light frame buildings in this regard are less demanding on soil characteristics.
The following types of soil are considered unsuitable for the construction of any buildings:
- — fine-grained and silty sands saturated with water;
- — fine, very wet sands;
- - plastic clays.
More detailed information about soil types can be found in the corresponding article on our website. Soils with poor bearing capacity and prone to severe heaving require the construction of a strong foundation, which increases the cost of constructing household buildings. Thus, the type of soil in the area where the bathhouse will be located largely influences such key points as:
- - materials for construction - whether it will be a massive stone or light wooden structure;
- - type of foundation (columnar, strip, etc.) and the need for its arrangement.
For example, on coarse and rocky soils, the construction of a foundation for buildings is not required at all.
Foundation
The foundation is the fundamental part of the bathhouse, without which it is impossible to do. The heavier the material and the larger the building, the stronger the foundation must be to withstand all impact factors. You shouldn’t do the foundation at your own discretion; it’s better to carry out all the work on the project. It indicates all the key points that will affect the construction process.
- Maximum accuracy of the depth at which the foundation is laid. It is necessary to take into account the depth of the floor outlets and the depth of soil freezing;
- The perimeter of the bath, that is, its length and width;
- Layer-by-layer marking of the entire foundation (pillow, frame and other elements);
- Clarification of individual details - the foundation for a pool or stove.
You can choose the type of future foundation yourself. A strip foundation is chosen for small and lightweight structures; a columnar foundation is suitable for wooden buildings. The slab base is useful for impressive buildings - for example, for a large two-story bathhouse.
You definitely need to know the type of soil on your site - in some cases it is impossible to cope with the task if, for example, you build a real bathhouse complex with several floors on watery soil. Therefore, you need to choose the foundation wisely, taking into account the characteristics of the land. But there is a “golden mean” - a foundation suitable for different types of baths.
On stilts
A pile foundation is the most reliable - it holds loads well and is suitable for areas with elevation changes and high levels of soil freezing.
It easily tolerates minor deformations, supports the weight of multi-story structures, and is also characterized by increased strength.
In essence, a pile foundation consists of several beams driven into the ground, which are connected by load-bearing beams or slabs.
Depending on the soil, you can choose one of four pile construction technologies.
- Pressable, which are lowered underground using hydraulic machines;
- Pressed ones - they are poured with concrete into a pre-prepared well;
- Screw - they work on the principle of self-tapping screws, that is, they are screwed into the ground;
- Drivers, which are driven into the ground with a special device.
Depending on the type of future bathhouse, different materials are chosen for making the foundation - for example, for lightweight structures made of foam blocks or wood, you can use treated pine piles. For heavy structures, steel pipes or reinforced concrete are suitable, but for unstable swampy soils it is worth using combined structures made of reinforced concrete and steel.
It is important to understand that a pile foundation will require a significant injection of funds, because it requires excavation work and a lot of concrete. It’s not for nothing that it is believed that the foundation “eats up” the bulk of the budget for the construction of a bathhouse. The costs will be justified - a bathhouse on a pile foundation will last for many years.
Ground water level
It is strongly not recommended to install a bathhouse in places with a high groundwater level (GWL) in order to avoid flooding (more details about the GWL and aquifers are described in the article “Searching for water on the site”).
Damp areas that are unfavorable for construction require preliminary drainage and careful arrangement of a drainage and drainage system. It is possible to locate a bathhouse in areas with high groundwater level on a pile foundation or, for example, if conditions permit, on an artificially constructed “cushion” made of geotextile and sand-crushed stone mixture (after preliminary extraction of the fertile soil layer). In each individual case, the issue of high water level for the further construction of personal buildings must be agreed upon and resolved with specialists who will suggest the most effective and least costly method.
Turkish bath
The Turkish bath or hammam (the name of public baths in Turkey and in the East in general) comes from the Roman baths. It got its name from the Arabic word for “hot”. This bathhouse was heated with steam coming from a large cauldron of boiling water, which penetrated through holes in the walls. The decoration of these baths was orientally luxurious.
Distance from bodies of water
Among the many options for places where it is better to put a bathhouse, the ideal place is considered to be a place near water - a lake, river, pond, reservoir. To prevent flooding (especially when there is a threat of floods), the building is located 15-30 meters from the edge of the bank. Regardless of whether the reservoir is natural or artificially created, wastewater from the bathhouse should under no circumstances enter it. To avoid the leakage of dirty water during the bath, install a reliable sewer drain leading in the opposite direction from the reservoir.
Is it possible to build a bathhouse in close proximity to a pond?
When the site is located right next to a natural reservoir, probably in 100% of cases there is a temptation to build a bathhouse right on the shore. This picture can be seen quite often in films. For quite objective reasons, this arrangement is liked by many lucky people whose plots are located near a river or lake.
However, there is one important nuance - building a bathhouse closer than 100 meters from natural bodies of water is prohibited by law. There is only one digestible and completely legal way out of this situation. It lies in the fact that if the reservoir is small and enclosed (not a river), then you can try to buy it out. In this case, as they say, the master is the master; I build whatever I want.
How to properly place a bathhouse in relation to other buildings and plantings?
A number of important conditions, where and how to locate the bathhouse relative to other buildings, are prescribed in special regulatory documents. The most important of them is SNiP 30-02-97 “Planning and development of territories of gardening associations of citizens, buildings and structures.” This document regulates the standards for the development of plots, including the recommended permissible distances between buildings located on one’s own and neighboring household plots.
According to the given SNiP, within one territory (your own summer cottage) the minimum distance from the bathhouse to:
- - the fence should be 3 m;
- — drinking well – 12 m;
- - any buildings made of non-combustible materials 6-10 m;
- - buildings made of wood with finishing made of non-combustible materials - 8-10 m;
- — wooden buildings – 11-15 m;
- — residential property – 8 m;
- — “red line” (roadway, street) — 5 m.
In relation to the country house, it is advisable to place the bathhouse in such a way that its entrance is clearly visible from the windows. This will allow you to control the process of heating the building in case of unforeseen situations. In this case, it is desirable that the entrance to the bathhouse does not face the neighboring area or is hidden from prying eyes by a fence or hedge.
Outside the same territory, the minimum distance from the bathhouse to:
- - the neighboring house should be 8 m;
- - wooden buildings on the neighboring plot - 15 m.
In relation to plantings, the bathhouse should be located at a distance (minimum):
- — to the forest area – 15 m;
- — to tall trees – 4 m;
- - to trees of average height - 3 m;
- - to bushes - 1 m.
Arrangement of the bathhouse
So, the building is ready, now all that remains is to figure out how to arrange a bathhouse in the country. Of course, the doors and windows should be installed first. Then you need to pay attention to the steam room.
The arrangement is carried out as follows:
- First of all, logs are laid and a wooden floor made of resin-free wood is laid.
- Next, insulation is carried out, especially if the building is built of brick or blocks. To do this, slats are nailed to the walls, between which mineral mats are fixed, after which foil insulation is installed. Then the walls are covered with linden clapboard.
Steam room shelves
- The next step is to make shelves from linden or abasha. The shelves are made of separate slats, between which there should be a distance of several millimeters.
- The final stage of work is lighting. For the steam room it is necessary to use special sealed lighting fixtures. In this case, the switches should be located outside it.
Advice! If there is no electricity at the dacha, then renting a diesel generator for the dacha will help solve the problem of power supply.
After the steam room is ready, you should purchase equipment for a bathhouse in the country. The most important element is the stove. Of course, it can be laid out of brick, but this is quite a difficult job, so it is easier and safer to buy a finished product.
Stove-heater
As for the arrangement of the remaining premises, the interior of a bathhouse at the dacha depends on individual preferences. Most often, the bathhouse is decorated in the Russian style, however, more modern options can be used.
The location of the bathhouse according to the cardinal directions
With respect to the cardinal directions, it is recommended that the bathhouse has an entrance to the south. In winter, less snow accumulates in this part of the site, which quickly melts with the arrival of warm weather.
The windows of the building, if possible, should face the western or southwestern side. Thanks to this, natural illumination of the bath rooms will be maintained, especially relevant in the evening hours (the most popular time for bath procedures).
Roman baths
In Ancient Rome, baths were built according to the Greek model, were also called “therms” and were the center of public life. The Romans could not imagine life without a bath; an inscription on one of the walls of the ancient building has been preserved to this day: “Bath, love and joy - we are together until old age.” The Roman baths had several rooms: a library, massage rooms, and grounds for sports competitions. Here they held feasts, had conversations, sang, and read poetry. The baths were free and luxuriously decorated. There were rooms with wet and dry steam.
How to arrange a bathhouse according to Feng Shui?
Among modern gardeners there are many adherents of feng shui - the ancient Chinese art of space development. It is believed that following the tenets of this ancient philosophy allows you to harmonize all aspects of human life, bring happiness and prosperity to it. When asked where and how to place a bathhouse according to Feng Shui, followers of this teaching recommend turning to the northern part of the site. In accordance with the Bagua grid, the north (Career sector) is under the control of the element of Water, which predetermines the location of objects here that are somehow related to water.
To avoid the “energy drain” of career prospects along with wastewater, adherents of the philosophy of Feng Shui advise placing images with any flowering plants or trees in the bathhouse. Thanks to this technique, dirty water will not be able to harm the Career sector, but will “feed” the depicted plants, thereby bringing positive energy into the space.
Location of the bathhouse on the site: a little about landscaping
Along with the question of how and where to place a bathhouse on the site, you should think about landscaping the surrounding space. Thus, the area around the building can later be decorated with plants, or a paved area or recreation area can be arranged nearby. Many gardeners erect terraces and cozy gazebos next to the bathhouse, conducive to a serene tea party after bathing procedures.
Such a recreation area must be hidden from strangers. For this purpose, hedges and plantings of low-growing trees or large shrubs (common hawthorn, spirea, evergreen euonymus) are used. Small architectural forms made of wood (screens, trellises, trellises) braided with the most beautiful climbing plants for the garden - honeysuckle honeysuckle, clematis, princelings, sweet peas or morning glory - are also suitable. Conifers can provide a high hedge around the bathhouse: juniper, western thuja, yew, fir.
The area around the bathhouse will be especially elegant, decorated with early and beautifully flowering plants - for example, forsythia, rhododendron, lilac. Their flowering can be replaced by timely planted shrubby cinquefoils, mock orange, deutzia or bush roses.
Construction of a bathhouse
Now let's look at how you can build a bathhouse in your country house with your own hands. It is clear that the work will be easier to complete with an assistant, who may be one of the family members. At the initial stage of work, some tasks can be given to children. Of course, they will not do everything and not as quickly as we would like, but if they feel that they are needed, then they will then be more careful about the bathhouse built with their participation.
But let’s be realistic, small children will help a little, and if you build alone, it will be a long-term construction, especially since some work simply cannot be completed alone. As you read the article, you will see when and how many assistants may be needed - this will help you plan everything.
Marking
So, the plan has been chosen, the location has been decided, now let’s start marking the area. To do this, you need to transfer the outline of the bathhouse to the area in accordance with the scale specified in the project. In the place where the corner of the building will be located, a long peg (or reinforcement) is driven in, and the lengths of two walls located at an angle of 90° are measured from it. The next pegs are hammered in there, and the distances of other walls are measured from them. Finally, the last, fourth peg is driven in.
Now that there is a designated perimeter of the future building, you need to check how straight the corners are. To do this, you need to check along the axes - measure the distance from one peg to another. The received data must match. If this is not the case, then the plane must be shifted, “shortening” the longest axis. After this, you will need to check not only the axes, but also other dimensions, and, if necessary, adjust again.
If the foundation is strip, then a small discrepancy can be left, but for a pile or column foundation, the markings must be very accurately done.
So we designated the dimensions of the bathhouse in accordance with the design data. Further marking is carried out depending on what the foundation will be. More details about this can be found in the table.
| Type of foundation | Where is marking used and how is it done? |
| Slab
| Due to its high cost, this type of foundation is done only in cases where it cannot be done without. The markings are made according to the dimensions of the building or a little larger when it is necessary for the foundation to be wider and longer than the bathhouse. |
| Tape
| A very common type of foundation. Relatively inexpensive and durable. The marking is carried out in such a way that the concrete-filled tape runs along the perimeter of the building and under the partitions. |
| Columnar
| This type of foundation can also often be found. It is mainly used for mounting wooden buildings on it. Depending on the dimensions of the bath, markings are carried out according to the number of supports being manufactured. |
| Screw
| It is believed that this type of foundation is new, but this is an erroneous conclusion made on the basis of the fact that it has recently begun to be used in civil engineering. The screw foundation has stood the test of time, since the military began to use it long ago. The advantage of installing a foundation on screw piles is the speed and simplicity of its installation. The second advantage is that there is no need to carry out excavation work, so the site will remain clean. In addition, with its help you can build a bathhouse even on a site that has a significant slope. The marking is done according to the number of piles and no deviation to the side is allowed. |
Weigh the pros and cons, and then make your final decision regarding the choice of foundation type.
Pouring the foundation
The manufacture of a shallow strip foundation is acceptable under the following conditions:
- The soil on the site is dry and non-flowing.
- The groundwater level is quite low.
- In winter the frosts are not very severe.
- The buildings are not heavy.
Don't try to guess the type of foundation for a heavy structure. If you are not sure, then invite specialists who, after performing the appropriate checks, will give an accurate answer.
Let's start with the simpler and most often made shallow foundation for a bathhouse.
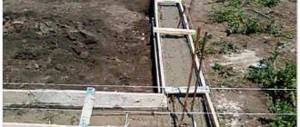
- We have the external markings, now we need to complete the internal ones, taking into account that the width of the foundation must be at least 50 cm, and must protrude beyond the building by 5-10 cm on each side. Therefore, if the bathhouse is 3x4 m, then the largest size along the outer perimeter will be 3.2x4.2 m.
- It is important to take into account the installation location of the stove and at the same time make a foundation for it.
- For convenience, you need to install wooden structures similar to benches in the corners. They need to be aligned in the same plane according to the height of the future formwork and a measuring cord should be attached to them. How to do this is shown in the illustration.
For strip foundations, markings are performed along both the external and internal contours
- You need to remove the fertile top layer of soil and put it aside, then dig a trench, the clay from which can then be used as bedding.
- As for the depth of the trench, in some cases it can be 35 cm. Much depends on the depth of freezing and the soil itself. You need to get to the bottom of the solid clay layer and under no circumstances stop on the ground. Therefore, most often the depth is within the range of 50–60 cm.
- The bottom of the trench must be leveled by checking its horizontalness with a level.
- Now it’s time for the sand bedding. You need to pour a layer of sand at least 15 cm thick inside the trench, moisten it with water and compact it well. For this, it would be more convenient to use a vibrating rammer, but you can also do it manually, using a heavy block with handles nailed to it.
- The next layer is filled with crushed stone of the middle fraction and is also carefully compacted.
- Now it’s the turn of the formwork, the height of which should reach the stretched cord. It can be made from scrap materials or timber harvested for other purposes, since this temporary structure will be dismantled shortly after the foundation is poured. The finished shields must be installed along the trench and secured well, otherwise the poured concrete may move them out of place.
The formwork must be securely fastened. You can also immediately insert the sleeve to conduct communications later
- In order not to stain the boards, and to prevent concrete from leaking out through the cracks, the formwork is covered from the inside with plastic film, which must be secured with a stapler or thin nails.
- Now you need to make a frame from metal or plastic reinforcement, fastened with knitting wire.
You can perform all calculations in our online calculator.
- The manufactured frame should not reach the edges by 5 cm. It must be carefully lowered into the trench so as not to tear the film protecting the formwork. To raise the frame above the bedding, you need to place pieces of granite under it, since, unlike brick, it will not crumble when exposed to moisture.
- If any communications will pass through the foundation, then you need to leave holes for them; sleeves will help with this, as was done in the photo above. The same applies to the manufacture of products.
- Plan your time so that you can pour the foundation with concrete in a day, since breaks are not allowed here - then the tape will not be monolithic. It is convenient to deliver the concrete with a mixer and pour it directly from it, otherwise it will have to be mixed in a concrete mixer, on the basis that you will need 1 bucket of M400 cement, 3 sand, and 5 buckets of crushed stone (or gravel).
- The foundation poured with concrete should be compacted with a vibrator or pinned. After shrinkage, you need to add a little concrete and level the site. If you are making a foundation for a wooden house, then you need to fix the foundation bolts in the uncured concrete.
- No earlier than a week later the formwork can be removed.
It should be remembered that the concrete has not yet reached its full strength, so it must be handled with care or wait 28 days, and only then build a bathhouse.
Video: building a foundation for a bathhouse
Wall masonry
When building a bathhouse from blocks, stone or brick, you need to level the foundation with cement-sand mortar and lay roofing felt on it, folded in half. Masonry starts from the corners. Having installed the first blocks on the cement-sand mortar, you need to make sure that they are in the same plane and only after that a string is stretched along the upper outer edge, which serves as a guide for laying a whole series of building materials.
When laying the next row, the masonry mixture may differ: a wall of brick and shell rock is built using cement-sand mortar, while for laying lightweight blocks, mixtures recommended by the manufacturer are used.
Having installed the lintels above the doors and windows, you need to install the formwork on top and make an armored belt, securing the foundation bolts in it for subsequent fastening of the Mauerlat board. After the concrete has hardened, it will be possible to begin making the roof.
Construction of a bath frame
The basis of such a bathhouse is a wooden frame, which is insulated and sheathed with various types of finishing materials. You need to choose high-quality materials and follow the sequence of their installation.
To make the frame, you will need boards made of well-dried larch, aspen or linden, because this wood has low thermal conductivity. The manufactured shields will be resistant to deformation.
On the foundation, a lower frame frame is made from 100×100 mm timber. At the ends of the bars you need to make cuts half the thickness and fasten them together with self-tapping screws. If 50×100 mm bars are used, then the frame can be assembled end-to-end using metal corners. The dimensions of the bar used depend on the type of foundation, design and size of the bathhouse.
Making a base for a frame bath
- At the next stage, the end trim board is installed, and the floor joists are attached right next to it. A timber of 50×100 mm is used.
- On the opposite side, the logs are cut so that a second end trim board can be installed.
- The logs need to be arranged so that the prepared insulation becomes closely between them, then the end trim boards are nailed.
- The wall frame is assembled from 50x100 mm timber, and then installed in place, all parts are fastened into a single structure.
To ensure vapor barrier of a frame bath, you need to use a vapor barrier film, which will avoid the accumulation of moisture inside the frame. Mineral wool or fiberglass is used as thermal insulation material. They are able to provide a high level of sealing without disturbing natural air exchange.
It is preferable to carry out insulation and wall cladding after installation of the roof. This approach will protect the wood and insulation from getting wet.
Floor
Concrete floor installation with wood flooring
If in a frame bath all that remains is to insulate the floor and lay a floorboard, then for other buildings you will have to work harder - you need to install logs, make a subfloor, fix a vapor barrier, lay insulation, perform waterproofing, lay a floorboard, which will have to be replaced in a few years. Considering that the dacha at the dacha will not be thoroughly dried due to lack of time for this, because after the weekend you will need to quickly leave for the city, then if there is such an opportunity, it would be preferable to make a concrete floor and cover it with tiles. Wooden panels are laid on it, which can be taken out to the barn to dry and then safely go home.
Wooden floor with insulation
It is clear that for frame and other buildings installed on a columnar or pile foundation, only a wooden floor with insulation is acceptable. This process is described in more detail in the next two videos.
Video: how to install floor beams, make insulation and ensure drainage in the bathhouse
Roof construction
Any bathhouse should have a reliable roof, but the options for creating it may be different. In any case, you need to lay waterproofing and then thermal insulation, think about the type of roof and the choice of suitable roofing material. Without waterproofing, steam will easily penetrate into the attic and, settling on beams and rafters, will contribute to their rapid destruction. In addition, the condensation formed on the roofing material will begin to flow onto the insulation, which will affect the properties and durability of the latter.
The type of terrain has a great influence on the choice of roofing type, since the technical parameters of the structure must be taken into account.
- So, in a holiday village, especially when it is located among tall trees, you can safely make a high gable roof.
- If the dacha is located in a steppe zone, blown by all the winds, then the slope for the roof should be minimal.
- For small bathhouses and light snow loads, the roof can be made pitched. The same roof is most often made on a bathhouse attached to the house.
To avoid extremes and errors, we recommend performing all calculations in an online calculator. This way you will have a clear idea of what type of material is suitable for a certain type of roofing and how much of it will be required.
Video: how to make a bathhouse roof
Interior and exterior decoration
Although wood is most often used for interior decoration, not all wood is suitable for this purpose. It is necessary to choose the right material, especially for a steam room, in which a high temperature is created with high humidity. It should be said right away that pine lumber, as well as fiberboard, chipboard and linoleum, cannot be used to decorate this room. Therefore, you need to purchase lining made of larch or linden.
As for other rooms, the conditions there are not so extreme, and therefore there are no such high requirements for the material used - what cannot be used in a steam room is perfect for a relaxation room and dressing room. Pine lining in the dressing room will exude a pleasant aroma and create a feeling of comfort.
Finishing a wooden and brick bathhouse with clapboard is done almost the same way. First, the sheathing is attached to the wall, and then the lining is attached to it. An exception is the steam room, in which there should be heat-reflecting foil under the lathing.
Exterior finishing is done not only to make the bathhouse beautiful, but also to protect it. To decorate the outside of the bath, you can use the following materials:
- Imitation of timber.
- Siding.
- Lining.
- Block house.
- Facade tiles.
- Dye.
All you have to do is choose the appropriate material and finish the facade.
Ventilation in the bath
Sometimes there is also the opinion that good ventilation in the steam room is useless, since all the heat comes out through it, and it is made very weak, or it is absent altogether. But there is another extreme, when the ventilation process is not controlled, and heat evaporates from the bathhouse. It is very hot in such a steam room at the top, and your feet are cold.
In fact, during bathing procedures, the air in the room should be renewed 2-3 times per hour, but this is not enough, since ventilation must be done correctly. Usually the inlet is located below near the boiler, and the exhaust under the ceiling on the opposite side. While the steam room is warming up, the exhaust window is closed. Then it opens and warm air begins to rapidly escape from the room. As a result, the steam room becomes cool and uncomfortable. You can make ventilation as in the diagram.
Air circulation diagram in the steam room
This device allows you to hold back warm air under the ceiling, and half-cooled air comes out through the hole located below (B), so it will be comfortable in the steam room. When you need to thoroughly ventilate the steam room, the upper ventilation hole (A) opens.
In addition to the steam room, ventilation is necessary in every room of the bathhouse. In order not to waste precious heat, you can make it possible to close the ventilation holes during those hours when there is no need for ventilation.
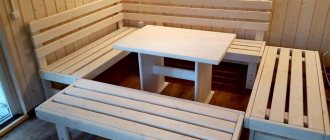
Furniture
You can make the canopy and all the furniture for a country bathhouse yourself. If you don’t want to make anything else, then there are many offers online for selling everything you need for your garden.
If you really want to save on furniture, you can review old stocks. Maybe there is something that needs repair, but you just can’t get around to it? After a little restoration, such furniture can last for a considerable period. The main requirement is not to use furniture made of chipboard, as this material will deteriorate very quickly from high humidity.