Types of baths
Designs of bathhouses attached to the house differ depending on the type of steam room:
- Russian bathhouse with its classic attributes - a stone stove, wet steam, brooms and a font.
- Finnish sauna, in which, thanks to dry steam, you can stay in it even at a temperature of 100 degrees, but in this case the use of brooms is strictly prohibited, as they can lead to burns.
- Turkish hammam with an air temperature of about 60 degrees. You can spend a lot of time in such a steam room without harm to your health.
The choice of a bathhouse for construction depends on the personal preferences of the owner of the site.
Bathhouse in the basement
Undoubtedly, the layout of a bathhouse or sauna inside a residential building provides enormous advantages. In a classic building layout, a sauna or steam room is installed on the ground floor of the building or attached to a box in the form of a utility block. The option is quite reliable, but ineffective, since you have to give up valuable living space in the house for a bathhouse, or occupy the local area. Much more interesting is the scheme for moving the bathhouse to the basement of a private house. In this case, it becomes possible to save at least 20-25 m2 and at the same time insulate the basement of the building.
The prospect is tempting, but not everything is so simple. To arrange a bathhouse or sauna in the basement of a private house, you will need to solve quite complex problems:
- Waterproofing and insulation of the basement under the house, thermal insulation of load-bearing structures and ceilings;
- Combating high air humidity in the bathhouse, equipping with effective supply and exhaust ventilation;
- Equipment of the sauna or bathhouse premises with a special sewage system;
- A set of fire safety measures.
When building a bathhouse in the basement of a house, modern materials will be used for waterproofing and insulation, which either burn well or are capable of releasing toxic volatile substances during thermal decomposition.
How to install a bathhouse?
Is it possible to attach a bathhouse to the house? There are no legal restrictions; in addition, there are rules that regulate the construction of extensions of this type. There are several options for how you can combine a steam room with a living space:
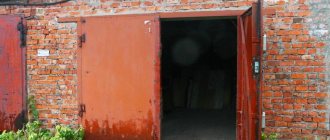
- Using an existing wall of the house. This method is the most economical, since costs are reduced for the construction of one wall of the bathhouse. However, the savings will have to be invested in high-quality vapor barrier and waterproofing, as well as fire safety methods. It is especially important to comply with all fire safety rules if the house to which the steam room is attached is wooden.
- Bathhouse attachment to the house. In this case, the bathhouse attached to the house has its own wall, which is built close to the wall of the dwelling. The advantage of such construction is that there is no need to make a vapor barrier. In this case, the doorway connecting the two buildings turns out to be quite wide, so it makes sense to install two doors instead of one and make the one closer to the house fireproof.
- Connecting the house and the bathhouse with a short passage. In this situation, the bathhouse does not come into direct contact with the home, but it is easy to carry out all the necessary communications through the existing corridor.
The choice of method depends on the planned construction budget, personal preferences and the type of house to which the steam room is attached.
Principles for choosing a house project with a bathhouse and a garage
Before you start drawing up a project, you just need to sit and think about what your future home will look like. There is no need to be afraid of bold ideas and fantasies, because they can become the highlight of your home. It is worth noting that most future owners are guided only by beautiful photos, and this is wrong. When building a house combined with a garage and a bathhouse under one roof, it is important to pay attention to several key points.
First of all, you need to determine the degree of importance of the garage and whether it will be used occasionally or constantly. It is important to assess the need for a garage, and its construction must be carried out in such a way that, if necessary, the room can be repurposed into a living space, rationally using every square meter.
The same applies to the bathhouse; it is important to determine whether it is really needed or whether it is only for guests. It is quite possible that a spacious bath will be enough, but if not, then you can build a bathhouse, and the bathroom will have a sufficient shower stall. It is also important to determine the number of floors of the building; for example, a one-story building will take up too much space, but a two-story mansion has a number of requirements for the soil and foundation.
Advantages and disadvantages
The pros and cons of a bathhouse attached to a house give a person the opportunity to think about his decision about future construction. The advantages include the following:
- the opportunity to visit your own steam room without leaving home;
- reduction in costs for a separate water supply, since communications are carried out from the house;
- there is no need to go outside and be exposed to sudden temperature changes during the cold season.
However, when trying to make a bathhouse attached to a house, a person may encounter the following number of difficulties:
- compliance with all SNiPs that regulate high-quality waterproofing, vapor barrier and fire safety standards;
- engineering communications require careful calculations, as in the case of self-construction;
- the need for regular treatment of premises with antiseptics.
The majority of the disadvantages are rather arbitrary, since when building a free-standing bathhouse one would have to comply with all the same established standards.
General recommendations
Professional builders recommend not to neglect the following tips:
- Properly done waterproofing will help to significantly extend the life of the bathhouse and the house.
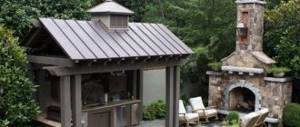
- The best option is to install a stove that is designed not only for a bathhouse, but also for a home. Thus, in the summer you can dry the premises by heating, and in the winter the bathhouse will heat the house with its heat.
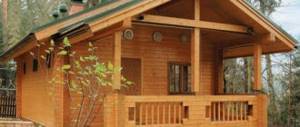
- It is better to attach a bathhouse made of profiled timber to a wooden house.
In general, it is recommended to build an extension in the form of a bathhouse from the same material from which the residential building is built.
The main thing is proper ventilation
According to experienced craftsmen, when arranging a built-in sauna with your own hands, the main thing is to provide high-quality ventilation. The following briefly illustrates what proper ventilation should be like in a home sauna using visual diagrams.
Prev
Next
The main condition here is that the air under no circumstances goes outside, but returns back to the same room from which it entered the steam room. The air inlet is always located under the stove, and the outlet is on the opposite wall under the ceiling. Additionally, you can also make a ventilation hole under the shelf and use it instead of the ceiling one. But top ventilation on the wall under the ceiling is provided in any case.
Prev
Next
The door must be located on the same wall as the stove. This is very important, since if you place a door opposite the stove, then the flows of cold air entering through the doorway will collide with the hot air of the stove and direct it to the wall, which will lead to dangerous overheating of its surface and may cause the overheating sensor to trip.
Prev
Next
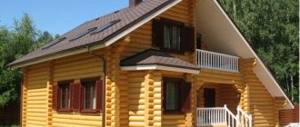
Bathhouse made of timber
Attaching a bathhouse made of timber to a house is allowed if the entire dwelling is built of wood. To implement your plans, you will need to choose the right building material. It is recommended to use timber with a section of 150 x 150 mm. It can be made of linden, larch, cedar. It is not recommended to use coniferous trees, as they can release a certain amount of resin when heated.
The beam can be of the following types:
- Profiled sheets are convenient to use during installation; in this case, the canvas is smooth and without gaps. The disadvantages of the material include the need for additional thermal insulation cladding after some time of operation of the building.
- Glued laminated timber is often used in finished bathhouse projects. It ensures quick installation, and the foundation can be lightweight. The disadvantage is the fact that in some cases the glue may contain formaldehyde.
- Conventional timber has a relatively low cost, but can shrink and become deformed when drying.
When purchasing material, it is important to take a little as a reserve, since some part of the beams will definitely deteriorate during the construction process.
How to attach a bathhouse to a wooden house? To do this, you can use the following instructions:
- a lightweight foundation is suitable for construction - strip or pile-screw;
- mastic and two layers of roofing material are used as waterproofing of the base;
- to lay floors, it is necessary to first assemble the logs;
- building walls is not difficult, especially if you use profiled or laminated timber, in which case the materials are simply stacked on top of each other;
- doors and windows are cut out after complete shrinkage of the timber, which may take several months;
- Before the end of shrinkage, a rough roof is made; after the allotted period, it is replaced with a permanent one made of metal tiles.
A sauna made from timber turns out to be the most environmentally friendly steam room, since no harmful substances are released when the wood is heated.
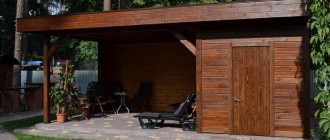
Frame bath
Constructions of this type have recently come into use, but have managed to earn full trust among experienced builders. The undeniable advantage of a frame bathhouse - an extension to a house made of brick or wood - is the absence of the need to create complex drawings, because the building is assembled easily and simply, like a designer. In this case, the lightest and simplest foundation on piles is required. Frame baths have the following advantages:
- ease of construction;
- no shrinkage;
- ease of installation;
- thermal insulation, which is not inferior in quality to brick buildings;
- low cost of building materials.
Unfortunately, frame structures are not without flaws, but they are an order of magnitude less numerous than the positive aspects:
- increased fire hazard;
- relative fragility of the structure;
- the need for exterior and interior finishing.
It is also important to pay great attention to vapor barrier, since the materials from which the frame is made can quickly deteriorate from high humidity and temperature changes inside and outside the building. An attached frame bathhouse to a brick house can look like a single unit with a residential building if its exterior decoration is made using brick-shaped tiles.
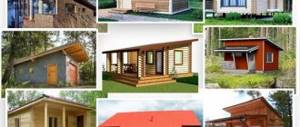
Options for residential bathhouse projects
Currently, the construction market presents a wide variety of projects for the construction of bathhouses with residential premises. At the same time, it is possible to combine exclusively bath rooms and living rooms in only two ways: by building them on the same floor, and by dividing them on different floors. Thus, a residential bathhouse and its construction project, which involves the construction of living rooms in the same building with a steam room and a washing room, usually includes 2 zones, sometimes with different exits.
The feather zone is the bathhouse itself. The second is living quarters. In principle, this is an ordinary house with a bathhouse, so you can’t expect any frills from it in terms of equipping the steam room itself. At the same time, you will have to equip more reliable and efficient ventilation, allowing you to remove all fumes from the steam room and washing room to the outside. You will also have to carry out enhanced waterproofing of the combined room, since moisture from the bathhouse will penetrate into the living spaces and spoil them.
The second option for constructing a residential bathhouse is protected from the need for enhanced ventilation and waterproofing, since all residential premises will be located on the second floor. The design of a bathhouse with a residential second floor can be made with or without an attic. If you give preference to the classic option, then you will be able to build larger living rooms, in addition, they will be better suited for living in winter.
If you liked a residential bathhouse with an attic, then its designs will provide for the possibility of erecting lightweight structures. At the same time, the area of the attic living room will be smaller than if you preferred a classic design. However, the option of building a bathhouse with a residential attic is cheaper compared to building a residential building with a full second floor.
There is another option for combining a bathhouse and a residential building - this is an extension. In principle, this is a pretty good solution in the case when you definitely need to build it, and there is not enough space on the land plot. In this case, you will have to take into account compliance with fire safety standards and regulations during construction, as well as the need to correctly fit the extension into the existing architectural ensemble.
Construction stages
How to attach a bathhouse to your house? A simple rustic Russian bathhouse can be made independently if you know some basics of construction. The following stages of building construction should be followed:
- Laying the foundation is where any construction begins. It is recommended to install it taking into account the weight of the structure and the characteristics of the soil. So, for example, on moving lands it is recommended to use a pile foundation, and for the construction of a permanent brick bathhouse - a concrete, strip, reinforced foundation.
- Floor installation. Since ancient times, bathhouse floors have been made of wood. This material, although less durable than concrete, is more environmentally friendly and resistant to high temperatures. In addition, you can walk freely on a wooden floor without fear of getting burned. But builders recommend constructing logs for laying floors from asbestos-cement pipes, since they are much more durable and are not subject to rotting over time.
- The walls of the bathhouse complex can be made of logs, bricks, or made of sandwich panels. It all depends on the financial capabilities of the developer, as well as personal wishes. It should be noted that brick buildings will cost much more than similar ones made from sandwich panels.
- Metal tiles are traditionally used for roofing. This is a modern environmentally friendly material that meets all safety standards.
- The last stage is interior and exterior finishing. The outside of the bathhouse is covered with siding, a slab that imitates a log house, wild stone, and tiles with imitation brick. The interior decoration should be wooden - linden and larch wood is used for these purposes.
All stages must proceed sequentially, since this is the only way to ultimately obtain a high-quality building.
Features of a sauna in the basement
If you are just planning to build your own home, it is better to immediately choose a house project with a sauna in the basement. In this case, you won’t have to rack your brains over insulation, waterproofing, or connecting all the necessary communications - all this is already laid out and calculated there.
You might like these projects of cottages with a sauna in the basement:
Layout of a two-story cottage with a semi-basement
Sauna in the basement of a small country house Garage, sauna and swimming pool in the basement
When building a house according to your own drawings, the design of a sauna in the basement also needs to be done in advance. The most difficult thing is to convert an existing basement, but in most cases this task is completely solvable.
Room parameters
In order for your relaxation area to be convenient and comfortable, its area must be at least 12 square meters, and the height of the ceilings “clean” is at least 2 meters. The layout of a sauna on the ground floor should include the sauna itself, a shower room, and a small changing room. Moreover, they must be adjacent.
Advice. If you do not have the opportunity to allocate the required area, it is better to abandon the idea of a home sauna and build it in the yard.
The height of the ceiling is dictated not only by the fact that it is convenient to wash in the bathhouse even for people above average height. It is necessary for proper air exchange.
The height of the basement floor in the sauna can be reduced due to additional insulation and cladding
In addition, it allows you to conveniently place shelves:
- The bottom row of shelves is made at a height of at least 40-50 centimeters from the floor level;
- The second row is at a height of about 90 cm;
Example of a frame for shelves with recommended dimensions
- The third row is arranged when the room height is more than 2 meters at a level of no more than 135 cm from the floor.
Three-tier shelves
Selection of materials
All materials that you will use in the construction and finishing of the sauna in the basement must have the following characteristics:
- Resistant to high temperatures;
- Resistant to sudden temperature changes;
- The absence of chemicals hazardous to health that can be released into the air at high temperatures.
Note. Many types of wood meet these requirements, but for finishing it is undesirable to use those that heat up very much and make the tactile sensations of contact with a hot surface unpleasant. And also conifers, which release resin when heated.
This is how coniferous wood behaves at high temperatures.
Communications and equipment
The first thing you need to do if you need a sauna in the basement of your house is a communications project. The location below ground level forces us to take additional measures to arrange them.
In particular:
- The layout of the basement with a sauna should be such that at least one side of the steam room is adjacent to the outer wall. This is necessary for high-quality ventilation;
The sauna in the basement should be adjacent to external walls
- Since in most cases it is impossible to arrange a gravity sewer system, the wastewater disposal system must include a special sololift pump. It is needed for forced pumping of wastewater into the general sewer network or directly into a septic tank;
Pump for forced pumping of wastewater
- Due to the difficulty of removing flue gases from the basement, the sauna on the ground floor must be equipped with an electric stove. This is also due to fire safety and strict requirements for rooms with gas and solid fuel boilers:
An electric heater takes up little space and does not require a chimney
- Of course, we must not forget about water and electricity supply. All electrical equipment, including wiring, must be adapted to conditions of high humidity and temperature;
RKGM wire can withstand temperatures up to 180 degrees
The protection class of lamps and other electrical equipment must be at least IP24
The electrical panel must be grounded
- Instead of the traditional washing room for a Russian bath, it is better to equip the sauna with a shower. This solution will avoid a critical increase in the level of humidity in the basement. Accordingly, you won’t have to spend a lot on its internal waterproofing.
Shower at the exit of the steam room - very convenient
Ventilation
Before making a sauna in the basement, it is necessary to think over an air exchange system, without which it is impossible to maintain the desired microclimate in it. Namely, the temperature is around 100 degrees and low humidity (about 15%).
The air in the room should be constantly updated and circulated, but not cool the sauna. Therefore, the supply opening should be located below, under or next to the stove. The cold fresh air coming from it will immediately heat up and rise upward.
But the location for the exhaust vent is selected based on the height of the room and the level of the shelves. It should be high enough from the floor to ensure proper circulation. But not higher than the shelf, since a draft arising from air movement can blow through a steaming person.
It is important. The size of the exhaust opening for natural ventilation should be 1.5-2 times larger than the size of the supply opening.
The installation of a sauna in the basement excludes the possibility of natural ventilation. Here the air circulation process will have to be started using supply and exhaust fans.
To understand the difference, look at the picture:
Ventilation diagram
- With natural ventilation, an inlet A is made next to the heater to bring in cold air from the street.
- On the wall farthest from the stove, at a height of 40-60 cm from the floor, an exhaust hole B with a ventilation duct is installed. The diametric arrangement of these two holes ensures that the air passes the maximum distance from the entrance to the exit from the room. The exhaust hot air can be discharged through the ventilation duct outside or to another room in the basement.
- Since the ground floor with the sauna is half buried in the ground, the inlet A is below its level and it will not work. Therefore, it is installed in zone E and equipped with a duct with a supply fan facing the street.
Ventilation outlet
- Further, it is possible to remove the exhaust air according to the previous scheme through hole B. But in order not to waste heat, it is better to direct the heated air from the sauna to an adjacent room with a shower stall or to the locker room. To do this, an exhaust hole D with a ventilation duct and a fan is installed in it under the ceiling, and the door between the rooms is raised by 10-12 cm. Through this gap, hot air will be drawn into the shower room and discharged out of it.
Exhaust fan
- To dry the sauna after finishing the procedures or dumping excess moisture, another hole C must be made in the ceiling or directly below it, connected by a tee to the existing ventilation duct. To prevent heat from quickly escaping through it, this hole is closed from the inside with a hatch.
Photo of a ventilation hole with a hatch cover
If everything is calculated and done correctly, breathing in the sauna will be easy at any temperature.
Insulation and vapor barrier
After all communications and air ducts have been installed, construction of the sauna in the basement can begin. There is nothing complicated about this.
| Image | Description of work |
| Metal guides are mounted on the floor and ceiling along the perimeter of the future sauna, and racks made of wooden beams with a cross-section of 100 mm are installed in them. |
| We also mount the frame on the ceiling, lowering it taking into account the diameter of the air ducts and the thickness of the insulation. We make an opening for installing the door. |
| The ceiling is insulated with two layers of mineral wool, each 100 mm thick. Lay the layers perpendicular to each other. |
| To insulate walls, one layer of insulation 100 mm thick is sufficient. It is tightly inserted between the frame posts, the distance between which should be slightly less than the width of the insulation. |
| As a vapor barrier, you can use foil-isolon with the foil inside or a thick plastic film. The material is aimed at the wooden posts with a stapler, the joints are taped with special tape. |
| Laying tiles | We lay ceramic tiles on the floor with grouting. |
| Before you start lining the walls and ceiling with clapboard, you need to nail slats onto the racks and ceiling beams to ensure a ventilation gap between the lining and the vapor barrier. The film and wood should not touch each other. |
All that remains is to make shelves, hang the door, put a wooden ladder on the floor and install an electric heater. If there is already a shower in the basement, the sauna is ready for use.
Drainage equipment
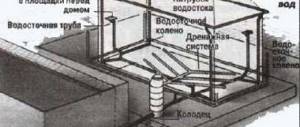
When designing and building a bathhouse attached to a house, it is important to take care of the plumbing and drainage. The advantage of such a bathhouse is that all necessary communications can be carried out from a residential building. Most often, water pipes are laid from a central water supply, but there may be several options for drainage:
- A drainage pit is considered one of the simplest and cheapest options. In this case, you just need to dig a hole of the appropriate size and line its inner walls with brick or concrete rings. A sewer truck is used to clean as it is filled.
- A drain well with a filtration system is the most expensive and labor-intensive option. The system consists of a filter made of shells, crushed stone or gravel, the upper part is filled with river silt, which is supposed to purify wastewater.
- A septic tank is a variant of a drainage pit where a plastic container for wastewater is used instead of a well. Purification can take place using a sewer truck, or a water filtration system can be installed, after which the liquid is discharged into the ground.
If the place where the bathhouse is built has a central sewer system, then you can connect the sewer pipes to it.
In addition, the floors of the bathhouse must be equipped with drains. This could be a leaking floor in a steam room, in which water passes through the cracks between the boards and collects in a tank under the floor, or concrete structures that are equipped at an angle.
Sauna in the basement of the house: project
Traditionally, the basement area under the building is built over the entire area of the foundation. One of the layout options is shown in the project below.
In addition to a bathhouse or sauna, a boiler room or furnace room must be built on the ground floor; there may be a garage, a tool warehouse and a small recreation room. Small windows in the upper part of the relaxation room soften the cutting effect of artificial lighting well, so with proper equipment of a bathhouse in the basement or basement, the level of comfort is no worse than in ground-based steam rooms and saunas.
If you don’t want to bother with permits and fire safety permits, you can use the project shown in the diagram below to plan the room for a bathhouse and build partitions.
At first glance, there are not so many advantages from such an organization of the room; only a small part is used effectively, and even then, you have to steam in a sauna measuring 2x2 m.
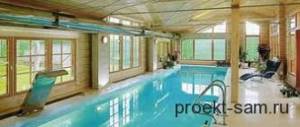
There are no partitions in the basement, but there is a swimming pool, shower, washing machine and a place to relax. It is the absence of internal walls that provides the most important thing for a bathhouse located in a semi-basement - good ventilation, fresh air and enough space to participate in health procedures.
Roof features
A frame, log or brick bathhouse attached to a house must have a roof that meets all the necessary requirements. Its peculiarity is that it should not allow moisture to pass through, which will accumulate in the steam room, since it can destroy not only the bathhouse building, but also a residential building. To prevent the formation of condensation, it is necessary to carefully insulate the roof; this can be done in several ways:
- fixing the insulation directly under the rafters;
- installation of material on rafters.
It is also important to lay a layer of material under the roofing material to waterproof the room. To prevent wood rotting, all elements must be treated with resin or paint.
Internal equipment
It is not enough to know how to attach a bathhouse to a brick house; it is also important to take care of the interior decoration. The main aspects of the internal equipment are as follows:
- Doors and windows are deliberately installed smaller than the standard size - this way you can maintain the temperature inside the room.
- To ensure fire safety, all doors and windows should only open outward.
- Door handles are only allowed to be made of wood, as metal ones can cause you to get burned.
- For reasons of heat conservation, windows are positioned horizontally rather than vertically.
- All wiring in the bathhouse must be covered with a fireproof casing, and if it is located inside the walls, it must be placed in metal pipes.
- Shelves and wall trim must be made from wood species such as linden, aspen or poplar. This material dries quickly and does not release resin when heated.
- It is important not to use paints and varnishes inside the sauna, as they can release toxic substances when heated.
A bathhouse attached to a house, made of a block or other material, should be as comfortable as possible for those people who are going to use it.
Frame residential bathhouse 6.5x6.5 m for a large family
Such a project would be an excellent choice for a family of several people who are going to live in a bathhouse with the opportunity to have the most comfortable living conditions. Three bedrooms on the attic level, plus living rooms on the lower tier, can easily accommodate a family of four. And if necessary, they will easily provide additional space, which will be enough to accommodate friends or relatives who have arrived for a short stay.
Prev
Next
Prev
Next
Prev
Next
The dimensions of the free area of the first floor allow the installation of kitchen furniture in a dining room measuring 4x2.7 m with dimensions that are not available in most modern apartments. Convenience of cooking for the housewife is guaranteed, and the size of the countertops can accommodate any number of modern household appliances. Adjacent to the kitchen is a large room (hall) 4x5 meters.
Prev
Next
Prev
Next
The steam room 2.x2.7 meters opens into a small washroom 2.7x1.6 m, where a comfortable shower stall is installed.
Prev
Next
Prev
Next
Heating in winter is provided by a stove located in the steam room. For this purpose, the Harmony PS-7 2014 model from the Feringer plant was specially chosen.
Bath accessories
It is difficult to imagine a steam room without traditional accessories - brooms, ladles, water buckets. It is also important to follow safety precautions. Buckets and buckets should only be made of wood to avoid getting burned when using them. But the brooms can be anything - juniper, oak, birch, linden, maple, alder, herbal (mint, nettle, wormwood).