Application
As already mentioned, the installation of wooden logs is possible in buildings of any type. However, in reinforced concrete buildings they are used relatively rarely, since it is easier to arrange a rough screed. This installation option is most convenient in:
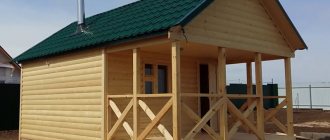
- wooden houses (wild or rounded logs, beams, boards). In this case, the logs are laid on top of wooden (less often metal) floor beams, forming a strong support for the floor. When covering the ceiling in the lower room, it is appropriate to fill the gaps between the floor beams and joists with insulating and soundproofing material;
- frame buildings. It is permissible to install wooden logs on top of metal or wooden floor beams. Typically, wooden joists are used in houses with a timber frame;
- buildings of any design made of “heavy” building materials (brick, concrete, reinforced concrete, stone) for the purpose of leveling and insulating the floor. This option is optimal if it is undesirable to increase the load on the floors and load-bearing walls (columns) that the concrete screed provides.
If the building does not have basements and there is soil under the finished floor, laying wooden logs is the best option to ensure warmth and dryness in the room.
Each option for using floors on joists has its own installation and further use nuances.
General installation information
So, if you are interested in the question of how to attach logs to brick posts, then you are seriously thinking about creating a reliable and durable floor. However, with this installation method, you will need to resort to constructing a foundation, and most importantly, it must be done in such a way that it can easily support each installed brick support. You can pour the foundation for installation separately or make it in the form of a narrow strip. The height of the support can be determined using the height at which the timber will be placed.
Columns
To find out the consumption of materials for installing columns under the logs, you need to perform a calculation and then draw up a plan that will indicate the layout of the subfloor, what materials will be required and their quantity. This will need to include the following materials: timber, high-quality cement and bricks.
Laying
To ensure that the lags are laid in a column efficiently, it is recommended to follow the following rule: where the load in the room is insignificant, a larger distance can be maintained between the lags. If thin material is used for flooring, then it is recommended to place the logs close to each other.
This suggests the following conclusion: the smaller the distance between the lags, the higher the strength characteristics of the structure.
However, such a solution leads to high consumption of materials, and therefore an increase in monetary costs. But the end result will be of high quality, and the laid floor will last a long time.
Advantages of flooring on joists
The main advantages of installing a floor in a wooden house on logs is the ability to obtain a practical and flat surface. In addition, this is achieved:
- uniform load distribution over the entire support area;
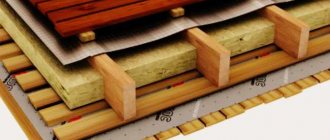
- good sound and heat insulation provided that modern materials are used for laying between the joists (as well as floor beams, if a beam system is used);
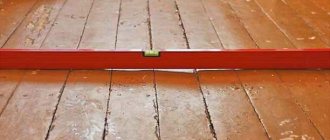
- leveling the surface for final coating. For this purpose, the beams are mounted using a level on supports to compensate for unevenness;
- ventilation of the underground space and the possibility of laying utilities in it;
- when installing not a solid, but a block (floorboard, parquet without gluing) flooring, it is possible to repair any elements of the flooring and their support;
- saving money and effort due to the relative cheapness of the material and ease of installation.
Disadvantages of floors laid on beams:
- significant rise in the height of the finished floor level (up to 10...20 cm);
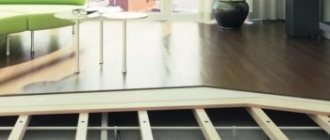
- You cannot install heating using a “warm floor” system, and this applies to both water and electrical systems. In the first case, additional work will be required to install the screed and, accordingly, an additional rise in the level of the finished flooring. In the second, there is a high risk of short circuit and wood fire. In addition, wood does not conduct heat well; such heating will be irrational;
- Despite the apparent simplicity of installing floor joists, great attention is required to the technology of laying both the support beams themselves and the flooring on them. Failure to comply with the technological process may result in deformation, divergence of joints, creaking and other defects.
Taking into account the listed pros and cons, we can summarize: floors on joists have proven themselves best in private buildings, old houses with high ceilings and buildings built on a soil foundation.
Functions and requirements for lags
Scheme of installing a wooden floor on the ground on logs (with heaving soil)
The main purpose of the logs is to obtain a flat surface for subsequent finishing work in the house. In addition, they help maintain proper ventilation of the lower part of the floor, thereby preventing rotting of the wood. This is especially important if the floor is laid on soil that causes dampness. The space between the subfloor and the flooring prevents dampness and improves sound insulation. In addition, there are other functions:
- In this space you can place communications that spoil the view if they remain on the floor;
- The logs ensure uniform load on the foundation;
- There is an opportunity for good thermal insulation, of which there are many types. Expanded clay, sawdust, mineral wool, etc. can serve as insulation;
- It is possible to adjust the floor height;
- The timber allows you to get a durable floor due to the support points;
- Installation on joists guarantees quick and simple installation, which even a beginner can do.
Logs are wooden beams that are laid on any foundation or directly on the ground. Most often you have to use timber with an aspect ratio of 1:1.5 and 1:2, but there are other section sizes. It all depends on the characteristics of the overlap and load.
Pine timber and the applied section for the floor joists
It is better to buy ready-made timber, but making it yourself is also not excluded, the main thing is to choose the right wood. Its ideal humidity levels are 18-20%. At higher values, the finished floor will deform after drying.
The most popular material is pine. You can also use spruce and fir. There are no special requirements for the quality of the wood; the timber can be made from second or third grade material.
There are options for making logs from simple boards, which are connected with self-tapping screws and installed on the edge. If very long beams are needed, they are spliced together by creating a locking connection or joint to joint. And at the joints a support is installed, for example, pillars made of bricks.
What kind of joists should I use for the floor?
Due to the nature of use (under load, hidden), the choice of coniferous wood is optimal. Most often they use cheap pine, spruce, and fir. The use of larch is justified in case of high humidity in the room. Timber for logs is not necessarily purchased of the first grade; a second or third grade is sufficient, provided the geometry of the lumber is correct. The section of the beam is a rectangle with a side ratio of 1 to 1.5...2 (thickness of the logs to height). Only one side should be flat and smooth, although it is advisable to use planed timber with all smooth surfaces - this will facilitate the process of leveling the base.
The dimensions of the timber are selected depending on the planned load and the size of the room. The length of the span (that is, the distance between the walls) and the type of supporting surface for the logs are taken into account. If the beams are laid on a solid surface (concrete floor slab, compacted embankment on the ground, old floor with a solid base), it is permissible to reduce the requirements for the cross-section and strength of the material.
If the span size is between two table values, the larger integer value is adopted taking into account the strength. For example, for a room 3.5 m long we take a span of 4 m. Accordingly, the timber (joists for a wooden floor) should have a cross-section of 180x110 mm or more.
Important: when choosing the direction of laying the joists, you should take into account the direction of the incidence of sunlight (in rooms with windows) or the predominant movement (in narrow passage rooms such as a hallway). In both cases, the logs are placed across (light rays or movement). This ensures their uniform wear and loading, as well as deformation.
The distance between the beams depends on the thickness of the flooring (floorboard or slab materials). On average, without adjusting for the individual characteristics of the room, you can take the data from the table. For detailed calculations, you should study our article “Distance between floor joists.”
It should be noted that ALL wood for flooring on joists should have a moisture content of no higher than 12%; when purchasing, you should prefer chamber-dried wood. When drying naturally, the material must be kept for at least 5 years.
Example calculation
As an example, we will determine the lag pitch for the floor in a standard panel house (calculation 1) and in a frame building (calculation 2).
Calculation 1.
Initial data - support on the floor slab along the base screed, with adjustable clamps (screws), under the laminate. The dimensions of the room are 3x5 m, the span is 3 m (parallel to the wall with the window). Under the laminate it is necessary to install a rough flooring made of 20 mm plywood.
According to the table, for such a thickness of flooring (plywood), the lag pitch can be taken as 300 mm, and the section of the beam for a span of 3 m can be 150x80 mm. The calculated quantity x will be at a distance from the walls of 50 mm, a beam width of 80 mm and a lag pitch for plywood of 300 mm
5000 – 80x – 300(x-1) – 100, x = 12.1 beams.
Since the number of logs cannot be less than an integer, we accept the number of beams as 13 or - with a low load, you can increase the distance to the wall - 12 pieces.
If, under the same conditions, the log pitch for a floor made of boards 50 mm thick is calculated, then the calculated number of beams x with a distance between them of 1000 mm will be
5000 – 80x – 1000(x-1) – 100, x = 3.6 beams.
We take the whole amount of 4 pieces (it is not advisable to reduce their number here).
Calculation 2
Initial data - support on wooden floor beams located at 1000 mm intervals, the same dimensions and configuration of the room, the same finish.
Let us determine at what distance the logs should be laid under the plywood flooring. According to the table, for plywood with a thickness of 20 mm, the lag pitch is 300 mm, while the distance between the beams is 1000 mm. It is necessary to first place the logs according to the number of beams with fastening to their side and alignment, then place the beams across the primary logs in increments of 300 mm. Since the beams are 3000 mm long, the primary joists must also be 3000 mm long and have a cross-section of at least 200x150 mm. For a five-meter room, such logs (according to the previous calculation) will require 4 logs (or five, depending on the position of the beams). The placement of secondary supports is along a span of 5000 mm long; at a distance of 300 mm and a beam width of 150 (section 200x150 mm), they will be required
3000 – 150x – 300(x-1) – 100, x = 5.3 pieces.
Taking into account rounding, the required number of five-meter (composite) logs is 5 pieces.
For a 50 mm thick floorboard, the required distance between joists is 1000 mm, which is equal to the pitch between the joists. Therefore, the number of logs corresponds to the number of beams (4 or 5 pieces).
In both cases, it is necessary to make an adjustment for the increased load on the floor. Depending on the operating conditions, you can increase the cross-section of the beams/reduce the distance between them/apply a complex correction (increasing the cross-section and reducing the distance between the logs under the boards).
If we accept an increase in the cross-section, then in both cases we should take the nearest larger value according to the table, that is, 220x180 mm (primary and secondary for cross-laying) and 180x100 mm for flooring under boards. Adjustment for changes in the distance of the joists under the floor (step) leads to an increase in the number of beams. For the first calculation, the number of primary lags will not change, but for secondary ones the number will be (with a reduced step of 250 mm)
3000 – 150x – 250(x-1) – 100, x = 6.
When attaching the joists to the beams, the pitch does not change, therefore, this method of making amendments is not applicable.
Laying joists
Installation depends on the type of base. Conventionally, methods for installing wooden logs can be divided into three groups: on a solid and durable base (concrete, reinforced concrete, cement-sand screed, stone or brickwork), on the ground and on beams. Mandatory measures for all types of installation include pre-treatment of lumber (antiseptics, fungicidal preparations, fire protection, moisture protection) and checking the evenness of the base.
Floors with joists on concrete
If there is a solid foundation, it is necessary to carry out the following preparatory work:
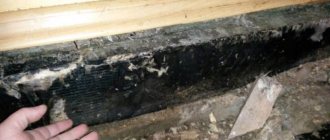
- waterproofing device. It is necessary to ensure that condensation and other moisture are not absorbed into the wood of the support beams, violating their geometry and integrity;
- creating a sound and/or heat insulating layer. This preparation stage is not necessary if you plan to lay insulating material between the joists, under the finishing flooring;
- organization of a cement-sand screed or a dense embankment (“dry” screed) on top of a slab or floor masonry.
Installation of the logs is carried out either on a base leveled with a screed, in which case the beams are laid directly on it, or on pads (stands). They are made of wood or other materials so that the different heights of the pads compensate for the unevenness of the base and guarantee a smooth surface of the finishing flooring.
If you plan to use wooden stands, it is better to use plywood or other thin board materials, pre-sawed in the form of square or rectangular fragments. A set of such tiles allows you to set the required height. The dimensions of the pads should exceed the width of the beam by 1.5...2 times.
Another popular installation option is on metal adjustable supports.
To use them, it is necessary to pre-drill holes in the beams with a diameter of 2...2.5 mm less than the diameter of the fastener. To prevent the head of the post from protruding onto the upper surface of the joist, part of the hole is drilled out to a diameter 3...4 times larger than the original one. The height of the support is adjusted by moving the nuts screwed onto them. Special (adjustable) supports for logs are also used. To cover the floor, it is better to fasten the joists without the possibility of displacement.
You can also attach the beams to galvanized corners. In this case, one side of the corner is fixed with self-tapping screws to the side of the beam, the second - with an anchor or dowel to the concrete or stone base.
In some cases, it is also convenient to use a “floating” floor. Its design and features are discussed in detail in the article “Floor Soundproofing”. This type of floor with a damping pad around the entire perimeter of the room is sometimes called a “screed on joists.”
Laying wooden logs on the ground
Before creating the frame, it is necessary to compact the soil manually or using machinery. For greater convenience of work and insulation, it is useful to arrange a backfill of expanded clay, a mixture of expanded clay with gravel, crushed stone or sand.
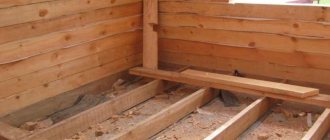
Depending on how it is planned to lay the logs - along a wooden frame or a grillage of piles, directly along the protrusion of the strip foundation, on the prepared soil - markings are made. If the distance between the elements of the grillage (piping, foundation) allows you to lay the logs without splicing, you should choose this option. If this installation method is not possible, install support posts as shown in the illustration.
This creates a relatively dry, ventilated underground. When choosing what kind of logs should be for such installation, you should give preference to larch. Despite its high price, the material justifies its use due to its increased durability and resistance to rot.
Waterproofing must be installed both on posts and on other supporting surfaces. If the level is not the same, leveling pads are also used.
If the logs rest on a frame or grillage, strip foundation, additional supports can be used to reduce the span length.
The timber is fastened to wooden elements with self-tapping screws, and to brick, concrete or reinforced concrete - with anchors or dowels.
Important: logs can be placed on the ground only in the case of temporary construction with a period of operation of no more than 2...5 years, and even in such situations the soil must be compacted and supplemented with waterproofing fill.
Fastening wooden logs to beams
Since the level of floor beams (metal or wood) does not always coincide, the side fastening method is used. In this case, the wooden beam is fixed with self-tapping screws on the side of the beam, as shown in the illustration.
If metal beams (channels) are used for the ceiling, the beams are also attached to the side surface so that the upper side of the beam is higher than the upper surface of the channel.
The use of metal beams in private housing construction is relatively rare, so they usually consider attaching floor joists in a frame house to wooden beams.
Important: for any installation option, the connection of wooden parts with self-tapping screws is carried out under the condition that the length of the self-tapping screw must exceed the thickness (height) of the attached element by 2…3 times. To avoid splitting and cracking of wood, holes with a diameter 2...2.5 mm smaller than the diameter of the fastener are pre-drilled in the parts.
Wooden floor on the ground
For private houses, cottages and bathhouses it is often necessary to make the cheapest flooring. And this is a floor on joists on the ground. Material costs are minimal here, but the floor turns out to be cold. So this is either for summer houses or for the southern regions. In other regions, space heating costs will be very high.
To install such a floor on the joists, the following work is carried out:
- Remove all fertile soil layer. If this is not done, the unrotted remains then begin to “smell” strongly.
- The remaining clean soil is compacted well.
- A layer of sand and crushed stone is poured. Instead of crushed stone, you can use construction waste - broken bricks, concrete, pebbles, all of this mixed with sand is also compacted.
- The clay is poured and compacted. This layer must be made of clay if the house is on clay soils. This is the only way water will not accumulate in the pit.
- If the soils are sandy or sandy loam, calcined sand or slag can be added as a second layer. Fresh slag cannot be filled in. It must sit for at least a year. You can fill it with expanded clay. If it is expensive to make the entire bedding from it, you can only make part of the layer. The thickness of the entire bedding should be three times the thickness of the log. We compact it very tightly: the logs and the entire floor will rest on this base.
Logs are installed on the compacted bedding, they are “recessed” and compacted well around them so that they stand firmly - The logs treated with antiseptics are embedded in the last layer of bedding. They should be level with the base. The logs are attached to the foundation or lower crown.
- Floor boards are being laid.
The installation of such a cold floor does not require much time. You also need a little money.
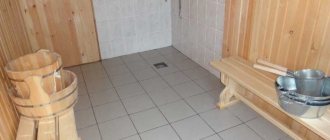
Read about the features of installing tile floors in the washing department of a bathhouse and steam room here.
Insulated option
Underfloor heating is expensive, but it is still an inexpensive option. Preparing the pit is exactly the same: removing the fertile layer and compacting the remaining clean soil. Here are the differences:
- The bottom and walls of the pit are lined with waterproofing materials.
- Crushed stone of the middle fraction is poured in a layer of 8-10 cm, compacted well, and then poured with cement laitance. Drying and setting of the layer lasts at least a day, then work can be continued.
Cement laitance is cement diluted with water. Its consistency is more like liquid kefir. Most often, the proportions are as follows: take three or four parts of water to one part of cement. This operation serves to adhere the bedding. A fairly strong foundation is formed.
- Waterproofing layer. The strips are laid with an overlap of 15-20 cm, the joints are taped with double-sided tape.
- Lay sheet materials - fiberboard, gypsum fiber board. Their thickness is about 20 mm. Lay not tightly, leaving 3-4 mm between the plates. This gap will serve to compensate for thermal expansion. If desired, you can fill the cracks with polyurethane foam, wait until it dries (a day), then cut off the excess. This way the waterproofing will be better.
- Pour expanded clay or other insulation about 8 cm thick.
This is what the diagram of an insulated floor on joists on the ground looks like: - A screed made of lean or normal concrete 3 cm thick. The maturation time of a conventional cement-sand screed is about 28 days. If you don’t have that much time to wait, plasticizer additives are added to the solution to speed up the setting of concrete. They need from 3 to 10% of their weight per kilogram of cement. It will be possible to carry out the work in a few days.
- Floor joists are installed using the finished screed, and the floorboard is already nailed to them.
In order not to bother with setting the joists - a long and troublesome task - level the screed. This is easier to do with the beacons installed.
Laying the floor on joists
Flooring on joists can be done:
- sheet materials (plywood, OSB or chipboard, others) in one or more layers;
- floorboard.
Parquet and other floor coverings are laid over solid flooring. The decking wood must meet the following requirements:
- high strength;
- resistance to shock and static loads;
- resistance to abrasion and mechanical damage (when using the flooring as a finishing coating);
- attractive appearance (if you plan to use the flooring as the final version of the decor and open it with transparent varnish).
Before you start laying the flooring, it is necessary to treat the floor joists in the house, if this has not been done before (antiseptic, fire protection, fungicidal and moisture-proof impregnations).
Typically, flooring on timber is considered a subfloor, but if the work is done well and the floorboard is significant, no further finishing is acceptable.
Installation procedure:
- checking and, if necessary, correcting the level of the upper plane of all joists;
- performing floor insulation along joists, as well as sound insulation. To prevent the insulating material from falling down, a hem is installed between the joists. The board or plasterboard covering of the floor of the lower floor can act as a backing;
- attaching the board to the joists (laying starts from the far corner of the room) according to the diagram. If the length of the boards is less than the width of the room, they are laid offset in two logs. This is necessary to improve the strength characteristics of the flooring;
- creating a finishing coating (if provided) or finishing the floorboard.
How to lay logs on the ground and make a wooden floor
Installing a floor on joists depends on the type of base used. Installation on wood or ground differs significantly in terms of execution. If you follow the plan strictly, you will end up with a strong and warm floor covering.
Laying logs on the ground . It is optimal to lay out the floor on top of the ground before laying load-bearing house walls or during interior finishing of the building. But the final finishing of the coating should begin when the ceiling is whitewashed and the walls are prepared.
The algorithm of actions is as follows:
- The soil under the future floor covering is compacted with a vibrating plate or a wide log. The earth is nailed down until it becomes dense. We pour crushed granite stone in a 5-centimeter layer, this ensures drainage and provides an incompressible base.
- We compact the crushed stone using a vibrating plate. We make formwork for each support column, pour cement into it, then strengthen it with reinforcement. This will serve as a foundation for the brick pillars.
- When the cement hardens, we cover each base with a roofing material layer and build brick columns. We lay a couple more layers of roofing material on top of the pillars and coat them with bitumen mastic.
- We put logs on the pillars. We attach a cranial block to them for support under laying the rough flooring. This decking is made from a base of inexpensive untreated lumber. The boards cannot be attached to the beams; they must lie freely.
- The floor needs to be covered with a waterproofing film or with roofing felt; for this we overlap the walls by 15-20 centimeters.
- Between the joists, we put insulation in the form of polystyrene foam, mineral wool or expanded clay on the waterproofing. We lay a vapor barrier on top of the insulation.
And between the vapor barrier and the outside of the finishing coating, a ventilation gap of at least 2 cm should be left. An exception is a double-sided vapor barrier membrane, thanks to which moisture will not penetrate into the insulation without a ventilation space.
Floor insulation
Warming is also a very important stage. Below, on one and the other side of the wooden logs, support bars 50 × 50 or 30 × 50 mm are nailed.
Next, a roll is laid on the block, which is an unedged low-grade board; its thickness should be 25 mm. Before laying, such boards are treated with a special antiseptic composition to protect the floor from rodents and insects. Self-tapping screws are used to attach the knurling to the bars.
Insulation
Next, a waterproofing membrane with a throughput capacity of no more than 800 g/m is laid on the created bead. It will protect the heat insulator from exposure to moisture. Afterwards, a heat insulator is mounted on the laid waterproofing layer. Considering that today there is a large assortment of insulating materials on the market, there will be no problems with the choice, but you should understand that not every one of them can be used to insulate a wooden floor.
Here it is recommended to choose mineral wool with a density of 35 to 55 kg/m². When laying, a gap of 2-4 cm is left between the boards and the heat insulator for ventilation.