Rafters for a bathhouse have always been the basis of a high-quality and indestructible roof. How can one not recall here the immortal work of Ilf and Petrov “The Twelve Chairs”, remember the famous newspaper refutation of the engineer Treukhov: “And then I would like to notice to Comrade Flywheel that the rafters hum only when the building is about to fall apart. To say that about rafters is like saying that a cello gives birth to children.” Strongly said. Today we’ll look at how to assemble the rafter system of our bathhouse so that nothing hums or falls apart.
Sloping gable roofs. Calculations and preparation for work
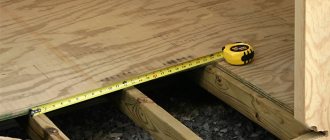
You need to start work by taking measurements of the bath, checking the placement of the upper crown and preparing materials.
Rafter system
Rafter system reinforced with crossbar
Gable roof - components
Step 1. Check the parameters of the log house in terms of length and width ; in plan, the log house should be rectangular.
Important! Pay attention to the horizontality of the upper crown; for this, use an ordinary hydraulic level - it is easy to work with, and in terms of accuracy it leaves far behind the most sophisticated laser devices. Only under one condition - if there are no air pockets in the hose. The standards establish a maximum horizontal deviation of no more than one centimeter per five linear meters. If you get it within 2 centimeters, it’s not a problem; if it’s more, you’ll have to level it with a mauerlat or ceiling beams (if they are not already installed).
Pay attention to the horizontality of the upper crown
Hydraulic level
Step 2. Prepare materials . Rafters for baths can be made from timber with a cross-section of 50×100 mm. For all types of soft roofs, you need to make a continuous sheathing; sheet plywood and fiberboard or OSB boards are suitable; you can use used material. For floor beams, take timber with a section of 100×100 mm.
Beam 50x100 mm
Plywood
Step 3. Determine the angle of inclination of the slopes. You can remember school mathematics lessons, measure the width of the bathhouse and the height of the roof. Then divide the width in two, using the Pythagorean theorem (the square of the hypotenuse is equal to the sum of the squares of the legs) to determine the length of the rafters. We decided not to overload you and provide a ready-made table for the various most commonly used options.
Roof angle and usable attic area
Roof angle depending on climatic conditions
Possible roofing materials depending on the roof slope
Determining the angle of inclination of a gable roof
| Height/half span | Angle of inclination of slopes, degrees. |
| 0,27 | 15 |
| 0,36 | 20 |
| 0,47 | 25 |
| 0,58 | 30 |
| 0,70 | 35 |
| 0,84 | 40 |
| 1 | 45 |
| 1,2 | 50 |
| 1,4 | 55 |
Indicators of standard snow load by zone
| Climate zone | Index |
| I climate zone | 80 kg/m² |
| II climate zone | 120 kg/m² |
| III climate zone | 180 kg/m² |
| IV climate zone | 240 kg/m² |
| V climate zone | 320 kg/m² |
| VI climate zone | 400 kg/m² |
For a rough guide, you need to know that Astrakhan is located in the first zone, Pechora is in the sixth zone, and the Moscow region is located in the third zone. Now you can begin installing the rafter system.
Selection of materials
Before you make a bathhouse roof with your own hands, you need to purchase the required amount of materials and fasteners. In order not to miscalculate the quantity and not overpay or face a shortage of material, it is advisable to draw up a detailed design drawing with dimensions.
Roofing materials
First you need to decide what you will cover the roof with. The load on the frame and the type of sheathing depend on this. Bathhouses are covered with the same materials as houses. Although, if the budget is limited and the beauty of the building is not a priority, you can use very inexpensive rolled materials, such as roofing felt.
Fusing roofing felt onto a pitched roof Source goldkryshi.ru
When laid in 2-3 layers, roofing felt does an excellent job of waterproofing the surface and does not create a large load on the frame. But you need to remember that this material is not resistant to fire and does not have good strength. And its installation requires a solid base made of sheet materials - plywood or OSB.
The same base is needed for laying other types of soft roofing - ondulin, bitumen shingles. It is more expensive, but looks much more attractive and lasts longer. The main advantage of such materials is their high level of sound absorption. The sound of rain drumming on the roof will not annoy you.
Rigid sheet roofing materials - slate, profiled steel sheet, roofing steel - create a large load on the frame and are mounted on a sparse sheathing of boards with a step of 40 to 100 cm between them, depending on the angle of the slope.
A separate conversation is how to make a roof for a bathhouse with your own hands from metal tiles. In this case, the pitch of the sheathing depends on the distance between the transverse waves of the material, since it can only be fastened under the wave.
Scheme of fastening sheets of metal tiles Source krovlyakryshi.ru
The required amount of materials is calculated by multiplying the length of the slope by its width. Be sure to take into account the size of overlaps and overhangs - end and cornice. In order not to make a mistake when buying sheet materials, you need to know their working width (the distance between the joints). For example, if the length of the bathhouse walls is 5 meters, and the working width of the corrugated board is 110 cm, then its quantity per slope is calculated as follows:
(500 + 2x20) : 110 = 4.9
Here 20 are the roof extensions beyond the facades of the walls on both sides. The resulting value is rounded up. In total, you will need 5 sheets for each slope. It is better to order them of the required length, so as not to make unnecessary joints. If you purchase material of standard sizes (for example, slate), then the number of sheets per row is calculated by dividing the length of the slope with eaves overhangs by the working length of the sheet (taking into account overlap).
Installation of a gable rafter system
Installation of a gable rafter system. Sectional diagram
We will not tire of repeating: for beginners, haste and inattention are the main enemies. Before you take a saw or hammer, you need to check the markings and the correctness of your decision several times.
Step 1. If there are no floor beams, you need to install them; use the same timber as was used for the log house (100×100 mm). Its length should be 60 cm greater than the width of the bathhouse. 30 cm on each side will be lined with wind boards.
Wooden floor beams
Wooden floors
Pay attention to whether there is a foundation under the partition between the bathhouse and the dressing room. There is a load-bearing wall, the floor beam can be made of two parts with support and on the partition.
Make the distances between the bars one meter at a time. Firstly, this is the most universal size, and secondly, rafter legs can be placed on the ends of these beams; a distance of one meter is also suitable for them.
Rules for the location of spacer boards and floor beams
Step 2. Check the position of the upper crown of the frame, horizontality is maintained - excellent. No - correct it when installing the floor beams; in the right places, the timber needs to be cut a little larger/smaller, depending on the specific placement.
Step 3. Preparing the rafter legs.
Dimensions and type of rafter leg during preparation
One of the most important, complex and responsible operations. It is better to assemble the rafter legs on the ground, place them on the ceiling and install them there. If you don’t have enough practical experience, we strongly advise you to make a template from the boards, check its dimensions directly in the bathhouse, and, if everything is fine, assemble all the rafter legs exactly according to it.
Use a template to mark and trim rafters
Step 4. Place the assembled rafters on the bathhouse and begin installation . For a bathhouse with dimensions of no more than 5x5 meters, the rafter system can be made without additional stops; the connection can only be made in the upper part of the rafters with a crossbar.
Scheme of the ridge connection of the rafter system
The diagram shows the location of the crossbar
Gable roof rafter system
Previously, all rafters at the place of installation on the crown were notched (or sawed), now many builders are trying to do without this operation and use metal corners with self-tapping screws for fastening. We would not recommend using corners as the main fastener. It’s still worth making the seats and, just for reinforcement, additionally securing them with metal corners. Seats - a recess 1/3 of the thickness of the timber at the junction with the top row of the frame or mauerlat.
Marking the seat
Template for marking
The marked seat is cut out with a jigsaw
Type of installed rafters
Step values between rafters
Knots of the ridge connection of rafters without support on the purlin
Step 5. Installation of rafters. Let us remind you that 50x100 mm beams were used for the rafters. You cannot install the rafter system yourself; you will have to call in help. If they have already been involved in similar work, you are lucky; if not, you need to take full responsibility upon yourself. Place the outer rafter legs first, level them vertically and temporarily fix them in this state with any available materials.
Installation of rafters
Rafter installation diagram and worker positions
Pull the threads between them on both sides. One on the skate and one on each side. Align all remaining rafter legs along the threads. Securely fix the rafters to the mauerlats, temporarily fasten the rafter legs together with long boards or slats. This will hold them in position until the sheathing is done. Nail boards or slats for temporary fixation on the inside of the rafters.
Three-hinged triangular arch with headstock
Keep in mind that if you doubt your abilities and the stability of the rafters, place stops (headstocks) under the ridge. To do this, a purlin must be installed in the ridge; the headstock will hold it. The lower end of the headstock rests against the floor beams or beams. You need to keep in mind that if there are money, then making the attic space habitable is very problematic. Considering the small size of the bathhouse, there is no need to use racks and struts to strengthen the rafter system.
Rafters
Elimination of irregularities in the Mauerlat
Let’s consider the “worst” and most difficult option - when checking the dimensions of the log house, large horizontal deviations were discovered in the corners of the building. You will have to level the plane using a Mauerlat. How it's done?
| Step, No. | Description of actions |
| Step 1. Checking the evenness of the Mauerlat | Find out the difference in height at the corners; by this amount you will need to cut off the mauerlat beam with an ax. |
| Step 2. Chopping cord | Place the timber on a flat area and use a blue thread to mark a line to size. It will be at an angle to the plane, the value of the angle is proportional to the horizontal deviation, do the same operation on the opposite side. |
| Step 3. Timber cutting | Turn the beam on its side, place a 20-30 centimeter high lining under the bottom and carefully trim away the excess thickness with an ax. Do not be afraid that the hewn surface will not be very smooth. Firstly, the insulation compensates for everything. Secondly, this is not critical for the Mauerlat. |
| Step 4. Mounting the Mauerlat | Place the Mauerlat on the top crown and fasten it securely. It needs to be fixed with dowels. It is very important - if the crowns of a log house can be fixed with both metal and wooden dowels, and they must necessarily have a gap, then this is not done with the Mauerlat. It is attached only with metal dowels, which are driven into the holes as tightly as possible. Take longer dowels; they should pass through at least three rows of the log house. Next, the rafter legs are installed in the manner described above. |
Video - Installing a roof on a bathhouse
Installing a roof with one pitched plane on a bathhouse
When erecting a roof with one slope, it is necessary to make the slope angle such that during rainy periods of the year water quickly and easily drains from the roofing surface, and in cold weather snow drifts do not accumulate. Therefore, the value of this parameter should be at least 20°. The most optimal angle of inclination of the rafters is 35°, and for areas with heavy winter snowfalls – 45° or more. How to attach rafters to a bathhouse on a roof with one slope? It is necessary that the rafters be installed at a pre-calculated angle, and also ensure the required difference in the heights of the supporting walls. You can get the required height difference in 2 ways:
- During construction, one of the two supporting walls is built higher than the other.
- An additional structure is installed on one of the walls of the building.
Scheme of fastening a pitched roof of a bathhouse
The first method is more often used for the construction of walls from piece building materials. The second method is used in any buildings that simultaneously receive a pediment covered with wooden elements or any sheet building material. Supporting functions under the rafters are performed by purlins installed and secured to the racks.
When constructing a roof with one pitched surface on a bathhouse, the rafters cover the entire span along the length of the bathhouse. It is possible to place rafters without installing supports if the length of the span is less than 4.5 m. To make the roof even more reliable, the rafters are placed at a distance of 0.6 m from each other (the value of the gap depends on the loads calculated in the roof design and the diameter of the building material used ). If the span is greater than 4.5 m, struts must be placed under the rafters.
The rafters are attached with the top and bottom sides to the support beam. To ensure the tightest contact, special cuts must be made in the rafters. Steel nails, plates and wire are used for fastening.
Important: when building a roof with one pitched plane, it is necessary to extend the rafters beyond the boundaries of the walls of the building by 0.3-0.5 m. This will protect the surface of the walls from the adverse effects of natural phenomena.
Roofing
The sheathing depends on the roofing material. For metal sheets, the distance between the bars is 30-35 centimeters, the bars are 25×50 mm; for soft roofs, the sheathing must be continuous. Roofing materials are nailed using conventional technology; do not forget to pay special attention to the first rows; the final results depend on the correct marking. Sometimes you have to redo it, and this is long, unpleasant and expensive.
Lathing for metal profiles
Slate roof sheathing
How to make a sheathing correctly
Cover the gables with boards; if you wish, leave some space for the window opening. A hole should be provided in the attic floor. Install a system for draining rain and melt water, nail wind boards.
Gable sheathing device
Covering the gable with siding - diagram
Covering the pediment with clapboard
The last triangle is attached without screws, only on the lower siding lock. If the front is sewn up with a board, the last triangle should be nailed to avoid deformation
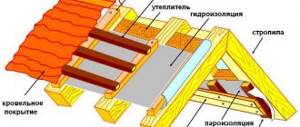
Insulated roof
This is rare in bathhouses - the size of the structure is too small. If you want, insulate it. It is better to use mineral wool with a thickness of at least ten centimeters, otherwise the insulation effect will tend to zero. On the roofing side, the insulation must be protected with a hydrobarrier; on the attic side, it must be protected with a vapor barrier. These are special fabrics sold in construction stores. The insulation can be covered with plasterboard, sheet plywood, OSB boards, natural or plastic lining. Each material has its own advantages and problems, choose at your own discretion and taking into account the fullness of your wallet.
Prices for OSB boards
OSB boards
For an attic, windows do not have to be made on the roof - this is expensive and time-consuming; you can install large windows on the gables on both sides. There will be enough light, and the savings in time and money will be significant.
Thermal insulation
Metal roof insulation scheme
Now we should dwell a little on other types of roofs used on bathhouses.
Prices for metal tiles
metal tiles
Main elements of a log house roof
Main roof elements:
- A rafter system consisting of roof trusses. Trusses, in turn, consist of rafters (another name is a rafter leg) and racks. The rafter legs are connected using pieces of boards called crossbars. The crossbars and posts provide rigidity to the roof truss and distribute the loads from the weight of the roof, snow and wind. To create an overhang, the rafter legs are extended with pieces of boards called fillies.
- The ceiling of the log house is made of timber or logs, called matitsa. The mats are hemmed from below to form a ceiling, and the attic floor is laid on top. For insulation, an insulating layer is placed in the gaps of the mats.
- To prevent rain and snow from falling on the walls of the log house, they organize a roof overhang. The horizontal projection of the overhang is 750-800 mm.
- The ends of the attic are decorated with boards, forming gables. Canopies are placed under the gables to divert atmospheric water from the walls of the house. A residential attic can be arranged with an attic. An insulated attic is a very attractive option; it increases the living space of the house and gives the house charm, but we must remember that its renovation is quite complicated. To insulate an attic, you need to lay insulation between the roof rafters, along all slopes. During operation, it is not always easy to eliminate possible leaks, and the insulation takes a very long time to dry, and wet insulation does not fulfill its task. The appearance of frost on the ceilings of insulated attics in winter is not such a rare occurrence. It is worth remembering these difficulties when choosing insulation and the type of attic insulation.
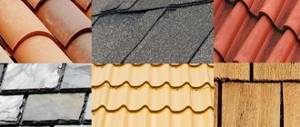
- The roof can be made from almost any material, which the modern construction market offers in abundance. Slate, ondulin, ceramic tiles, metal tiles, cement-sand and bitumen tiles - they all have a lot of advantages and inevitable disadvantages. A soft roof, which is not afraid of wind and repairs, has additional unique advantages and a serious disadvantage - high cost.
The strength of the log house materials - logs and beams - allows the use of any type of roofing.
Flat roofs
Flat roof
Flat roofs
The slope angle is within 10÷15°, specific data depend on the width of the bathhouse and the climatic conditions of the region. The least suitable roof has a higher chance of leaks. But it’s easy to install, and the construction is cheap. Practical recommendation - you should not use such roofs for northern regions and for baths wider than 4 meters. To raise the slope on one side, you can use additional beams or pieces of them; the cracks are then clogged with boards. It is not necessary to fix it with dowels; metal factory or homemade corners or brackets made of reinforcement/wire rod Ø5÷10 mm are sufficient.
The structure of a flat roof pie
Mauerlat attachment technology
The Mauerlat is one of the outermost elements of a log house roof. It bears pressure from the large weight of the entire roof, which should be equally distributed among the load-bearing elements. The Mauerlat is fastened with rafter elements, which provide this pressure. Mauerlat can be made from solid logs laid around the perimeter, or in meter-long pieces that are placed directly under the rafter elements.
Related article: Typical breakdowns of geysers and their elimination
For the manufacture of Mauerlat, only logs, beams and boards with minimum dimensions of 100x100 mm, 100x150 mm and 150x150 mm are used. If logs are used, then one of the sides is cut for maximum contact with the top crown of the log house. The Mauerlat can be secured using several methods.
Scheme of rafters with a sliding support.
When the log house is made of logs or timber, the mauerlat is mounted along the top row and installed on the logs. You can pin:
- using wooden or steel dowels;
- steel staples;
- metal corner;
- using galvanized wire with a minimum diameter of 4 mm.
Inclined single slope
Differs from flat by increased angle of inclination. Due to the larger angle, flexible tiles can also be used as roofing coverings. Water and snow shed better from a sloping roof, and the risk of mechanical damage is reduced. On free-standing bathhouses, sloping pitched roofs are rarely used; the design appearance and functionality are far from the wishes of customers. Most often, this type of roof can be seen on bathhouses that are closely adjacent to other buildings. Making a roof is not difficult; the rafters rest at one end on the upper crown of the frame, the other end rests on the purlin and headstocks. For the headstocks, side struts made of beams should be installed. All other operations for installing roofing coverings are identical to those described above.
Sloping roof
Shed roof rafter design and pitch
Mounting methods
Attaching rafters to a wooden frame is a technologically complex process, the correct execution of which determines the strength, integrity and durability of the roof. When working, you need to take into account that the wood settles during the drying process, so the geometry of the structure changes. In addition, this material is subject to thermal expansion, so fastening the rafters to the frame too rigidly causes deformation. There are two types of rafter leg fastenings:
- Movable. Movable rafter fastenings are called special “sliders” made of metal. Thanks to them, the rafter legs do not experience deflection loads, and also react to the slightest temperature fluctuations, adjusting the geometry of the log house. The sliders allow you to fasten the rafter system until the house shrinks without the risk of deformation.
Swivel mount
"Crawlers"
Movable mount design - Stationary. Fixed fasteners do not provide a small margin of mobility when fixing the rafter legs, however, they guarantee the rigidity and strength of the structure. Nails, self-tapping screws, wooden dowels, metal staples and overlays are used as fastening elements.
Fixed mount
Important! A wooden frame has a unique ability to “breathe”; it regulates the humidity in the room itself, so it does not have rigidly fixed dimensions. Movable fasteners that respond to wall shrinkage and thermal expansion of the material are the best option for fixing the rafters to the log house.
Hip roof
It has four slopes, two end ones are triangular along the contour, the front ones are trapezoidal in shape. The rafter system is quite complex in design and is used on large structures. If the side slopes end before reaching the eaves, the roof is half-hip. A hip roof reduces the volume of attic space; it is not used for attics. The attic can be used for ordinary household needs.
Hip roof
How does a hip roof work?
Hip roof drawing
Uneven-sided roof
A very interesting, fairly simple and cheap option. By increasing the length of one slope, you get a veranda near the bathhouse - there is a place to relax after the steam room. When installing it, you need to reduce the angle of inclination of the slopes to the maximum or make the roof sloped. The first option has several disadvantages, we will name only two main ones. Firstly, the low height of the bathhouse significantly reduces the size of the veranda or reduces its height. Secondly, the small angle of inclination of the slopes makes the use of attic space very problematic. Think about whether it is worth installing such a rather complex and low-functional roof? We recommend using the single slope option. Let's take a closer look at the process of building this roof.
Gable roof for a bathhouse
Uneven-sided gable roof
A few more important points. If for a regular roof the distance between the rafters should be within one meter, then for our option such dimensions are not suitable; the distance between the rafters must be increased to at least 1.5 meters. Another. The length of the rafters increases significantly; purchasing material of this length is very difficult, and sometimes impossible. You have to connect them to lengthen them. How to do it?
| Name | Splicing rafters - description | Scheme |
| Butt splicing of rafters | The rafters on both sides are tightened with scraps of beams using self-tapping screws or nails. The length of the scraps is at least 50 cm, the length of hardware is at least 150 mm. | Butt splicing of rafters |
| Overlapping splicing | One rafter overlaps the other, the overlap length is ≈ 50 cm. | Overlapping splicing |
Stages of roof construction
There are some features in the construction of such a roof, let's look at everything step by step.
Step 1. Drawing up a preliminary project.
You need to determine the minimum height of the veranda and tie it to the angle of the slope. These works must be performed with an assistant. The height of the veranda at the lowest point should be 180÷190 cm. Take a block of this length, nail a nail at the end and fasten one end of the rope to it. The second end will be held by an assistant on the ceiling of the bathhouse. Move the block closer and further from the wall of the bathhouse and at the same time look at what angle the rope is at. Make the tilt angle at least 15°. If the optimal position of the rafters has been found, measure the distance of the rafters to the opposite wall of the bathhouse and the distance from the vertical block to the facade wall.
Shed roof with veranda
Step 2. You need to make columnar foundations for the vertical supports. Approach this work very responsibly; be sure to pour columnar foundations on a sand cushion to prevent swelling phenomena. The columns “play” - the rafter system “plays”, and this is a very unpleasant phenomenon. It is not worth making formwork in the ground, but it is advisable to concrete the anchor for the post. For the anchor, use construction reinforcement; in concrete its length should be at least twenty centimeters; outside, ten is enough. It’s difficult to make an anchor - later you will fix the vertical supports with metal corners.
foundation column
Step 3. After the concrete has hardened, you can install the supports. You already have the length, cut the beams with a margin of a few centimeters. The reserve is made due to the fact that accurately aligning concrete pillars is much more difficult than making their upper ends the same horizontal position. Be sure to install waterproofing between the beams and the concrete.
Waterproofing a columnar foundation
Prices for waterproofing
roof waterproofing
Step 4. Install all supports, temporarily secure them with any supports. Using a hydraulic level, make height marks on the outer posts and stretch the thread between them. Align the height of all other columns with the thread. Finally secure the supports.
Pole mounting option
Step 5. Installation of rafters . Due to the fact that the distance between the rafters is increased, it is necessary to use stronger beams for their manufacture. For an ordinary roof, beams of 50x100 mm are used, in this case it is better to take 50x150 mm. Specific values depend on the size of the rafters (the width of the veranda) and the climatic conditions of the region. The rafters must have three points of support: on vertical posts and on two walls of the bathhouse. To increase stability, you can install struts under them.
An example of the structure of the roof in question. One side of the roof rests on both the wall of the house and the pillars
Step 6. Lathing. Sloping roofs must withstand significant vertical forces; snow falls off them poorly. The loads are especially heavy in the spring; the weight of snow increases by an order of magnitude. Such operating conditions make it necessary to make the sheathing more durable than on pitched roofs. Use bars with dimensions of at least 50x50 mm.
Further, all work on the installation of roofing materials and water drainage is carried out in the usual way.
Bathhouse option with an uneven roof
Video - Installation of metal profiles on the roof. Important nuances
Determining the type of future roof
We once devoted a separate article to the assessment of various types of roofs for bathhouse construction. Today we will briefly recall the main criteria for informed choice.
A pitched roof is used when:
- The construction budget is very limited;
- Simplicity of design and speed of construction take precedence over functionality and appearance. Very often this is done in cases where a bathhouse is built independently, without the involvement of outside specialists;
- The region where the facility is being constructed is characterized by a small amount of rainfall and a low snow load in winter, but it is characterized by very strong and stable winds;
- There is no need to arrange a voluminous attic space for its widespread use for a variety of economic purposes.
The gable roof has a wider application because:
- Features a traditional and attractive appearance;
- Has significantly better thermal insulation characteristics;
- Provides the possibility of arranging an attic space;
- Better drains rainfall and resists snow loads.
At the same time, the construction of such a roof is associated with significantly higher costs of materials and labor, and also requires certain knowledge and skills.
The construction of the roof begins after the construction of the load-bearing walls of the structure is completed.