Pros and cons of a bored foundation
The drilled version has the following advantages:
- There is no need for additional work on leveling the soil and constructing a trench or pit. If we compare it with a foundation such as a strip foundation, the foundation on bored piles requires less preparation costs, since a strip type device requires a flat surface and a large amount of excavation work is carried out.
- Low cost of installation work, low consumption of materials compared to a slab base.
- High speed of work completion. They can be completed in 12 hours, depending on the characteristics of the object and the properties of the soil on the site. It takes 8 days for the concrete mixture to harden, while the strip foundation will harden within a month.
- There is no need for additional waterproofing, which also helps reduce costs.
In addition, with a bored-type device, there is no need to look for a place to store piles, which is especially important in a small area. The service life of the foundation is 100 years. For private construction and frame houses this is a long period.
But this type of foundation also has a drawback: piles of the same type can differ in their load-bearing capacity even in the same geological conditions - the difference in indicators is 30%. This makes it difficult to calculate the bearing capacity of piles.
Description and Application
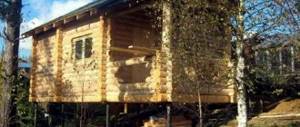
Figure 1. Bored foundation
The strip version of the pile-bored foundation is used in the following situations:
- Construction of a building in a populated area where the installation of a buried strip or monolithic foundation is impossible.
- When the surface of the site is weak-bearing soil. In this case, piles are driven until solid soils are reached.
- A geological study of the territory has not been completed. Then it’s better to play it safe and organize a reliable foundation.
- A site with changes and difficult terrain. The base of the structure is leveled with different heights of piles and the installation of a suspended strip foundation.
- When the soil is too alkaline, it is not possible to build a pile-screw foundation with a monolithic slab or strip.
Bored-type strip foundations are convenient for constructing cottages. If heavy building materials are used, the number and diameter of supports are increased. When lightweight blocks are used, such a bored strip base is inexpensive.
Bored or screw piles: which is better?
When building on subsiding, swampy and soft soils, both bored and screw foundations are used. It is difficult to unequivocally answer the question of what is best.
It is believed that screw piles are a more reliable structure that can withstand high design loads. Their installation is faster than the installation of bored piles; they are immediately ready to bear the full load, and no additional time is required for the solution to harden.
Bored piles.
Screw piles are subject to repair, but the process is considered simple. They can also be reused if necessary. But at the same time, they have a significant disadvantage compared to a bored foundation - they are more expensive.
Nuances of arranging a bored foundation
This foundation does not involve driving piles, as a result of which the soil layers are damaged. It is made by driving piles into prepared wells, into which formwork and reinforcement are first installed, and then the solution is poured.
For problematic soils, such a foundation is a real salvation, because no other foundation has the ability to rest on denser layers of the foundation. And the bored foundation performs this task with a bang. Such a layer can be located very deep, where bored piles are reached.
Nowadays, a bored-type base with insulation, which is used as polystyrene foam or expanded polystyrene, is becoming increasingly popular. Such a foundation is more expensive, but also more resistant to soil heaving forces.
The bored foundation will not disrupt the communications that were previously installed on the site, so you can use them when building a house.
Calculation and layout of bored piles
If the developer decides to make a bored version with his own hands, he needs to understand the design features of such a foundation. Thus, bored piles are installed in rows under all load-bearing walls; the piles must be located at the corners of the future house.
In order to calculate the diameter of the piles, their number and the required distance between them, you need to take into account the soil structure and the weight of the structure. Semi-rocky and rocky soils have the best bearing capacity. Clayey, sandy, loamy soils require more piles.
To determine the weight of a future building, you need to calculate the weight of the building materials used in its construction (including the roofing “pie”). For this, there are special reference tables and SNiPs.
The more the house weighs, the more piles will have to be installed and the smaller the distance between them should be.
The distance between the piles should be at least 3 of their diameters. If the supports are installed at a smaller pitch, this will reduce the load-bearing capacity of the base.
Price
As already mentioned, a strip foundation with bored piles is a much cheaper option, but you should still know what you will have to fork out for during the construction process, and this list includes the following materials (if you decide to do everything yourself and not turn to special companies):
- materials for marking (pegs, etc.);
- rental of drilling equipment;
- concrete for concreting piles and grillages;
- metal fittings for reinforcement;
- grillage costs;
Step-by-step instructions for installing a bored foundation
First, the future foundation is marked. To do this, knock down casting boards from boards and beams. This design consists of 2 levels: the first indicates the height of the piles, the second - the upper edge of the grillage.
Determine the landmark from which the count will be made, this could be the border of the site or a fence installed on it. Then the base lines of the foundation are marked - this is where the walls of the building will go. After this, the dressing boards are installed, and a string is pulled between them.
It is important to check the angles between adjacent partitions - they must be straight.
The location of the piles is marked in accordance with the project, lowering a plumb line from the string, and reinforcing pegs are driven under it.
Then the following types of work are performed:
- drilling of the wells;
- installation of casing pipes;
- reinforcement of piles;
- their concreting;
- cutting casing pipes.
At the final stage, the construction of the ground part of the foundation of the future house is carried out.
Drilling wells and installing casing pipes
Drilling in private construction can be carried out either using a hand drill or using special machines.
A hand drill allows you to construct a well with a diameter of 15-45 cm. It is necessary to drill to a depth of at least 1.5 m, so that the wells are at least 0.3 m below the soil freezing level.
Well drilling
After the well is ready, a casing pipe is made. For its construction, you can use roofing material. The diameter of the casing pipe should practically coincide with the well, and its length should be 50 cm greater than the depth of the well. For the upper part of the pipe, several layers of roofing felt are used and they are tied together with wire. The result is formwork for the future pile, which is placed in the hole until it stops.
Reinforcement of bored piles
If in industrial or multi-apartment residential buildings the length of the pile can be several tens of meters and the diameter - at least 1 m, then in private construction piles with a diameter of 0.35 m and a length of 2.5-3 m are most often used.
In this regard, when reinforcing such a foundation, it is important to remember several rules:
- The total length of the reinforcement cage can be less than the length of the pile by no more than 10 cm.
- The tying of longitudinal reinforcement with horizontal jumpers should be done every 70 cm. In this case, welding is not always used for connection; sometimes tying wire is sufficient.
- For reinforcement, use either 3 rods of corrugated reinforcement with a cross-section of 14 mm, or 4 rods with a cross-section of 12 mm. For transverse lintels, smooth reinforcement 6-8 mm in diameter is used.
Reinforcing blank.
The calculation of the required amount of reinforcement is carried out at the design stage.
Concreting of bored piles
Scheme of a bored pile.
After the bundle of reinforcement has been installed, the pile can be concreted, that is, concrete can be poured inside the casing. It is best to use a mixer for these purposes, since it is designed for large-volume concrete work.
The selection of a suitable material is made at the design stage; standard concrete of a grade not lower than M100 is used for these purposes.
It is recommended to process each layer with a deep vibrator so that voids do not form inside the mass. It is better to prepare concrete in small portions simultaneously with compacting the previous layer.
The structure of the heel - the base of the bored support
In order to increase the load-bearing load of the pile by 5-10%, you can widen the base of the support - the heel.
Two methods can be used for this:
- expansion of the soil at the wellhead, after which intensive compaction is performed, and then the concrete mixture is poured;
- casing pipe of such a design that it widens at the bottom.
In the first case, it is difficult to control the quality of the resulting design. In the second, the quality will be higher, but the labor intensity of the work will increase, since a wider well will have to be drilled.
When building a relatively light private house, such widening is not necessary.
Trimming casing pipes and fittings
Pipe and fittings are cut using a grinder. The reinforcement bars should protrude from the finished pile, but all should be of equal height. This is necessary in order to connect the piles with the ground part of the foundation.
Grillage arrangement
Grillage on piles
When constructing a bored foundation with a grillage with your own hands, you need to make a decision - will it be suspended or buried?
If you chose the first option, then you need to provide a gap between the bottom surface of the grillage and the ground equal to 200-300 mm. If a recessed grillage is installed, it should be immersed in the ground by 200 mm.
When constructing a wooden building - a bathhouse, for example - the role of a grillage can be played by the lower crown of the log house. But most often the piles are tied into a single structure with reinforced concrete tape.
The grillage is poured into the formwork. Previously, a reinforcing frame is installed into it, consisting of upper and lower chords connected to each other by vertical rods. Wooden plates 30-50 mm thick are placed under the lower belt.
Scheme of a bored foundation with a grillage:
In this way, the regulatory requirement is met, according to which the metal in reinforced concrete structures must be protected by a 3-5 centimeter layer of concrete.
Construction of the ground part of the foundation
The execution of this part of the work depends on which project has been selected.
The bored version can serve as a support for several types of foundations:
- Pile-monolithic, that is, a combined version, when a monolithic slab is made on top of the piles. This type is suitable for dense soils; it is most often used for buildings that exert high loads due to their large mass. The cost of pouring such a foundation is quite high, which is associated with a large amount of work, so it is used only where high load-bearing capacity is required.
- Pile-tape. This option is considered optimal for private construction. In this case, with the help of formwork, a concrete strip is poured, which rests on the installed piles, thereby transferring up to 40% of the weight of the house to the supports. Although this type of foundation is considered simple to implement, it is not always suitable for the site; for example, on marshy soils it cannot be considered reliable enough.
- Pile-grillage. The design of this base resembles a pile-tape, but instead of a tape, a grillage made of metal is installed. This type of foundation is most often used for relatively small country houses, since its load-bearing capacity is lower than that of the options listed above.
When choosing the type of foundation, it is best to consult with a specialist or entrust all related calculations to a professional in order to choose the most reliable option.
How to make a drilled foundation
This type of foundation is constructed in several stages:
It is necessary to level the ground. It should be as level as possible relative to the horizon line. In this case, the house will be located along a straight line.
Then you need to mark the installation locations of the piles. First of all, you should mark the corners of the building, and then the intermediate points. The step of each point should be about 1.2 - 1.5 meters.
When the land plot is marked and the places for the piles are visible and determined, you need to drill holes for the piles using specialized equipment. As a rule, the width of the piles is 30 - 40 cm. Therefore, in order to carry out precise and accurate work, it is better to involve equipment. But if you need to save money, you can dig holes yourself.
Obviously, if done manually, the diameter will be greater than 40 cm. But after installing the piles, the remaining free spaces along the edges can simply be filled with soil. If the basic technological conditions are observed, the quality of the foundation will not suffer in any way.
After which, it is necessary to place the piles themselves in the pits. They will serve as the base and frame for the foundation. Their main purpose is to penetrate to the non-freezing layer of solid soil and fix it in it. In this way, the required strength of the structure will be achieved.
When the piles are placed in the appropriate pits, their cavities are filled with cement mortar. It is best to use high-grade ready-mixed concrete. Indeed, under conditions of immersion in soil, the pile and concrete will be constantly exposed to moisture and mildly aggressive environments. Therefore, if the concrete is of low grades, and this is M150, M200, then it can collapse quite quickly. And this will entail a violation of the stability of the main structure of the house. Its walls may begin to crack, and the geometry of the structure may change.
Since the main component of concrete is cement, you can save on pouring piles without losing the quality of work. Instead of ordering concrete, you can mix the solution yourself and use broken bricks rather than expensive crushed stone. This will significantly reduce the cost of constructing a drilled foundation.
The piles are connected to each other using a low grillage. Its height can reach 70 cm. As a rule, it is made of brick. It is not him who erects the structure. In addition, the grillage essentially acts as a plinth and prevents the floor from freezing and warm air being blown out by drafts.
Drilled piles
Review: I really wanted to have my own country house. At first, only ready-made options were considered. These are one or two-story houses with an area of 120-200 m². They didn’t even think about starting to build a house themselves, because they didn’t understand anything about it and therefore were afraid. We looked at many ready-made and not so ready-made options for country houses within our capabilities. It turned out that our possibilities do not coincide with our desires. In general, after a long and unsuccessful search, we felt that we were mentally ready to begin this difficult path of individual construction, in order to ultimately get what we ourselves initially wanted. Now we had to do the “simplest” thing - buy a plot and choose a contractor. Since we were new to this matter, the process dragged on for a long time. Of all the options for potential contractors, we chose Arkhangelsky House. Despite the “distant” name, the company’s office is located in Moscow. But the company brings the building material - northern forest in the form of laminated veneer lumber and rounded logs - from the place corresponding to its name. There, in the Arkhangelsk region, production has been established. We learned that the northern forest has the best characteristics for building houses even before choosing a contractor, and the final choice was probably influenced by the fact that in the process of communicating with “Arkhdom” we did not feel any “fog”. For us, not experienced in this matter, everything was explained in simple, understandable language. The entire construction cycle was divided into stages, and we received comprehensive information about each stage. There was no feeling of intrusiveness, no desire to fleece us of inexperienced money. At the same time, and importantly, the director of “Arkhdom” very clearly presented a phased construction scheme, in which working and non-working periods were structured in such a way that it was possible, when necessary, to painlessly suspend construction to accumulate “financial” forces. In general, we decided to work with Arkhdom and have not regretted it yet. From November 15th to March 16th, a foundation was made (shallow strip) and on it a “box” of rounded logs (240 mm) with a temporary roof (the house was assembled in January-February) and a drainage system (lowland, accumulated water). Now the house has stood in this form for more than a year and from mid-May we plan to continue (installing a permanent roof, installing windows, finishing, etc.). We are optimistic that construction will continue. My wife and I have the best impression of the quality of the work done. We have observed all the stages completed so far. And when installing the foundation, and when assembling the house, and when arranging drainage. We didn't have to push or remind, or face any negative aspects. The workers behaved in a disciplined manner; they had an experienced foreman with them. There was always order on the site and in the living area (we installed a shed for the workers, and they made temporary toilets and showers themselves). We, not being specialists, still understand how carefully and efficiently the elements of the house are made. The foundation lines are ideal, the reinforcement is laid and tied according to the drawings, the logs were composed with additional resistance against twisting of the wood when drying - holes were made through small lengths through several logs and long wooden dowels (in my opinion, Ø 20 mm) were inserted into them. This, as I later found out, is not done by all construction companies. In addition, the logs were fastened with long screws, which, as the logs dried, had to be tightened, which is what “Arkhdom” did when they arrived specially. By the way, we chose the shape of the house on the company’s website (this is Velegozh Park 138), and proposed our own vision for the layout. To implement our plan, the director offered us a choice of 2-3 technical solutions, explaining and justifying their essence and meaning, one of which we chose. This is the review for this stage so far. Maybe for some it will seem custom-made - the text is very large, and everything is very good. So, so that they don’t think so, I’m giving my email address
Write to me here. There I can send you the information you are interested in, plus a photo. Also, if you wish, you can come directly to our site and look at the house. This is Klinsky district. All the best to everyone. Sergey.
PS And one more thing. 1. About prices. “Arkhdom” does not “hide” its prices. As many companies do, and not just construction ones. They attract customers with a low price, and then “surprises” begin for them. “Arkhdom” announces this or that price, gives a justification for it, explains why theirs is more expensive (if more expensive). There has never been a case where previously agreed prices were increased. 2. About deadlines. "Arkhdom" is a punctual company. 3. About control. It often happens that in order for something to be done to you, you literally have to stand over your soul. There is no such thing here.
Pile-monolithic foundation
One type of pile foundation is a monolithic grillage, which is used for row placement of piles.
Pile-monolithic foundation can be used when piles are placed in rows
A grillage is a beam or slab that connects piles above the base of the soil.
It is advisable to construct such a foundation when performing construction work on soft soils:
- a private house is planned to be built using frame technology;
- the soil has a deep freezing depth;
- The width of the base is more than 2 m.
A pile-monolithic foundation can be made in the following options:
- Design with a hanging grillage. The foundation assumes that there is a gap of 80–90 mm between the grillage and the soil, thanks to which the foundation will hang over the ground. Accordingly, the negative influence of the earth on the grillage structure is eliminated. This method can be used when constructing buildings from any materials.
- Embedding the supports into a solid foundation grillage. In this case, there will be no gap between the soil and the foundation, but the result will be a basement room, which cannot be made with an ordinary pile foundation. The grillage can be constructed from concrete, reinforced concrete, steel or wood.
Regardless of which option is chosen, you will need to perform the following activities:
- The pile heads must be cut down to the required height.
- The upper part should be washed, cleaned and dried.
- The frame is being made.
- For a removable frame, you will need to protect it from the concrete mixture.
- A solid grillage is being poured.
The mixture should be laid in even layers over the entire base.
Tape grillage
The technology for pouring a grillage is a little more complicated than pouring piles. This is due to the peculiarities of the design. Work on its production includes the following stages:
- installation of formwork;
- installation of reinforcement cages;
- pouring concrete, preferably in one go;
- vertical waterproofing;
- horizontal waterproofing.
The marking of the grillage may be different.
If the area contains coarse soils or sands of medium and coarse fractions, you can rest the strip grillage directly on the ground.
If there are heaving soils on the site (clay, loam, sandy loam), a damping layer will have to be provided. It will prevent the soil from damaging the grillage during frost heaving. In this case, the foundation mark is set 10–15 cm above the ground surface.
Arrangement of grillage formwork
To provide a gap, you can use a sand cushion, which, after hardening, is removed from under the structure. Polystyrene is also used; there is no need to remove it after completion of the work. When selecting a foundation, data obtained at the stage of geological research are used.
Tying reinforcement: it is important to tie the reinforcement outlets from the piles to the grillage frame
A do-it-yourself bored foundation needs protection such as waterproofing. Vertical will protect the grillage concrete from negative environmental influences. Waterproofing of this type is usually made from coating materials.
Horizontal waterproofing of grillage
Horizontal waterproofing is necessary to separate materials with different characteristics. In this case, the strip grillage is covered with several layers of rolled materials. Waterproofing helps prevent the appearance of mold and mildew when materials of different properties come into contact. Waterproofing is necessary when laying brick walls on concrete, as well as when laying walls made of wood and lightweight concrete.
A do-it-yourself pile-grillage foundation will last a long time, but for this you need to choose the right materials and follow the technology. Waterproofing becomes an important element in ensuring durability. It is especially important to correctly manufacture a tape grillage that will connect all the supports into a single system.
Pile foundation construction technology
The guide to creating a bored pile foundation involves drilling a well, installing reinforcement, and then pouring concrete mortar. You can complete this process yourself by studying the technology description.
Well production
When calculating the number of wells required, do not forget that the maximum diameter of a hand drill is 30 cm with the ability to adjust the rod length to more than 5 meters.
During operation, the drill blades should be positioned so that a minimum of effort is required to make the well. On the construction market you can find equipment that allows you to make wells with an expanded base. This shape allows you to install the heel of the pile, thereby saving on the number of supports and mortar. If during the installation process it is necessary to drill wells measuring 50-60 cm, it is advisable to use a drill powered by an electrical network or a motor.
When starting to drill wells using pre-made marks, it is worth checking the soil at the depth of the holes. If there are obstacles in the form of roots or stones, they must be removed, otherwise the drilling points must be moved. The depth of the wells should be below the freezing depth of the soil in your region.
Installation of reinforcement and pouring concrete
Having finished making the well, you can begin installing the piles:
- Install a pipe of suitable diameter into the well. You can make it from roofing felt in this way: roll the material into a tube and place it in a hole so that it exceeds the height of the hole by 25 cm. The upper part must be made in several layers, fastened with wire;
- If there is water in the well that fills it more than 25%, it is necessary to first pump it out;
- To give rigidity to the pillars, it is necessary to place three corrugated reinforcement with a diameter of 10 mm in the recess. at a distance of 5 cm from each other and fasten them together with crossbars - 4 mm wire. Their height should be 2 cm less than the height of the grillages;
- Having finished with the frame, you can begin pouring concrete mortar of a grade no lower than M-300. After pouring a 50 cm layer, compact the mixture with a vibrator.
Phased installation of piles will ensure maximum density and reliability of the future structure.
Grillage installation
Installation of the grillage is carried out in stages:
- Manufacturing of formwork for above-ground grillage . It is raised on supports and the bottom is lined with boards or gravel, compacted soil and plastic film. You can start installation no earlier than 7 days after pouring concrete into the wells;
Further work on the foundation can begin in a month and waterproofing can be done. To do this, the surface is covered with a layer of bitumen mastic, roofing felt is fixed on top, then mastic and roofing felt again. At this point, production is considered complete.
Video: Bored piles. Installation. Technology. Device
Before closing the pile foundation from the outside with a fence, it is necessary to erect walls. The fence is a structure designed to cover the space between the piles under the grillage. Installing a fence significantly increases the heat level in the house, prevents snow and moisture from penetrating under the house and makes the building visually more attractive. For these purposes, you can use brick, concrete slabs, stone, wood or basement siding.
The optimal balance between price and quality are edged boards 2.5 cm thick. They are attached either horizontally to posts using dowels, or vertically. In the second option, it is necessary to first dig a shallow trench around the perimeter, pour sand into it, with a beam laid on top with a cross-section of 5 * 5 cm with a longitudinal groove for the boards. The beam must be secured to the post using a metal angle. Before installation, all wooden elements must be treated with a special antiseptic compound. A blind area is not necessary for this type of foundation, but for decorative purposes and for convenience, paving slabs can be laid around the perimeter.