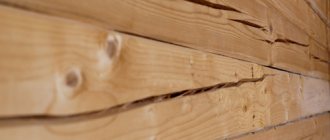
Remember! The specified data is valid for an ordinary non-grooved board.
- According to the indicated scheme, the step for placing the logs is selected, while they are set at the zero level, the horizontal positioning is controlled by a bubble level, and visual perception can be ensured by pulling a synthetic cord along the diagonals of the room from opposite corners. If the logs are not calibrated in size, then the horizon is provided with pads of the required thickness;
- The logs are pre-treated or on site treated with fire retardants and antiseptics - in several passes;
- Laying the logs should provide for a gap between its side and the wall within 150 mm.
- The columns on which the logs rest must be waterproofed by any available method. The most convenient to use roofing material is based on modified bitumen. Bitumen mastics require good heating of the mass to acquire a sufficient degree of fluidity or to introduce effective solvents;
- If the climate in the region has rather cold winters, then lathing is installed on top of the joists, perpendicular to their laying. It is placed in the lathing substrate, and with the help of a construction stapler, the hydraulic barrier sheet is secured. Extruded polystyrene plates, cut to size using a stationery knife, are placed on the resulting base. The joints are glued with tape. If the climate in the region is quite harsh, then the cross-section of the lathing can be raised to 50 mm. This will allow you to lay a thicker layer of insulation and will significantly increase the load-bearing capacity of the floor as a whole. If there are severe winters, the underground can be filled with bulk insulation based on expanded clay, perlite or boiler slag;
Attention! If the underground remains free, then according to the requirements of SNiP, if the area of the dressing room is more than 15 sq.m. the space under the floor should be equipped with two ventilation holes located diametrically opposite each other, at the level of the baseboard rebate. It is advisable to cover the cross-section of the holes with a metal mesh with a 5x5 mm mesh to prevent rodents from entering the room.
- The laid insulator is covered with a vapor barrier based on a membrane film. The joints are made by overlapping the material within 150 - 180 mm and are also taped;
- The finished floor can be installed using either a tongue-and-groove board or a calibrated edged board. A tongue-and-groove connection provides a higher degree of quality of mating of adjacent elements and a clean surface as a whole. However, such material is much more expensive than ordinary boards. In addition, if the tongue-and-groove board is sold in sealed plastic bags, then before installation it must be freed from the film and kept in natural conditions for 3 - 4 days;
By the way! For the floor of a bathhouse, it is not advisable to use a board with a thickness of more than 38 mm, since constant fluctuations in temperature and humidity can cause some deformation, and the load-bearing capacity of such a material will be excessive.
- Boards can be fastened with both nails and self-tapping screws in an open or hidden way. With an open type of fastening of elements, it is necessary to deepen the heads of the hardware into the body of the board by 2 - 3 mm. With the hidden method of mounting a tongue and groove board, the hardware is attached to the groove at an angle of 35 - 50 degrees and is also recessed into the body by 2 mm. We should not forget that the boards adjacent to the wall should be 7 - 10 mm away from it to ensure a deformation gap. The starting board is laid with the groove towards itself. To tightly fit adjacent elements, it is necessary to use the “wedge on wedge” technique;
- After installation, the surface must be sanded, removing visible defects that were present both initially and that arose during assembly. This can be done using belt and vibration sanders, but their performance leaves much to be desired. It is better to rent scraping machines for large processing areas and, before starting, carefully inspect the surface for the presence of loose fasteners. Contact with hardware is fraught with breakage for a carbide scraping knife;
- The completion of the work can be considered covering the floor surface with a protective composition. Although some adherents of the natural bath believe that any chemicals in the bath are absolute evil and, at best, are limited to wax-linseed impregnation.
It is worth saying that the arrangement of a concrete floor also has the right to life in the conditions of a dressing room, and we dwelled on the intricacies of the process in previous articles.
Conclusion
In the overwhelming majority of cases, the question of how to make a floor in a dressing room is decided in favor of a wooden one, since it most fully corresponds to the spirit and style of a real traditional bathhouse. At the same time, the trend of arranging heated floors is becoming more and more stronger, which allows not only to ensure a comfortable stay for those present in the room, but also to enable the process of effective heating of the bathhouse space due to convection flows emanating from the bottom up. It is quite obvious that the arrangement of such a floor requires additional knowledge, skills and financial investments. Among other things, a floor of this type will require a sauna stove with a water circuit or powerful and high-quality electrical wiring if the source of electricity is electric current. In general, the topic is not simple, it is a compromise, and we will definitely return to the intricacies of arranging a heated floor.
How to cover a wooden floor in a bathhouse
Wood will require at least some surface preparation. For a bathhouse, laying the first protective layer is of particular importance. The floor needs to be covered correctly, and most importantly - with high-quality materials. The starting layer creates the base on which all other paintwork materials will be laid. If experiments with impregnations and varnishes are still allowed on the outer part of wooden walls, then inside the first layer of varnish or paint for the floor in the bathhouse must be laid in compliance with all the subtleties of technology.
It is impossible to sand or cut off poor-quality paint or impregnation with a grinder, as this can completely ruin the wooden floor. Removing varnish, paint or impregnation will be expensive and difficult.
The classic technology for painting a bathhouse floor is as follows:
- First of all, a layer of antibacterial protection of wood is applied, the number of passes may vary, depending on the density and degree of surface treatment; on average, it is enough to cover with two layers laid in mutually perpendicular directions;
- Priming a wooden floor. Even the highest quality and most durable paint intended for wood processing can swell with bubbles if there is no normal adhesion to the base;
- Applying a paint coating or just a varnish base.
In addition, you will need to use a wide and narrow brush and a plastic spatula. The process of choosing a tool in order to cover a wooden floor in a bathhouse or sauna deserves special attention. A spray bottle and a paint roller are definitely not suitable; in both cases, you can cover wooden floorboards with paint or a varnish composition quite quickly, but at the same time, quite a lot of air bubbles remain under the protective layer, due to which the paint quickly peels off.
The prepared surface can and should be coated only with a brush.
Advice! It is best to cover it in two layers, in this case the thickness of the layer does not matter, it is important that the protective coating is as dense as possible.
A good paint for a wooden floor has a fairly liquid, low-viscosity consistency, due to which it adheres very well to the surface.
Is it possible to paint the floor in a bathhouse?
It is clear that if you have a strong desire and under the influence of advertising, you can paint the floor inside a bathhouse with almost anything, from water-dispersion paint to oil-based paint. At the same time, the bathhouse is considered one of the most difficult in relation to the correct use of paint and varnish material. There are two serious reasons for this:
- Wood responds differently to different varnishes and organic bases used in paint compositions. For example, acrylic and polyurethane paints require a wood floor to have natural moisture. In other cases, the boards must be primed, otherwise it will definitely not be possible to cover the surface with paint;
- With any bath structure, the floor, wooden or concrete, no matter what, experiences increased stress from excess moisture and temperature changes.
The boards pick up moisture and can expand, causing the paint or varnish to peel or flake off the wood base. The problem is more serious than it might seem at first glance, for example, in the summer, when heating a bathhouse to 60°C, the wooden floor heats up to only 20-30°C, the difference with the outside air temperature is relatively small, so there is nothing to worry about.
Floor varnish must be heat-resistant and plastic at the same time
It’s a different matter if we are talking about a country bathhouse, which is heated once or twice a week. In winter, there is often a temperature difference from -30 to +40-60°C. If we add to this the effect of moisture, it becomes clear that a wooden floor experiences enormous tensile or compressive loads.
Important! Painting the floor in a bathhouse is important and necessary, but at the same time, the paint material itself, after drying, must retain a certain density and elasticity, otherwise after a couple of seasons the varnish or paint layer will have to be removed, and the wooden surface of the floor in the bathhouse will have to be seriously repaired.
Antiseptics for bath floors
The first thing to do is sand and coat the floorboards with a protective water-based bioseptic solution. There are quite a lot of products on sale for the bioprotection of wooden bathhouse structures; there will be no problems purchasing them. It is better to take imported compounds from the island. You can, of course, cover the floor in the bathhouse with budget Senezh, but given the fact that you will have to work and breathe the mordant for quite a long time, it is still better to take a composition that is safe for health.
To cover the torrential floor of Senezh it will take twice or three times as much
Why water-based? Water is best absorbed by the surface of a wooden floor due to the specific structure and the presence of a large number of pores in the wood. Neither oil nor varnish penetrates that deeply, so covering with an aqueous solution of salts means making the floor at least 4-5 mm deep closed to pathogenic microorganisms.
Before covering with impregnation, it is advisable to sand the floor surface with fine sandpaper in order to “open” the top layer of wood. Before being coated with a primer, the wooden floor is subjected to artificial veneering. This is an operation very similar to polishing. Essentially, the floor of the bathhouse is sanded with a rapidly rotating felt wheel mounted on the shaft of a grinding machine. As a result, the impregnating materials are sealed inside, the surface acquires a smoother appearance, and the consumption of primer and paint is significantly reduced.
The method of facing floors in a wooden bathhouse was widely used 100-150 years ago, when there were no salts, mordants or bioprotective solutions; the floorboards had to be, as they say, cauterized to make them more durable.
It is necessary to cover all floors in the bathhouse with bioseptic solutions, from the steam room and dressing room to the entrance to the room.
How to paint the floor in a bathhouse
Choosing the right paint option is easy. First of all, quality is important. Therefore, if possible, it is best to purchase paintwork materials produced by Tikkuril, Belinka or Eurotex. If you cover a wooden floor according to technology, then the difference will not be big.
When choosing paint for the wooden floors of a bathhouse, it is important to follow two unwritten rules:
- In rooms where people walk mostly barefoot, “soft” coatings are needed, for example, for washing and inside the steam room, it is best to paint with oil or wax compositions, for example, Supi Lattiaoljy from Tikkurila. This is a water-soluble oil-based suspension that penetrates well into parts. If you need to save money, the floor can be covered with acrylic paints or urethane-alkyd enamels;
- The harder the protective layer of paint is after drying, the denser and at the same time more slippery the floor will be. Therefore, it is better not to use varnishes and paints that give gloss inside the bathhouse on wooden floorboards.
You should not even try to paint with epoxy paints or any compositions based on epoxy polymers. The coating will be durable, but hardly safe and easy to use.
In addition, it is necessary to take into account the design of the floor; if it is assembled according to a pouring scheme, then the lower part or drainage pads are covered with rubber paints or waterproofing compositions. The upper level of the floor or wooden grate can be coated with alkyd-urethane or acrylic compounds. This part is usually cleaned regularly and thoroughly auditioned, so there is no threat to the wooden floor parts.
Bathroom floor varnish
Of all the possible options, Finnish yacht varnishes and special heat-resistant compositions, such as Tikkurila Unica Super, are most often used. This is a semi-gloss varnish with a pre-primer.
Even the floor in the washing compartment can be covered with an alkyd composition, since the protective layer is completely non-slip. According to most users and owners of wooden saunas, the floors in the bathhouse will have to be treated at least once every 4-5 years. Acrylic varnishes can last a little longer, but they lose their appearance noticeably earlier.
Flooring: how to insulate a dressing room
The bathhouse will become much more comfortable if the floors are insulated. Installation of a heated dressing room floor is usually made of wood using heat-insulating materials.
There are now several options for insulating the floor in the dressing room. There are several options:
- electric;
- water;
- infrared.
This type of flooring is a certain tape, cable or special heating film, which, by converting the current flowing through them, produces heat.
Installation of such floors occurs in several stages:
- gravel or crushed stone is poured onto the prepared soil to a thickness of 15 cm, then compacted thoroughly;
- form the basis;
- then a concrete solution is poured there to a thickness of 5-7 cm;
- then reinforcement and filling with mortar takes place;
- when the solution dries, the warm floor of the dressing room is installed directly;
- at the end the work is done once again by pouring and facing.
The preparation process itself is not complicated, but it is still better to entrust the actual installation of the system to professionals. This will allow you to avoid mistakes that are unacceptable in this matter: if even a local breakdown of the system occurs, it will no longer be possible to get to it.
Ceramic tiles are considered an excellent lining for electric heated floors. Firstly, it is practical and beautiful, and the heating of the system prevents it from being cold.
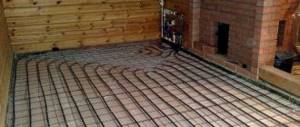
Water floor
This type of heated floor comes in two types according to the type of installation: flooring and concrete. In both cases, the heating element is a pipe filled with hot water. Now plastic or, alternatively, metal-plastic pipes are successfully used for these systems.
The peculiarity of their installation is the ability to create a completely sealed system, virtually eliminating breakdowns. This system works ideally in wooden houses and bathhouses. These materials are non-toxic, very hygienic and inert to water. Moreover, their warranty period is over 50 years.
For heating, you can also use not only water; the following coolants are suitable for this:
- antifreeze;
- ethylene glycol;
- specialized solutions.
To reduce heat losses, pipes should be laid on a layer of heat-insulating material. To increase heat transfer, place it on foil. They are mounted in two ways - “snail” or “snake.” The “snail” distributes heat more evenly. The “snake” is easier to install.
https://www.youtube.com/watch?v=2kc1Wtta5Fo
Further arrangement usually takes place in 2 options:
- use polystyrene plates equipped with grooves and lay pipes on top of them;
- lay the floor on a wooden base;
- They install the pipes and cover them with concrete screed.
This heating system works thanks to the properties of natural heat, which is the infrared spectrum of radiation. Such a floor in the dressing room is usually made using a film into which heating elements are soldered.
It is easiest to install such floors: the film is placed on the ground over the entire surface of the dressing room. A wooden flooring is made on top.
Before you carry out any work, you should initially put together a plan. It must be created before construction begins. This is necessary in order to navigate when choosing insulation, since the installation of each of them requires adherence to a certain technology.
There are many different options for insulating such a room. But when using any type of thermal insulator, you will have to remove about 15 centimeters of the base. If you plan to make the floor higher than the foundation, then you can fill the space with bulk materials, such as:
- Earth.
- Expanded clay.
- Slag.
These mixtures will need to be compacted after backfilling.
The ideal insulation for the floor will be a material that is durable and fire resistant. It must be inorganic, so it could be:
- Minvata.
- Perlite.
- Glass wool.
Such elements are not subject to rotting and microbes and/or fungi cannot spread there.
Organic materials can only be used to insulate ceilings and walls. These include slabs made from wood chips. Plastic-based materials for wall insulation are also common:
- Sotoplast
- Poroplast
- Styrofoam
- How to make a waiting room warm
- How to make warm dressing room floors Warm dressing room walls
- Warm ceiling
Even the smallest bathhouse has two rooms: the first is the room in which they undress, the second is the steam room. So that in the first room the temperature allows people to change clothes comfortably, and in the second the high temperature remains as long as possible, you need to think about how to insulate the dressing room and steam room before starting construction of the bathhouse.
Scheme of insulation of a brick bathhouse using ventilated facade technology.
If the owner of a bathhouse has a concrete floor in the dressing room and does not want to spend his energy and money on insulating it, then you can simply cover it with boards or mats. Sometimes it is not necessary to insulate the floor here; insulation in the steam room is more important. But mostly such work is carried out in the dressing room.
Scheme for insulating a concrete floor in a dressing room
To insulate a concrete floor, you need to select a material that allows air to pass through well to avoid condensation accumulation. This can be prepared by foaming, polystyrene foam, polystyrene foam or natural expanded perlite. Expanded polystyrene and polystyrene tiles are laid in layers on the subfloor, and perlite is mixed with water and cement, placed on the floor, it must dry for at least 2 weeks.
There are other types of materials for insulating a concrete floor in a dressing room:
- glass wool or felt;
- expanded clay sand;
- gravel;
- boiler slag, etc.
A concrete floor will undoubtedly last a long time, but many still prefer wooden structures. And insulating them will not be difficult.
A waterproofing material, for example, roofing felt, is laid on the subfloor, and insulation is placed on it. Then another layer of waterproofing is laid, and then the plank floor is laid. All wooden structures must be treated with special agents against fungus and mold. The following materials will be suitable for insulating a wooden floor:
- glass wool or stone wool;
- Styrofoam;
- expanded polystyrene.
The option with a wooden floor in the dressing room is relevant. Proper insulation will significantly reduce body losses. And in the steam room, for long-term use, the floor can be made of concrete. It has high strength and is not subject to chemical reactions. A well-decorated room in front of the steam room will allow family or friends to comfortably spend time in the bathhouse, cheer up and improve their health.
Coating concrete floors
Unlike wooden floorboards, a concrete base remains insensitive to moisture in any form, as well as temperature changes. Concrete floors in bathhouses are made relatively rarely, and only if the problem cannot be solved by protecting and waterproofing the base. Before covering the screed with a protective varnish layer or applying paint, the concrete floor must be carefully leveled horizontally, otherwise water will collect in puddles in several places.
On concrete floors, leveling the surface is more hassle than painting.
Next, you should cover the floor with a primer. If you compare concrete with wooden floorboards, the situation is the opposite. The cement-sand base turns out to be little sensitive to temperature, while the varnish or paint on its surface under the influence of water and hot steam can peel off. Therefore, it is always necessary to prime.
Next, we lay out the main layer of paint, you can take latex or butyl-styrene compositions or the popular Tikkurila Betolux Aakva Base, designed specifically for rooms with high levels of humidity and temperature, like in a bathhouse.
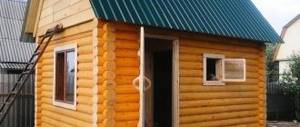
Preparation for construction
Before you make a dressing room with your own hands, you count the materials that will be needed for the work. Traditional Russian baths are built from wood, and the same material is taken before adding a dressing room. It is treated with an antiseptic in 2-3 layers. If this is not done, the dressing room will become covered with fungi and mold in a short time. It is recommended to treat the wood with fire-fighting mixtures, since fires in the bathhouse are not uncommon.
Moisture-resistant materials of inorganic origin are used as insulation for the dressing room. Inorganic materials are very resistant to water, unlike organic ones. It is better to insulate with stone wool, polyurethane foam, polystyrene foam, glass wool, polystyrene foam, etc. Polyurethane foam is the best material for insulation, as it is durable, has high moisture resistance, fire-resistant, noticeably insulates and evens out sudden temperature changes.
When deciding how to make a dressing room, you cannot do without a drawing. A well-thought-out project will not only help in the work, but will also prevent possible errors when measuring area and counting materials. To calculate the area of the dressing room from the inside, use the principle of 1.3 m^2 per person. The standard room area is 1.4x2.3 m^2.
Bath flooring
What you shouldn't try to do is cover all the floors in a bathhouse with the same type of paint. Firstly, the savings that are usually claimed in this case turn out to be absolutely meager, and secondly, in different rooms there are completely different regimes, which means that the requirements for covering a wooden floor are also different.
How to cover the floor in a bathhouse vestibule
In this case, there are two options - use inexpensive alkyd enamels or try to protect the wooden floor with more durable polyurethane or acrylic paints. If there is a wood-burning stove in the dressing room, then it is better to use the second option. In addition, for rooms with stoves or fireplaces, the floor cannot be covered with polyvinyl chloride and rubber materials.
According to reviews, most owners prefer to use inexpensive water-dispersed and alkyd materials in their bathhouse. The calculation is very simple, it’s easier to cover a wooden floor with a fresh coat of paint once a year and have a great look than to spend money on very expensive but safe silicate coatings. It is clear that with this approach, the interior inside the bathhouse looks very attractive, but the floor and wooden floorboards practically rot under a thick layer of enamel, which does not protect at all from moist air.
How to paint the floor in a bathhouse in a washroom
Two types of paints and varnishes are best suited in the washing department:
- You can paint it with quite expensive, but very beautiful and durable polyvinyl chloride paints. The protective layer can withstand any detergents, powders and soaps; the wooden floor under such paints and varnishes lasts in the bathhouse for quite a long time, since PVC is absolutely plastic and does not allow moisture to pass through, even when completely flooded with water for a long time;
- Butyl styrene paints protect any wooden surface well from moisture, provided that the protective coating is applied to the wood without old paints and varnishes.
Before covering the floor in the bathhouse with a protective layer, the surface must be cleaned and dried with a hairdryer at 70-100°C.
Rubber paint is only suitable for concrete
If the washing room has a concrete floor, then acrylic-silicone or epoxy materials can be used.
How to cover the floor in a steam room
For a very difficult, humid and very hot steam room atmosphere, we can only recommend special paints based on alkyd-urethane compositions. They are not distinguished by high decorative qualities, but at high temperatures they ideally withstand wear and contact loads.
In addition, even over time, varnish and paint do not lose their plasticity, do not peel off or “glaze” to the state of tiles. At the same time, they remain safe and do not emit any harmful substances into the atmosphere in the bathhouse.
Work order when arranging the floor
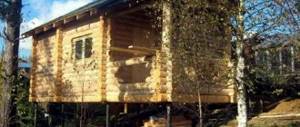
At the preliminary stage, the owner must clearly decide whether he needs a subfloor or not. Basically, the arrangement of underground space is mandatory where there are seasonal fluctuations in groundwater levels.
The sequence of work is as follows:
- The foundation of the underground is being prepared. To do this, the soil is leveled in a horizontal plane, carefully compacted and a sand-crushed stone cushion 120 - 150 mm thick is poured. Supporting columns made of brick or monolithic concrete, reinforced with a central reinforcing rod, rest on it. The base of the soil must be sufficiently watered with clean water to ensure the quality of compaction;
- The load-bearing capacity of the load-bearing frame can be calculated based on this table:
| Geometric dimensions of the board, mm | Distance between lags along their axes, mm | Maximum span length between two supports, mm |
| 25×120 | 250 350 470 | 3000 2800 2400 |
| 25×150 | 250 350 470 | 3100 2900 2450 |
| 25×190 | 250 350 470 | 3200 3000 2550 |
| 25×230 | 250 350 470 | 3500 3250 2800 |
Remember! The specified data is valid for an ordinary non-grooved board.
- According to the indicated scheme, the step for placing the logs is selected, while they are set at the zero level, the horizontal positioning is controlled by a bubble level, and visual perception can be ensured by pulling a synthetic cord along the diagonals of the room from opposite corners. If the logs are not calibrated in size, then the horizon is provided with pads of the required thickness;
- The logs are pre-treated or on site treated with fire retardants and antiseptics - in several passes;
- Laying the logs should provide for a gap between its side and the wall within 150 mm.
- The columns on which the logs rest must be waterproofed by any available method. The most convenient to use roofing material is based on modified bitumen. Bitumen mastics require good heating of the mass to acquire a sufficient degree of fluidity or to introduce effective solvents;
- If the climate in the region has rather cold winters, then lathing is installed on top of the joists, perpendicular to their laying. It is placed in the lathing substrate, and with the help of a construction stapler, the hydraulic barrier sheet is secured. Extruded polystyrene plates, cut to size using a stationery knife, are placed on the resulting base. The joints are glued with tape. If the climate in the region is quite harsh, then the cross-section of the lathing can be raised to 50 mm. This will allow you to lay a thicker layer of insulation and will significantly increase the load-bearing capacity of the floor as a whole. If there are severe winters, the underground can be filled with bulk insulation based on expanded clay, perlite or boiler slag;
Attention! If the underground remains free, then according to the requirements of SNiP, if the area of the dressing room is more than 15 sq.m. the space under the floor should be equipped with two ventilation holes located diametrically opposite each other, at the level of the baseboard rebate. It is advisable to cover the cross-section of the holes with a metal mesh with a 5x5 mm mesh to prevent rodents from entering the room.
- The laid insulator is covered with a vapor barrier based on a membrane film. The joints are made by overlapping the material within 150 - 180 mm and are also taped;
- The finished floor can be installed using either a tongue-and-groove board or a calibrated edged board. A tongue-and-groove connection provides a higher degree of quality of mating of adjacent elements and a clean surface as a whole. However, such material is much more expensive than ordinary boards. In addition, if the tongue-and-groove board is sold in sealed plastic bags, then before installation it must be freed from the film and kept in natural conditions for 3 - 4 days;
Necessary tools and components
In order to obtain a high-quality floor with a long service life, it is necessary to follow the installation technique and materials preparation technology. The success of installation largely depends on the correct choice of tools. The floor can be installed under the guidance of a specialist or independently.
Some tools needed to install a concrete floor in a bathhouse:
- The correct screed cannot be laid without the use of special rakes. These devices level the concrete mass during the laying process. It is important to understand that the coating should be as smooth as possible: violations in technology can lead to serious consequences.
- A laser or water level will help to obtain the surface of the required evenness. It can also be used to vary the angle of the boards. The grooves for water drainage must be smooth: no level differences along the flow of liquid are allowed. Such points must be corrected both at the initial stages of installation and as the slabs are laid.
We invite you to familiarize yourself with: Bath stones: types and their properties
- Trowels are needed to spread cement over the entire surface from the far corner of the room to the edges. With the help of trowels, impregnation or varnish is also applied when finishing the surface. Trowels come with both pointed and semicircular edges. The rounded edges of the tool do not leave visible marks on the screed.
- Cement grater. This device is necessary to obtain a flat surface. It is necessary to make circular movements along the surface of the laid mass. With their help, excess material is also removed and an even coating is obtained.
- Flats are also necessary to obtain a smooth surface. Thanks to their design, they are able to cover and smooth a larger area than graters or trowels. The trowels are used for global work of rolling out cement over the entire surface. Among such tools are corner-type trowels - they are used to obtain a smooth coating at the junction of the floor and the wall.
- To mix expanded clay or expanded clay concrete efficiently, you need a concrete mixer and a container for the solution. The mixing technology depends on its composition and installation method. Before working directly with cement, it is necessary to familiarize yourself with the technology and mode of preparation of the mixture. This process can be done manually, but there is a risk of getting a non-uniform mass. An incorrectly mixed composition will not provide the required performance properties of the floor.
- Also, don’t forget about simple tools. A shovel will greatly facilitate the process of spreading the concrete mass over the surface. A Velcro towel or any other cloth material is necessary for cleaning tools while working. An even screed will only be achieved when working with cleaned equipment. You should also have a container of water on hand.
To install a wooden floor, you need a different set of tools.
- Metal profile for laying boards. A special grid is mounted from small steel gutters onto which the boards are laid. Such a frame is necessary to ensure that the sauna floor is laid evenly and holds tightly. Profiles are sold complete with special fasteners.
- An electric screwdriver and drill are needed to secure the boards. They can be replaced with a metal hammer, but this will require a lot of time and effort. In addition to ordinary screws, staples are used to fix the boards.
- To obtain beams of the required size, use an electric plane and a wood saw. The work of cutting wood is quite dusty, so craftsmen recommend laying a rug or sheets of newspaper on the floor of the work area. This will significantly reduce subsequent cleaning time.
- Any flooring job requires a level. The laser device is much easier to use and helps to achieve even coverage or the desired slope.
- The final wood layer often needs to be varnished or painted. To do this, you need to stock up on rollers and brushes. Also, many materials are sticky and toxic, so all work must be done with gloves.
Arrangement of rough flooring
The subfloor is intended to support the insulation layer between the subfloor and the facing flooring. It is made from short pieces of thin boards nailed to the joists on the underside.
The subfloor is not visible from the outside and is not subject to stress when walking. Therefore, it is not at all necessary to use a high-quality floorboard with a length equal to the length of the bathhouse.
Attention! For the subfloor, it is rational to use scraps of boards obtained during the construction of other elements of the bathhouse. There is especially a lot of such waste during the construction of panel baths.
The subfloor is assembled from unplaned boards or from others that are available. Also, the board does not have to be tongue-and-groove. A regular edged one will do.
Typically, a subfloor is constructed in a bathhouse in a recreation room. In the steam room, its function is performed by a concrete surface that collects water (waste system). Antiseptic treatment for subfloors is required.
Concrete floor
Concrete floors are the optimal solution for baths that are planned to be used all year round. The cost of the materials used in the construction of such a floor is low, and the constructed floor itself will last for many years.
The floor is built like a non-leaking wooden floor: from the first steps, you need to arrange a slope along which water will flow into the drainage system.
The floor does not require special care, but during construction it should be treated with antiseptics that will protect it from moisture, parasites and fungus. Concrete is rarely left bare and covered with tile or ceramic tiles. The tile is resistant to various influences, as well as to fungus, but it should also be treated with antiseptics. Tile is a rather slippery surface, so you should walk on it carefully, or lay wooden nets, which is done most often. The nets are taken out after each wash and dried thoroughly.