The floors in the bathhouse are formed for a specific purpose - in this case, special attention is paid to interaction with high humidity and heat preservation. Accordingly, “simply” creating this structure, without taking into account its specifics, will not be the most rational solution and will inevitably lead to serious problems in the future.
A special approach to floors is explained by the fact that most of the moisture will accumulate in this part of the room. If when decorating walls it is quite possible to get by with traditional plaster, then with the material for forming the floor the situation is somewhat more complicated - here it is important not only to correctly install them, but also to make the right choice from the very beginning.
Floors in the bathhouse
This article will discuss in detail the question of what kind of floor should be in the bathhouse? With its help, you can choose the most optimal solution for your circumstances. It also contains instructions that describe all the most important points of the process and how to install them yourself.
Bath floors
Tile covering for a bath
There are several technologies for creating a floor for a bathhouse, while the answer to the question “how to cover the floor in a bathhouse?” is rhetorical - no other material other than ceramic tiles is provided for this purpose (with the exception of natural wood in a Russian bath).
- Most often, concrete mortar is used to form bathhouse floors, through which a cement screed and CBPB sheets are created.
- Wooden analogues can be found less frequently.
- Cement-containing materials are used only as a basis for future finishing with ceramic tiles, since their surface cannot be used as a finishing coating.
- While a poured floor in a bathhouse made of natural wood is created as an original covering that does not require further manipulation.
Let's look at these three main analogues in more detail.
Selection of finishing material
When choosing a material for decoration, of course, take into account that the steam room should look aesthetically pleasing, but the most important are the performance qualities:
Attention! When producing a steam room, it is prohibited to use materials such as plastic, linoleum and various types of wood boards. Even with good ventilation, toxic substances released by artificial materials can seriously harm your health.
The most suitable materials for finishing a steam room are considered to be lining, wooden boards, natural stone and ceramic tiles.
Wood is a traditional material in our latitudes; it is used to construct a Russian-style bathhouse and a Finnish sauna. Wood easily absorbs moisture and gets rid of it, has a rare aroma and other unique qualities. Traditions include the use of hardwood, since they do not emit resin in the heat.
Hardwood paneling
Linden lining
Lining
- Larch, birch and linden are suitable for finishing the steam room. These types of wood are popularly considered to give strength; such wood does not rot or crack.
- The lining made of poplar and aspen, thanks to its unique properties, will give you relaxation.
- Ash has special decorative qualities, its core is incredibly beautiful, and this species is very durable.
- The alder finish guarantees not only reliability, but also the absence of odors.
Alder lining
Hardwoods dry out quickly and are therefore not threatened by fungus. High-quality lining has a minimum number of knots, which can cause harm to health when touched by a naked body.
Currently reading
Sauna plan 4x5 washing and steam room separately
How to line a stove - Building a bathhouse or sauna
Types of lining
Attention! Pine wood is considered the least suitable option. It releases resins that can cause serious burns if it comes into contact with the skin.
If there is no other choice, you must definitely check the pine boards for the presence of so-called “resin pockets”.
Resin pocket on the cut of a spruce trunk
Resin pocket on lining
The finishing of baths and saunas with valuable abacha wood, obtained from trees growing in the tropics of Africa, is considered incredibly rich and expensive.
Abashi lining (abachi)
Abashi tree
Prices for lining
lining
Concrete floors
Concrete floor
Concrete floors in a bathhouse are not the most traditional, but at the same time one of the most popular design methods. The material for their formation is a mixture of cement, sand and filler (crushed stone, gravel), through which a monolithic screed is poured onto a solid base .
The main advantage of concrete floors is the low price of the starting material, which allows you to save a lot on their creation.
Its disadvantages include its heavy weight - a monolithic concrete floor in a bathhouse on stilts would not be entirely appropriate. Only hard soil can be used as the basis for its creation.
It is also worth mentioning the resource intensity of installation - without partial mechanization of the process, you will have to attract a large amount of labor to implement even a not very large project.
Note! There are technologies such as creating a cement screed on top of floating floors made of gypsum fiber boards, but in this case it loses some of its positive properties.
Installation technology
Laying the floor in the bathhouse - filling with expanded clay
Filling with expanded clay:
- Before installing concrete floors, it is necessary to level the base - it is not necessary to do this particularly carefully, it is enough to plan and create a relatively flat surface. It is necessary to fill the holes and cut off the mounds so that the overall plane is level relative to the ground;
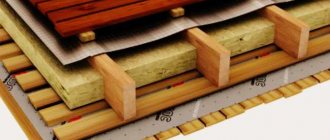
- To create a heat-insulating layer, expanded clay is poured into a layer of at least 10 cm - this will not make the floors warm to the touch, but they will not “suck” heat from the room so intensely;
- Using a laser level or hydraulic level, the perimeter is marked and a surface level relative to the ground is visually drawn, which will serve as a guide for further work;
How to build a floor in a bathhouse - leveling the screed
- Metal reinforcement is laid, which most often takes the form of a welded lattice of reinforcement - in the future it will prevent subsidence of individual sections of the coating;
Note! The reinforcement should not lie directly on the insulating backfill - it must be positioned so that it is approximately in the middle of the future screed. To do this, it is enough to raise it using stones or blocks to the required height.
- Based on the markings made, beacons are installed - metal profiles that will serve as a guide for pouring. It is necessary to take into account that the floor is poured for a bathhouse and it is necessary to ensure the drainage of water - for this it is enough to make a gradual slope of the surface equal to 1 cm for each linear meter of the floor;
- Then the area is filled with concrete mortar, which is leveled according to the existing beacons;
Choosing tile or stone
For a good bath, with the smell of natural wood, steamed broom and aromatic oils, finishing with tiles made of natural stone: jadeite, serpentinite, soapstone and coil is suitable.
Tile or stone cladding
These natural materials can withstand the highest temperatures and have excellent strength, safety and durability. They can be used both for the floor and for laying a heat-resistant screen next to the stove. Ceramic finishing is also traditional. Since ancient times, tiles made from clay have been considered the standard of environmental cleanliness; they do not emit any odors or fumes at all. To decorate the steam room, choose products with high heat resistance and the lowest moisture absorption coefficient. To avoid injury, it is advisable not to lay glossy tiles on the floors; it is better to use ceramics with a rough surface.
Floor finishing with porcelain stoneware
Video – Finishing the inside of the bath + ceiling insulation
DSP floors
DSP floor
DSP is a composite material based on wood chips, a chemical component and Portland cement, which has increased strength and moisture resistance, which is especially important if you want to create a leak-proof floor in a bathhouse. The main advantage of this material is its low weight, which allows it to be used to create a floor on a pile foundation.
Installation technology
- First of all, as in the previous case, the perimeter is marked, after which load-bearing logs are placed, which will serve as the basis for the future floor. The distance between them should not exceed 80 cm;
- According to the set level, the lathing is assembled from wooden beams - the distance between the load-bearing elements should not be more than 50 cm;
- Then the intermediate parts are inserted, and it is necessary to position them in such a way that the edges of the joints of the two sheets fall exactly in the middle of the beam. In this case, it is also necessary to create a gradual slope of the common plane for water drainage, as in the previous case;
DSP boards photo
- DSP sheets are spaced apart to prevent the appearance of cross seams that will weaken the surface structure. When joining, a gap of 4–5 mm must be left between the edges of the sheets, since this material is subject to shrinkage deformation. It is also necessary to have an expansion joint 5 cm wide near the walls along the entire perimeter of the room;
Partitions between the steam room, sink and relaxation room
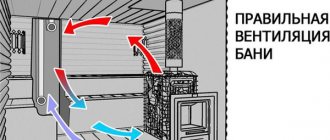
Partitions between the steam room, washing department and rest room must ensure appropriate temperature and humidity conditions in the room intended for relaxation. High humidity is not desirable here. The temperature should be comfortable, but not high. Solving the problems posed in this way is helped not only by correctly selected partition materials, but also by a well-thought-out ventilation system. In advanced projects, this is a “room microclimate control system.”
Spilling floors
Shower floors consist of plank flooring, and the floorboards are not fitted closely to each other - equal gaps are left between them, through which water flows away. This is the most common floor in a Russian bathhouse, as it is assembled entirely from natural wood. Their use is also relevant when constructing a lightweight structure - pourable floors in a frame bathhouse are one of the lightest and most economical analogues.
Shower floor in the bathhouse
Installation technology
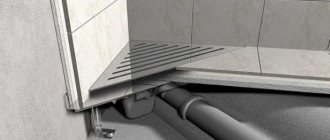
- The main condition for this technology is to ensure rapid drainage of water and good ventilation to avoid rotting of the structure. Water should not be absorbed into the soil - it is necessary to create a waterproofing subfloor. For this purpose, you can use ordinary roofing material, with which the subfloor is glued. The joints are treated with bitumen. If the foundation is strip, it is necessary to consider ventilation holes;
- Load-bearing logs are installed on concrete or brick pillars about 30 cm high, at a distance of up to 1 m from each other. Then the sheathing is assembled onto the logs, as in the previous case;
Spilling floors
- The assembled structure must be coated with a special compound, of which there are several varieties - it’s up to you to decide how to treat it in your particular case. The best option is internal moisture-resistant impregnation + bitumen coating;
- The frame is covered with boards, which must be planed on both sides so that water does not absorb into the fibers. The gap between them should be at least 4 -5 mm. Several boards above the drain and on the opposite wall must be made removable so that you can dry and clean the subfloor from debris;
Fastening the lining
Before starting work, you need to take measurements of the steam room and cut the lining to the required height.
Cut out the linings
The choice of fastening type depends on the room temperature.
Installation of lining can be carried out in different ways
If the room is not cold, then you can use clamps rather than nails. The finishing nails are visible on the front surface, so they can cause burns. The clamps are completely invisible, and the lining secured by them can be dismantled and installed several times.
Using a clamper
The steam room is lined from the stove and goes around the perimeter of the room. The correct installation direction is from top to bottom.
The ceiling is sheathed first
The board is attached with the groove down, the next element is attached to it, etc. The lining boards are assembled “groove into tenon”, like a construction set.
Lining profiles
Each subsequent board is inserted into the groove of the element located above.
When the water in the steam room is on the wall, it will flow freely without flowing into the gaps between the boards, this will protect the wood from rotting. The bottom boards are attached to the beams with self-tapping screws; in this case, they can be easily dismantled and replaced without dismantling the entire sheathing structure. The trim is nailed onto the door opening using bars.
Attention! A ventilation gap must be left between the paneling and the vapor barrier foil, otherwise the wood will begin to rot on the reverse side or mold will appear. Water often collects on the floor, so the lining should not come into direct contact with the floor either. One smart solution is to lay a row of tiles where the walls meet the floor.