Building a good-quality house from timber is a difficult process, in which each operation must be carried out with special care and reason. Much attention should be paid to laying the first crown, because this is what will affect the quality of the entire structure. If you do this step correctly, the walls of the house will stand straight, forming angles of 90 degrees.
The first crown should be laid slowly, in accordance with all requirements and technical standards. In addition, you need to prepare for work no less carefully. Even before you start laying the crown of a house made of timber, you need to take care of waterproofing the foundation.
Projects of timber houses
Number of projects 1346
- 5 rooms
- 2 bathrooms
House Project Delta 16.5*12
- To favorites
- 230² Total area
- 16 x 12m Construction area
from 3,105,000 rub.
Construction period 113 days
- 3 rooms
- 2 bathrooms
Gloria House Project 13.5x11.5
- To favorites
- 175² Total area
- 13 x 11m Construction area
from 2,362,500 rub.
Construction period 89 days
- 5 rooms
- 3 bathrooms
Project of the House "Galina"
- To favorites
- 173.4² Total area
- 9 x 9m Construction area
from 3,979,000 rub.
Construction time individually
- 4 rooms
Project House Hunter 1.5
- To favorites
- 82² Total area
- 8 x 6m Construction area
from RUB 646,933
Construction time individually
- 3 rooms
- 1 bathroom
House project Stanislav Chalet
- To favorites
- 93² Total area
- 8 x 7m Construction area
from 1,195,000 rub.
Construction period 20 days
- 3 rooms
- 1 bathroom
Akhtuba-B House Project
- To favorites
- 93.3² Total area
- 7 x 9m Construction area
from 1,196,000 rub.
Construction period 40 days
- 6 rooms
- 2 bathrooms
House Project Azure 12.2*11.8
- To favorites
- 216² Total area
- 12 x 12m Construction area
from 2,038,584 rub.
Construction time individually
- 7 rooms
- 6 bathrooms
Barvikha House Project
- To favorites
- 701² Total area
- 18 x 27m Construction area
from 13,386,600 rub.
Construction time individually
- 5 rooms
- 2 bathrooms
Modern House Project
- To favorites
- 81² Total area
- 9 x 9m Construction area
from 1,190,000 rub.
Construction time individually
- 6 rooms
- 2 bathrooms
Aurora House Project
- To favorites
- 163.4² Total area
- 11 x 9m Construction area
from 2,690,000 rub.
Construction period 90 days
- 2 rooms
- 1 bathroom
Corvette House Project
- To favorites
- 97.6² Total area
- 7 x 9m Construction area
from RUR 1,178,670
Construction time individually
- 3 rooms
- 2 bathrooms
Project of the House "BK 13"
- To favorites
- 161.4² Total area
- 11 x 9m Construction area
from RUB 1,573,650
Construction period 50 days
- 6 rooms
- 3 bathrooms
Project House Amur 528
- To favorites
- 500² Total area
- 28 x 17m Construction area
from 6,558,650 rub.
Construction time individually
- 11 rooms
- 6 bathrooms
Zeus House Project
- To favorites
- 691² Total area
- 20 x 17m Construction area
from 12,367,300 rub.
Construction time individually
- 6 rooms
- 2 bathrooms
La Casa House Project-3
- To favorites
- 153² Total area
- 9 x 13m Construction area
from 2,065,500 rub.
Construction period 79 days
- 4 rooms
- 2 bathrooms
Project of the House Neva 120
- To favorites
- 120² Total area
- 8 x 10m Construction area
from 1,488,000 rub.
Construction time individually
- 4 rooms
- 1 bathroom
Project of the House "BK 24"
- To favorites
- 146.42² Total area
- 9 x 10m Construction area
from RUR 1,427,595
Construction period 35 days
- 2 rooms
- 1 bathroom
House Project Smolensk
- To favorites
- 120.55² Total area
- 10 x 9m Construction area
from 4,132,875 rub.
Construction time individually
- 6 rooms
- 3 bathrooms
New House Project
- To favorites
- 284² Total area
- 11 x 13m Construction area
from 5,087,500 rub.
Construction time individually
- 4 rooms
- 3 bathrooms
Ida House Project
- To favorites
- 122.1² Total area
- 9 x 9m Construction area
from 3,663,000 rub.
Construction time individually
View all projects
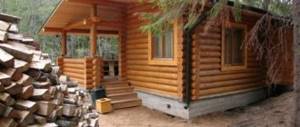
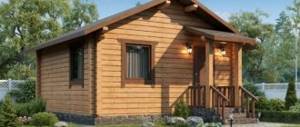
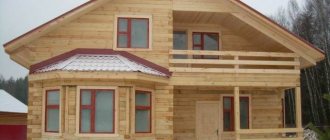
Houses made of timber are in demand. Many people want to live in environmentally friendly buildings, while enjoying all the benefits of civilization. Therefore, a large number of private developers today give their preference to timber as the main material for building their own home. But today we will figure out how to lay timber. And in this case, we will be interested in the process of laying on the foundation.
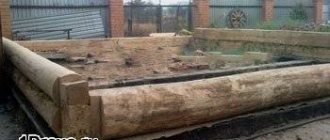
Timber laying technology Source okarkase.ru
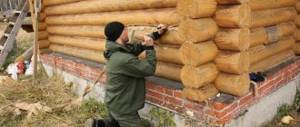
How to properly lay timber on a foundation?
At the very beginning of building a house made of timber, a rather difficult task arises: how to lay the timber on the foundation? After all, without a foundation, not a single wooden house will stand for long: despite all efforts to preserve the lower crowns, they will very quickly rot from moisture constantly coming from the ground. And in order to successfully fix the first crowns on a concrete or brick foundation, you need good theoretical preparation and at least minimal practical skills.
Scheme of fastening the lower trim and waterproofing under the first crown.
Laying technology
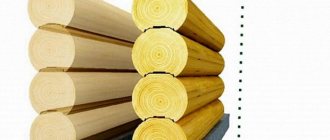
First of all, you need to choose a beam. Everything is simple here. This material should have a minimum number of knots, because it will be subject to heavy loads. And knots are places that do not withstand loads well. Plus, the material should not have a tint of blue.
It is recommended to pay attention to the annual rings of wood. Or rather, the distance between them. The closer the rings are to each other, the stronger the beam.
It is clear that even in one batch of material there are different timber with different degrees of quality. And if you come across elements of lumber with visible defects, do not be upset. The main thing is to place them correctly. So, if there is a visible defect on the beam, then this side should be laid upward. If there are bulges, then this side will be lateral.
Before laying, all lumber must be treated first with an antiseptic and then with a fire retardant. The first will protect the wood from fungi and mold, the second is a protective layer from fire.
Treatment of lumber with antiseptic Source teplicno.ru
Now a few words about the foundation. A wooden house made of timber requires a structure with the most flat upper plane. Because leveling beams is not easy. But there are options:
- This can be done using a waterproofing layer, which is usually formed from roofing felt and bitumen mastic. The first one is laid in 2-3 layers. On uneven areas, roofing felt can be laid with a large number of layers. Or use a thicker layer of mastic.
- Wooden pads are placed under the timber.
Other options do not apply. Some craftsmen subsequently fill the free spaces between the laid timber and the foundation with polyurethane foam. The option is acceptable, but short-lived. Therefore, advice - before laying the timber on the foundation, decide how to level the latter. It's better not to save money on this. But it is better to do it correctly right away at the stage of forming the foundation structure, taking into account the evenness of all surfaces.
Leaks hidden by bitumen mastic Source https://i.ytimg.com/vi/hr_Y3edfXGM/maxresdefault.jpg
How to attach timber to the foundation
In general, the question of how to properly lay timber mainly concerns the method of attaching it to the foundation structure. There are several options here, which we will now discuss.
The first of them is fastening with studs. The latter is a steel rod on which threads are cut: on one or both sides. In this case, one-sided studs will be required, the threads of which will be directed upward. This fastening element is installed in the foundation at the stage of installation of the reinforcing frame. It is to this that they are welded by electric welding. Here it is important to accurately set the distance between fasteners.
It turns out that the studs will stick up from the foundation structure. And their protruding size should be 5-10 cm greater than the thickness of the timber.
Beam fastened with metal pins Source tskastra.ru/
See also: Catalog of double timber house projects
So, the foundation is ready, the studs are sticking out, we need to lay the timber. To do this, it is necessary to drill through holes with a diameter slightly larger than the diameter of the installed studs. In this case, the distance between fasteners is strictly maintained. After that, the lumber is simply placed on the protruding pins and tightened on top with a nut, under which a wide washer must be placed. First, a wide groove is made on the upper surface of the beam in the places of through holes for a washer and a nut. It is important here that both elements do not protrude above the plane of the lumber.
Fastening with dowels
The second fastening method is based on the same metal pin, only without a thread. It is also welded to the reinforced frame. But the length of its part protruding from the foundation is equal to half the thickness of the timber being laid. Therefore, in the latter they do not make through holes, but blind ones. And their length should be equal to the length of the protruding part of the dowel.
That is, it turns out that before laying the first row of beams on the foundation, it is necessary to prepare it, and then simply place it on the pins protruding from the foundation structure. In this case, no fastening is performed. The dowels will hold the lumber well, preventing it from moving in the horizontal plane.
Attaching timber to the foundation with dowels Source 1.bp.blogspot.com
Fastening with anchors
Not the best option, but some masters use it. There is no need to install fasteners into the foundation structure. First, through holes are made in the beams, the material is laid on the foundation and marks are made on the concrete plane through the holes.
After that, the timber is removed and holes are made according to the marks. Then the lumber is laid back and a metal dowel is inserted into the foundation through the holes, which is tightened with a nut. Long and difficult.
Fastening timber with anchors Source krysha-expert.ru
Fastening timber to screw piles
If a wooden house is built on screw piles, then the first crown is attached to them with bolts. To do this, through holes are also drilled in the timber, which must exactly coincide with the holes on the piles. It is through them that the bolt is inserted: from bottom to top. And on the upper side it is secured with a nut and washer. Typically, four bolts are installed on each pile.
Some craftsmen use long, thick self-tapping screws as fasteners.
Fastening timber to screw piles Source strhouse.ru
Pile foundation
If your house has this type of foundation, then for installation it is necessary to tie it. This is because the piles do not provide uniform support and the pressure may be greater in some areas.
Make sure the piles are positioned correctly in the base. Eliminate deviations by sawing out the timber in the right places. Place the anchors at the corners of the lower rim of the beams and fill them with mortar. Using aluminum corners, reinforce the outside of the corners. Then carefully cut the beams to ensure their reliable joining. Fill the joints with jute. This method is preferred by most novice builders, as it is very convenient, and the building is given additional strength due to the first crown. In addition, there are a lot of master classes on the Internet in which experts share the secrets of this installation method.
Connecting beams to each other
So, let’s move on to the topic of how to correctly lay the first crown of timber on the foundation, and move on to a very important position - fastening the elements together. If this concerns the corners of the house, then four options are most often used:
- Half a tree. This is when half the thickness of each element is cut off to a certain length. Two adjacent beams are joined, forming a reliable connection that does not change the cross-section of the joint relative to the body of the material.
- Butt joint is the simplest option. But it is not recommended for use in residential buildings. Because it is the corner that often becomes the place where heat leaks from the house due to the formation of leaks at the joint. Therefore, the corners of buildings are well insulated, but often this does not save.
Root tenon - ideal joint Source remontik.org
- Root thorn , also known as a warm corner. An ideal option for corners both in terms of reliability and thermal insulation qualities. Structurally, it is a tongue-and-groove connection. That is, a groove is made in one element, a tenon is planed in another, which exactly fits the dimensions of the first. When joining, insulation is placed inside, providing high thermal insulation characteristics of the structure.
- Dovetail . The most difficult to manufacture, but the most durable option in terms of fastening. It also falls into the category of tongue-and-groove joints. Only the shape of the cut elements is not rectangular, but trapezoidal. It is this shape that ensures an increase in the contact area of the joint parts.
Methods of fastening the beams of the first row
The lower crown of timber for a log house or frame-panel structure requires replacement most often, so the installation is carried out in such a way that repairs can be easily carried out.
Anchoring scheme
It happens that builders do not attach the first crown of timber to the base. Due to the significant weight of the structure, they believe that the erected structure will not move.
The studs are laid when the base is poured with concrete. At the same time, their height reserve is taken such that the first row of timber can be tightened using nuts without problems. To secure the lumber, holes are drilled in it for studs.
Pins are reinforcing pins. They are also embedded in the foundation slab or tape at the concreting stage, in order to then lay the beams.
On screw piles with U-shaped or plate heads, the crowns located below can also be changed if they use up their resource.
Anchored, rigid fastening does not allow the structure to be repaired in the future.
Briefly about the main thing
The timber that will be laid on the foundation must be of high quality - without knots, blue stains, with tightly lying annual rings. Antiseptic treatment is required.
The smoother the foundation on which the timber will be laid, the higher the quality of the work as a whole.
The timber is attached to the foundation with studs, dowels or anchors. The choice of method depends on the skills of the master.
The beams are attached to each other in different ways - depending on whether it is an angle or a longitudinal connection. Popular methods are root tenon, dovetail, bowl, oblique lock and others.
Ratings 0
How to build a house from timber yourself: selection of materials, design, construction technology
A country house made of timber looks stunningly beautiful. Just looking at it gives you a feeling of comfort. It is quite possible to build such a home on your own, even without large financial resources and special construction skills. You can learn how to do everything step by step from the article.
Before you start building with your own hands, you should complete several points:
- Choose the right place for construction. The site must have an area commensurate with the future building and suitable soil.
- The second important point is creating a project. It must be approved by the local architectural department.
- Select and purchase the necessary materials and tools. The wood for construction must be selected with special care, because the structure must stand for more than one year. The main criteria for choosing wood are density and strength. It should also be taken into account that the future home must have good thermal insulation.
We suggest you read: How to make waterproofing under tiles with your own hands
Attention! Wooden beams have a significant drawback. In the first few years after the construction of a building, it tends to deform under the influence of precipitation.
https://www.youtube.com/watch?v=EXfJRUCvbUI
Most often, a log house is built from coniferous wood. It is lightweight (does not load the foundation too much), is not subject to rotting and does not crack.
Tools for construction you will need:
- electric or chainsaw;
- tape measure;
- level;
- electric drill;
- electric screwdriver;
- axe;
- hammer;
- nails;
- self-tapping screws;
- hammer drill
After preparing the tools, you can begin purchasing timber.
For construction, you can use solid and profiled timber. Advantages of the first option:
- Solid ones are several times cheaper than similar building materials.
- Buying it is not a problem - it is sold on any construction market.
- Such timber does not lose natural moisture, so the time for preparing wood is greatly reduced.
- Where solid timber is used, there is no need to use special construction equipment.
The disadvantages when choosing solid timber are as follows:
- Additionally, you will have to spend money on finishing. Since solid timber in itself is not beautiful, it is sheathed with clapboard or siding.
- The tree in this version does not undergo a special drying procedure, so it may be damaged by fungus. To avoid this, treatment with special impregnations should be carried out in advance, and this is an additional expense.
- If you use the timber in its entirety, the room will be less warm, since the roof joints are well ventilated.
Attention! Timber without a profile cracks after shrinkage. Solid wood housing needs sheathing on both sides.
Profiled version - as the name suggests, this type of timber requires the presence of a profile. Connections (tenons and grooves) are installed along its entire length.
The advantages include:
- During construction, the walls turn out to be very smooth.
- Profiled timber does not need cladding - it looks great on its own.
- Intervention seams during construction are very tight, and the inside of the room is correspondingly warm.
- Water from precipitation will not be able to get into the tight seams, which will prevent the wood from rotting.
Attention! Profiled timber has a small percentage of moisture, so it burns easily. Before construction, it must be treated with special fire-prevention impregnations.
Of the obvious disadvantages that this option has, we can note:
- In the warm season, such timber may crack.
- Walls made from this material are quite thin and require additional insulation from the outside.
It is quite possible to build a beautiful house from timber cheaply. A self-made project will help reduce the construction budget. It roughly looks like this:
- The house itself has a rectangular shape.
- The roof is gable, maximum five. Corners and roof windows increase the cost of work by approximately 40%.
- There is no basement. This provides significant savings, since its presence increases costs by at least 30%.
- The foundation is shallowly buried.
- The building has 1 floor and few window openings.
- There are no columns, balconies or bay windows.
- The walls are decorated very simply.
- The windows are of standard size.
- The facade is traditional.
Once the project is approved, you can begin laying the foundation.
https://www.youtube.com/watch?v=TqcQqealmhY
A timber house is built on a concrete or wooden base. The first option is most often used. First, concrete is poured, then a brick base is built on it. Only on top of this structure do they begin to lay timber. Several types of foundation can be used as the basis for a wooden house:
- recessed;
- shallow;
- tape type;
- columnar.
In most cases, shallow and strip versions are prepared for wooden buildings. The laying depth is 50-70 cm.
On the finished foundation, the timber is laid in rows one on top of the other until the walls of the required height are obtained. There are grooves made in the tree, with the help of which the logs fit tightly to each other. To make the walls stronger, be sure to use spikes designed for connection.
Attention! All seams must be caulked. This will make the walls windproof.
It is better not to skimp on materials when arranging a roof. You can choose a lot of options for different budgets. Experienced builders advise equipping different areas of the roof with boards of different sizes. For example, a board of 140x40 mm is required for rafters, and 100x40 mm for braces and racks.
When arranging the floor, you should also be guided by your own preferences. There must be a waterproofing layer under the screed, for which several material options can be used:
- jellied composition;
- coating materials;
- roll waterproofing;
- penetrating moisture protection.
The interior design of the floor also needs to be approached with careful consideration of all the details.
Advice. For housing built from beams, wood-based coatings, that is, parquet and laminate, are best suited.
The next stage of construction is the arrangement of heating, energy supply, sewerage, and water supply. At the same stage, doors between rooms are installed, and the finishing coating of the floor and ceiling is installed.
External wall decoration is also selected based on the preferences of future residents. Siding, lining, paint will do. In the case where the timber has an excellent appearance, you can leave the outside without finishing.
Photos and video materials attached to the article will help you get more information about construction. Of course, building a house from timber yourself is not an easy task. However, if you maintain the technology, you can get a reliable, beautiful and inexpensive home for yourself and your family.
Tags: timber, first, believe, foundation
« Previous entry