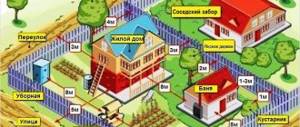
What is a dugout bathhouse?
Where is it used?
Hunters use it to keep warm, leave things behind, and be as unnoticeable as possible in natural conditions.
Gamekeepers and foresters use it for survival in harsh conditions, protection from rain, snow, wind and observation of wild animals.
Gardeners and gardeners use dugouts as a cellar to store their vegetables and preparations. And if you install a stove in the dugout and build it in compliance with all the technology, then it will be no worse than an adobe house.
Eco-settlers. Recently, this type of housing has become very popular among fans of ecological housing.
Instead of logs, moss, and branches, they use high-tech materials and approaches, as a result of which they obtain unusual, but full-fledged modern housing.
We will talk about simple dugouts that you can make with your own hands.
Regardless of the purpose of this type of building, there are general rules.
Materials
It should be noted here that we will be building a dugout for a long time and using a large amount of building materials that cannot be obtained in the wild.
But we will try to offer analogues of materials that can be found in the forest.
We will need a set:
- Poles are a long and thin tree trunk, cleared of branches and twigs: 70 pieces, 6 meters long and 120 pieces, 5.5 meters long.
- Ruberoid. Used as a waterproofing material for floors and roofs.
- Wire 8-9 kg.
- Iron or sheet profile. It will take about two sheets to arrange the roof.
- Insulation, beams, boards and other building materials intended for insulation and interior decoration.
- Fastening elements. Self-tapping screws, nails, corners.
- Doors and windows, if provided for in the project or drawing.
- Bake. It is important to ensure fire safety at home.
Russian, Finnish, Aztec and Turkish baths are interesting, but there is also a bathhouse underground. The list goes on, but most readers will imagine a bathhouse in the house, next to it or in a room, anywhere, but not underground! But an underground bathhouse is not that uncommon. And in frosty winter conditions - the best solution. What's so good about "fox holes"? Who knows, maybe Hobbits lived in such baths? One thing remains true - it is beautiful, fashionable and unusual.
Underground baths
It is the fox norms that are used to call huts that are half buried in the ground. In such a bathhouse, as a rule, a canopy is formed above the entrance, protruding above the porch of the bathhouse. They also resemble temazcals - the Aztec baths. In Europe, many “fashionable” modern architects build such structures, but using modern technologies.
Underground sauna - undeniable advantages
and not only baths, but also residential buildings:
- Underground, the wall temperature is less susceptible to temperature fluctuations,
- The heat transfer of half-buried walls is several times less than that of blown walls,
- As a rule, the roofs of such baths are covered with an earthen cushion and a grass lawn,
- The original design cannot be compared with any other form,
- The sound insulation of such rooms is beyond competition with any other walls.
- Savings on façade finishing works,
- Coolness in the hot season.
Perhaps the most famous underground baths are Abanotubani - underground baths in Tbilisi (Georgia). This is a very famous area with entire underground areas of baths that stand on hot sulfur springs. They are located on Joseph Grishashvili Street. The oldest bathhouse in this area is Iraklievskaya. It has become famous since the 16th century. The springs in these baths reach 24 – 42 degrees. Pushkin himself steamed there and Alexandre Dumas recalled.
Disadvantages of underground baths:
- Can be built in areas with low groundwater levels,
- There is no full daylight through the windows,
- It is difficult to drain water from the bath,
- A large number of drainage and waterproofing works.
This probably won’t stop a steam lover who decided to build a bathhouse underground
Underground bathhouseAn unusual underground bathhouse. A tribute to fashion or technological requirements?
Since ancient times, a dugout bathhouse has been dug into the soil. Russian baths were not always a log hut covered with a roof, above which a chimney rose. Similar projects were dugouts or semi-dugouts.
Such baths have always attracted attention due to their originality and practicality.
To begin with, a large hole was dug, the walls of which were strengthened. The finished structure was covered with logs. At first, dugouts were used as housing. When people began to live in log cabins, the “bathhouse” purpose was assigned to the pits.
To prevent heat from escaping, a layer of earth was laid on top of the roof, and any cracks that appeared were carefully sealed. For the same purpose, the bathhouse door swung open exclusively inward. And it will be much easier to dig out an entrance blocked with snow.
Unlike the dugout bathhouse, the semi-dugout was supplemented by a log house above the surface of the ground. There was a small window there. The opening was closed with a bull bladder or a plug made of straw.
A fireplace was built in the interior of the bathhouse, and a special vent was made to remove smoke. At worst, the doors simply opened. The used water flowed down a drainage chute, which was closed on top with half-logs.
The earthen bathhouse was equipped with two shelves on which they steamed and washed. The hearth was filled with stones. Hot boulders were thrown into tubs of water. The heated spray formed steam.
A dugout bathhouse is the best option for price-quality ratio. Indeed:
- no need to purchase expensive insulation materials. They cannot be compared with earth, clay, turf and moss,
- instead of lumber, dead wood, fallen trees and trees blown down by the wind are taken,
- there are no extravagant and vulgar outlines of various designer “bells and whistles”. Unplaned timber is installed in their place. The new building begins to attract with its special taste,
- they do well without capital foundations,
- the thick snow layer that occurs in winter is an additional natural heat insulator,
- baths located below ground level are able to retain heat much longer in comparison with their above-ground “sisters”, since the latter are constantly blown out by gusts of cold winds through the cracks,
- dugout baths do not require the installation of expensive window structures,
- here you can get by with simplified stoves or simple hearths. In other words, stove complexes for baths or saunas will not be needed,
- If there is a competent design of the entrance to the dugout, the buildings become much more attractive than “standard” log houses covered with standard metal roofs.
Dugout baths are objects where the walls are not built, but dug out. The whole complex of complex concrete work gives way to large excavation procedures. It is not difficult to dig a pit, but it will take a lot of effort.
There are differences between dugouts and dugout baths:
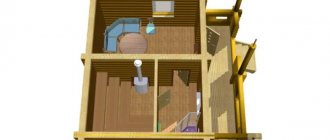
- in the bathhouse it is necessary to equip an additional “room”, which delimits the common space into sections for “undressing” and a section for “washing”,
- some options are equipped with chimneys and stoves. There are versions where smoke escapes through the windows (we are talking about classic baths that are heated “black”),
- if the pipe is led out through the ground, and the roof of the dugout is covered with dry leaves and pine needles (peat), then additional fire safety measures are needed to prevent fire,
- bathhouse designs require at least one window opening installed in the steam room, through which combustion products are discharged. Light penetrates through them. The importance of window arrangement is explained by the fact that many dugout bathhouses have kerosene lighting. If such baths are located on the outskirts, then natural light is especially important here,
- when the landscape of the site has a natural slope, then you can use the washing method, where the water simply drains from top to bottom, going into the ground. If ground and surface waters are low, then it becomes necessary to construct a drainage well for wastewater. At the same time, such plums spread extra unpleasant odors that arise after some time,
- It is desirable that there is a natural body of water next to the dugout bathhouse.
Underground baths equipped with stone walls are reliable and practical to use, but they have to be preheated for quite a long time. For arranging a dugout bathhouse, only an area where surface water will be located below the floor is suitable. Standard markings are carried out using pegs and cords. The depth of the dugout bath is calculated taking into account the following factors:
- The height of an adult is taken as the initial size. A quarter of a meter is added to it to organize a small window through which the room will be illuminated,
- In any construction of underground baths there are corner pillars plus a central pillar. A flat roof is erected on these supports. It can be sprinkled with earth, and the turf will not slide,
- Hewn or debarked round timber is used to make rafters and purlins. Before installation work begins, all material is treated with special compounds that protect the wood from bugs and fungi,
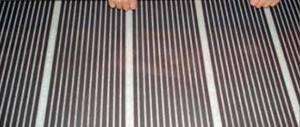
- To prevent rainwater from getting inside, you can use PVC film, as well as sheets of roofing felt, roofing felt or glassine (by the way, moss is an excellent antiseptic). Pieces of insulating films laid in 2 layers perpendicular to each other will protect against leaks.
Instead of a conclusion
Nowadays there is a comeback of dugout bathhouses. Similar projects are being built in the territories of summer cottages. They are built by construction companies engaged in individual steam baths - semi-dugouts. The cheapest construction is obtained on summer cottages with a considerable difference in terrain.
What is a dugout bathhouse? Since ancient times, a dugout bathhouse has been dug into the soil. Russian baths were not always a log hut covered with a roof, above which a chimney rose. Similar projects
Moving away from the purchased option, we can recommend the optimal price-quality ratio in the form of a dugout bathhouse. Such structures are built, or more precisely, swarmed on their own. Hence the first point of saving. The work of hired craftsmen is assessed not in favor of the bathhouse owner.
The second point of savings can be considered an independent basis. That is, a foundation for a dugout bathhouse is not needed. The third point will be to reduce costs for wall materials. The disadvantage is the difficulty of preparing the pit.
Work progress
When a place has been chosen, the future premises are marked, the turf is removed and after that you can start digging a pit. This may take several hours or several days - the volume is about 30 cubic meters.
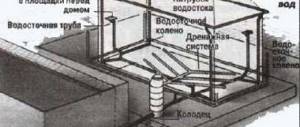
Next, drainage is performed, where the water will flow, and roll waterproofing is installed.
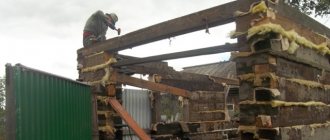
Then we begin to build a “shed” inside the pit. You can use dead wood and dead wood for it. First, corner pillars and load-bearing pillars are installed under the roof, then logs are laid around the perimeter. The waterproofing is fixed, and the void between the logs is filled with earth. External walls can be treated with clay.
Next, the rafter structure is assembled, the ceiling and roof are installed.
The top is covered with waterproofing material, the chimney is removed and the surface is covered with turf - the underground bathhouse is almost ready!
A window is very desirable, even necessary, for fire safety and natural light. Diesel lamps are often used as light bulbs in such a bathhouse.
Next, internal partitions and structures are erected to the owner’s taste, and a stove is installed. This could be a stove or another option.
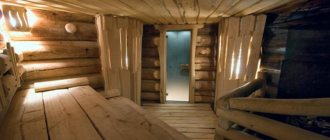
Any design is possible inside, but wood looks best.
Outside, it is recommended to organize a ladder from boards.
You can build doors between rooms with your own hands, or you can buy them to better retain steam.
This is what a real forest bathhouse that has been in use for many years might look like inside and out:
How to fold a stove-stove:
Mobile structures
First, let us highlight the desire of all manufacturers to introduce a variety of cheaper bath options. Keeping abreast of the problem, the consumer is offered to purchase mobile structures. The set of such a bathhouse consists of a tent, a stove and a bag. There are lighter options. They do not have ovens, and the temperature is increased by a portable steam generator.
You can install such a structure on any site, and two adults can do it. Depending on the type of mobile sauna, from 3 to 7 people can steam in it. Again, it all depends on your budget. The temperature created inside is acceptable for carrying out procedures – 90°C.
Bathhouse made of tongue-and-groove boards
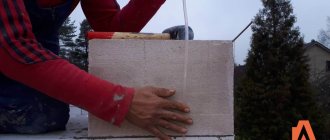
A special feature of the tongue and groove board is its strong locking connection, which does not let cold into the bathhouse. Assembly of the structure consists of the following steps:
- The frame of the bathhouse base is assembled from timber with a cross-section of 150 mm. A board 50 mm thick is suitable, but it is laid on edge in the amount of 3 pieces. The frame elements are connected at the corners. Additionally, grooves are cut for the vertical posts of the frame.
- The finished frame is installed on a columnar base. A support must be placed at each angle. Two layers of roofing material are laid between the base and the wooden part of the bathhouse. The horizontalness of the frame is measured using a level.
- The racks of the bath frame are installed in the grooves of the frame and secured with mounting angles. The optimal pitch of vertical elements is 600 mm. Additional racks are placed at the locations of windows and doors.
- Each rack is set vertically in level. Stability is ensured by temporary jibs.
- The racks are connected at the top by strapping made of boards 50 mm thick. In the finished bath frame, check the evenness of the corners and all vertical elements.
- On the outside, the tongue and groove board is nailed horizontally, tightly connecting the locks. The horizontal position of the board ensures the stability of the structure. Do not forget to attach waterproofing under the outer cladding to the bath frame.
- On the inside, mineral wool is laid between the frame posts. The thermal insulation is covered with a vapor barrier.
- Covering the walls of the bathhouse from the inside occurs in the reverse order. The boards are nailed vertically. A ventilation gap is provided between the sheathing and the vapor barrier.
The cladding of the bathhouse ceiling is carried out according to a similar scheme. Thermal insulation is used 2 times thicker than on the walls.
Choosing a wood species
The outside of the bathhouse is covered with any board. Pine and larch will do. Inside the bath, wood should have low thermal conductivity. Linden and aspen are ideal.
How to build a sauna cheaply?
Content
If a person wants to build a bathhouse, then the key point is the financial issue. People who are limited in funds want to kill two birds with one stone - to do everything efficiently, but cheaply. Is it possible? There are several ways to build a sauna cheaply. We will tell you the principles of building a budget sauna.
Construction of a budget bathhouse. General Tips
- Choose moisture-resistant materials! Damage to material has a negative impact on savings.
- If you are interested in the question “how to build a bathhouse at minimal cost?”, then we give advice - build a small bathhouse. The larger the bathhouse, the more materials are needed.
- Watch out for fire safety!
- The construction site must be level, otherwise additional material will be required for the foundation.
- The bathhouse is a relatively lightweight structure, which allows the use of a floating foundation. It's profitable.
Bathhouse made of plastic film - it happens!
If you are going on a hike or you have a summer house that you don’t visit often, then a temporary type of bathhouse may be suitable for you. This type of construction is very inexpensive. You will need a couple of pieces of plastic film, a couple of fabric sheets and rope. Pieces of film need to be selected according to the size of 3 by 5 meters, and fabric - one and a half by 3 meters. You will use rope to connect the frame elements. This is what is cheaper to build a bathhouse from. Other materials can be easily found in nature.
- Construction of a foundation for a stove made of stones.
- Bake. Larger stones are placed on the foundation. Later, large and flat stone slabs are placed on such a structure. It is necessary to leave a gap between them through which the heat will penetrate. The process ends with the installation of a flat boulder on the hole. A container of water will be placed on it.
- Frame. It is constructed from branches that are tied together with a rope.
- Finally, the stove is lit and the frame is surrounded with polyethylene. An awning is used for the door. The final size of the structure: 1.5×3×1.7 meters.
Summer view of the bathhouse
There is another option for how to build a bathhouse with your own hands cheaply - the summer type. This bathhouse does not contain a stove in its design. Indoor air and water are heated by the sun during the day. The southern wall must be made at an angle. Under the material of such a wall, polyethylene film is used. The side should not be shaded throughout the daylight hours.
The door is also made of wood on the eastern side of the bathhouse. Roofing felt or a black aluminum sheet is perfect for the roof (you can paint it yourself). Both options are good for attracting heat from sunlight. It is possible to install a water tank on the roof. A tap or watering can is led from such a reservoir into the bathhouse. The water heated during the day will provide the owner with a warm evening shower.
The ideal place to build a permanent bathhouse is the bank of a river. If this is not possible, then you will need to place a bowl measuring one and a half by two meters. During construction, a room for storing firewood and necessary bath accessories is being considered. A steam room, a dressing room and the stove itself are also being built.
The sauna stove is the main element with a strict arrangement. One side of the stove heats the dressing room, and the other side heats the hot water tank. You can also choose a place for stones, watering which gives rise to heat. Cold water is poured into a separate tank or supplied via a tap - depending on your budget.
So, how much does it cost to build a bathhouse is a very vague question. Much depends on your goals and desires. If we compare the listed types of baths, the cheapest will be a temporary bath. A permanent bathhouse is the most expensive option. Well, a summer bath is an ideal option for a summer cottage.
How to build a cheap sauna? Is it possible? There are several ways to build a sauna cheaply. We will tell you the principles of building a budget sauna.
Building a bathhouse without a foundation with your own hands
It just so happens that a bathhouse is an integral attribute of a beautiful, equipped dacha.
It’s one thing to hastily wash yourself in an uncomfortable and cramped shower stall, and quite another to comfortably take a steam bath in a cozy place, feeling like a real resident of “Ancient Rus'”. It is not surprising that bathhouses in summer cottages are so popular.
Of course, you can order the construction of a bathhouse from some construction company. But what if you yourself were involved in the design of your dacha and now you don’t want to disturb the existing harmony with someone else’s interference? All that remains is to build the bathhouse yourself.
Moreover, it is not that difficult. This article will highlight all the points that may cause difficulty, and you will have a wonderful bathhouse without a foundation.
There are three main reasons.
Bathhouse on a site without a foundation
- Construction of a bathhouse with a foundation is much more expensive. If you do without it, construction costs can be greatly reduced.
- Without a foundation, the building will be legally considered a barn or a shed. You will not have to coordinate the construction of the bathhouse with numerous inspections and obtain permits. No, the “barn” will also have to be decorated, but this is much easier. Conventionally, this bathhouse will be considered a mobile, collapsible building that can be moved anywhere at any time. But the time she spends on the site is not regulated, so there is no need to worry about it.
- Sometimes there is simply no time to build a solid foundation. And then this will be a temporary solution. And then you can move the bathhouse to the foundation, if you want.
To avoid problems with inspections in the future, it is better to immediately ensure that your bathhouse meets the following requirements:
- weight no more than four tons;
- area no more than 30 square meters. It is considered not inside the room, but outside, along the outer perimeter;
- There should be only one floor, the first. You cannot build a second floor;
- the structure must be collapsible. Conditionally collapsible. Of course, no one will dismantle the bathhouse to check this criterion.
Soil on the site
First you need to find out whether it is possible to build a bathhouse without a foundation on your site. Is it always possible to do without it? No. A lot depends on the type of soil on your site.
Rocky, mountainous terrain is ideal, where the soil is quite hard.
Soft soil will inevitably sag, and it will do so unevenly, causing distortions of doors, windows, and even destruction of walls.
The soil must withstand a pressure of 12-15 kilograms per square centimeter. This is the minimum required hardness. If it is not there, you will have to make a strip or pile foundation, and this is a topic for another article.
Clay base
If the soil is dense, is not washed away by water, and is not prone to sloughing or sliding, you can use this method.
- Level the site where construction is planned.
- Mark the outline of the future bathhouse and dig a trench along its perimeter. The depth should be about 30 centimeters, the bottom of the trench should be strictly parallel to the surface of the earth.
- Reinforce the trench with boards. They must be quite durable, that is, rotten wood falling apart from old age will not work here.
- Fill the gaps between the boards with clay. Do not dump all the clay at once, do it gradually, for example, 5-10 centimeters of clay at a time. Tamp it down thoroughly each time. You can use a special roller or just some kind of log, which you will need to knock on the clay, compacting it.
- The clay will dry in a few days, and now you can build walls on it. It will provide sufficient density to the base.
Features of the soil on the site
It still won’t be a foundation, but you’ll have to dig a foundation pit. This option is suitable for less dense soil.
- Dig a pit. Its depth should be 90-100 centimeters. Theoretically, you can get by with a shovel, but it is better to use special equipment.
- Dig drainage trenches. They should go downwards and at an angle from the pit. Their task is to drain groundwater from the pit and reduce humidity. The trenches will need to be filled with special drainage soil.
- Fill the pit with crushed stone. You can use something else, such as broken brick, but it will be less effective. Crushed stone is better.
- On top of the crushed stone you need to lay a waterproofing layer of any material that you like and that meets the purpose of waterproofing. Roofing material is well suited for these purposes.
Such a base can support much more weight than a clay base.
As already mentioned, one of the most suitable areas for building a bathhouse without a foundation is mountainous and rocky terrain. In it you can find boulders and stones of different sizes and shapes in abundance. Therefore, it will be cheaper and easier to make a base for a bathhouse from them.
- Collect boulders and sort them into large and small.
- Dig a small pit and mark the contours of the future bathhouse inside.
It is necessary to note both external and internal walls. Pit of boulders - Along the lines of the future walls, form walls from large boulders. You need to select them so that the gaps between the stones are minimal. The boulders can be held together with concrete or cement.
- Fill the space between these walls with small boulders.
- Make a grillage on top of the masonry. Additional waterproofing is not required.
We invite you to read: Bath procedures for rejuvenation
Such a foundation will be very reliable and will withstand even a fairly heavy structure. A bathhouse without a foundation, but on a stone foundation can even be built from logs. Reliability and ability to withstand heavy loads are quite comparable to a real foundation.
Crushed stone pillow
This base is only suitable for a flat surface. If in the place where you are going to install a bathhouse, there is some slope of the soil, you will have to make columns.
- Dig a shallow (up to 50 centimeters) hole at the base of the future bathhouse. Its bottom should be smooth, parallel to the main surface.
- Fill the hole with crushed stone.
- Place a waterproofing layer on top.
Features of the bath
Remember, the foundation is needed precisely to support the heavy weight of the building.
No matter how beautiful your foundation may be, it is still not a foundation. And it won’t withstand really heavy loads.
Therefore, the bathhouse itself that you will build should be lighter than its “fundamental” counterparts.
The walls are best made of wood or plastic, heavy logs will not work very well, but if they are light and not too thick, you can use them.
How to raise a bathhouse
What if you already have a bathhouse on your property, but you want to raise it. For example, for the reason that you noticed how the walls are rotting from below.
How to raise a bathhouse without a foundation? It's not as difficult as it might seem.
You will need a jack (you can have one, but it will be easier with several), supports and posts on which the bathhouse should eventually be installed. So how is this done?
Place the jack under one of the corners of the bathhouse and carefully lift it. Not too much, five centimeters at a time will be enough. Place a firm base. Move to the next corner and repeat the same with it.
So, the foundation has been laid under the walls, now you can begin to support. Everything is the same: you lift the corners a little bit, put supports one after another, remove the jack.
If you have several jacks at once (preferably four), everything can be done much more conveniently: you install the jacks at all corners at once, lift them at the same time, and only then add supports.
This way you can raise the bathhouse not five centimeters at a time, but a little more. In addition, this way the load on each individual jack will be less, which means there will be less risk that something will go wrong.
If the crown of the building looks unreliable and it seems to you that it may break, there is no need to follow the above instructions, because this is dangerous and fraught with injury, not to mention harm to the structure of the bathhouse.
If you are not sure that you can build a bathhouse yourself, you can always purchase a ready-made option. Then the foundation must be done in the same way as described above. The technology will not change.
You just have to focus on the dimensions of the finished bath; don’t forget to check them carefully and several times.
In general, even if you want to buy a so-called “mobile” bathhouse on wheels, the base will not interfere with it.
Distortions will cause inconvenience when using the bathhouse, so a solid base will be a good solution. The only thing is that when buying a mobile sauna, you can take a little less care of waterproofing.
It will still rise above the ground.
So, if you are not afraid of difficulties, have ingenuity and some engineering imagination, it will not be difficult for you to build a bathhouse on your own at your summer cottage.
The main thing to remember is that if something doesn’t work out for you, stop and ask for advice from more experienced friends and acquaintances.
You can also often get qualified advice on some forum dedicated to construction.
Of course, it is a very special pleasure to steam in a sauna built with your own hands, so overcoming all the difficulties on the way to this goal is really worth it.
- Construction of a foundation for a stove made of stones.
- Bake. Larger stones are placed on the foundation. Later, large and flat stone slabs are placed on such a structure. It is necessary to leave a gap between them through which the heat will penetrate. The process ends with the installation of a flat boulder on the hole. A container of water will be placed on it.
- Frame. It is constructed from branches that are tied together with a rope.
- Finally, the stove is lit and the frame is surrounded with polyethylene. An awning is used for the door. The final size of the structure: 1.5×3×1.7 meters.
How to build a sauna cheaply?
There are many options for constructing and purchasing inexpensive bathhouses. But still, without departing from tradition, we need to talk more specifically about options for reducing the costs of constructing capital structures. Everyone wants a full-fledged bathhouse on their site, to which they are not ashamed to invite friends on their day off.
There is only one way out of this situation - to build a bathhouse that meets all modern requirements and introduce all kinds of economic solutions, of which there are plenty on the construction market today.
The most inexpensive is a sauna made of timber. Choosing this material for laying a log house allows you not only to carry out all the processes yourself, but also to vary the price. For example, if you use the sauna only in the summer months, the savings will increase due to the reduction in the cost of purchasing timber. A log house made of logs with a cross-section of 100 mm will be sufficient.
For a bathhouse of a budget size of 12 m/2, you will need approximately 65–70 bars. Plus - inexpensive insulation in the form of tow. You can even refuse finishing by first cleaning the surface of the wood. The most economical option for building a bathhouse.
Arbolit
Home craftsmen offer to save money by using this material. To work on the construction of a small bathhouse, you will need the following:
- 20 bags of cement;
- sawdust;
- sand about 3 tons;
- lumber
In addition, you will need a lot of water. The bathhouse is built using monolithic technology or pre-fabricated blocks of various sizes. In the first option, the formwork is assembled, all the ingredients are mixed and poured into it. In the second, masonry is carried out using the technology of assembling bathhouse walls from foam blocks or bricks.
In the language of builders, this is a bathhouse made of sawdust concrete. This is what is called wood concrete in the construction environment. This is a reliable material with a high degree of heat resistance.
The construction process itself causes some inconvenience. When pouring walls by collecting formwork, you have to wait 3–4 days. Time intervals are necessary for the layer to harden. Saves costs, low material cost.
Insulated frame
Another budget option for building a bathhouse. A small structure will require approximately 3 cubic meters. lumber, plus an insulating layer. You won’t be able to get away with inexpensive tow or jute, but the costs are still low.
A frame bathhouse for summer use is assembled with a wall thickness of only 10 cm. The insulator plays the main role in containing heat. These are ecowool or mineral fiber panels.
The proposed options for saving on the construction of a bathhouse were considered in the summer version. When planning a capital structure in which procedures will be carried out all year round, you will have to spend a lot of money, at least on the same insulation of the walls of the bathhouse from the inside. Costs for the base and roofing structure will increase.
Savings will really appear if restrictive measures are observed at all stages, but not to the detriment of the internal microclimate. In this regard, when laying the floor, there are also certain tips and craftsmen suggest resorting to a double structure.
The base is poured concrete, no more than 7 cm thick. A 15–20 cm layer of river sand must be laid underneath it. After the concrete has hardened, a removable panel of boards is constructed. In everyday life, craftsmen call this option a leaky floor. The panels can always be removed and taken outside for ventilation.
Remembering the law of physics from the school curriculum that hot air rises, you should not skimp on the ceiling. Up to 70% of the steam escapes through it, but still, there are some tricks.
Craftsmen suggest saving money by using natural materials for insulation. At the beginning of the first century, dry leaves mixed with soil were the only way out of this situation. Time and experience, coming over the years, have made it possible to move away from such compositions and today, other mixtures can be used to insulate the ceiling in a bathhouse.
Sawdust or expanded clay are an excellent option. Using them you can make inexpensive but high-quality backfill. In this case, you cannot save on vapor barrier and it is better to lay it in 2-3 layers. This recommendation must be especially observed when choosing sawdust backfill. Expanded clay is more resistant to moisture, but still, it should not be allowed to circulate through the ceiling.
In a small bathhouse, you don’t have to install windows at all. Ventilation vents will be sufficient for ventilation. But you will need at least two doors: the entrance door and the one separating the dressing room from the steam room.
You can make the door yourself. Given the small size, one canvas will require 5 tongue-and-groove boards and two timbers. It is not necessary to insulate the door to the steam room; this must be done with the entrance structure.
The most inexpensive in this regard will be a lean-to structure. For assembly you will need a minimum of lumber and the same amount of insulation and roofing sheet. Regardless of which roofing structure is chosen for the bathhouse, in order to save it, it is better to cover it with roofing felt or other materials derived from it. Slate is not very expensive today either.
Content
Bathhouse underground
An underground bathhouse, whose design resembles a dugout, is considered an unusual but economical structure. The walls are lined with stone for reliability. There is often dampness in the dugout. High concentrations of moisture are observed in spring and autumn. The stone walls of the dugout easily resist moisture.
Bathhouse walls made of wood have a shorter service life. Dampness does not spare the material. The advantage of wooden dugouts is that they warm up quickly compared to stone buildings.
It will only be possible to install a dugout bathhouse in an area with deep underground layers of water. It is important to choose a hill. In the lowlands, the dugout will be flooded with melt and rain water. The height of the bathhouse is 25 cm greater than a person’s height. The dugout cannot be completely immersed in the ground. The pit is dug to such a depth that part of the bathhouse extends above ground level. Windows are installed in the protruding parts of the walls of the dugout for natural lighting and ventilation.
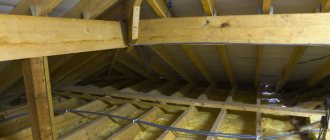
The design of a wooden dugout involves the installation of log supports at the corners of the pit and in the center. Moreover, the pit can have not only a rectangular shape. If desired, the dugout bathhouse can be built with a tent of 6 or 8 corners. If the roof is supposed to be covered with earth, it should be made flat. The soil will not slide off such a bathhouse roof during rain or melting snow. The roofing material of the dugout is several layers of waterproofing. The material is laid on a continuous sheathing of boards. The rafters of the dugout are round timber cleared of bark. All wooden elements are impregnated with protective compounds against bark beetle and fungus.
Forest dugouts are not covered with waterproofing. The roof is covered with dense layers of clay, leaves, moss, and pine needles. The walls of the dugout need special waterproofing. On the soil side they are covered with roofing felt, film or membrane. To prevent the soil from falling into the dugout, the walls of the pit are strengthened with a board nailed to the supports.
Do-it-yourself dugout bathhouse: photo
How to make a bathhouse in the basement of a private house - tips for arrangement
Installing a bathhouse in the basement of a private house has a number of advantages, including saving space on the site, direct access from the living space, minimal construction time, and others. Provided that high-quality building materials are used and the design is strictly followed, it will last for many years.
You can entrust the construction of this facility to professionals, but this will entail higher financial costs. However, even when building a bathhouse on your own, you will periodically have to seek advice from experienced specialists, which will allow you to avoid some mistakes.
When is an underground sauna the best solution? This is mainly true in cases where its construction in a separate room is not possible. The reason may be limited free territory on the site, the financial capabilities of the owner, and others. One way or another, a bathhouse in the basement will bring no less pleasure than with its traditional placement.
Before constructing any object at the preparatory stage, it is necessary to study its features and specifics.
The bathhouse on the ground floor is no exception:
- placement of a workshop or other premises will require a complete replacement of sewer and ventilation systems, water supply,
- planned during the construction stage of the house, the bathhouse in the basement must be built in accordance with the drawn up project,
- installing a chimney is always accompanied by a number of difficulties, especially if firewood is used as fuel; the more floors in the house, the more difficult it is to make a chimney.
As in the case of a steam room, a bathhouse can be equipped in a separate room, but some features should be taken into account:
- Since we are talking about high temperatures, electrical wiring should be laid at a small height from the floor, or better yet, under it. You will also need to install special lamps that are resistant to high temperatures.
- It is necessary to provide an air dehumidifier in the bath room. This is especially important if you plan to build a swimming pool even of a small size. The option of a split system, of course, can be considered, but it will not provide sufficient drying of the bathhouse.
A bathhouse in the basement of a private house needs high-quality comprehensive insulation. Since it belongs to rooms with high humidity, this implies the penetration of steam into the walls. We are talking about deep penetration into the structure of the material, which will lead to its excessive wetting. As a result, the insulating layer will begin to deteriorate, so it is recommended to provide an air corridor between the thermal insulation and the wall, which will solve the problem of air drying out. The width of the corridor should not be more than 10-20 centimeters.
It is better not to use polystyrene foam as an insulation material, as it tends to emit harmful fumes when exposed to high temperatures. For these purposes, a special thermal insulation material is used, which is intended for this type of work.
Natural wood is an ideal material for sauna cladding. However, you should not cover it with varnish, which, like polystyrene foam, emits harmful vapors when exposed to high temperatures. An underground bathhouse with your own hands must, first of all, be safe for health, so such materials must be excluded.
The installation of a chimney is mandatory when installing a stove, regardless of the type of fuel (coal, wood). If one is provided for in the house design, this is the best option. Adding it to an already completed structure is a very difficult task.
Sewage for a bathhouse is extremely important, since this room involves a large consumption of water. According to experts, the best option is to install a pumping station. This is justified by the fact that the location of the sewer pipes is lower than the main sewage system of the house, which makes it impossible to naturally drain water into the sump.
What are the advantages and disadvantages of a dugout
Definitely one of the positive aspects is good thermal insulation - the earth retains heat well. The soil cover is not susceptible to such a disease; sharp temperature fluctuations; heat is retained longer, which means less energy consumption. Sound insulation in a dugout is much better than in a conventional building; for a while here you can really forget about time.
In practical terms, a dugout is better than a conventional building - it does not require a foundation, and local materials can be used during construction. As a temporary building for 3-4 months, this is the most profitable project.
True, you need to remember the disadvantages - for long-term use you need reliable waterproofing and a well-thought-out system for draining used water and natural precipitation.
Room layout
This item makes a big contribution to reducing the cost of building a bathhouse. Avoiding planning multiple rooms will help reduce costs. The classic version, where the steam room is combined with a washing compartment, is the most effective way to build a budget bath.
All the extra partitions only increase the price. It is necessary to purchase additional material, plan their location, and in some cases, lay a base specifically for them.
In the fight against cost cutting, any weapon is acceptable, as long as you use it correctly. All options for building a budget bathhouse must be carried out carefully, analyzing the materials used and methods of saving. Actions aimed at reducing costs should not affect comfort.
Bathhouse from a gun carriage
In villages, in simple language, truck trailers are called carriages. For bathhouse builders, a carriage is a round timber hewn on both sides. The material is also called “two-roll timber”. The carriage was invented by the Norwegians. They came up with the idea of a strong locking connection. The docked carriage does not allow heat to pass through and ensures reliable stability of the walls of the bathhouse.
Advantages and disadvantages
Laft baths have a number of advantages, but there are also several disadvantages.
- The carriage is environmentally friendly. Wood does not emit chemical impurities in the bath, creates an aroma, and maintains a special microclimate.
- The locking connection of the carriage is considered one of the most durable. The walls of the bathhouse are not deformed in dampness or after drying. There are no gaps between the carriage.
- The appearance of the carriage has natural beauty. There is no need to additionally line the outside of the bathhouse.
- For the carriage, logs with a thickness of about 400 mm are used. Such a bath wall reliably retains heat without additional thermal insulation.
- The carriage inside the bathhouse is beautiful. The walls do not need to be sheathed with anything additional.
- The price of the carriage will seem high to many, but the construction of a bathhouse will be cheaper due to the absence of the need for additional interior and exterior decoration.
- If we compare two identical bathhouses made of a carriage and a rounded log, then the first building turns out to be more spacious.
- The walls made from gun carriages are lightweight. There is no need to pour a powerful foundation under the bathhouse.
Among the shortcomings of construction from a gun carriage, 3 important points are identified:
- The carriage is susceptible to rotting faster than a log. The problem is the hewn sides. The core of the tree is exposed, which is less resistant to moisture. To increase service life, the carriage is often and carefully treated with protective impregnations.
- The cost of a bathhouse built from a gun carriage will be cheaper when compared with stone buildings that require interior and exterior finishing. In other cases, the costs will be higher. Construction from logs or beams will cost less than a similar option from a gun carriage.
- An important drawback is the appearance of cracks on the carriage. However, not a single tree is immune from this problem. The cracks in the carriage are not through.
In terms of speed and ease of construction, timber construction wins. In the carriage there is a difficulty in making the locking connection.
Construction Features
A bathhouse is assembled from a gun carriage in the same way as a construction made from timber or logs. First, the foundation is poured, the walls and roof are installed, and the interior space is arranged. The difference in construction is the assembly of walls from gun carriages. Logs are used from coniferous trees. To make a carriage yourself, the round timber is dried. Pre-made longitudinal cuts will eliminate the appearance of cracks. The shrinkage of logs for carriages after drying reaches from 5 to 15 cm.
Polycarbonate bath
A summer version of a bathhouse can be built from polycarbonate without much expense. Under the sun, energy is accumulated through transparent sheets, it will be warm inside, and the water will warm up faster. The bathhouse is not used in winter due to the lack of a stove. Additional heating is carried out by electricity.
Step-by-step instruction
To build a bathhouse, you need to install a frame and cover it with polycarbonate. The process consists of the following steps:
- On the site, the dimensions of the bathhouse are marked with stakes and a cord. Concrete foundation pillars are dug in at each angle at the location of the piers.
- The base is covered with roofing felt. The frame of the bathhouse is assembled from timber - a rectangular frame. It is fixed to the foundation pillars with anchor pins. The polycarbonate bathhouse is light, with a large windage. Fixation with anchors will prevent the structure from overturning by the wind.
- Vertical posts made of 50 mm thick boards are fixed to the frame. They are tied on top with a similar board. The rafters are attached to the frame at a distance of 600 mm. To prevent the structure from playing, the racks are reinforced with jumpers and jibs. The rafters are connected with lathing.
- The roof of the bathhouse is covered with one layer of polycarbonate. On the walls, the internal and external cladding is made of two sheets, which eliminates translucency. The partitions inside the bathhouse are similarly made of polycarbonate.
- The floor is made in the simplest way - poured from wooden gratings. For a summer bath, a complex drain with sewerage and concrete screed is not needed.
- You can even supply water to the bathhouse from a boiler or install a heated tank similar to a summer shower.
Bathhouse made of polystyrene concrete
Polystyrene concrete blocks have poor thermal conductivity. For a bath this is an ideal option. However, the material absorbs moisture. The walls of the bathhouse are protected to the maximum with reinforced waterproofing from the inside and outside.
Bathhouse construction technology
A reliable strip foundation is poured under a bathhouse made of polystyrene concrete blocks. From above, the base is covered with two layers of roofing material. Laying out the walls starts from the corners. The first row of bath blocks is placed on cement mortar. The subsequent rows are laid using glue. The thickness of the seam is kept to a maximum of 5 mm. Every third row is reinforced. Grooves are cut in the blocks for the rods. The laid reinforcement is filled with mortar. Further laying is again done using glue.
The roof of the bathhouse is made gable. Mauerlat is laid along the perimeter of the walls. Rafter legs and floor beams are attached to it. The rafters are filled with sheathing, waterproofing is rolled out, and a roofing covering, most often corrugated sheeting, is laid.
A ventilated façade is installed on the walls of the bathhouse outside. Mineral wool is used as insulation, and the cladding is chosen as desired. The inside walls of the bathhouse are similarly insulated and vapor barriered. Wooden lining is used for cladding. The ceiling of the bathhouse is hemmed in the same way as the walls. The floor is concreted. The rest room is tiled and heated with electric mats. Boards are laid inside the steam room.
The video gives tips on how to properly lay out the blocks: