- Video author: Roman Zaitsev
- Author's channel: https://www.youtube.com/channel/UCsN4LDmlQO3kKZphP7tACBA
- Video:
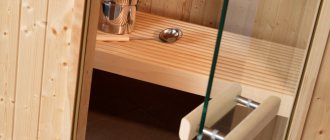
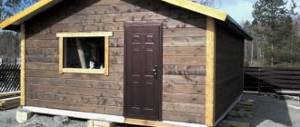
Now I will install the extension on this door. The accessory will be telescopic. For those who don't know, here it is in cross-section.
This is the groove. There is a groove in the additional strip. And on the cash there is this thorn. Cashing has this profile.
Why was this done? When we place an additional amount, the cash is inserted into it. And we can adjust the distance within this pass. About one and a half centimeters.
Now, if for example, this distance is not 8 centimeters, like here. And there from 5 to 15 millimeters, we can cash out immediately without additional charges. This box is certainly not telescopic. This door has been installed for a long time. This is a simple box. In general, telescopic boxes contain passes here. Immediately so that the cash can be mounted there.
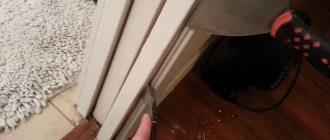
Where do I start installing the addition. First I saw off to height. First I trim the bottom, then here I make a mark with a stationery knife and saw it off 1 millimeter shorter.
Then, I take a square and measure this distance from the box to the edge. And add more depth to the groove. In this case it is 1 centimeter. And I make markings on the reverse side. Here's the line.
Well, here we need to take into account that you need to saw off from the side where it will be inserted into the box. Because this region cannot be spoiled. Well, here I expect the additional strip to be about a couple of millimeters less than the plane of the wall itself. Because it doesn't matter here. I can adjust these 2-3, even 5 millimeters with this cashing spike. If there are ordinary additional strips, then on the contrary, I make the width of the additional strip 1 millimeter larger. For what? So that there is enough cash in any case. And you need to measure. The walls are not always level, so I measure at several points. Well, at about 4. Up, somewhere here and down.
If the wall is approximately flat, you can do it at 3 points. And thus I adjust the left and right additional strips. Then I mount the top one on top of them, directly on them. I saw off the whole thing with a jigsaw. You can use a circular saw to cut some parquet or a mini-circular saw. I mark the top bar like this.
Here I place it like this, so that this edge of it is before the beginning of the groove. Here I also mark, right in the groove. Just a knife and that's it. Then I turn it over and put it in like this. And here we make marks as if in width. Because there are different left and right edges. This is how we make marks. Here and here. Like this.
And then I draw and cut.
Materials, design features, types of accessories
Additional strips are used to mask slopes in cases where the width of the box is less than the thickness of the wall. Inserts are placed in the space between the trim and the frame. The materials of additional elements are selected in accordance with the canvas. To ensure that the color and texture of the decorative inserts match the doors, it is recommended to purchase the entrance structure as a complete set.
Materials from which the planks are made:
- three-layer plastic panels reinforced with metal;
- from wood species;
- MDF and chipboard panels;
- covered with laminate.
Types of extensions in accordance with installation technology:
- Standard - ordinary slats, often covered with eco-veneer. The edges of the plank can be raw or framed with edge tape. If there is no edge, you will need to perform installation work more carefully. The smallest imperfections are visible at the ends without an edge film. The protective layer also prevents the panel from deforming when exposed to moisture and temperature fluctuations. You can glue the film yourself using an iron.
- Combined - angular-shaped elements that combine extensions and platbands in one piece. Used for narrow floors. They are built into grooves located in the box.
- Telescopic - a complex design that involves fastening using ridges and grooves. The edge of the plank is inserted at different depths and can decorate walls of any width. Installation does not require additional fastening.
Advice from professional installers
- If the wall has a perfectly flat surface, ordinary additional strips are attached to it with liquid nails. All surfaces are degreased, glue is applied pointwise, the strip is pressed and tapped with a rubber hammer.
- Regardless of the method of installing the extensions, it is advisable to first install the platbands, which, fixed with foam, align the line of attachment of the strip.
- If there is a noticeable curvature of the wall surface and a gap formed during installation, block blocks are placed.
- If the door swings open at an angle, the expanders should be mounted on the side opposite to the location of the hinges.
- To remove additional excess, use a jigsaw.
- Small cracks are removed using a wood putty mixture that matches the color of the finish.
- Black or hardened self-tapping screws are used for installation.
- It will be easier to install the extensions if you attach a wooden plate to the slopes not treated with plaster.
- When adjusting the dimensions, the extension is applied to the wall with the wrong side and marks are made. The trimmed part is again tried on at the attachment point, and then fixed. Vertical extensions can have different sizes.
- Horizontal expanders are leveled using wedges.
- To prevent distortion of the additional panels when the construction foam dries, spacer elements made of foam plastic are installed in some areas.
Additions for interior doors make doorways logically complete. You can design the passages yourself, as this does not require any special skills or the use of complex technical equipment.
Standard sizes of door panels
The dimensions of the door extensions correspond to the average dimensions of the door leaf:
- Standard height is 200-220 cm.
- The approximate thickness of the strip is 10 cm. These dimensions ensure that the insert is tightly fastened into the hole in the box.
- The width of the elements depends on the thickness of the interior partition. In this regard, the parameters of the slats can be different - 3-20 cm or more.
For private homes and individual layouts, ready-made inserts are not always suitable. It is necessary to order the manufacture of the entrance structure with additional components of a suitable size.
How to install, fasten and install extensions on interior doors
Before starting work, remove the space from unnecessary things so that they do not interfere with installation. You should always have the tools at hand that you will need in the process. It’s not bad if one of your relatives helps you.
We measure and prepare the boards
We install the factory product evenly in the opening, foam it with sealant under pressure and wait until everything dries. At this time we make blanks according to exact dimensions. Using a tape measure, measure the width and length at at least four points. If the coefficients differ, then we take a slightly larger indicator as a basis. The main point here is that the top part should be similar to the length of the top of the box. Using a simple pencil, make marks and cut out with a jigsaw. If necessary, you can carefully remove the excess.
How to install with self-tapping screws
We make holes (sunk holes) with a drill in the closing slats. Let's look at an example. If you have an element 10 millimeters thick, then you need a screw with a diameter of 7-8 mm and so long that it fits in after screwing in after two or three turns to avoid cracking. Choose a drill bit designed for wood materials as it has a sharp, ground end that allows you to drill through the center without moving.
Next you need holes for the screws themselves. They are much more difficult to make, so the diameter of the drill should be similar to the screw itself. The work is done from the back side of the sweat and at an angle, so the front part will remain without damage.
Insert the screws into the holes and twist until the ends appear on the back side. Start installing first the vertical and then the horizontal extensions. Finally, use sealant.
Mounting with nails
We make holes in the same way as described above. We insert nails into them and remove the heads with wire cutters. They must be hammered in with a wooden hammer, without leaving any gaps. Otherwise, the work will have to be done again. Then wedge the extensions with spacers and start filling the gaps with polyurethane foam. After it dries, carefully cut off the protruding part.
How to install using sealant in a can
This method has its undeniable advantages, because you cannot damage the material, as when installing using screws and nails. The strength of the structure will be even better than in previous methods.
We take measurements, prepare blanks and install closing elements as we described above. We pre-moisten the space between the doorway and the jamb with water from a spray bottle for better adhesion. We consistently fill the voids with foam, but you should make sure that there is not much of the composition and swelling does not occur.
Rules for calculating the width and length of the extension
The width of the extensions is calculated according to the following principle:
- If there are grooves in the box, it is necessary to take into account the recess into which part of the strip is built.
- The width of the remaining opening is measured from the frame to the edge of the wall.
- Additional parameters are determined based on maximum point measurements.
- If measurements are taken before installation or after dismantling the door structure, the width of the strip is calculated as the difference between the thickness of the wall and the width of the future frame.
Important! Measurements must be taken separately for the top and side panels in at least several places. The surface of the walls is often uneven.
The length of the panel is equal to the height of the side posts of the box. When calculating the dimensions of individual parts of the entrance structure, generally accepted standards must be taken into account.
Basic requirements for the dimensions of the door block, according to GOST:
- the gap between the box and the wall should be 10-15 mm;
- the perimeter distance between the canvas and the loot is 3 mm;
- the gap between the door and the floor in the absence of a threshold is 10 mm;
- To improve sound and heat insulation, sealing strips or sealant are used.
If the parameters of additional inserts do not comply with regulatory requirements, you need to adjust the dimensions manually using tools.
Conclusion
As you can see, the telescopic extension is simply mounted. The main thing is not to forget about the recommendations that we gave when choosing the material and everything will work out for you.
Source: doorchange.ru
How to attach the accessories?
Sometimes, when replacing interior doors, owners of standard apartments are faced with the problem of a discrepancy between the width of the walls and the installed door frame. Walls that are not covered with a box can be plastered and decorated with panels or wallpaper, but this process will require additional material investments and time. It is unlikely that in this way you will be able to fully realize your design ideas, and from an aesthetic point of view, such an interior will be devoid of zest.
However, there is still a solution! You can use door panels - special panels 5-400mm thick, which will not only decorate the doorway, make the structure monolithic, but also greatly facilitate installation.
So, how to attach the extensions yourself? Let's consider the possible options.
The technology for installing door trims is in many ways similar to installing sheet window slopes. The most optimal way is to fasten the panels into the groove of the door frame. In this case, the connection of the elements is tight, without visible gaps, cracks and other defects.
dobor We take measurements around the perimeter of the box in 2-3 places. We saw off the plank taking into account the measurements taken so that the platband fits closely to the trim and the wall. First we install the vertical parts, after which we attach the horizontal bar to them.
The process takes a minimum of time and effort, the extensions look impressive without the need for additional fasteners and wedges. In case of very noticeable unevenness of the wall, it is unlikely that it will be possible to avoid gaps, so we fill the gaps with foam. We do this carefully, with a small interval, so that the addition does not become skewed. Then seal the bends with sealant.
dobor2When connecting planks that are not equipped with special elements, we tightly join the two extensions together. If necessary, saw off one of them to obtain the desired width. Next, use screws to secure one or more planks on the back side. We install the strips in the door frame in a similar way. We drill holes for self-tapping screws both in the box and in the extensions. We carry out this procedure very carefully; it is advisable to position the holes for the screws as accurately as possible, otherwise they may become skewed and it will be difficult to tighten the screws.
You can attach extensions both after installing the door structure and before it. Installation is carried out on the opposite side of the hinges - this will allow the door to swing open completely without resting against the door.
By using the tips on how to attach extensions without resorting to outside help, you can forget about the monotonous and costly leveling of slopes and enjoy a new look for your interior!
Source: kazap.ru
How to determine the required thickness
The thickness of the additional board should not exceed the dimensions of the groove in the box. The average value ranges from 10-16 mm.
Factory strips are produced in standard sizes, depending on the parameters of the partition:
- if the wall width is up to 9 cm, then the thickness of the decorative insert is 1.5 cm;
- up to 16.5 cm - 1.5/2.5 cm;
- up to 26.5 cm - 2.5 cm.
The maximum thickness of finished panels is 3 cm. For non-standard openings, extensions are made to order.
For interior structures, planks of average thickness up to 1.4-1.5 cm are sufficient, and for entrance doors it is recommended to use extensions of 1.5-2.5 cm or more.
How to make additions to an interior door in different types
We have already written the operating technology for each variety. Now let's talk about additional, equally important installation methods:
- Installation with conventional slats. First, mount the finished factory product using a screwdriver and foam. Wait for the sealant to dry completely. This takes up to 12 hours at positive temperatures. Remove excess with a sharpened household knife or special tool. Is there a recess in the box for an additional strip? In this case, make sure that various contaminants do not get into it. Manipulate the adjustment of the slats. To try it on the wall, draw a diagram of your door with exact dimensions. Attach the completed structure to it. If all the points coincide, then put it in a permanent place.
- Telescopic material is, of course, the most convenient to use. But there is one unpleasant moment. It is necessary to select a door with an existing cut groove at the factory. If you have little experience, then you will not be able to complete the modification perfectly at home.
What to do if the dimensions of the extensions are not suitable
There are situations when the size of the extensions is larger or smaller than the remaining uncovered section of the wall. If it is not possible to order new strips, you can adjust the inserts yourself.
If the elements are too wide, you will only need to carefully reduce the size of the board using available tools (saw, hacksaw). On the front side you need to make a groove for installing platbands. Difficulties may arise with telescopic slats. The ends of the plank are equipped with grooves on both sides. Such boards are sawn lengthwise, the tenons are cut off from the platbands and nailed to the smooth edge of the board with nails or pins.
For overly wide walls, several additional elements are used for cladding, combined with furniture clips, glue, hardboard strips, and thin wooden blocks. Telescopic structures are connected by specially prepared thin strips, which are placed in the recess of two adjacent ends.
Another way is to select a plastic insert that matches the color of the block and sew up the area with the bare wall. It is better to glue onto colorless silicone. This mount can be easily dismantled if something needs to be changed or corrected.
If you plan to line the passage yourself, it is better to buy parts with a margin in measurements. Additional centimeters may be needed to correct flaws or errors in calculations. It is also recommended to select all the components of the structure at the same time, so as not to make a mistake with the shade and texture of the finished block.
Methods for installing extensions
Two methods are practiced. The choice of an acceptable one depends on the specifics of the room, the material of the wall and its condition.
Gluing the extensions
The simplest technology that does not require much time to implement. But it has significant disadvantages.
- The extensions have the correct geometry. Consequently, the surface on which they are attached must be as level as possible and not have differences in the height of individual sections, and this is not always possible or extremely difficult to achieve. Various techniques are used to eliminate minor panel distortions. But in this case, the manual cladding of the entrance opening becomes dramatically more complicated, and its strength decreases.
- Gluing the extensions eliminates the possibility of insulation and sound insulation. How important this is, you will have to determine for yourself.
Advice. For minor wall defects, it is advisable to use polyurethane foam as an adhesive. It will fill all the recesses, and after installing the extensions, it will ensure the evenness of the cladding and the reliability of its fixation. The large consumption of the product pays off in that finishing the entrance opening will not take much time, and the hallway will be free of dust and dirt.
Attaching extensions to the sheathing
The technology is familiar to everyone who has independently decorated the facade of a building, rooms with clapboards and other finishing panels and slabs. The nuance is that you need to select the material of the slats in relation to the additions. If they are metal, then the corresponding profile; for wood products - wooden blocks. The reason is the identity of the expansion coefficients; given their difference, warping of the cladding cannot be avoided in the future.
This technique allows you to lay insulation in the cells of the supporting frame, and before installing its slats, you can finish the wall with hydro- and sound-insulating material. Many owners use foil-lined roll products (for example, penofol) for these purposes. For old buildings and houses made of reinforced concrete, this is a good solution that allows you to additionally insulate the opening in the area of the front door.
Installation of telescopic elements
This type is good because the parameters of the planks can be changed within certain limits. This leaves no gaps.
Take the required measurements. Select an extension with the expectation that the grooves allow you to slightly change the obtained values. Install the main jamb strip where the instructions say it should be. Level it and secure it. After that, simply insert into the grooves and press the platbands against the wall. Using a similar technology, the ceiling part and the opposite side are made.
Installation of a structure with platbands
Combined elements are easier to put in place than all the others. The method consists only of correctly taking the dimensions, filing the excess and mounting it into existing grooves. They start working from the top. Next, the slats cut from the bottom are attached to the sides. You can do this yourself without the help of an assistant.