To make the room reliable and durable, it is necessary to equip a solid foundation. To accomplish this task, a blind area made of concrete is used, since this material is considered one of the most reliable. Compliance with installation rules will allow you to create a high-quality structure that will be used for its intended purpose for many years.
What is
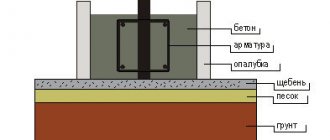
A concrete blind area is an external structure with waterproofing, which is installed along the perimeter of the building and has a slight slope from the wall to the topography of the garden area. According to the requirements of the project, the structure is pressed tightly against the base of the house, but is made movable. In structure, it resembles a layer cake, which has the following components:
- Base layer (bedding). It is created from crushed stone or clay.
- Waterproofing layer.
- The top covering is concrete.
Tips from builders
- “In order to drain water away from the house, it is not enough to slope only the upper structure of the blind area. Water seeping through crushed stone and sand should flow along the waterproofing, made with a slope.”
- “A mandatory requirement is a tight fit to the foundation. For example, there is a small gap into which water gets in. During the period of frost, the water may freeze - ice will form, it will move the blind area away from the foundation and widen the gap.”
- “There are no trifles in construction. The width must be strictly consistent with the roof overhang and ground conditions.”
To make a high-quality blind area from crushed stone, it is necessary to select the necessary materials, calculate the width based on soil conditions and the roof overhang. Make markings using pegs and begin excavation work: dig a trench and compact the soil.
Materials should be laid in layers. The layers are made with a slope of at least 0.03 and are carefully compacted. The finishing layer is backfilling with crushed stone; you can give preference to decorative crushed stone.
If done correctly, the work will bring not only good results, but also pleasure. A protective path encircling the house will make it possible to enjoy the pleasant appearance of the home and be confident in the safety of the structures.
Functions performed
Organizing a blind area around a concrete house with your own hands is an important stage of construction, which performs a number of useful functions and affects the durability of a residential building. The main purpose of such a structure is to effectively drain water from wall structures and the foundation of the house.
A high-quality concrete blind area extends the service life of a building by preventing deformation of the base during prolonged exposure to precipitation, groundwater and other factors. Having a temporary concrete structure will effectively drain and transport water away from the foundation.
If it is missing, and a lawn or flower bed is tightly adjacent to the room, this will negatively affect the waterproofing and increase the risk of destruction of the base by the root system from garden plantings that grow nearby.
Constant rain and snow will also become a big problem, since moisture accumulated in the soil will begin to affect the foundation, contributing to its rapid destruction.
For many years, the technology for constructing a blind area consisted of using clay, which was placed in a special trench around the perimeter of the building and carefully compacted. The finished layer is additionally moistened to form a waterproof film.
Today, concrete blind areas are the most common, the manufacturing technology of which has its own nuances. This material has many advantages, since it allows you to create a smooth surface without gaps, cracks or cracks, which enhances the insulation of the base of the house.
At the same time, experts recommend filling the blind area with concrete even if there is no finance for organizing the finishing touches. And for the design to be as efficient as possible, it is better to equip it before the cold weather.
The list of the main functions of the structure looks like this:
- Presentable appearance of the exterior. The presence of a competently constructed blind area is the final stage in the design of the outer part of the room.
- Protection and drainage. The design saves a garage or private house from the negative effects of groundwater and rainwater. And if it is equipped with a storm drain, all excess liquid ends up in the sewer pit.
- Soil stabilization. The thickness of the concrete blind area allows the soil layers to breathe normally and at the same time prevents the penetration of large living organisms along the base.
- Reinforced thermal insulation. With the help of such a protective covering, the degree of soil freezing is reduced, so there is always a comfortable microclimate in the house.
- Protection against soil swelling.
Beautiful design of the blind area
A blind area with a profiled membrane can become part of the landscape design.
An example of a completed blind area with a profiled PLANTER Geo membrane. This drainage system allows you to use gravel, paving slabs and even a lawn as a finishing coating to completely merge with nature. At the same time, the type of material does not in any way affect the efficiency of drainage and protection of the foundation. Attention, discount! Using the promotional code 7dach_planter you can get a 10% discount on the PLANTER Geo membrane. To do this, you need to register in the TECHNONICOL online store. The promotional code is valid from April 20 to August 31, 2020. Go to the store.
Requirements for the blind area and design rules
When starting the process of constructing a concrete blind area with your own hands, you need to make sure that it has the same width, 20-30 cm greater than the overhang of the cornice. In most cases, architects adhere to dimensions of about 1 m (this value can be deviated when placing strip foundations on subsiding soil). The encircling structure is buried to half the freezing point of the soil. Its thickness varies from 7-10 cm. If it acts as a path, a deviation of up to 15 cm is allowed.
The optimal slope of the blind area is 92-94 degrees from the load-bearing wall. The base can rise by 50 cm. The outer lower side is raised 50 mm above ground level to ensure effective drainage.
Advantages and disadvantages
A soft blind area, which can be made independently, has negative and positive sides. The advantages of the material include the following facts:
- Unlike conventional materials, the soft blind area is very resistant to ground movements resulting from thawing or freezing of liquid. So, if the base of the building is located below the freezing point of the soil, it remains in a state of immobility. In this case, the protective structure is located above this level. This means that the joint between the blind area and the base will be damaged in spring and winter, regardless of the quality of its execution. Water will penetrate into the holes that form under any conditions. There can only be one way out of this situation: creating additional insulation from water. If it is not possible to bear such costs, soft structures that are resistant to frost are used;
- a soft blind area can protect the structure of a building, improving its exterior. The top layer is made of various materials, so a blind area made of crushed stone will suit any style of building. Plants, including climbing plants, or lawn grass can be planted on the soft blind area;
- When using crushed stone for a blind area, extruded polystyrene foam and its analogues are used as insulation. This material makes it possible to raise the freezing point of the soil near the blind area. This makes it possible to place the base of the structure at a shallower depth.
If we talk about the disadvantages, we should note the mandatory constant maintenance of the top layer of the blind area. For example, decorative backfill needs to be cleaned regularly, and the lawn needs to be mowed several times a week.
How to make a blind area
If you are interested in how to properly make a blind area around a house with your own hands from concrete, you should read the step-by-step instructions and mark the ground. You should also prepare the area by getting rid of the fertile layer of soil and laying out a sandy or clay layer.
Next, a geotextile covering is laid on the ground (in most cases, roofing felt is used as it), and formwork is also installed. The perimeter is additionally reinforced, and the concrete mixture, created in the appropriate proportion, is placed in the formwork.
Preparation of tools and materials
When starting the construction of a concrete blind area around a house with insulation, it is important to take care of all the necessary tools and materials. Excavation work is carried out using a shovel, pickaxe, twine, compactor, pegs and construction tape.
You also need to prepare the optimal amount of waterproof film for the water seal. Next you should find all the additives for mixing the concrete mixture, which include:
- Moistened sand.
- Water.
- Gravel.
- Crushed stone.
- Cement.
As an alternative, you can use a ready-made mixture labeled M400 and higher. Necessary tools include a mixer for diluting the mixture, shovels, stretchers, a measuring bucket and other containers. The underlying layer consists of clay or sand.
To arrange the tape formwork, boards are used, so the construction site must have a hacksaw, a building level, and a hammer with nails. For reinforcement, steel mesh, welding equipment and tools for cutting metal elements are used.
Marking
Before digging a trench along its perimeter, it is necessary to secure the pegs and stretch a string between them. The location where the blind area adjoins the plinth is indicated using special beacons with a permissible step of up to 1.5 m.
The top layer of fertile soil is removed taking into account the landscape design. Sand or clay is placed at the bottom of the recess and then compacted thoroughly. The maximum depth can reach 500 mm for heaving soil.
Creation and compaction of a sand cushion
The bottom layer of the recess is equipped with a drainage system, on top of which 10-20 cm of sand is poured. The exact thickness of this embankment is determined by the type of blind area and the depth of its placement. The sand is carefully leveled and compacted.
To reduce the time and effort required when performing such actions, you can fill the trench with water and wait until it soaks into the soil. In this case, the sand will be better compacted.
If groundwater lies close enough to the surface, installing a drainage system will be an obligatory step. It uses a tube with special holes, which is laid around the entire perimeter and connected to the general sewer system of a private house through a storm drain.
Waterproofing
To create effective waterproofing, you can use the following materials:
- Bitumen mastic or tar.
- Ruberoid and other rolled waterproofing materials.
- Available solutions in the form of geotextiles, rubemast, polypropylene and a number of other materials.
- Hydrocements and asphalt concretes.
- Mastered.
- All kinds of polymer products for placing a waterproofing layer between the blind area and the foundation.
When starting to waterproof the blind area around a concrete house, it is important to completely get rid of the fertile layer of soil around the entire perimeter at a distance of up to 1.5 m before construction. If there are no financial restrictions, all compacted clay must be covered with a roll of waterproofing material. To improve protection against moisture penetration, several layers of hot bitumen can be made. Next, backfilling with crushed stone and compaction is carried out.
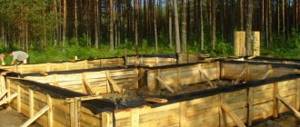
Creating formwork
To extend the life of the enclosing blind area, it is important to provide high-quality formwork. It is made from boards 30 mm thick. The height is determined taking into account the dimensions of the blind area. Experts recommend applying markings to the boards to monitor the thickness of each layer.
Having secured the base, all that remains is to strengthen the structure with twine and corners. They are placed from the outside, and bolts are used to tighten them. If an individual section is damaged, it is enough to unscrew the bolt to carry out repair work.
The diameter of the fastening elements is 1 cm. If you do not have to restore the formwork, all wooden elements will need to be treated with an antiseptic. And to extend their service life, it is recommended to make an insulating layer based on roofing felt. Such a solution not only provides reliable protection of the formwork from rot and mold, but also increases the durability of the blind area.
Large formwork is reinforced with supports or blocks. Even at the stage of its installation, an expansion joint is created, it is placed near the junction of the blind area and the wall structure and is installed across the structure. The presence of an expansion joint will prevent possible consequences from temperature surges. If you do not do this, the blind area will become covered with cracks.
For error-free installation of transverse joints on the formwork, a distance of 2 m should be maintained. Wooden formwork is effective only for concrete enclosing structures. If the blind area is created on the basis of other materials without filling, a wooden base is not necessary.
Reinforcement and filling
To strengthen the structure, a metal mesh with dimensions of 50x50 (100x100 mm) and pieces of reinforcement are taken, fixed in the base in increments of 0.75 m. The mesh is raised above the crushed stone by 30 mm, and the concrete base is mixed and poured independently.
At the reinforcement stage, it is necessary to prevent the appearance of air pockets in the concrete. To do this, you should adhere to the proportions that are used in the production of concrete for laying roads. Cement grade M400 and higher is used as the finished mixture.
The composition may also contain various additives that give it increased strength and reliability.
Leveling and drying
To level the upper surface of the blind area, you must adhere to a number of rules and requirements. It is recommended to carry out the procedure of covering the screed with dry cement 1-2 hours after ironing. The top layer should have a thickness of 3 to 7 mm. After this, the coating is thoroughly rubbed, and an opaque polyethylene film is laid on top. The blind area can be called ready in 1.5-2 weeks.
Work order
After the dimensions have been selected, the actual installation of the blind area begins. In general, this occurs in several successive stages.
Marking and removing soil
The selected width is laid around the perimeter of the building. Here it must be said that in those places where people will walk, it can be made wider.
They are usually marked by driving in pegs. By stretching a string or cord between the pegs, they outline the front of the work. Over this entire area it will be necessary to remove the turf and some of the soil. At the same time, the roots of the plants are removed. Often they are treated with chemicals that prevent plant germination. If this is not done, as they germinate, they will destroy the coating.
Construction of expansion joint
An expansion joint between the blind area and the foundation of the building is necessary.
It is very important to remember when doing this that the blind area and the foundation should not be connected. To do this, it is necessary to leave an expansion joint around the perimeter of the foundation, about 2 cm wide. In practice, this is either strips of foam plastic 2 cm thick, or two layers of folded roofing material attached to the foundation.
An expansion joint is necessary so that when the soil moves under the blind area, it does not put pressure on the foundation. If this is not done, instead of preventing destruction, it will create pressure, which will sooner or later lead to cracks in the walls.
Bedding and finishing coat
If you follow the “folk” technology, a layer of clay is poured onto the bottom of the trench. It will prevent moisture seepage. It is compacted, already at this stage creating a slope from the foundation. This backfill is suitable for any type of soil. It may take a long time to compact it, but it will not conduct water. If you use sand for the blind area of a house standing on clay soils, most of the water will end up just under the foundation.
Compacted clay drains water well
Things will go faster if you use a tamping machine. If there is no such thing, take a log of medium diameter and saw off 80-90 cm. The height should be such that you do not have to bend over - you should be able to reach the top edge with your hands. On one side they fill the crossbar - the handle. This deck is used to compact it, raising and lowering it.
Then add a layer of sand. It is spilled with water and also thoroughly compacted. In normal soils and if people will not walk on the blind area, you can lay paving slabs or paving stones. When using concrete as a protective covering, it will be necessary to pour and compact a layer of crushed stone, arrange formwork and expansion joints, lay out the reinforcing belt and only then pour the solution. So making a concrete path takes a lot of time.
How to protect the blind area from destruction
Since concrete is used to construct a boundary strip around the perimeter of the foundation, it may be subject to damage and cracks. Most defects are a series of deep or superficial cracks, traces of crumbling and subsidence. Cases of tiles peeling off from the basement of the building cannot be ruled out.
Such phenomena are associated with the following factors:
- Failure to comply with installation rules. Often, builders ignore the importance of waterproofing, do not ensure optimal compaction and uniformity of backfill, do not comply with dimensional standards and make other primitive mistakes. Another problem arises when choosing the wrong recipe for a concrete mixture, when the composition contains an insufficient or excessive amount of binder additive. The first option threatens cracking of the surface, and the second - crumbling.
- The absence of an expansion joint that prevents damage to the supporting structure due to temperature changes or precipitation.
- Lack of reinforcement in the blind area. Some home craftsmen refuse to lay this layer, arguing that its presence is not specified in SNiP standards. However, the metal elements make the strip not only functional, but also durable.
To protect the blind area from any negative factors, it is important to monitor the width and density of filling expansion joints and restore them in time. Instead of wood, it is better to use 15 mm thick vinyl tapes. If the building stands on heaving soil, the blind area should not be connected to the basement part.
To increase the tightness of the concrete composition, it is treated with a deep penetration primer.
Composition of concrete for blind area
To do quality work with your own hands, you will need to choose the right concrete mixture. There are two ways to obtain a filling solution:
- purchase at the factory and transportation by concrete mixer;
- self-cooking.
Concrete composition table
It is better to choose the second option. This is due to the following factors:
- Buying a ready-made mixture is always more expensive than making it yourself;
- the blind area requires a small amount of concrete, and factories sell it in fairly large volumes;
- no need for transportation costs.
When making a mixture, a home craftsman must only correctly select its components and maintain the proportions. The composition of concrete for the blind area is as follows:
- cement (it is better to use PC400);
- sand (the best option is medium, fine is allowed);
- coarse aggregate (crushed stone or gravel);
- water.
The proportions of each of these components are set depending on what grade of concrete needs to be obtained. For concrete grade B15 (optimal for blind areas), the proportions should be made as follows:
- cement -1 part;
- sand – 2.8 parts;
- coarse aggregate - 4.8 parts.
These proportions from 10 liters of cement make it possible to obtain 54 liters of concrete mixture. For every 6 parts of water by weight there should be 10 parts of cement.
If you need to create a material of a different brand and there is no opportunity to familiarize yourself with the information more carefully, you should remember that in general the proportions look approximately as follows: 1: 3: 4 (cement: sand: crushed stone, respectively).
Repair of concrete blind area
If traces of cracking, peeling or other deformation processes appear on the blind area, it is necessary to quickly begin repairs and get rid of the resulting defects. If they are strong and deep enough, you will need to completely replace the coating.
To eliminate small gaps from temperature effects, it is enough to use sealants and fillers. The wide hole is filled with sand and cement with fine crushed stone to ensure optimal insulation.
The dry coating is treated with a primer. The same actions are performed with cracks in the surface of sections.
The presence of a concrete strip around the perimeter of the house is a guarantee of the reliability and durability of the foundation of the house. But in order for the structure to be as durable and functional as possible, it is important to follow the rules of its construction and follow the instructions exactly. It is also important to correctly calculate the thickness of the concrete blind area, apply all the required markings and be careful at each stage of construction.
What is a blind area at home
A blind area is a covering around the perimeter of a house, designed to protect the foundation, basement and basement from water. It is made of waterproof material at a slope from the foundation.
Why do you need a blind area around the house (functions):
- hydrobarrier - protecting the foundation of a building from moisture. First of all, rain and melt water are diverted away from the foundation using a blind area. In addition, the presence of a blind area imparts thermal insulation properties to the foundation;
- comfort - the blind area can be used as a path around the house. A wide blind area can become the basis for arranging a recreation area or terrace near the house. With the correct calculation of the load, it is possible to organize the movement of a car or its parking along the blind area;
- aesthetics - design of the site and local area, giving the structure completeness.
And further
Articles on the topic
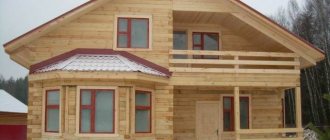
Foundation for a timber house
Foundation calculation
Soft blind area around the house - how to do it right
Pile-grillage foundation
Choosing a foundation for a frame house
Strip foundation for a wooden house
- the blind area stabilizes the air-gas regime in the soil surrounding the foundation. The soil invariably contains oxygen, which is necessary for plant growth and the vital activity of soil microorganisms. Large pests also create passages for air to enter the soil;
- eliminates the possibility of damage to the foundation due to frost heaving of soil. It occurs due to the fact that water, solidifying in the soil during the cold season, increases its volume. Soil heaving in itself does not pose any threat, but it creates a significant lateral load on the foundation of the house, which can result in a distortion of the foundation of the house, which will ultimately lead to the destruction of the building standing on it. Thus, the blind area allows you to distribute the load more evenly.
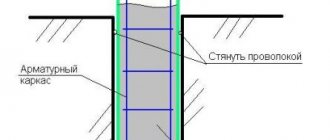
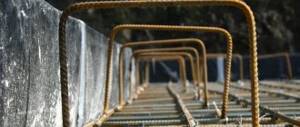
Reinforcement
Reinforcement of concrete is not specified in the standards, but metal reinforcement:
- will increase compressive and tensile strength - will reduce the risk of concrete cracking due to subsidence, soil displacement or changes in the weight of the building (when constructing superstructures or replacing the roof);
- will give additional rigidity;
- will make it easier to repair the concrete strip in the future.
For reinforcement, it is better to buy a ready-made mesh of size 50*50*5, 100*100*4 and 150*150*8 - the larger the diameter of the rod, the larger the cell size.
You can make the frame yourself by cutting and laying perpendicularly a metal rod with a thickness of 4 to 16 mm, with cells from 100 to 200 mm. The rod is fastened with binding wire.
It is optimal for the mesh to be raised above the surface by 1–2 cm - this is achieved by installing special inserts.
Laying rules:
- The mesh is laid in 1 layer - overlaps are made only at the joints.
- They start with straight sections - the corners are reinforced last with the help of specially cut “corner” mesh fragments.
- Do not use rods or mesh of different thicknesses.
Cement consumption per 1 m3 of solution
The reinforcing mesh should not be attached to the foundation - during shrinkage, this will only accelerate the formation of cracks.
Protective measures after concrete placement
After compaction, it is necessary to provide the concrete with conditions to gain strength. After pouring, to maintain optimal humidity and temperature, it is recommended:
- Moistening the concrete every 8 hours – for 3–7 days;
- Covering with plywood panels or slate sheets leaning against the wall above the blind area at an angle.
If there is no possibility of constant moistening, you can simply cover it with a polymer film with a thickness of at least 200 microns. The joints of the film should be sealed using tape or PVC adhesive tape.
If concrete is not properly maintained, the risk of cracks and deformations increases, and the final strength decreases.
The formwork (if there are no defects in it) can be removed when the concrete gains 70% strength - after 14 days.
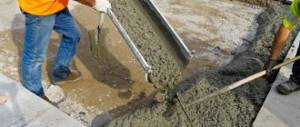
How to properly mix the solution in a concrete mixer