A strip foundation for a bathhouse is the most suitable option, which is chosen by many due to its versatility, reliability, strength, and resistance to different loads and impacts. The strip foundation is ideal for baths made of any material. This type of foundation takes up about a third of the estimate, which is why doing all the work yourself can significantly reduce overall costs.
A strip foundation is a zero construction cycle, the correct execution of which will determine the life and quality of operation of the bathhouse. The foundation is affected by groundwater, load-bearing buildings, soil heaving and other factors that must be taken into account. The strip type of foundation is one of the most reliable, suitable for a bathhouse of any size.
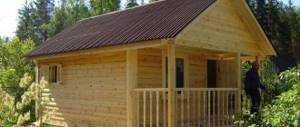
DIY sauna foundation tape
A strip foundation for a bathhouse is used quite often in construction and is a continuous strip of concrete mortar, blocks of different configurations or red brick, which is laid in the ground below the groundwater (but above the freezing level) and rises at least 20 centimeters above the surface.
When is a strip foundation for a bathhouse optimal:
- If you plan to use the basement floor for different purposes (as a utility room, tool storage area, pump, etc.)
- If the building is planned to be large with considerable weight (assembled from rounded logs, bricks)
- When there is a high groundwater level
A strip foundation for a bathhouse is capable of taking on loads from the entire structure and transferring them to the soil. The base protects the base from cold, wind, moisture; its walls can simultaneously serve as a basement or ground floor. The cost of the foundation is in the average range - higher than columnar, but lower than monolithic. Ideal price-quality ratio, especially if you build a strip foundation for a bathhouse with your own hands.
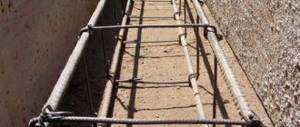
Foundation reinforcement and reinforcement tying
The reinforcement cage is designed to compensate for the tensile forces that the tape experiences under bending load. Concrete can easily withstand high pressure, but it cannot work in tension, so installing reinforcement is a necessary procedure.
The frame design is a spatial lattice, the main elements of which are longitudinal rods. They are held in position by vertical rods of smaller diameter with a smooth surface . They are needed only to support the main rods until pouring.
The frame is connected by welding or by knitting with annealed steel wire. Welding is not always available, but knitting provides some elasticity to the structure, which allows it to maintain its integrity with small movements.
The knitting process is not complicated and does not require much time, but it does require some skill..
Calculation of the foundation for a bathhouse
When pouring a strip foundation for a bathhouse with your own hands, step-by-step instructions will definitely not be superfluous.
You cannot perform the foundation “by eye” (like any construction work). It is necessary to calculate everything in advance, draw a diagram, draw up a work plan, a project, and then strictly follow the standards, maintaining all values and parameters, without skimping on materials.
To correctly calculate the foundation, you need to know the weight of the future bathhouse (with all the floors, interior fittings, roofing) and the level of freezing of the soil layer and the flow of groundwater in the prepared area. By examining the soil, the depth, width and height of the strip foundation for the bathhouse can be correctly determined. Research can be entrusted to specialists or performed independently.
To implement the first stage of calculations (to study the groundwater levels and the soil freezing limit), it is necessary to drill wells at the construction site in several places until water appears. For clayey and dense soils, with low groundwater levels, a shallow strip foundation 40-60 centimeters high will be sufficient. For middle strips, choose a strip base buried 1.6-1.8 meters (below the soil freezing line).
The loads on the strip foundation, which are placed on the structure, are calculated using special tables that contain approximate weight indicators for all elements of the bathhouse.
Much depends on the materials used and design features. The weight of all bathhouse equipment and people (in the amount that can be in the building at the same time) are added to the indicators. The tables also determine soil resistance.
The dimensions of the strip foundation are determined by the total load from above, which is divided by the soil resistance.
Two important differences: shallow or deep
Before considering the types of foundations in detail, two main types should be distinguished - shallow and deep . The difference is in the depth of immersion in the ground. Why is this moment important?
In winter, the top layer of soil freezes, and all the moisture in it turns into ice. When it freezes, it expands, causing the top layer of soil to change its volume. This phenomenon is called “ frost heaving ”, it is typical for soils with a high moisture content, clayey and loamy soils.
The depth of soil freezing depends on average annual temperatures and soil composition. For deep ones, the basic rule is to immerse below the freezing point to eliminate the effects of heaving loads. For some areas, this type is difficult to implement - the soil can freeze to 2.4 meters. There is a way out.
A shallow type is used , the feature of which is a shallow immersion depth. Such a foundation is located in the upper layers of the soil, above the freezing point, but the loads from heaving processes are much lower - 2 or even 3 times.
The point is to properly arrange the foundation: the trench is dug a little wider, a sand cushion is installed, a concrete strip is erected, which is subsequently filled with sand on the sides. As a result, there is a sand cut-off on all sides.
Sand does not retain moisture; it goes deeper in warm weather, so there is nothing to freeze in winter.
Only loads emanating from the lower layers of the soil remain, so it is impossible to use a shallow type of foundation on soils with large seasonal heaving .
Foundation installation methods
Before making a strip foundation for a bathhouse with your own hands, it is important to decide on the materials and geometry of the structure, the method of installing the structure, and other important points that influence the choice of foundation parameters.
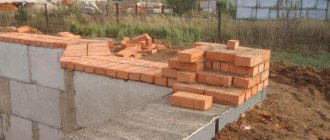
Brick strip base
A bathhouse can be built exclusively from red brick, since white silicate brick is resistant to moisture and deteriorates quite quickly. When choosing a brick base, be sure to pay attention to the seams - they must be well waterproofed, since the concrete solution allows water to pass through.
Brick is an ideal choice for those who build a bathhouse with their own hands on sandy, dry soil. If the groundwater level is high enough, it is better to make a foundation of concrete mortar with mandatory reinforcement with steel rods and screed. A reliable brick foundation is installed on a sand-crushed stone bed, well compacted. You can do everything yourself, since the brick is light in weight and is relatively simple and quick to lay.
From blocks
When designing a strip foundation for a bathhouse with your own hands, you can choose reinforced concrete blocks, but the work will require special equipment, since the blocks can weigh a lot and you won’t be able to lift them yourself. For a small structure, you can make a block base from blocks measuring 20x20x40 centimeters, which are laid preferably in a checkerboard pattern and require a cement connection. The blocks are laid clearly according to the markings on a sand bed, installation takes a maximum of 1-2 days.
From stone
A high-quality rubble concrete base can also be made with your own hands; it consists of cement and most often river stone, preferably flat in shape (preferably the same size). The stone is carefully laid out in the formwork in layers, poured with a concrete mixture - this way a strong, beautiful base is created, which will be relatively inexpensive, provided that the stone is not delivered from afar.
With permanent formwork
Installation of a strip foundation for a bathhouse with permanent formwork is a new technology that involves the use of two expanded polystyrene slabs. They are connected with metal pins, the inside is tied with reinforced steel wire, and everything is filled with concrete on top. The strength of the base can be compared with any other installation method; it does not require additional waterproofing or insulation.
Made from concrete
A concrete base is the simplest and most affordable option for making a monolithic foundation. To create it, formwork is installed, steel reinforcement is placed in it (tied and correctly installed on clamps), and filled with durable concrete. Pouring is carried out at a time, so the work will have to involve several more people to supply the solution or use a concrete mixer to supply the solution to the site.
The concrete hardens for 28 days; after the initial setting, the formwork is dismantled, and the base is ready for further construction work.
Video description
Learn more about columnar foundations as a technology in this video:
Calculation of a columnar foundation
The calculation of a columnar foundation on 20×20×40 blocks on the ground is carried out in several directions. First you need to decide on the parameters of the cross-section of the pillars and their number. This depends on the expected total load, which consists of the following factors:
- The total weight of all structures of the future building, taking into account the load exerted by future furniture and the number of people living.
- Seasonal loads exerted by wind, amount of snowfall, and others.
Foundation calculation Source proekt-sam.ru
Once the number of pillars has been determined, you need to think about how to place them correctly. All important places are thought through:
- Mandatory installation in the corners of the building.
- Installation at wall junctions.
- If the length of the building is large, then the spacing of the pillars should not exceed 2 m.
- If a monolithic grillage is installed, the pillars can be placed at a distance of 3 m.
At the next stage, attention is paid to choosing the type of grillage. Ground or shallow structures are often used. The installation of a hanging grillage entails a number of additional hassles: the construction of formwork and the use of a large amount of reinforcement.
Online foundation calculator
To find out the approximate cost of a columnar foundation, use the following calculator:
This might be interesting!
In the article at the following link, read about waterproofing a foundation slab.
Site preparation
The optimal option for deepening the pillars is below the soil freezing level. Based on this, the recesses for them must be prepared up to 1.5 - 2 m. The perimeter dimensions are usually 1.2 × 1.2 m. The initial task is to correctly apply the markings. It is done using pegs and twine. The pegs are placed along the lines of the walls, but outside the future pillar. This way you won’t have to move them while the work is being done.
Even at the stage of marking and performing excavation work, it is necessary to decide on the issue of protecting the blocks from which the pillars are formed from moisture. This is done in several ways:
- installation of a waterproofing layer directly under the sole and along the entire perimeter of the column;
- installation of a drainage system below the level of the base and along the perimeter of the future building;
- installation of a storm drain, which is built directly into the blind area.
The next issue to be resolved at this stage is the arrangement of communications, if any. It is necessary to lay all the necessary pipes and other elements when performing excavation work.
Scheme of the foundation block Source zen.yandex.ru
Pillow device
A columnar foundation made of concrete blocks, like any other, is recommended to be laid on a cushion. The only exception is sandy soils. To create a pillow, perform the following steps:
- The bottom of the trench is covered with geotextile and a layer of sand with a ball thickness of at least 20 cm is poured. In this case, it is necessary to compact it by moistening and compacting layer by layer.
- A layer of crushed stone is poured on top of the sand, the thickness of which should also be about 20 cm.
Many experts believe that in case of problematic soils, especially when groundwater is too close to the surface, it is best to make the pad entirely from gravel.
An example of a sand and gravel cushion Source martand.ru
Providing soles
To achieve greater reliability, a sole is provided under the posts. This is some expanded space made of reinforced concrete. First, formwork is constructed, a reinforcement cage is installed, and then the structure is filled with concrete. When arranging the sole, be sure to take into account the following points:
- The dimensions of the sole exceed the cross-section of the future pillar by almost 2 times.
- Do not neglect the waterproofing of reinforced concrete.
- To prevent crushed stone from damaging the integrity of the waterproofing with its sharp edges, you must first lay a footing.
The footing is a screed, the thickness of which reaches 5–7 cm. It is made from a weak sand-cement mortar. It allows you not only to protect the waterproofing layer, but also to level the surface of the pillow.
If necessary, drainage outlets are additionally laid in the crushed stone.
Construction of pillars
After the base for the pillars is ready, they proceed directly to their construction. To connect the sole with the post, several reinforcement rods are released from it. To connect the blocks, sand-cement mortar is used. When laying masonry, each row is bandaged and the horizontal and vertical levels are checked.
Pillars made of concrete blocks Source m-dom47.ru
If you plan to subsequently connect the pillars with a grillage, then in the upper rows you must provide embedded reinforcement. They will help to securely connect the horizontal beams to the base.
After installing the last row, the waterproofing of the side edges of the pillars is wrapped on the surface of the structure and secured with 2–3 layers of bitumen mastic.
Grillage construction
The process of constructing a grillage depends on its type. For example, a prefabricated one is attached to the poles mechanically. Monolithic must be poured along the heads of the pillars. In any case, the grillage must be isolated as much as possible from the influence of the soil. To do this, a small gap is provided in two ways:
- foam is laid under the base of the grillage;
- a 7 cm layer of sand is poured onto the bottom of the formwork, which is removed after dismantling.
The gap between the grillage and the ground will help compensate for swelling forces and reduce their impact on the base of the structure.
Construction of a grillage Source tarifi.info
This might be interesting!
In the article at the following link, read about insulating the foundation with polystyrene foam.
Marking
Before you properly pour a strip foundation for a bathhouse, you need to know how to mark the territory. The marking corresponds to the project and involves marking all internal and external boundaries of future walls.
To perform external markings you will need: a cord, a square, a plumb line, regular pegs, and a large tape measure.
The starting stake is driven into the point where it is planned to locate any of the corners of the building (with mandatory control of the vertical level). The remaining stakes for the corners are also driven into the ground, and the diagonals of the perimeter of the structure are checked. Then a cord is pulled between the stakes, the horizontal level of which corresponds to the height of the foundation. Check the evenness of the cord with a level.
Next, mark the internal walls around the perimeter, noting the locations of the partitions. Then they retreat from the outer perimeter to a width equal to the strip base, drive in stakes, pull the cord, and mark the location of the partitions. Here, too, everything must be level, so you can’t do without a tape measure, a plumb line, or a construction square.
Excavation
The depth of the foundation directly depends on the type of soil on which it is built. A trench is dug along the marked elements, the bottom of the ditch is compacted manually or with a vibrating plate, making sure the base is even. Then they are covered with sand 7-40 centimeters thick, which is directly dependent on the type of base.
Thickness of the sand layer depending on the type of foundation:
- 7 centimeters – shallow foundation
- 7-15 centimeters – deep foundation
- 15-40 centimeters - if a floating base is laid
A layer of sand is poured horizontally, watered, and compacted. If you need to lay a lot of sand or add a layer of crushed stone, the work is carried out in stages, in layers of 5-7 centimeters. Further work is allowed after 2-3 days, after the pillow has completely dried.
Formwork for concrete screed
The formwork of a strip foundation for a bathhouse is constructed from pieces of slate, fiberboard, any boards, plywood panels and any other materials. Collapsible structures made of metal or plastic can even be rented. The material is wrapped in polyethylene, mounted inside the trenches, the outer sides are immovably supported with stakes and lumber.
Between the walls of the formwork you need to insert transverse struts and attach metal pins every 50 centimeters. This will eliminate the possibility of a mass of mortar escaping from ruptured seams. The shields are fastened to the ground with 20-centimeter nails and secured to each other with a stapler or self-tapping screws.
Special holes for communication pipes are made in advance in the panels, so that later you do not have to drill into the concrete and make it less durable. Using film or glassine to protect the formwork will not only preserve the panels, but also reduce the absorption of moisture into the wood (because of this, concrete often becomes covered with cracks).
Formwork for strip foundations
Most often, formwork is made from edged boards, and this is not very cheap. To save money, you can use a disassembled structure to install sheathing under the roof. If you plan to make a soft roof, then the formwork can be made from sheet material (for example, from moisture-resistant plywood).
One of the formwork panels
You can knock down shields right next to the trenches. The height of the formwork should be at least 30 cm above ground level. When driving nails, try to ensure that all the heads are on the outside - this will make it easier to remove and disassemble the structure. Fasten the opposite panels with spacers (wooden planks) - this guarantees the immobility of the structure during pouring.
You can collect shields near the trench
To prevent the boards from “driving” during concrete pouring and the solution not leaking through the cracks, the formwork can be protected with plastic film, roofing felt or roofing felt boards fixed on the inside (you can use a construction stapler or small nails).
A construction stapler is suitable for attaching film or roofing felt
If possible, it is still better to use plastic film, as it is guaranteed to protect wooden panels from getting wet.
It is better to protect the formwork from the inside with plastic film
Don't forget to check the levelness of the formwork (you can use a building level).
Reinforcement
Making a foundation for a bathhouse is impossible without reinforcement. For strengthening, choose reinforcement with a cross-section of 12 millimeters (for laying longitudinally) and 6-8 millimeters (for laying vertically and perpendicularly). To perform reinforcement, you need to prepare: wire, steel rods, an angle grinder, a tape measure, a welding machine (if you plan to weld the frame rather than knit it).
The structure is made up of 4 or more rods lying in three planes (longitudinal, perpendicular, vertical). The finished frame rises above the ground by at least 5 centimeters, the corners are further reinforced. The work is completed correctly if the cut of the armored belt turns out to be either a square or a rectangle.
Stages of creating a reinforcement frame for a bath:
- Measuring the perimeter, cutting the reinforcement to the required length.
- Laying out the reinforcement on the ground, tying it with wire - the longitudinal rods are laid with an overlap of 30 centimeters and tied together. Between vertical and perpendicular rods there should be a step of a maximum of 50 centimeters. To lay a foundation wider than 120 centimeters, a frame is made from a larger number of rods.
- Strengthening the foundation in the upper part with special clamps in the shape of the letter P.
- Complementing the frame with steel rods, which are placed at an angle of 45 degrees with respect to the horizontal rods.
Filling the tape
It is best to pour the foundation for a bathhouse in one day (preferably in one go), which will ensure the strength and reliability of the structure. You can’t do this without a concrete mixer, but if you don’t have one, you can order the required volume of cement mortar.
DIY recipe for mixing concrete mortar:
- Clean sand – 2.5-3 parts
- Cement grade M400 at least – part
- Clean crushed stone - 4-5 parts
- Water - in sufficient quantity to obtain a mixture of medium consistency
The solution is poured into layers of 20 centimeters, leveling each with a tool (trowels or shovels). Then they are compacted by piercing or a vibrating drill, tapping the walls of the formwork. If the work is completed in the evening, it is better to cover the foundation with a polyethylene film at night. During the day you need to spray water on the surface for the first 10-12 days. Then the formwork is dismantled, they wait until it reaches full strength (28 days), lay a layer of insulation and continue work.
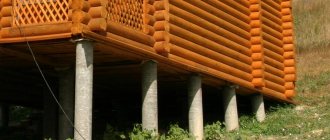
Bathhouse on a columnar foundation - block construction technology
Using various types of building materials, it is easy to build a shallow base of a columnar structure. Support elements that take the load from the mass of the structure and the reaction of the soil are installed in corner areas, as well as at the intersections of walls.
The set of measures for the construction of a bathhouse on a columnar foundation includes the following stages of work:
- Clearing the construction site for the construction of a bathhouse.
Various debris, vegetation and roots are completely removed from the work site. - Cutting off the top layer of black soil.
A fertile soil layer 10–15 cm thick is removed and transported to another location for further use. - Performing markings.
The external and internal contour of the object is marked on the site using a rope, a building level and pegs. - Digging pits 0.5–0.6 m deep.
Recesses for support columns are made according to a previously developed design. - Forming a cushion 0.2–0.3 m thick.
The pits are filled with a gravel-sand mixture, which is carefully compacted and covered with roofing felt. - Preparation of masonry mortar.
Mix Portland cement M400 with pre-sifted sand in a ratio of 1:4. - Laying out pillars.
The laying is done using cement mortar with the products overlapping by 50% of the length and checking for correctness using a level. - Waterproofing the support.
After the final hardening of the cement composition, the surface is coated with bitumen mastic using a brush. - Backfilling of support columns.
The existing gap around the perimeter of the pillars is filled with soil, sand or fine gravel and carefully compacted.
Carrying out activities according to the given algorithm does not require special training and allows you to independently form a solid base on vertical supports.
Pouring a warm strip base under the bath
A relatively new technology that allows insulation of castings in the soil based on porous polystyrene boards. To create the formwork, in this case, take plastic plates of a permanent type, install them in a trench, connect them end-to-end, and fix them with steel spacers. After pouring, the concrete mixture fixes the thermal insulation, creating complete insulation of the structure.
Creating a strip foundation for a bathhouse is a task that can be done with your own hands. Provided that preliminary calculations are carried out correctly, quality materials are purchased and technology is followed, it will be possible to obtain a high-quality, strong and reliable, durable base for a bathhouse.