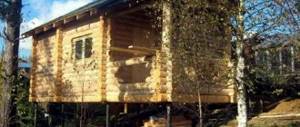
If you build a columnar foundation for a bathhouse with your own hands, provided that the soil characteristics are satisfactory, this will ensure minimal construction costs. This is a reliable choice for areas with soil that is not prone to subsidence and swelling. This type of foundation consists of pillars buried in the soil made of different materials.
The columnar foundation is used for bathhouses made of logs and timber, and panel buildings. The frame structure of the bathhouse can also be installed on such a foundation. This is an ideal and economical option for lightweight wall structures and small buildings. The cost of material resources and labor costs for a columnar foundation is 1.5-2 times lower than the cost level for constructing a strip foundation.
A tangible result when constructing a columnar foundation for a bathhouse with your own hands will be real savings in money.
Construction of a load-bearing building structure from various materials
Initially, the question arises of choosing a suitable and accessible material. The columnar foundation is made of:
- From wooden pillars - logs with a diameter of 200 or maybe timber using insulating materials and treatment with antiseptics. Least durable. Practical if the structure is being built for a period of up to 10 years;
- Made of brick, the size of the columns in plan is 380x380, stone 500x600;
- Made of concrete blocks 400x400;
- From steel pipes or asbestos-cement pipes filled with concrete;
- Made of monolithic concrete 400x400.
A bathhouse on a columnar foundation is being built on a prepared site; below are step-by-step instructions for its construction.
Preparation of work
First, the site is cleared of debris and graded. The top plant layer, at least 30 cm thick, is cut off. If necessary, the site is drained to drain the water. On clay soil, gravel-sand preparation of the required thickness is arranged with leveling. If there is a large difference in height between the sides of the site, it is necessary to level the surface to avoid distortions of the walls.
The plan of the bathhouse is transferred to the land using a tape measure, level, stakes and twine, marking the axes of the building.
Excavation
The laying depth of non-buried columns, as a rule, is from 40 to 50 cm; it should be less than the soil freezing depth by one third of the value.
It is typical for a recessed columnar foundation that the supports are laid to a depth less than the freezing depth by 50-70%. So, if the soil has a freezing depth of 1.2 m, then the laying depth should be from 60 to 80 cm.
Holes for supports are dug manually or using a drill. Their depth is greater than the calculated backfill depth by the thickness of the sand bedding. The cross-sectional size of the pits is made larger by 10-15 cm for ease of installation of the reinforcement frame and formwork.
Stages of work execution
The DIY construction procedure is divided into four stages. Each of them must take into account all the nuances and requirements. Otherwise, the builder will not be able to obtain a high-quality columnar foundation for a bathhouse.
Preparatory stage
Step-by-step instructions for a columnar bathhouse foundation begin with preparation procedures. The main attention is paid to drawing up the project and preparing the site for the construction of the building. The design of the bathhouse is not a complex structure, so any person can carry out the design work independently. Otherwise, you can find standard designs on the Internet or in print that are suitable for most builders.
The first thing you need to do when preparing the site is to clear it of vegetation. The resulting tree stumps must be uprooted. Afterwards you can proceed to marking the site. For this purpose, linear dimensions are used from the project to the ground in accordance with the specified scale. The starting point for the calculation is one of the corners.
It is important to correctly position the bathhouse relative to other objects on the territory. To correctly draw the corners, it is important to use a theodolite, which will allow you to build a rectangular building without uneven lines. If the building turns out to be curved, then problems will arise during the interior decoration of the room.
If the builder does not have a theodolite or does not have enough professional skills to work with the tool, then you can use an alternative method - using a tape measure and twine. To do this, you need to measure two diagonals, which must be equal in a regular rectangle (as indicated by the laws of geometry), as when using the rule for a 4x6 bath and other sizes. If the resulting diagonals differ from each other, then the bathhouse does not have a rectangular shape, and to eliminate irregularities it is necessary to adjust the markings.
The resulting perimeter is marked using cast-offs with twine stretched between them. Cast-offs are boards that are fixed on pegs at the corners of the future building.
The cord stretched between the cast-offs is the visual boundary of the bathhouse. Next, mark the holes where the supports will be installed. The distance between the supports and their number depend on the pressure that will come from the building standing on them.
Land works
Earthwork is an indispensable stage in the construction of any type of foundation, regardless of the type of soil; only the volume of work performed changes. In the case of a columnar foundation, the number of actions is reduced due to the small volume of soil that needs to be moved. Due to this difference, the stage takes much less time compared to the foundation where strips or slabs are used.
There is also no need to level the construction site, since the house will stand on poles. This makes it possible to create the necessary angle of inclination of the soil so that water from the washing area goes to the drainage collector. In this case, the bathhouse itself will stand level without slopes.
It will be necessary to remove the top layer of soil. It is here that most of the humus is contained, which can cause soil settlement after its complete decomposition. Also, the absence of humus will reduce the importance of soil. After the hole, they increase to a diameter 10-15 cm larger than the diameter of the pillars.
Installation of supports
The method of installing the supports will depend on their type. If monolithic reinforced concrete pillars are used, then formwork with internal reinforcement is required. To create formwork, boards are used, which are knocked together, and the inside is lined with any smooth material that is required to avoid sticking.
Often, special lubricants are used to enhance the effect, which can be found in any hardware store. If there is no lubricant, then machine oil or mixtures based on it can be used as a replacement. Both new oil and used oil are suitable. If there is not enough time to create wooden formwork, then sheets of roofing felt are used, which form a roll. The joints are stitched with self-tapping screws or a construction stapler.
Inside, the formwork is equipped with a reinforcing frame, for which 4 rods driven into the ground are used. The rods touch each other to connect in 3 places. For fastening, wire jumpers are used, which are necessary to add volume. The reinforced frame is constructed using corrugated steel or fiberglass reinforcement. The diameter of the rod should be 6-10 mm, which will be enough to hold the bath. Before pouring the bud (a mixture of sand, crushed stone, cement and water), a cushion is created at the bottom of the hole from sand or gravel.
To get rid of air in the formwork, it is necessary to remove it using a vibrator or similar tools. Otherwise, the voids may cause the pile to collapse.
Concrete pouring is used if the pillars are made of brick or cinder blocks. Creating a concrete base is a necessary procedure due to the porosity of these materials. If you do not fill, then over time the brick will begin to collapse due to moisture absorbed from the soil. The pillars are erected after the concrete has completely dried. A layer of roofing felt is created between the fill and the material for waterproofing.
To facilitate the process of installing pillars, pipes with a diameter of 10-20 cm made of asbestos cement, cast iron or steel are used as the material. After installation, all works are cut to the same height to eliminate the tilt of the bath. The pipes are reinforced with concrete mortar poured into the hollow space.
If wooden poles are used as support, then care must be taken to waterproof the material. For this, filling with crushed stone or gravel and treating the material itself with moisture-repellent impregnation is suitable.
For a frame bath, a non-recessed structure is sufficient. In this way, concrete blocks filled with concrete or covered with crushed stone can be laid on the site, after which they must be tied together. A monolithic grillage is used for the connection. If the pillars are metal, then they are connected by welding. Wooden pillars are the lower crowns of the building. The strapping is necessary to enhance the rigidity of the structure.
Basic principles of construction
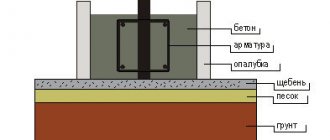
Regardless of the chosen material, the columnar foundation is installed almost according to the same scheme - a hole of the required depth is prepared, filled with 15-20 cm of sand, which is compacted after pouring with water, then a support is placed. Let's look in detail at how to install poles made of various materials.
Wooden foundation
The construction of a lightweight building, such as a bathhouse, allows the use of wooden poles. For the “chair” posts, the lower part of the log is used - the butt with a diameter of 25-30 cm. It is better to use pine or oak. The size of the pit should be 1.5 times the diameter of the support. Preparation for installation consists of burning the lower part of the support with a blowtorch, treating it with an antiseptic solution and coating it with bitumen in accordance with building codes. These measures will extend the life of the tree. As a rule, pine supports last up to 10-15 years, and oak supports up to 25-30 years.
When building a bathhouse, one of two methods of constructing pillars is used - non-buried, in which a wooden pillar, the height of which is 70 cm, rests on a wooden base and is buried with a pillar height of 1.2-1.4 m. In the latter case, it is better if the support is installed on a concrete preparation in a hole for reliable fixation, followed by backfilling with crushed stone and soil.
Brick foundation
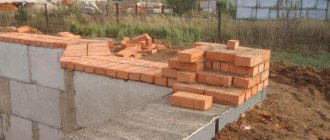
The installation of brick pillars dictates the condition of durable and high-quality masonry in order to avoid destruction of the pillars and deformation of the walls of the bathhouse itself.
The cross-sectional area of the pillar consists of 4 bricks. The pillars are laid to a depth of 0.5 to 0.7 meters. The service life of a foundation made of brick pillars can be 50-100 years, depending on factors such as climatic conditions, soil characteristics, brick quality and masonry strength.
It is important to use only solid red fired brick, which has the least properties to absorb moisture and good strength. Sand-lime brick is completely unsuitable for this purpose.
A sand and gravel cushion up to 20 cm thick is placed along the bottom of the pit, poured with liquid cement mortar and laid with a steel mesh made of wire with a diameter of 3-4 mm or reinforcing bars.
After completion of the masonry, waterproofing is installed on the surface of each pillar, for which roofing felt and bitumen are used, preventing contact of the masonry with the ground.
The sinuses are filled with soil or crushed stone and compacted.
Foundation made of concrete blocks
Scheme of a buried and shallow foundation on a sand cushion.
The obvious advantage of this type of foundation is the speed of its installation. Ready-made concrete blocks are used. These are solid blocks, or with small voids, which have dimensions of 20x20x40 cm. The quantity is calculated based on the design of the future construction.
The foundation of blocks is installed in the same way as brick pillars. Each row consists of at least two blocks. The next row is laid perpendicular to the previous one on masonry cement mortar and so on until the required height is reached. As a rule, 20-30 cm from the surface of the area is sufficient. Then work is carried out to waterproof all surfaces of the structure using roofing felt and bitumen mastic. The seams need to be treated especially carefully. It is necessary to finish by backfilling the sinuses with previously removed soil.
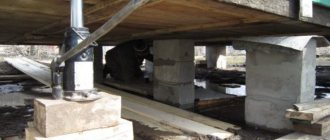
Pipe foundation
Load-bearing building structure on asbestos-cement pipes with a diameter of 200 mm.
Metal or asbestos-cement pipes with a diameter of 200 mm are considered a convenient type of columnar foundation. Their advantage is that they can be easily cut to the required length using a regular grinder with discs for cement or metal. The pipe should protrude approximately 40 cm from the ground surface.
Pipe surfaces must be waterproofed. It is done either by coating with bitumen or by covering with roofing felt on bitumen mastic in order to avoid corrosion and the negative effects of external factors.
We build a columnar foundation from foundation blocks
Like any construction on a summer cottage, a block version of the foundation can be built several hours a day if you have free time and physical strength. The work is not hard and does not require a huge amount of digging of trenches or foundation pits. But there is one feature - the construction of a columnar foundation, first of all, will require very serious preparatory work. It is necessary to lay out the blocks, install beacons and landmarks along which the material will be laid on the cement mortar. The easiest way is to do this delicate part of the work right away, while the necessary details of how to mark the area are fresh in your memory. See how to seal and level a cushion under a columnar foundation of 20x20x40 blocks:
Two words about building blocks for a columnar foundation
For the construction of the foundation, in most cases, monolithic stones are used, cast on a vibrating machine or press from concrete grade M100-150. The easiest and cheapest way is to buy such material than to try to make it yourself. It is relatively inexpensive; during the construction of a summer house or utility room, you can buy leftover material from the owners, especially since you won’t need much of it, 40-50 pieces.
A 20x20 block with a length of 40 cm is most often used for the construction of columnar foundations for quite objective reasons:
- The size of the block determines its light weight. Depending on the filler used, the weight of one stone ranges from 30 to 32 kg, which makes it relatively easy to lift and lay out blocks without additional tools and devices;
- Most often, blocks are made on vibrating presses, in standard forms for foam concrete or cinder block. In this case, a cast stone is obtained with an initial strength that is significantly higher than an artisanal concrete casting;
- The successful proportions of the material make it relatively easy to fold the foundation column and level the plane, without using a grinder to trim the top of the support.
Marking the site and preparing the cushion for columnar supports
At the initial stage of preparation, you will need to correctly mark the installation points of the columnar foundation supports. For this purpose, the dimensions and shape of the frame of the dressing timber grillage, which will rest on the pillars, are used. Based on the project sketch, it is necessary to calculate the exact dimensions of the midline of the beam and transfer it to the ground using cords. In addition to observing the lengths of the sides of the future foundation with millimeter accuracy, you will need to check that a right angle is maintained between the adjacent sides.
The result should be four main installation points for corner column supports, between which a construction or marking cord will be stretched without sagging. In this case, the stakes on which the thread or cord is attached must be located outside the perimeter of the foundation.
In a similar way, you need to align the position of the marking cord in height so that the plane is perfectly aligned with the horizon.
The next step is to prepare the cushions for laying the blocks. It would be more reliable to bury the columnar supports into the ground by 20-25 cm, but in this case you will need to use an additional pair of blocks for each pillar, instead of laying three rows.
If you perform additional soil compaction within a radius of 50 cm around the support, you can get by with a non-buried version of a columnar foundation. In a pit dug to a depth of 30-35 cm, it is necessary to pour two layers of sand with the thickest layer of crushed stone in between. The poured material is carefully compacted layer by layer so that a small layer of spreading sand remains on the surface.
Installation of columnar foundation supports
Laying blocks at the base of a columnar support is carried out using the same technology as laying bricks. High mechanical strength is not required from the masonry mortar; the main thing is that it is plastic, but does not spread on the concrete. The sand base on which the block will be laid is moistened and immediately covered with a thin layer of mortar 1-1.5 cm thick. Blocks can be placed on the concreted layer.
The position of the block must be aligned with the stretched cords and the building level so that the supporting surface is well filled with the solution and there is no blockage along the horizon.
When laying the next pair of blocks, they are turned a quarter turn, thereby ensuring the ligation of the rows. If there is a third row, it also needs to be tied with the bottom pair.
In some cases, craftsmen make a cushion for laying blocks in the form of a concrete screed, which, after preliminary setting of the mortar, is cleaned with a lath and leveled horizontally. In this case, the top layer of sand is not poured onto the cushion, but the masonry mortar is laid directly on the crushed stone with liquid concrete poured over the gravel.
Finishing work and laying of strapping
After the masonry mortar has set, the base of the blocks in the columnar supports is cleaned, the cracks are filled with mortar, plastered and waterproofing is laid. If the pillars are installed correctly along the beacons, without blockages of the supporting surface, you can proceed to tying the foundation with timber.
The wooden frame of the grillage is made in carpentry in advance, most often in the form of two L-shaped elements. The lower part of the corner joint, which will rest on the columnar masonry of blocks, is reinforced with a metal plate. There will be an anchor pin running through a pair of metal flashings, embedded in the seam between the top two blocks.
The two halves of the frame are laid out on supports and centered along the axes of the columnar supports, after which they are connected by overhead plates. The timber is also attached to the intermediate supports with reinforcement, but without plates; the beams are simply tied with soft wire to the upper blocks, or as in the video:
What is the best way to make a floor on this type of foundation?
In order to protect the floor in the bathhouse from cold air and snow, a special wall is usually made of brick or concrete between the pillars with technological openings for communications and ventilation. This wall is called a fence. It serves to enclose the underground space; later, additional insulation of the space can be carried out with polystyrene foam. The question of how to close it is solved when covering the facade of the entire bathhouse.
The problem of organizing drainage in a bathhouse must be solved at the stage of constructing the foundation. This is relevant if it is planned to install a pourable floor. The device of the pouring floor has an extremely simple design, in which a ladder is arranged for draining water.
Watch a video on how to prevent the pillars of a supporting structure from rising due to winter soil heaving
Options for pillars for foundation construction
When making supports for a bathhouse, steel, asbestos cement, concrete, cinder blocks, wood and bricks can be used. When constructing private dachas, reinforced concrete pouring is preferred. The spread of concrete was made possible due to the high strength and durability of the material. Most existing external factors do not affect the functions and service life of concrete supports.
If you need to quickly build an object, then metal pipes are used. This method does not require the installation of formwork. But due to the fact that steel is subject to corrosion, it is necessary to take care to protect it with a water-repellent primer or paint.
An alternative is cast iron or asbestos-cement pipes, whose anti-corrosion properties are higher than their metal counterparts. Asbestos cement has a drawback - the material is fragile, which is why concrete mortar is poured into the supports to increase strength.
Bricks, cinder blocks and aerated concrete have a porous surface, which is why all outgoing moisture is absorbed from the material and remains inside. When the frost season arrives, the liquid freezes, turns into ice and expands, causing the material to gradually break down. To prevent such developments, such supports are installed on a concrete base, after which the surface is protected from moisture using waterproofing (linseed oil, mastic, paint).
Wood is the cheapest material from which to build a pillar foundation. But the porous structure of the material forces us to take into account many nuances during construction. You can only use larch, oak or other types of wood with high density. To prevent the supports from becoming saturated with moisture, they must be coated with hydrophobic compounds or waterproofing.
It is not recommended to use wood supports in soils with a lot of moisture. In such cases, the tree will quickly become damp and become unusable.
Requirements for the floor in the steam room
The floor in the steam room must meet the following technical specifications:
1. Equipped with an effective drain.
2. Be warm, with anti-slip coating.
At a level of 20 cm from the floor, the temperature in the steam room does not exceed 30 °C, which increases energy costs for heating the room. For year-round use of the bathhouse, it is recommended to thermally insulate the floor.
Materials for foundation insulation
A number of different materials are used to make a warm foundation, such as mineral wool, expanded polystyrene, and bulk materials.
General requirements for insulation materials: not to deteriorate under the influence of soil and not to absorb moisture.
Mineral wool
Glass and stone mineral wool is usually used in the form of layers, which makes it much easier to work with. However, this material is easily subject to deformation and absorbs moisture well, therefore, when the foundation is thermally insulated with mineral wool, it is additionally protected by a specially constructed wall of boards or bricks.
Advantages and disadvantages of the material:
- The advantages of use include low cost, excellent thermal insulation properties, and ease of installation.
- The disadvantages are quite significant: an unpleasant odor when insulating the floors inside the bathhouse, significant deformation. In addition to the above, mineral wool has one more drawback: various rodents very often settle in it, which quickly multiply and subsequently damage the heat-saving layer.
Bulk insulation
Sawdust and expanded clay have been used in construction for many years, but, like any material, they have their pros and cons.
- This material has few advantages: perhaps only very low cost and widespread distribution.
- The disadvantages significantly outweigh the positive qualities of bulk insulation: sawdust and expanded clay rot very quickly, absorb moisture and have low thermal insulation values.
Styrofoam
Often, when insulating the foundation, sheet foam is used.
Advantages of application: low cost, wide availability, good moisture and heat insulation.
Cons: breaks easily due to low strength.
Extruded polystyrene foam
This material has many advantages, which makes its use not only more rational and effective, but also less expensive than other materials. Thanks to its cellular structure, it does not allow moisture to be absorbed inside, which allows the insulation to be used for at least 40 years in a row. Expanded polystyrene is less likely to be damaged by rodents and at the same time has high thermal insulation rates, which makes the bathhouse floor always warm.
Bathhouse on a columnar foundation: structure and design features
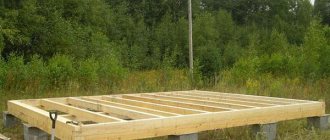
A columnar foundation is a structure consisting of pillars located along the perimeter of the future building. They are located in the corners of the building, at points where internal partitions pass, and in places with significant load. Typically, the pillars are placed at a distance of 1.5-2 m. The exact value depends on the material from which the bathhouse will be built. The heavier it is, the smaller the distance between the pillars.
To make the structure more reliable and rigid, individual pillars are connected with grillages, which in the future will also be useful for installing the base.
Columnar foundation for a bathhouse. Video: