Long gone are the unsightly bathhouse buildings with the random flow of dirty water into “nowhere” or the nearest body of water. Today, sewerage in a bathhouse is not a luxury, but a necessity. The installation of a high-quality wastewater disposal system is prompted not only by ethical and aesthetic standards, but also by legal requirements aimed at ensuring the environmental safety of the environment.
Do-it-yourself sauna sewer
The first step to improving the bathhouse is assessing the condition of the soil on the site, determining the optimal depth for laying pipes and deciding on the location of the septic tank. It’s easiest for those homeowners who were directly involved in the construction of the bathhouse or built (are building) it themselves. It is no secret to them the type of soil, its freezing point (FPP) and groundwater level (GWL).
Have you built a sauna with your own hands? This means you should already have data on soil geology
Without knowledge of these indicators, it is impossible to build a trouble-free sewer system. For those who have purchased a plot with a bathhouse built on it, you will need to perform a set of simple observations and calculations.
Independent study of the geology of the site
To determine the type of soil, you can conduct an express study that does not require special knowledge and is based on visual inspection and tactile sensations. For this purpose, in the proposed pipe laying location, a hole is dug with a depth of 25-30 cm below the TPG. Information about the depth of soil freezing in a given area can be obtained from neighbors, from reference books, and on specialized Internet resources.
| Regions | Soil freezing depth, cm |
| Vorkuta, Surgut, Nizhnevartovsk, Salekhard | 240 |
| Omsk, Novosibirsk | 220 |
| Tobolsk, Petropavlovsk | 210 |
| Kurgan, Kostanay | 200 |
| Ekaterinburg, Chelyabinsk, Perm | 190 |
| Syktyvkar, Ufa, Aktyubinsk, Orenburg | 180 |
| Kirov, Izhevsk, Kazan, Ulyanovsk | 170 |
| Samara, Uralsk | 160 |
| Vologda, Kostroma, Penza, Saratov | 150 |
| Voronezh, Perm, Moscow, St. Petersburg, Novgorod, Ryazan, Tambov, Tula, Yaroslavl | 140 |
| Volgograd, Kursk, Smolensk | 120 |
| Pskov, Astrakhan | 110 |
| Belgorod, Kursk, Kaliningrad | 100 |
| Rostov | 90 |
| Krasnodar | 80 |
| Nalchik, Stavropol | 60 |
Soil freezing depth
It is important to take a soil sample at the bottom of the pit, since sewer pipes will be laid at this level. After which the soil sample is carefully examined visually, rubbed between the palms, and rolled into a rope.
Lump of earth Clay rope
And they evaluate the results according to the table.
Methods for determining soils
If it turns out that the soil is clay or loam, you should know that these categories of soil are classified as highly heaving. In this case, the pipes will need to be laid on a sand “cushion” by analogy with “floating” foundations. The sand will act as a shock absorber during seasonal soil movements and the integrity of the underground part of the sewer system will not be compromised.
Example of a trench with a sand cushion
Example of laying a sewer pipe
After the safe depth for laying the pipeline has been determined, the issue of the location of the septic tank (filtration well) is resolved. The wastewater collection point must be separated from the water intake point by at least 15 m and located no closer than 7 m from the foundation of the bathhouse.
Location of the septic tank on the site
Features of the location of the sepik on the site
How to independently equip a drainage pit for a bathhouse
Inspection of the soil at the site of the planned drainage pit
In order for the bathhouse drainage system to be effective, it is necessary to determine the type of soil in the area at the approximate depth of the planned pit. To do this, a trench or test hole is dug. In order for the bathhouse to be used in winter, the depth must be below the freezing level of the soil. Information about soil freezing in a specific area can easily be found on the Internet, or you can consult with the owners of neighboring plots who have been using similar drainage systems for a long time.
Prices for concrete rings
concrete rings
To determine the nature of the soil and make a decision in favor of one or another drainage pit design, you will need to carry out certain research
Sandy soils and sandy loams, including those with rocky inclusions, have good drainage abilities.
But dense clay layers can cause problems. At high humidity, they are well saturated with water, swell, and become practically waterproof; when dry, they shrink. In addition, they are highly susceptible to frost swelling. These qualities of such soils are unfavorable both for laying foundations and when laying pipes in trenches, as they can lead to deformation and damage to themselves and other elements of the system.
Constructing a drainage hole in such soil, if it extends to great depths, is an almost pointless exercise. Well, if you have to lay a pipe through such layers to a drainage pit that reaches the depth of soil with high absorbency, then the bottom of the trench must be lined with a sand cushion 100–120 mm thick, which will prevent the harsh impact of ground vibrations on the elements of the drainage system.
The level of groundwater (GWL) is also important, since the degree of absorption of water entering the drainage pit will also directly depend on this. So, between the bottom of the pit and the location of the stable aquifer there should be a distance of about 1000 mm. If the groundwater is located close to the surface, then the contaminated water will not drain well, and such a well will soon turn into a fetid pit, as it will be constantly filled. In this case, as with clay soils, the option of a drainage pit will not work. You will have to either install a sealed container that requires periodic emptying, or organize water drainage to special surface filtration fields.
Some recommendations for arranging a drainage pit
Having chosen the material for constructing a pit, it is necessary to decide on several more important aspects of its arrangement, on which the efficiency of the system and the environmental safety of both the site itself and its inhabitants depend.
First of all, you will need to decide on the location where the hole will be located.
The location of the drainage pit directly under the bathhouse is not the most convenient option, since it sharply limits the possibility of inspecting and servicing the drainage system
- Quite often, owners place a drainage hole directly under the building, but this becomes possible only if:
- the pit is arranged before the construction of the bathhouse itself;
— the building rises above the ground on a columnar or pile foundation, which will need to be well waterproofed;
— good ventilation must be provided under the bathhouse building;
- the sewer pipe connecting the bathhouse drain and the pit will require effective thermal insulation.
- If the pit is located separately, away from the bathhouse, then it is necessary to ensure that it is located at the required distance from sources of drinking water, natural reservoirs, residential and outbuildings, trees, the border of the site and the road passing near it. The required standards are shown in the diagram below:
Necessary removal of the drainage pit from other objects on the site
- The pit should be located below the level of the drain hole in the bathhouse floor by at least 150÷200 mm, and the recommended distance from the bathhouse building is 3÷5 meters.
If the circumstances are such that the pit has to be placed in close proximity to the walls of the bathhouse, it is necessary to provide for several design features
- If the drainage pit has to be located fairly close to the bathhouse structure, then:
- the bottom of the pit should have a slope of 20÷25 degrees, draining water from the walls of the building;
- perforation in the walls of the barrel, concrete rings or tires must be done on the side that will be located further from the walls of the bathhouse;
- in this option, it is recommended to additionally organize a drainage trench that drains water from the walls of the bathhouse.
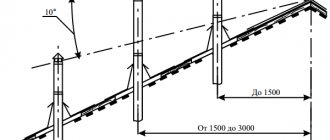
- It is very important to maintain the correct slope of the sewer pipe so that dirty water does not stagnate inside the channel, but immediately goes into the drainage hole, and there is no risk of freezing when using the bathhouse in winter. It is especially necessary to remember this in cases where it is decided to place the pit quite far from the bathhouse. The amount of required slope depends on the selected pipe diameter - this is clearly shown in the diagram below:
Minimum slope of free-flow sewer pipes, depending on their diameter (height difference per linear meter of length)
It should be noted that to organize the drainage of water from a small bathhouse without a toilet, a pipe with a diameter of 50 mm is usually sufficient. In order to maintain the required slope, when digging a connecting trench, as well as when adding a sand “cushion” to it, you should control the difference in its depth using a building level.
Arrangement of a drainage pit - step by step
In this section of the publication, two options for drainage pits will be considered, which can be arranged independently.
Regular drainage hole
This version of the drainage pit has a design that can be made from various materials discussed above.
| Illustration | Brief description of the operations performed |
| After determining the location of the drainage hole, you can proceed to digging a pit. For a bath drainage well, a pit depth of 2500÷3000 mm will be sufficient. It can have a round or square shape in cross-section - it will depend on the chosen material for the walls. For example, if the pit is made of brick, then it is more convenient to lay a square or rectangular shape from it, but in some cases a round well can also be built from it. The diameter of the pit should be 150÷200 mm larger than the prepared container. | |
| When the pit is prepared, a trench is dug from it to the bathhouse building at the required angle for laying the drainage pipe. The width of the trench can be 300÷500 mm, and the depth will depend on the level of soil freezing in the area where the bathhouse is built, but not less than 500 mm at the entrance to the well. | |
| The bottom of the finished pit is filled with medium-fraction stone - gravel, crushed stone, crushed brick or even broken slate. The drainage layer must be at least 300 mm, as it is designed to retain dirty water and purify it, that is, moisture must reach the soil by capillary action, which will allow it to be quickly absorbed. | |
| Further, they act differently. You can lay a sewer pipe right away, and then work on the brick walls of the water intake well, or you can first install or build a container, and as it is being built, a drainage pipe is inserted into one of the specially made holes. Most often, the pipe is laid at a time when the walls are brought out to the level of the depth of the trench, otherwise it will simply interfere with the work. | |
| So, the walls of the drain well can be built of brick. The laying is carried out maintaining a clearance between adjacent bricks in a row of 40÷50 mm. The wall can have a thickness of half a brick or one brick - this parameter is chosen by the builder, and largely depends on the amount of prepared material. Having raised the walls of the well by another 200÷300 mm, the space between the soil and brick walls is filled with drainage backfill. | |
| If concrete perforated rings are used to form the walls, then specialized equipment will have to be used to install them, since each of them has an impressive mass, and distortions must not be allowed during installation. After their installation, the distance between the soil and concrete also needs to be filled with drainage backfill. It should be noted here that if concrete rings are used for the pit, then you should not rush to install them in the hole of the sewer pipe wall, since under their weight they can sink somewhat into the ground - sometimes by 100-150 mm. Therefore, it is recommended to leave the finished concrete well alone for some time to shrink, otherwise the plastic pipe may crack or break due to the resulting pressure and tension. | |
| When using metal barrels for a pit, the bottom and lid are cut off, and the side walls can simply be cut using a grinder. The cuts are made at a distance from each other of 200÷250 mm horizontally and in increments of 100÷120 mm in height. If two barrels are used, they are placed one on top of the other. After installing the lower one, the free space around its walls is filled with drainage. After this, in the second of them, in the top, a hole is marked and cut through which a drainage pipe will be installed into the barrel. The hole according to the markings can be cut with a grinder, but an opening made with an electric jigsaw will still be neater. To do this, a hole is drilled at one of the points on the marked circle into which the tool file should fit freely. | |
| If plastic barrels are prepared for the drainage pit, then they are mounted in approximately the same way as metal ones, but quite often the drain pipe is connected through the top lid of the container. The bottom of a plastic barrel can also be cut off or several round holes with a diameter of 100÷120 mm can be cut into it. | |
| Holes with a diameter of 10 mm are drilled in the side walls along the entire perimeter of the polymer container with a frequency of 100÷150 mm horizontally and vertically. Crushed stone or gravel is poured around the barrel and under it, into which, just as in previous cases, water will flow from the holes of the barrel, be cleaned and go into the ground. | |
| The most commonly used material for arranging a bathhouse drainage well is car tires, which are stacked one on top of the other. On the inside, in the edges of the tires, in three or four places, holes with a diameter of 10 mm are drilled, through which they are fastened together using, for example, plastic clamps. The sewer pipe can be connected between two tires. In this case, for support, bricks are installed along the edges of the plastic pipe and in three or four more places between the tires at the place where it passes, which will relieve the load on the plastic from the upper slopes. | |
| Another option for drilling the pipe is to install it in a hole cut in the side wall of the tire. When choosing this method, it is necessary to provide for possible shrinkage of the structure by cutting a hole larger than the diameter of the pipe by 70÷80 mm. | |
| Quite often, the drainage bath pit is not filled with drainage material around the barrels or tires, but is filled with it two-thirds - this allows the water to slowly flow to the soil walls and slowly be absorbed into them. | |
| It is recommended to strengthen the top of the pit with brick walls by constructing a concrete platform with a hole for a hatch. To do this, a formwork is built around the well, into which a reinforcing grid is laid, and then it is filled with concrete mortar, a layer 70–80 mm thick. | |
| After the concrete has hardened, a homemade cover made of a steel sheet and a corner is installed on the hole. Factory-made hatches, metal or plastic, are also quite applicable. | |
| Special plastic sewer manholes can have various shapes and linear parameters. So, when planning to install this particular option, the hatch is purchased in advance, and the top cover of the drainage pit is built according to its dimensions. | |
| A well made of concrete rings is usually covered with a special lid made of the same material with a ready-made hole for a plastic or cast iron hatch. | |
| Well walls built from tires or barrels have less rigidity than brick or concrete, so it is best to strengthen them with cement mortar mixed with crushed stone. If the drainage was filled between the walls of the well and the soil, then its top layer, 120÷150 mm high, is recommended to be made from the solution mentioned above. Further, the top of the pit can be left in this state by simply installing a hatch on the hole, or a concrete platform can be built over the structure and then backfilled with soil. |
A pit based on the principle of a two-chamber septic tank with access to a filtration field
The second option is more complex in design, but its functionality is significantly higher. This system is perfect for installation in areas with groundwater located close to the surface, since it does not require a deep pit. In addition, such a design can also be a solution for organizing drainage of water from the foundation, from a storm well, filled from linear rainwater inlets on the site or their gutters on the eaves of the roof of the house.
To figure out how to cope with the arrangement of such a hydraulic structure, you should consider this process in detail.
| Illustration | Brief description of the operations performed |
| For this system, two plastic barrels are used, which are easy to prepare for installation work and connect to sewer pipes made of the same material. Usually, for the drainage pit of a small bathhouse, two or three containers with a volume of 200÷250 liters are enough. | |
| The pit for installation of barrels is also dug 100÷150 mm larger than their diameter, and due to the fact that containers of equal size will be installed at different levels, the pit for them should have a stepped configuration. The depth of the pit in this system should be 450÷500 mm greater than the height of the barrel. This distance will be needed to create a drainage cushion under the barrel and a recess for the pipe entering it. The difference in the installation level of the containers should be 150÷200 mm, and the distance between them varies between 200 and 300 mm. The barrels are installed in one line. The bottom of the pit is compacted and filled with medium-fraction crushed stone, a layer 80÷100 mm thick, which also needs to be compacted. | |
| Next, you can move on to working on preparing the containers. The barrel installed above will serve as the primary chamber, that is, a sump for dirty water. A neat hole is cut in its top cover into which the drain pipe will be installed. In the side wall, on the opposite side from the hole in the lid, holes are cut for a pipe that will connect the first barrel with the second, installed slightly lower. To insert plastic pipes into the lid or into the walls of the barrel, you can find special flanges at a plumbing store, such as the one shown in the illustration. | |
| If not, then you will have to cut the hole with maximum precision, and then to seal it, use high-quality silicone sealant. | |
| Additionally, it is recommended to cut a hole for installing a ventilation pipe with a diameter of 40÷50 mm, or install a tee, as shown in the illustration, where one outlet will be intended for connecting the sewer drain pipe from the bathhouse, and the other, vertical, for the ventilation pipe. | |
| The second barrel is equipped with three holes, one of which is drilled in the top lid, and two in the side wall, 100÷120 mm below the top edge. The axes of these side windows should be radially rotated from the axis of the central hole by 45 degrees. | |
| Nozzles with 45-degree bends installed on them are cut into the side holes and sealed. As a result, the pipes for connecting the drainage pipes will become parallel to each other - as shown in the illustration. | |
| Additionally, in the lower part of the walls of the installed second barrel, on the opposite side from the entrance, small holes with a diameter of 5 mm are drilled, at a distance of 150÷170 mm from each other. This is an additional outlet of water into the drainage fill around the barrel. However, if powerful filter fields will certainly cope with their task, and even more so if such a septic tank has to be installed in the immediate vicinity of a bathhouse, then this operation is not necessary. | |
| The result should be a design similar to that shown in the illustration. Having installed a system of barrels and pipes, you can proceed to creating a filtration drainage field. | |
| For the drainage area, which is located at a slope from the installed barrels, a trench is dug, having a width of 1200÷1500 mm and the same depth to which the first barrel standing above is buried. If desired, the drainage filter field can be extended over the entire area, since it will not interfere with the arrangement of beds for annual crops or for planting shrubs above it. A geotextile fabric is laid at the bottom of the resulting channel, on top of which drainage will be laid. Filling the trench with crushed stone is done in layers, each of which should be carefully compacted and distributed at a slope along pre-set pegs. The slope of the trench should be approximately 25 mm per linear meter. Pegs installed in advance with the required height difference will become a kind of beacons for the correct filling of the drainage layer. | |
| As drainage material is poured around the lower barrel, water is poured into it, otherwise external soil pressure may deform it. It is recommended to fill the space between the walls of the barrels with gravel or coarse sand, which should be compacted by pouring water. Next, pipes with perforated walls are connected to the nozzles, through which water will be distributed throughout the drainage area. Holes are drilled in increments of 150÷180 mm along the bottom and sides of the pipes. After drilling, the pipes are dressed in a filtering “casing” made of geotextile - so that the inside of the pipes is not subject to silting. | |
| The next step is to fill the pipes and the entire trench space with medium-fraction crushed stone mixed with sand. Such a layer should reach the lid of the barrel installed below, that is, completely cover the pipes from above with a layer of at least 100–120 mm. It is best to backfill several different layers of soil on top of the crushed stone. So, the crushed stone is first covered with geotextiles, on which a layer of moistened sand 70÷80 mm thick is laid, and the rest of the space can be filled with fertile soil. On this site it is quite possible to arrange a flower bed, plant annual vegetable crops or even small shrubs with a shallow fibrous root system. |
At the end of the publication, it should be noted that there are other materials that can sometimes be found in the yard among old supplies or even seemingly unnecessary trash, which in fact may well be suitable for building a drainage pit for a bathhouse. For example, you can find a use for old sheets of corrugated or smooth slate, or even scraps of corrugated sheets remaining after roofing work.
Some inventive owners of country houses line the walls of the drainage well with glass or plastic bottles, which are filled with sand, and find other very interesting solutions. Therefore, if you want to save money, and at the same time free up part of the yard or barn room from old materials, then you need to use your imagination “to the fullest” - and act! We will be glad if any creative master shares his innovations on the pages of our portal.
Another example of a simple drain for a bathhouse is shown in the video below.
Choosing the type of sewer system
To improve the bathhouse, it is possible to use three types of individual sewerage:
- non-pressure;
- pressure;
- connected to a centralized city drainage system or to the existing sewer system of a private house.
Gravity system
Gravity sewerage
The non-pressure method of drainage is otherwise called gravity. This is the simplest and least expensive type of sanitary sewer system. Its main advantage: energy independence. Installation of a free-flow system requires careful adherence to the slope of the pipes (1-1.5 cm per 1 linear meter) and is impossible if the terrain of the site is difficult.
Sewer slope
To transport wastewater, pipes of a larger diameter are required than when installing a pressure system. Straightness of the highway is highly desirable. If the pipeline diagram includes turning points, inspection wells are installed in these places. This rule is relevant for any type of sewer system.
Korsis pipe for storm and free-pressure sewerage
Gravity sewerage – PP pipes
Installation of non-pressure sewer pipes
Lookout well
Pressure system
General scheme of pressure sewerage
The pressure sewer system provides for the forced transportation of wastewater, which is provided by a pump or pumping station. The equipment can be installed both indoors and outdoors. A pressure sewerage system for a bathhouse is built if for some reason it is impossible to make a non-pressure one. Features of this type of sewer:
- pressure is more expensive than non-pressure;
- volatile;
- requires insulation of equipment in winter.
The photo shows pipes used for pressure sewerage
Pressure sewerage – pumps
Pressure sewer with sewage pump
Pressure sewer pipe
Inset sewerage system
A less labor-intensive, but most troublesome way is to connect to a centralized sewer network. This method is not possible for all bathhouse owners. Therefore, it makes no sense to consider it in all details.
Connection to a centralized sewer network
More often, it is used to connect the wastewater system to an existing septic tank on the site. However, in this case, you will have to choose the type of drainage system (pressure or gravity).
Connection to a septic tank
Tips for use
If you have done everything correctly, ensured the slope and evenness of the pipe run, if the pipe is laid below the freezing point of the soil and has a sufficient diameter, and the hole is deep and has enough drainage, then operation will be problem-free. But if they arise, then there are ways to solve them.
Dirt in the drain
Hair, some dirt, and residues from bath procedures may go down the drain. Everything is easy and simple here: the pre-designed floor boards are removed, the ladder is removed and cleaned. If the blockage is in the pipe, then it is not long at all, and the blockage can be removed with an ordinary brush on a pipe cleaning wire. It is not advisable to use chemical cleaning agents - nevertheless, this water will somehow end up on your site.
The pipe freezes in winter
When the drain pipe lies with too little slope or wave, water remains in any bend and freezes. This prevents free flow, and the pipe freezes along its entire length. In addition, water may stop flowing and freeze even with a normal blockage. Ice in pipes has a larger volume than water and can rupture them. Therefore, if the pipes are frozen, you need to defrost them urgently.
- With the drain removed, boiling water is poured into the pipe with an Esmarch mug (in common parlance - an enema).
The enema defrosting method is the simplest, and the tool is always at hand
- A steam generator is a luxurious tool: we insert the hose of the device into the pipe, and high-pressure steam very quickly defrosts all the ice plugs.
A steam generator is the fastest way to defrost pipes - As soon as the pipe has thawed, you need to dig it out as quickly as possible and insulate it with insulation products.
We design a sewerage scheme for a bathhouse
For greater design convenience, the unified sewer system is divided into two types: internal and external. The first includes communications indoors, the second - outside the building. Once you familiarize yourself with the basic principles of constructing a circuit, it is easy to develop it yourself.
Design stages
- It is necessary to draw a plan of the bathhouse, taking into account the thickness of the walls and partitions of the building. Graph paper is best for this purpose, but you can also use a regular piece of checkered paper.
Internal sewerage diagram
The photo shows a typical internal sewerage diagram - Indicate the dimensions, mark the installation locations of plumbing fixtures or drain points.
- Determine the location of the main pipe outlet.
- If the bathhouse has a toilet, take into account the need to install a drain pipe.
Example of installation of a drain pipe
How to properly install a vent pipe on the roof - Plumbing fixtures are connected to the main pipe along the most convenient and short path, aiming for a minimum number of turns in the line.
- The length of the communications is summed up, taking into account the outlet beyond the outer wall of the bathhouse.
- Proceed to constructing a drawing of the external sewer system.
Rules for designing an external network:
- an inspection hatch is provided at the junction of the external and internal sewerage;
- according to SNiP, inspection wells are installed at the turning points of the main line, at the points of connection of a separate side branch of the pipeline, every 15-35 m of a straight main line with a pipe diameter of 100-150 mm;
- according to SNiP, the slope of external sewerage with a pipe diameter of 110-150 mm is 0.01 (1 cm per 1 meter);
- the first inspection well should be located no closer than 3 m and no further than 12 m from the bathhouse;
- if the site has a large slope and there is a toilet in the room, install a multi-stage sewerage system with drop-off wells.
Diagram of a stepped sewerage system Simplified diagram of external sewerage
Approximate diagram of the internal sewage system of a bathhouse
Wastewater disposal options and their implementation
There are several ways to dispose of wastewater after a bath:
- central sewerage;
- septic tank;
- filtration well;
- cesspool.
Each of these options can be used under certain conditions and for different purposes.
Connection to central sewer networks
Connection to central sewer networks
This is the most convenient way to dispose of wastewater. To implement it, you must obtain permission from the service organization and enter into an agreement with it. An inspection well is installed at the connection point to the main line.
Since the services of contractors can be expensive, and during the registration process you will have to deal with the Russian bureaucratic system, to receive a small amount of wastewater, it is better to use other methods, for example, soil filtration.
Filtration well
Filtration well
This is one of the most popular options for draining wastewater from a bathhouse that does not have toilets. But it is feasible only in conditions of low groundwater level and permeable soil.
To implement this, you need to purchase a container without a bottom, for example, a plastic pipe. It can be replaced with concrete rings and even old tires that are mounted on top of each other.
Filtration well. Plan, section 1-1. M 1:25
The construction of the well is carried out according to a simple scheme.
Step 1. Dig a trench for the pipeline, maintaining a slope to the site where the future well will be installed.
Step 2. They dig a pit at a distance of about 3 m from the bathhouse, the minimum area of which is 1 m2, and the depth should be greater than the freezing level of the soil. This will be the site for soil filtration.
Pit
Step 3. A bottomless container is installed in the hole.
Step 4. The bottom of the trench for the supply pipeline is filled with sand and compacted, not forgetting to maintain the slope.
Step 5. Lay the pipeline and connect it to the well. If necessary, the pipe is additionally insulated, for example, sprinkled with expanded clay.
Step 6. Filter material, for example, crushed stone, is poured into the resulting well. The height of the backfill should be slightly higher than the zero temperature point of the soil.
The photo shows the connection of the pipeline and backfilling of crushed stone
Step 7. Install the ceiling or neck with a hatch.
Filtration well cover
Step 8. Backfill the well and pipes.
Periodically you need to check the condition of the filter media, and if necessary, change it or wash it.
Septic tank
Septic tank
If a lot of wastewater is generated, and besides, a toilet is installed in the bathhouse, then it is recommended to install a septic tank to dispose of bathwater. You can also connect to an existing local sewer system. Moreover, the second option is much more profitable, since it does not require additional investments. But bath drains (their quantity) must be taken into account when choosing the performance of a septic tank.
Septic tank installation process
cesspool
Since the bathhouse is not used every day, not too much wastewater is generated, one of the options for collecting wastewater is a simple cesspool, which will have to be emptied periodically by calling a sewer truck.
Brick cesspool
A sealed catchment container is installed in a convenient place, and a pipeline coming from the bathhouse is connected to it. This method can be used where soils are poorly permeable to water and fecal contamination is present in the drains.
Sewage for a bathhouse, although it requires taking into account several nuances, can be installed independently. The main thing is to choose the right method for waste disposal, observe the slope for the gravity system and take into account the natural features of the area.
Water seal options
A water seal is an important element of the sewer system, the purpose of which is to cut off unpleasant odors coming from the septic tank (drainage pit). Simply put, this is a water plug that remains in the pipe even if the bathhouse is not in use. An example of the simplest water seal is a U-shaped siphon. In a pipeline made of plastic pipes, a water plug is created using three shaped elements: bends.
Water seal
Water seal - example
The difficulty is that when the sewer system is rarely used, the water in the water seal tends to evaporate. In this case, experts recommend installing a dry shutter. It is a simple plastic or metal structure equipped with a spring and a valve (membrane) that blocks the exit from the pipe. When water enters the system, the damper is folded back under its pressure, and after the flow passes, it returns to its place.
Ladder with dry seal
Dry water seal - diagram
Craftsmen make unique homemade valve systems for bath drains. If you wish, you can use one of the following options.
| System Description | Illustration |
| A plastic funnel with a diameter slightly larger than the cross-section of the pipe and an outlet with a diameter of 3 cm is installed in a vertical position into the gap in the sewer pipe. A plastic ball (for ping-pong or other) is placed in the funnel of such a size that it blocks the narrow exit. When water gets into the pipe, the ball floats up. | A funnel and ball valve. Example for clarity |
| To install a dry seal for a plastic sewer with a pipe diameter of 50 mm, you will need a 50/110 adapter, which needs to be slightly modified: cut at an angle and attach a circle of thick rubber to it. After which the structure is installed at the outlet of the pipe in a septic tank or drainage pit. | Dry shutter Dry seal in the sewer pit |
Prices for water seal
water seal for sewerage
Materials for arranging a drainage pit for a bathhouse
Various materials can be used to construct bath drainage pits. Their choice directly depends on the expected volume of wastewater, the financial capabilities of the site owners and the convenience of construction.
Barrel drainage pit
To create this water drainage system, metal or plastic barrels of different sizes are used. However, such a drain can be arranged in different ways:
- First option. At the bottom of the excavated pit, covered with drainage material 300–400 mm thick - crushed stone or coarse gravel, after compaction, a barrel with perforated walls and a cut bottom is installed. In this case, it is taken into account that between the walls of the barrel and the pit there should be a space of at least 100 mm, which is also filled with drainage backfill.
To make the pit, an old metal barrel was used.
A pipe is inserted into the barrel at the required slope angle, through which used water will flow from the bathhouse into the container. These drains will gradually seep into the drainage layer through holes in the walls and through the bottom, be cleaned, and then be absorbed into the surrounding soil. In some cases, drainage material fills not only the free space of the pit, but even the barrel itself, that is, water will flow directly into the drainage layers and then into the ground. This way the barrel will never fill up.
It must be correctly understood that such a scheme is not suitable for collecting other types of wastewater from a residential building. For a bathhouse that is used for its intended purpose once or twice a week, such a pit becomes one of the most optimal options.
- Second option. In this method of arranging a pit, two barrels are used, installed at different levels - one above the other by about 200 mm. They are connected to each other at the top by an overflow pipe. Water from the bathhouse enters the first upper container, soap sediment and solid suspensions settle in it, and when it is filled, the water is poured into the second barrel, to which one or two long drainage pipes with perforated walls are connected.
This is, in fact, a mini-septic tank with the output of water that has undergone primary purification to the drainage field.
Outlet pipes from the second tank are laid in drainage trenches filled with gravel or crushed stone, through which water purified from chemical precipitation will be distributed, moistening the soil. The trenches are covered with a layer of fertile soil, approximately 500 mm, and can be planted with ornamental shrubs that will receive constant watering. Thus, two problems are solved at once - draining water from the bathhouse and irrigating plants on the site.
This option for arranging a drainage pit will be discussed in detail below.
Brick drain pit
The walls of the drainage pit can be arranged using bricks, which are laid out with gaps - through them, water is drained into the drainage backfill and further into the ground. The difference between this pit and the first version, made from a barrel, differs only in the material, but the operating principle remains the same. A drainage layer is poured into the gap between the soil and brick walls, which will purify the water and distribute it throughout the pit, discharging it into the ground.
Drainage pit with red brick walls
A pit made of brick is more durable and is designed to hold a larger volume of water. Moreover, if you dig a pit deep enough, and the bottom and lower part of the walls are sealed, then this structure can also be used to drain other waste, but in this case the pit will have to be cleaned periodically.
To build this version of a drainage pit, it is not at all necessary to use new brick - used material is also quite suitable.
Prices for metal barrels
metal barrels
Drainage pit made of concrete rings
If financial and technical capabilities are available, then a drainage pit can be built from perforated concrete rings, which are installed in a prepared pit. After installing the rings, a drainage backfill is arranged at the bottom of such a well.
A good solution, but, as a rule, requiring the use of special construction equipment
In this option, the entire space between the walls, as in previous cases, is also filled with drainage material, so the hole, provided it is used only for bathing needs, will never be filled with water. In the same case, when the pit is deep enough and the bottom of the well is cemented, then such a pit is suitable not only for a bathhouse, but also for the general sewage system of a house. True, this will require additional calculations, assessment of the absorbent properties of adjacent soils and the location of aquifers.
Pit made from old car tires
A drainage pit made from unnecessary car tires can only be used for liquid waste, so it is ideal for collecting periodically incoming water from a bathhouse.
A very popular scheme among owners of summer cottages is a drainage pit made from old tires.
Tires are installed in different ways: in some cases, holes are cut out in their side walls, in others, a small gap is provided between the slopes, in others, the outer walls are almost completely cut off, but the principle of operation of the drainage pit remains the same.
This option for draining water from a bathhouse can be called the most popular, since it is simple to install, affordable (tires are easy to find for free) and practical to use.
Schematic diagram of a drainage pit made from car tires
The numbers on the diagram indicate:
1 – Crushed stone or coarse gravel – drainage backfill, in a layer 250÷300 mm thick.
2 – Old car tires.
3 – Drain pipe from the bathhouse (there may be two of them)
4 – Crossbars for laying the lid.
5 – Cover or hatch.
Around the laid out stack of wheels, and sometimes inside the resulting well, a drainage cushion is backfilled, which allows you to retain and purify the water coming from the bathhouse. With good drainage capacity of the soil and periodic use of the bathhouse, the pit never overflows.
It should be noted that other materials that can withstand the effects of high humidity are also suitable for the construction of a drainage bath pit.
Which pipes to choose
In fact, the choice of sewer pipes is not so large.
| Type of pipes | Description |
Cast iron pipes for sewerage | It is irrational to use cast iron in our time: they are expensive, heavy and inconvenient to install. Ceramic ones are ideal in any respect, but also have a high cost. |
Asbestos cement pipes | Asbestos-cement ones are the cheapest of all possible, but they often disappoint with their defects. In addition, when installing a non-pressure sewer system, products with smooth and even walls are required. And asbestos-cement ones have a rough inner surface, often riddled with depressions. |
Plastic pipes | The optimal choice is plastic pipes that are resistant to all types of destructive influences. These products are excellent for installing internal and external sewage systems, are flexible in processing, and are available with or without a socket. The warranty period for plastic pipes is 50 years. For long products, shaped elements (fittings) are offered, with the help of which the sewer system is installed. |
The category of plastic pipes includes:
- PVC (polyvinyl chloride);
- PVC (chlorinated polyvinyl chloride);
- PP (polypropylene);
- HDPE (low density polyethylene);
- polyethylene corrugated.
Any of these products can be safely used in a sewer system. The diameter of the main line is selected based on the expected intensity of operation of the building and the number of drain points. For an average bathhouse with a steam room, washing area and toilet, when installing a gravity drainage system, pipes with a cross-section of 100-110 mm are required. If a toilet is not provided, a diameter of 50 mm is sufficient. Plumbing equipment is connected to the main line with pipes with a cross-section of 50 mm.
Prices for plastic pipes for sewerage
plastic pipe for sewer system
Internal network and its installation
Concrete screed and drain
The type of sewage system running inside the bathhouse depends on the type of floor. Today, concrete screed is most often made. Tiles can be laid on it or a slotted wooden floor can be installed on the joists. The gap between the floorboards in the latter case will be about 5 mm.
The photo shows leaking floors
Note! For safety reasons, when choosing tiles, it is better to opt for a product with a rough surface that will not slip.
But, as mentioned above, before the floors are laid out and at the stage of laying out the foundation, it is necessary to begin the arrangement of the sewerage system.
Note! The sewage outlet from the bathhouse is made where the washing room will be located. It is in this section of the base of the bathhouse that a hole is left for the outlet sewer pipe.
All this must be taken into account in the design of the bathhouse and the drainage system from it, in accordance with which the entire sewage system is installed in stages. But first you need to prepare all the materials and tools.
Leak-proof bath floor
Installation of the internal sanitary sewage system
It is necessary to start installing a sewer system at the construction stage of the bathhouse. But it is also possible to improve a building that has already been completed and has been in use for a long time. The scope of work and their sequence are different in both cases, so each option must be considered separately.
Pipes for internal sewerage of a bath
Installation of sewerage during the construction phase of a bathhouse
To carry out the work, you will need a previously drawn up plan (diagram) of the sewer system. In order to accurately find the connection points for plumbing elements (drains, showers, toilets, sinks, etc.), markings begin after the foundation has been erected. In places where the main line is laid, trenches of appropriate width and depth are dug.
Important: The bottom of each ditch is leveled taking into account the required slope towards the septic tank.
Leveling a trench for laying pipes
Ditch for laying pipes
Then they begin laying the pipes. Experts advise starting the installation of a sewer system by installing the main pipe and large (nodal) elements, to which side branches of a smaller diameter are subsequently connected.
Installation of sewer system
At the plumbing connection points, vertical pipes are installed. To prevent foreign objects from entering the network, each outlet is closed with a plug. Install the ventilation riser.
At the connection points, plumbers install vertical pipes with plugs
In regions with cold climates, pipes are insulated. For this purpose, fibrous materials (mineral wool and its analogues), foam half-cylinders, and foamed polyethylene are used. If desired, you can pre-wrap the pipes with noise-absorbing material, which will significantly reduce the volume of sounds emitted by the operating system.
Pipe insulation
Lay geotextiles.
Insulation flooring
Form a sand cushion.
sand cushion
Installation of indoor sewage system
If the bathhouse has been in use for more than a year, it can also be equipped with a system for draining dirty water. To do this, you will need to draw up a diagram and open the floor in the right places. The pipes are installed at the foundation level, in one of the walls of which a hole is drilled to lead out the main line.
Drain drain Installation of drain and floor
Drains are installed in the washing room and steam room. When performing work, the following rules are adhered to:
- the ladder must be located flush with the floor;
- gaps are closed with moisture-resistant grouts;
- tiles are laid after installing the ladder.
Prices for drainage ladder
sewer drain
The importance of the bath part called “drain”
The Russian bathhouse is a very extreme place. Temperature changes up to 1500, especially in deep winter. High humidity and very serious temperature contrasts - up to 1500. The only source of thermal heating. Fire hazard. Streams of water on the floor in the steam room and washing room. That’s why a well-made floor, and a well-made drain in the floor, is so important. It doesn’t even matter critically whether there is water supply in the bathhouse or not. In extreme cases, the barrel can be trained by hand. But the drain should function perfectly.
Principles of good drainage
- The drain must cope with any flow of water, especially in the washing room, and especially if a bucket with a chain is used.
When using a tub, there is a particularly large load on the drain - The drain must have a good water seal so that the smell from the sewer does not penetrate into the bathhouse.
- The drainage along with the pipes to the pit or septic tank must be designed in such a way that it never freezes in winter.
- The drain should be easily accessible in case of need for repairs: if the floors are cracked and there is a single drain below, then the boards should be easily removable; if the ladder is visible, then the ladder itself should be easily removable.
- The drain must be durable, so the pipes and the structure itself must be made of durable materials and parts.
Installation of external sewerage for a bathhouse
The main element of the external wastewater disposal system is the septic tank. If the bathhouse does not have a toilet, there is no need to buy a factory-made product or independently equip a well with multi-level filtration of wastewater. It is enough to dig a drainage hole. But it is relevant only for soils with a high level of moisture permeability (rocky, sandy, sandy loam).
Video - DIY drain hole
Installation of sewerage with a drainage pit
- According to the diagram, they mark the area: find the location of the wastewater collection point, determine the route for laying the main line;
- dig a hole 1-1.5 m deep below the TPG;
- a 20-30 cm layer of sand and gravel is poured onto the bottom;
- to prevent soil walls from collapsing, you can install a metal container or a column of large-diameter tires in the hole. A more solid structure is a frame built of brick.
Drainage pit
They begin to lay the highway. Dig a trench to a depth below the TPG and form a slope towards the drainage hole. Lay the pipes and check that the slope complies with the requirements of SNiP.
At the turning points of the pipeline, inspection wells are installed. In order to prevent pipes from freezing in these places during cold times, it is necessary to provide insulation and cover the holes with double covers.
Inspection well
The place where the pipe enters the drainage pit is sealed using cement mortar or foam.
Sealing
The insulation of the main line is carried out in any convenient way: by wrapping pipes with mineral wool or by laying polystyrene foam.
Insulation of the main line
Sewerage with pit
In areas with clay soil, it is recommended to install a pit located under the floor of the bathhouse for waste disposal. The presence of this drainage receiver does not relieve the owner from the need to install an external main that transports water outside the premises. The pit serves as an auxiliary structure for the smooth operation of the sewer system.
Sewerage with pit
A square-shaped pit is dug under the floor with an edge length of at least half a meter and a depth of 1-1.5 m. At a height of 10-15 cm from the floor level, a pipe is installed connecting the pit with the external sewerage system. Maintain a slope of 1 cm per 1 linear meter in the direction of water drainage. The bottom and walls of the pit are concreted.
Digging a pit
Main types of drain pits
Construction of any drainage pit is a rather labor-intensive process, since the pit will most likely have to be dug manually. At the same time, such a hydraulic structure is not very complex in design, so any owner of the site can build and equip it independently, without even involving assistants, of course, if there is enough strength for excavation work.
Drainage pits can be divided into three main types - a sealed container, a pit with drainage capacity, and a septic tank consisting of several chambers.
First, let’s figure out what each of the varieties is, in principle.
- A sealed drainage pit is most often installed on construction sites with shallow groundwater aquifers. It is more often called a cesspool, that is, requiring periodic emptying of accumulated volumes of dirty water.
To build it, a pit is dug into which a container with a sufficiently large volume is installed. This is where wastewater will be collected. As the container is filled to a certain critical level, the waste is pumped out by a sewage disposal machine.
If you have a cesspool completely isolated from the external environment, you will have to very often use the services of sewerage equipment
This option is environmentally friendly, since no contaminants or chemical cleaning solutions get into the soil and groundwater, which can negatively affect the condition of the fertile soil on the site, as well as have a negative impact on high-lying ground aquifers. However, this option is not convenient and economical, since you will have to constantly monitor the filling level of the container and often call specialized vehicles, and such services are not cheap.
Prices for septic tanks
septic tank
- There is no hermetically sealed bottom created in the drainage drainage pit. It is used as a bulk layer of filtering building material - most often crushed stone or gravel is chosen for this purpose.
The bottom of the drainage pit is covered with a layer of filter material - crushed stone or gravel.
In addition, holes are often made in the walls of the drainage pit at a certain height through which water will be absorbed into the soil. This option is perfect for a bathhouse and is perhaps the easiest to build, however, if the soil characteristics on the site allow it.
- A septic tank is a whole system consisting of two or more chambers that have different purposes.
In any of the options, the first chamber most often has a sealed design and is used for collecting, primary filtration and purification of waste - solid components settle to the bottom, and liquid components are clarified and undergo a biological treatment cycle due to the action of aerobic microorganisms. This container is connected to the second chamber with a special overflow pipe - clarified liquid waste flows into the next compartment, which is already organized according to the principle of a drainage well. Water passes through the drainage, is further purified and absorbed into the soil.
Approximate diagram of a simple septic tank
If a septic tank of three containers is planned, then the third chamber is made into a drainage chamber. The second serves for the final sedimentation of suspensions, deeper purification of water due to the action of anaerobic microorganisms. And from here the purified liquid is poured into the drainage well.
A septic tank is most often installed when it is expected to collect the entire considerable volume of liquid waste from both a residential building and a bathhouse.
What is important to know about the design and rules of septic tank equipment?
A septic tank is already a rather complex engineering structure, the creation of which must obey certain rules. Often, home owners prefer to install a ready-made factory-produced system. What are the rules for arranging such a treatment plant, and what to pay special attention to when choosing a septic tank - read in the special publication of our portal.
Basic moments
The owner of a bathhouse must remember that each stage of sewerage installation requires careful compliance with the requirements for it. The failure-free operation of the system is ensured by a properly designed scheme and exact compliance of the pipe slope with SNiP standards. A comfortable stay in the bathhouse is guaranteed by the presence of a hydro- or dry seal.
You should not neglect the design of the ventilation system, as it forms optimal air exchange and promotes the removal of moisture after bath procedures. This will help prevent the formation of mildew and mold. For regions with cold climates, it is extremely important to perform high-quality work on insulating the sewer system.
Video - Do-it-yourself sewage system in a bathhouse
Video - Draining water in a bathhouse with a water seal system
Bath drainage device
In different rooms of the bathhouse, it is customary to make drainage devices that differ in design and operating principle. There are three options for constructing a drain in a bathhouse:
- Raised floors with sheer floorboards. Often used in a steam room, where there must be a warm wooden floor to ensure a comfortable stay in high temperature conditions. Whereas the wash compartment traditionally uses tiles with a slope and a shower drain;
- Leak-proof floors. All liquid and dirty water remains on the floor and is washed off from the surface through a standard drain with a bellows into a septic tank or collection container;
- A combined version, used only in small baths or in full-fledged washing departments of baths. In modern projects, baths are used to a limited extent, as they do not comply with sanitary standards.
The choice of a specific scheme depends on the structure of the foundation, the method of insulation and the arrangement of the water seal. For small steam rooms and washing sections of the bathhouse, a double floor system is used, this is convenient, especially when the building is installed on a pile foundation. If you plan to build a bathhouse box as an extension to the house, then the most suitable option would be a non-leakage floor with a drain through a drain. This will simplify the connection of the bathhouse sewerage system to the general wastewater disposal system of the building.
Leaking floors
Similar options for draining a bathhouse with a wooden floor were also called pour-over drains. The essence of the design was that the upper part of the floor consisted of boards laid with a gap of up to 10 mm, so most of the water simply flows through the cracks and collects on the lower tier or is absorbed into the ground. At the same time, the floorboards themselves, as a rule, were made with a slight rounding of the surface, which ensured normal water drainage and its discharge to the lower level in the subfloor. One of the options for draining water in a bathhouse with wooden floors is shown in the diagram below.
The gap between the floorboards helps to dry the floor
The advantages of such a device for collecting and draining water include:
- Simple room cleaning;
- No puddles or residual water on the surface of wooden floorboards;
- Durability of joists, insulation and wooden parts of the floor and drainage system.
Important! Despite the fact that the lower tier, on which moisture and dirt accumulated, actually remains closed with finished wooden floors, the entire water drainage system from the bathhouse is well suited for ventilation and drying of the subfloor.
As a rule, ventilation ducts from the stove, located either in the steam room or in the dressing room, go to the lower tier. Upon completion of the bathing procedures, the channels were opened, the ventilation windows in the steam room itself or in the washing compartment were uncorked, and the warm air from the stove quickly dried and removed traces of water, if it was not removed through the drain system.
Non-leakage floor
It is clear that the manufacture of pouring or deck floors requires quite significant costs associated with the manufacture of two levels of water collection, installation of a drainage system and connection of a sewer pipe leading to a pit or septic tank.
It is much easier during the construction process to make classic concrete floors in the bathhouse with a slight slope towards the drain. The concrete screed must be insulated with foam plastic or extruded polystyrene foam. To ensure water flow through the system, a classic version with an elbow and a corrugated pipe is used, or a more modern shower drain can be installed.
Scheme for a drain with a heated floor for a bathhouse - extensions to a house
At the same time, the floor of the bathhouse does not have to be covered with tiles; the surface can quite realistically be covered with wooden floorboards. This solution is most often used for steam rooms. The amount of water discharged through the drain system is relatively small, so you can get by with a small drain pipe installed in the corner of the room.
Combined water drainage scheme for a bath
This option for organizing water drainage is traditionally used for large bathhouses with an insulated base and a concrete strip foundation.
The essence of the drainage system is that water is collected in the center of the room in a special gutter or pit. The channel is covered with a protective grating, and the drain surfaces are usually covered with gratings.
A drainage channel or gutter usually has an additional slope along which water flows directly into the ground or into a septic tank located in the underground bathhouse. The design is quite simple, so it is often used for summer cottages of steam rooms and bathhouses built with one’s own hands.
How to make a hole with your own hands step by step
First, a location for the pit is selected. From the bathhouse and the foundation of a residential building you need to maintain a distance of 3 to 5 meters. The depth of the pit depends on the required volume of wastewater and the groundwater level. It is recommended to take a value of no more than 8 meters.
- An area for a bathhouse and a drainage pit is being prepared. Before concreting the foundation, one or more outlet pipes are installed from the bathhouse (depending on the size of the room);
- A trench is dug from the foundation and insulated. Its bottom is covered with a layer of fine gravel and river sand;
- This trench should have some slope in relation to the source. The average value is 3 degrees per linear meter. This will ensure the normal speed of movement of wastewater, preventing stagnation and siltation of the pipe;
Exiting pipes from the bathhouse - Afterwards, a pit is prepared for drainage. Its bottom and walls must be strengthened. They will constantly be washed away by large amounts of water, which affects the strength of the entire structure. Wooden beams can be used for protection. On moving soils, it is more advisable to build formwork;
Drain design - The thickness of the drain tank for a bathhouse can be significantly less than for a cesspool. The brickwork can consist of one layer, and the concrete casing can be 15 centimeters;
- If the waste tank rises above the ground, then it needs to be additionally insulated. For this purpose, earth, clay, polystyrene foam or even textile fiber are successfully used;
- If the drain is completely underground, then there is no point in additional insulation. Some homeowners believe that a cesspool for a bathhouse does not need a hatch, but this is not so. An inspection hole will be needed for cleaning and preventing siltation of the drain, as well as necessary repairs. It is best to use double lids made of plastic;
- Of course, if you don’t have a special lid at hand, but you need to cover the hole with something, then a sheet of corrugated board, slate or any other durable and hard material is perfect.
Inspection hatch
The drainage pit for a bathhouse should be cleaned several times a season using a sewer machine. This will free the drain from solid waste, plaque, and get rid of sludge. Instead of vacuum cleaners, you can use a submersible drainage pump.
Video on the topic:
If an unpleasant smell of rot or dampness begins to appear from the drain hole, the drain is cleaned and dried. The next time it is used, special microorganisms (anaerobic or aerobic bacteria) are added to the water.
Selection of required materials
Before you make a reliable sewer system for a bathhouse, you need to select high-quality pipeline elements.
There are several types of pipes on the modern market for laying internal and external networks.
The main ones are:
- Cast iron pipes are durable, but at the same time heavy, and therefore extremely inconvenient to install. The price for them is quite high.
- Asbestos -cement products are inexpensive products whose performance parameters are inferior to their plastic and cast iron counterparts. Due to the fact that they have a rough inner surface with many tiny depressions, they should not be used when constructing a free-flow system.
- Plastic is a universal option, suitable for installing any type of sewer system. They are inexpensive, easy to install and durable in use. In addition, there are many options on the market - all you have to do is choose the right one, and read how to do this in this material.
When laying autonomous sewer systems in suburban areas, plastic pipes are most common.
For a bathhouse with a steam room, when laying the main line of the gravity system, it is allowed to use pipes D 100-110 mm, and for connecting plumbing to the main line - pipes D50 mm
They are available with and without bells. To simplify the installation of long products, fittings and other shaped elements are produced for them.
For laying a horizontal pipeline in the walls of a building, gray pipes D110 cm are chosen, for vertical branches when installing receivers - pipes D50 mm and D110 cm.
When laying an external pipeline - yellow-red PVC pipes of the same size. To connect elements of different diameters, adapters are used.
Determination of terrain conditions and soil type
The first thing you need to do when installing a sewer system in a bathhouse is to determine the condition of the soil on the site.
At this stage it is important to identify:
- Groundwater level.
- The freezing point of the soil in winter.
The depth at which the pipes of the external sewage system should be laid and the septic tank should be installed directly depends on this.
Knowing the level of groundwater and taking into account the freezing point of the soil in winter, you will ensure trouble-free operation of the sewer system
You can get information about the depth of soil freezing from construction reference books, for example, from “Construction Climatology,” or by talking with neighbors who have already performed similar work.
You can find out the type of soil by performing simple manipulations and checking the indicators with the data in the table below. To do this, in the place where you plan to lay the pipeline, you need to dig a hole 25-30 cm deep below the freezing mark.
A sample for research is taken from the bottom of a dug hole. The rock sample is first rubbed between the fingers and then rolled into a ball.
A piece of earth taken for testing is assessed visually and studied tactilely, comparing their observations with tabular data and drawing appropriate conclusions based on this
When dealing with loams and sandy loams, which are classified as heaving soils, when laying external sewerage, the bottom of the trenches will have to be equipped with a sand “cushion”. Acting as a damper, sand will prevent damage to the pipeline during spring earth movements.
According to the type of organization of sewerage, bath sewer systems are divided into organized and unorganized:
Image gallery
Photo from
Pipes for organized drainage
Unorganized water drainage option
Drain hole in wooden floor
The outer part of an organized sewer system
Preparing for drainage installation
The design and installation of the bath drainage system occurs together with the installation of the floor. It is optimal if the work is carried out in the warm season, when the soil is driest. This will allow you to test the functionality of the drain and make adjustments if necessary.
Design of the internal part of the drainage system
Construction of a concrete floor with a drain in a bathhouse
The design of the internal part of the drainage system takes into account the rules that apply to the installation of sewage systems in residential premises. If necessary, a ventilation riser is erected or a shut-off valve is installed. For example, installation of a riser is required when organizing drainage from several rooms at once.
The general layout of a concrete floor with a drain consists of the following:
- 1 - internal wall cladding;
- 2 - vapor barrier of the wall;
- 3 - foundation waterproofing;
- 4 - load-bearing base;
- 5 - crushed stone cushion;
- 6 - concrete layer with thermal insulation;
Diagram of a wooden leaky floor in a bathhouse
- 7 - cement-sand screed for covering;
- 8 - floor covering;
- 9 — sewer drain pipe;
- 10 - wooden gratings;
- 11 - drain hole or grate;
- 12 — water seal partition;
- 13 - drain pipe or gutter.
The layout of a wooden floor depends on its design, but in general it has a similar appearance. The drain pipe with a branch pipe is placed in the center of the room at the lowest point of the floor. For natural drainage, the sewer pipe is mounted with a slight slope. When installing drainage in the washing room of a bathhouse and steam room using one pipe, the drainage chute should be located between the rooms under the floor structure.
Design of external drainage area
General diagram of various types of sewage systems in a bathhouse
The calculation and design of the external sewerage section is carried out taking into account the size of the bathhouse, the frequency of its operation, the type of soil and the design of the water intake. As stated above, a filter well is optimal for use for private purposes. The design is designed to purify a large volume of water, sufficient for a family of up to 6 people to visit the bathhouse.
It is optimal if the well design is carried out by professionals. This will allow you to select the required size of the tank for receiving water without overpaying for useless volume.
Septic tank-based drainage systems are available in a ready-made version. Their volume is calculated depending on the number of people simultaneously visiting the bathhouse in a short period of time. For a family of 7 people, a tank with a throughput capacity of 1.5 m3/day is sufficient.
Related video: planning sewerage in a bathhouse
Design features
A drainage pit for a summer shower or bath consists of a drain pipe and a reservoir into which water flows. The water drainage pipe must be laid before the foundation is built. It is a wide outlet, for which the diameter and shape are extremely important.
- The outlet pipe must be without bends or additional cuts. Its linearity directly affects the efficiency of the wastewater system. Any turns or jumpers can cause cracks and blockages;
An example of a drainage pit for a bathhouse - Its diameter is calculated based on the estimated volume of wastewater. The pipe must only be filled halfway with liquid, otherwise it will not be effective enough. For the calculation, you can use estimated information on water consumption (for example, take an average value per person of 0.2 cubic meters), distance to the drain tank, slope and estimated cross-section. In the calculation, you also need to take into account that at maximum fullness there must be a distance of at least 1 meter between the liquid and the lid;
- The floor in the bathhouse is not insulated, but the pipe runs in the open ground. Therefore, it must be covered with mineral or fiberglass, as well as waterproofing;
Bath design diagram - To avoid problems with liquid stagnation on the floor of a summer shower or bathhouse, it is done at a certain angle. The slope is accepted from 3% to 5%;
- The inlet and outlet pipes are protected by a metal mesh filter. This will protect it from contamination by solid residues, foam, etc. Filter mesh
The pipe is discharged into a drain tank. This pit is located at a certain distance from the bathhouse. Unlike a cesspool, this drain is almost always open. This approach is explained by the fact that bath water does not pose an environmental hazard.
- One of the most important factors when equipping a drainage pit for a bathhouse is groundwater. If they are located high, then there is no point in arranging the tank. With any change in the groundwater level, the hole will involuntarily fill. In this case, it is better to simply remove the drain pipe from the bathhouse to the site or beyond;
- The pit can be made of bricks, plastic barrels, foam blocks. In some cases, it is even equipped with wooden planks;
- A sand cushion is placed at the bottom of the container, and construction waste or fragments of bricks are placed on top of it. This is necessary to protect the pit from silting.
The junction of the pipe and the drain tank is additionally sealed and strengthened with a flexible coupling.
Metal drain container for a bath
Types of bath sewers
In order to avoid problems with regulatory authorities in the future, do-it-yourself sewerage in the bathhouse must be installed in accordance with the requirements of SNiP 2.04.03-85 “Sewerage. External networks and structures.” This document outlines all the basic rules, regulations, requirements and specific recommendations that will help you correctly approach the organization of this important system. Bath sewerage is necessary to drain water from the steam room, washing room, and bathroom (if any). If it is absent or installed incorrectly, moisture will accumulate on the floor and in the underground, leading to rotting of the wood and gradual destruction of the foundation, the appearance of mold, mildew and an unpleasant odor.
Depending on the design of the bathhouse and the topography of the site, the system can be of the following types.
- Free-flow sewerage. It is a gravity-flow system, where drainage is provided through an inclined pipeline. It can be organized only in areas where the terrain allows for a pipe slope of at least 2 percent (2 cm for every meter of line). Gravity drainage is the most common option for bath sewerage. Its main advantage is its efficiency, ease of arrangement and operation. At the same time, due to the lack of pressure, the system easily becomes clogged (even with accumulation of hair), and the outflow is quite slow.
- Pressure sewer. Provides for the forced removal of water and sewage using a pump. The main disadvantage: the need for special equipment and energy consumption, dependence on electricity. However, in some cases it is very difficult to do without this option. Most often, the problem occurs when groundwater rises close to the surface, which makes it impossible to bury the sewer pipe to create a slope. This circumstance forces the pipeline to be installed horizontally, which counteracts the movement of water by gravity. The advantages of a pressure system include faster drainage (over a considerable distance) and a lower likelihood of pipe clogging.
- Connection to centralized sewerage. The presence of such a possibility eliminates many problems with organizing the accumulation, purification and disposal of waste liquid. However, often the connection is no cheaper than your own sewer system, especially when the main highway is remote. In addition, to connect, you must obtain permission and involve the relevant organizations.
Any of the options considered implies the presence of 2 components: an internal and external sewer system.
The internal sewage system is located within the bathhouse and is needed to collect liquid from all rooms, and the external part ensures its drainage and transit, accumulation and purification.