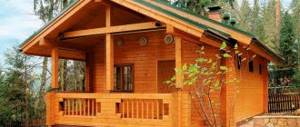
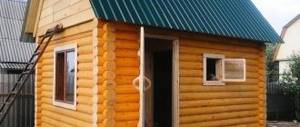
A wooden block of regular geometric shape, which has been dried in special chambers, is a durable material for private construction. To make a bathhouse from profiled timber with your own hands, you do not need the skills and experience of a carpenter. The tongue-and-groove technology used to construct a log house makes construction from profiled material no more difficult than assembling a children's construction set.
Designing a 4x4 m bath
A bathhouse can be built from virtually any material. It can be a frame structure, a building made of brick, foam concrete blocks, logs, etc. The dimensions will depend on the shape and dimensions of the site. However, if we are talking about a 4x4 m bathhouse, then first of all such dimensions are dictated by the length of the wooden beam, which is equal to 4 meters.
Sawn timber
Profiled timber
Section of profiled laminated timber
The compact area of the bathhouse directly affects the size of the premises. As a rule, when designing a 4x4 m bath, the internal space is divided into two parts. In this way, a dressing room is separated, the depth of which varies within 2 m.
The second half of the space is once again divided into two parts, one of the rooms will become a sink, and the second will become a steam room. In a 4x4 meter bathhouse, you can equip a steam room up to 2.6 m wide. The minimum width is determined based on the size of the stove, shelves and the approach to them. A standard stove-heater has a length of about 0.7 m. The upper shelf is made 0.6 m wide, the lower - 0.4 m. If you add up all these dimensions and leave a passage so that it is convenient to turn around there, then we get the size that should be not less than 2 m.
Bathroom layout
The depth of the steam room directly depends on the length of the shelves located in it. If you do not plan to take procedures while sitting or standing, then the length of the shelves should be no less than the length of a person lying at full height - 2 m. So, the minimum dimensions of the steam room are 2x2 m.
Restroom
An example of a rest room into which the furnace firebox opens
Small steam room with corner shelves
Steam room with shelves located opposite each other
Washing
Small bath shower
Prices for timber
timber
Assembling a log house
The following main zones are distinguished in the cobblestone bathhouse.
Base
The lower basement part of the log house (3-4 crowns) is in the most difficult conditions - it is subject to maximum mechanical loads and moisture .
For this area it is better to use larch beams larger than for the walls. The most common option is 15x20 cm timber.
The base is assembled in the following order:
- Roofing felt waterproofing is laid on top of the foundation .
- Metal pins are fixed in the concrete , which secure the lowest crown.
- The beams in the subsequent crowns are fastened with wooden dowels with a diameter of at least 2 cm. To do this, a hole is drilled, starting from the middle of the lower beam, passing through the next crown and ending in the middle of the third beam.
We recommend: How are saunas made of laminated veneer lumber built? Health effects of laminated lumber
Corner connections
A log house made of profiled timber is usually built using the “ no residue ” method.
In this case, the corner part of the bathhouse is a rectangular joint in which the end of the beam is in the plane of the wall. When forming a corner joint, it is important to ensure a reliable and even joint . There are 2 main methods used - in half a beam and using the tongue-and-groove system .
In the first option, exactly half of the beam is removed at the joint and the elements are joined with a dowel. The second type is more reliable, but also more labor-intensive. A “tenon” is made at one end, and a corresponding “groove” at the other. During installation, they are joined and also fixed with a dowel.
Wall installation
The construction of a log house is carried out in rows (crowns) , i.e. a row of beams is laid along the entire perimeter of the building, and then the next row is laid on top of it. They are fastened together using wooden dowels in the same way as a plinth. When erecting walls, it is important to control the verticality with a plumb line and the horizontality of each row with a building level .
Important!
The joints between the beams need to be insulated. To do this, fibrous material is placed in the groove of the profile - flax fiber, jute . All wooden elements must be thoroughly impregnated with an antiseptic and fire-retardant compound.
Features of the steam room
In bathhouses built exclusively from wood, there is always excellent air exchange and minimal humidity. The steam room has a pleasant and unique aroma that fills the space immediately after lighting the stove.
Features of the steam room
- For a bathhouse built from large 200 mm logs, no additional finishing or thermal insulation will be needed; the interior of the steam room will have a beautiful and historical rustic look.
Glued laminated timber 200x200
- If desired, the 150 mm beam also does not need to be insulated. However, lighting a bathhouse built from such timber will require more fuel, and the heat will disappear faster. The decision should be made based on the climate, depending on financial capabilities. In the end, thermal insulation and finishing can be done a little later.
Beam 150x150 mm natural humidity
- If a bathhouse is built from 100 mm timber, then a steam room in such a structure will definitely need additional insulation, and this, in turn, will reduce the area of the room.
Combined glued insulated timber
Insulated laminated veneer lumber - log assembly
Double insulated timber TsPSB
Thermo – Brus
For decorative finishing of the steam room, after insulation and vapor barrier, hardwood is used, which does not emit any toxins or resins harmful to health.
Prices for laminated veneer lumber
laminated veneer lumber
Project selection
A typical bathhouse design is selected according to the following criteria.
Structure size
This parameter is determined by the size of the area and the planned number of people washing.
The purpose of the bathhouse must be taken into account - a private residential building (see: types of private houses), a summer house.
For a modest dacha, a small structure measuring 2x3 m is often sufficient.
For your own home with year-round use, the minimum dimensions start with a project of 3x4 m.
The most popular designs are 4x4, 4x5, 4x6, 5x6 m. For luxury buildings, designs of the 6x9 m type are offered.
Internal layout
Depending on capabilities and needs, baths can have a different number of interior spaces . The minimum option is a steam room and a dressing room.
The most common project contains a steam room, a dressing room and a washing room . A separate lounge and bathroom may be provided.
Design
The most typical layout is when all rooms are separated by internal partitions . Other projects are also possible - with an attic, a terrace, a closed veranda.
Local features
Climate, soil structure, relief, groundwater level and soil freezing. Seismic hazards and seasonal fluctuations in air temperature are particularly highlighted.
Features of the washing machine
The temperature in the sink is usually higher than in the dressing room, but lower than in the steam room. There are benches for massage treatments here. If space allows, a small shower stall is installed in the sink.
Shower tray in washroom
The floors in this room should not be slippery; they are often made of wood. If tiles are laid on the floor, then choose not a glossy one, but one with a rough surface.
Attention! To ensure safety, the door from the steam room to the washing room should open easily and quickly. Under no circumstances should there be any locks or latches on it. The opening is designed only outward, towards the exit from the bathhouse.
Wooden floor in the bath Wooden ladders for the bath
Tile floor in washroom
Doors for steam room
Bath door manufacturing option
The handle for the bath door can only be wooden. Metal fittings are not used
Interior and interior decoration
Finishing inside the bathhouse is necessary both to create a specific interior and to ensure the necessary operating conditions. Different bath rooms have different finishing requirements.
Steam room
The steam room in the bathhouse is the most important working room, where the most extreme conditions . Here the temperature can reach 50-60 degrees, and the humidity can reach 80 percent, which is created by superheated water vapor.
In such conditions, the safest and most durable finish is clapboard made of linden, oak, aspen or larch . If the log house is made of coniferous wood, then it must be covered from the inside with cladding.
Pine and spruce in steam rooms emit resin that is harmful to humans. A mandatory element of arranging a steam room is a vapor barrier . It is necessary to protect wood from water vapor and limit its rapid evaporation.
A foil-coated vapor barrier is applied to the walls and ceiling. It is equally important to install hydro- and thermal insulation on the walls. Thermal insulation is best made from basalt wool . The use of foam plastics is not allowed.
We recommend: How to make dry profiled timber? Price for house kits from the manufacturer, comparison with other lumber
Washing
There is no high air temperature in this room, and steam only occasionally escapes from the steam room. Special conditions are caused by water sprayed from showers or containers.
In such circumstances, it is better to cover the floor with ceramic tiles. Wall decoration, unlike the steam room, can be provided with coniferous wood . At normal temperatures, it creates a pleasant aroma, and spruce lining also has an attractive shade.
Waiting room
In a modest bathhouse, this room serves to prepare for the bath procedure and relax after it . There are no aggressive influences and the main focus is on appearance. A person, having crossed the threshold, must immediately appreciate the attractiveness of the entire bathhouse.
More on the topic: Do-it-yourself sauna house from logs and timber
Waiting room
The minimum area of the dressing room is 1.3 m². But in a 4x4 m bathhouse it turns out to be much more spacious, so this room will simultaneously serve as a locker room and a relaxation room. Here you can drink tea after treatments in the cold season.
Waiting room
The room is equipped with windows for natural light. Most often they are placed closer to the ceiling to retain heat. A cabinet or hangers are also installed here; their placement should be provided for at the time of design. If it is planned to place a stove firebox in the dressing room, then all dimensions must be carefully calculated taking into account ergonomics so that no one is cramped.
To decorate this space, ceramics or wood are used. Theoretically, the dressing room can be finished with plastic, but this material is in dissonance with the overall environmental concept of the building.
Dressing room finishing option
Wall assembly methods
There are several basic ways to install walls and secure them together. The first is the connection of profiled timber with wooden dowels or metal crown pins. To do this, you need to drill holes at a distance of 1.5 meters, and it should go through 2 logs for greater rigidity.
The second method is to use nails without heads. Such sunken nails will sink into the wood and will naturally be protected from rust and further rotting of the wood. The third is the use of square bars 18x18 mm and up to 25 cm long. Such bars are inserted into pre-drilled holes, staggered and piercing right through the bars.
The fourth method is fastening using a “force” spring unit. This unit looks like a screw equipped with a compression spring inside. Thanks to the use of this system, the beams will be pressed against each other without leaving gaps. This is the best of the above methods, as thanks to it you can easily avoid wall deformation and gaps.
Types of profiled timber and types of connections
Profiled timber can have different shapes and sizes; it is made from laminated boards or solid wood.
Types of profiled timber
To build a 4x4 m bathhouse, four-meter beams are purchased. They can be connected:
- “in the bowl” or “in the cloud” (with the remainder);
- “in the tooth” or “in the paw” (without remainder).
Corner cutting with remainder
Connecting a beam into a paw
Connection of timber along the length
Video - Sawing timber into a bowl
When choosing the type of connection of profiled timber, you need to take into account that with the bathhouse dimensions of 4x4 m along the outer walls, the area of the building will be much less than 16 m². For example, when constructing a building from 240 mm “bowl” beams, the length of the wall inside may be no more than 3 m.
Video - Connecting corners and beams
Therefore, when constructing a small bathhouse, it is better to use any type of connection without any residue. But even with this method of laying beams, a reduction in area is inevitable. The thicker the beam, the smaller the area. If, for example, the beam has a size of 250 mm, then the length of the wall inside will be 3.5 m, and if the width of the beam is 150 mm, the length of the wall will be 3.7 m.
Selection of profiled timber
The quality of the future bathhouse depends on the condition of the wood used for construction. First-class timber is perfectly smooth; it is a high-tech material made from pine, spruce, larch and expensive cedar. There should be no blue spots on the bars that are caused by fungi. Wormholes also talk about marriage. Such wood is burned immediately, otherwise the infection may spread to high-quality wood. There should be no cracks in the beams; even the smallest of them can begin to enlarge during shrinkage, and in the future it is because of this that the tree will rot.
Lumber calculation table (timber)
Therefore, when ordering, it is better to purchase the required amount of material with a small margin. If you come across several low-quality logs, you will not need to re-issue the order. Bars with defects can be used for the production of parts, having previously sawed them into pieces. Wood is useful both in the construction of floors and in finishing the room. Of course, an experienced craftsman can calculate the amount of material needed literally by eye. Those who find this difficult should know that for the construction of a future bathhouse (with the dovetail type of connection) you need to purchase 48 beams 150x150 mm (without reserve).
Beam connection
Assembly Features
In principle, a cobblestone frame is similar to a log frame . In both cases, crowns are laid alternately on top of the foundation, the elements of which have a specific corner connection (linkage).
The main difference between profiled timber and its other types is the presence of a tongue and groove along the entire length of the edge , which allows the crowns in the log house to be tightly joined together, creating a closed butt seam.
The entire construction process is divided into several stages:
- Selecting a project. Typically a standard project is used.
- Calculation of needs and purchase of necessary materials.
- Selecting a location and preparing a construction site (read: all stages of preparing a site for construction).
- Calculation of parameters and construction of the foundation.
- Assembling a timber frame with door and window openings.
- Roof installation and roof covering installation.
- Internal and external decoration of the bathhouse.
- Arrangement of engineering communications.
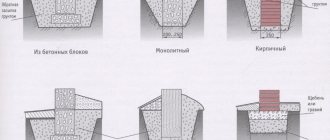
Foundation structure
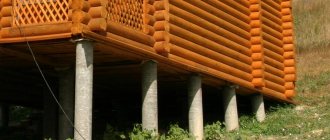
Both columnar and strip foundations are laid under a 4x4 m bathhouse. A wooden structure is relatively light in weight, so columnar foundations are suitable for use. Their design is even more logical if the depth of soil freezing is more than one meter.
Foundation with grillage
| Work order | Illustration |
| A bathhouse project is being drawn up. Load calculations are carried out, the type of soil, its freezing depth, and the proximity of groundwater are specified. According to the project, markings are made on the area (the area is pre-prepared, namely, a fertile layer of soil up to 15-20 cm thick is removed). | Project |
| The boundaries of the internal and external walls are marked, the location of the pillars is noted. Marking is carried out using a rangefinder, a bubble and hydraulic level, and a plumb line for setting cast-offs. | Marking in progress |
| A trench is dug according to the markings. The walls of the trench must be strictly vertical; in sandy soils, it is recommended to use temporary formwork to prevent soil from falling to the bottom of the trench. Holes for pillars are drilled to a depth of one and a half meters or more, taking into account the freezing point. | Trench for grillage and drilled holes for pillars |
| The frame is knitted with soft wire from steel rods 10 mm thick. Reinforcement is carried out in wells and tape, and these elements are connected to each other. The dimensions of the reinforcement frame are smaller than the future foundation, that is, the rods are spaced from the outer walls of the foundation by 5 cm from the bottom and sides, 10 cm from the top point of the poured grillage. | Reinforcement cage |
| The formwork is assembled from edged boards. They are connected by transverse strips, forming shields, after which I install them inside the trench. The shields are secured with supports from the outside and the opposite shields are connected through and through with pins. Vents are immediately placed into the formwork - plastic pipelines installed in the grillage to ventilate the underground of the future bathhouse. | 4 - breath In the photo there is a vent, reinforced frame and formwork |
| Pouring concrete is combined with compaction, for which internal vibrators are used. | Pouring and sealing |
Note. The walls of the wells must be protected with roofing felt or asbestos-cement pipes; these elements are inserted into the trenches before pouring concrete. To make the formwork easier to remove, it is worth covering it with polyethylene at the installation stage. The same polyethylene will protect the foundation from excessive moisture loss. The formwork can be dismantled after 2-3 weeks.
Between the first layer of timber and the base, waterproofing is made of two layers of roofing felt. To do this, a layer of hot bitumen is applied, onto which the roofing material will be attached. Then the procedure is repeated one more time.
Grillage waterproofing
Construction of the foundation
The bathhouse is considered a lightweight structure , and therefore the foundation can be either strip or columnar. The latter option is much cheaper to construct, but it should be used for country baths that are used only in the warm season.
In winter, the gap between the foundation pillars becomes a passage for cold air mass, which requires expensive insulation of the base and floors.
A strip foundation is considered optimal in bathhouse construction . The height of its underground part is chosen equal to the height of the soil freezing level. To reliably protect the base part, it is recommended to raise the foundation above the ground to a height of 30-50 cm .
The foundation construction technology is standard. A trench is dug along the entire perimeter of the bathhouse, on which a cushion of sand and crushed stone and waterproofing are laid. A mandatory element is a reinforcing belt made of steel rods . Concrete is poured into wooden, removable formwork. The side surface of the foundation is covered with waterproofing - a layer of bitumen, roofing felt.
We recommend reading: How to correctly mark the foundation for a private house
Laying profiled beams
Installation begins with the placement of thin 11-mm slats, pre-impregnated with an antiseptic, on the previously created base. The distance between them should be about 30 mm. This trick will protect the logs from rotting. The gaps between the laid slats can be filled with polyurethane foam. Over time, the structure of the log house will certainly shrink, so the beams do not have to be laid very tightly.
Laying slats on the grillage
Laying slats
Important! The wood of the first row is treated most carefully, using numerous antiseptics or machine oil, especially paying attention to the place that will come into contact with the base.
As a rule, the bottom beam is never secured. All subsequent rows will put pressure on it; for excellent stability, such natural gravity will be quite enough. If you ever have to replace the bottom row, it will be easy to do without dismantling the structure of the entire bathhouse.
Laying the first row of timber
First row of timber
To lay the first row, experienced craftsmen recommend purchasing beams of a larger diameter. For example, if construction is carried out from 150 x 150 mm timber, then for the first row it is better to use 200 x 200 mm logs. After laying, they are chamfered from their upper ribs, this ensures that water drains from the walls.
The evenness of all walls depends on how well and competently the first row is laid, so the work process should be accompanied by a thorough level check.
The second row is placed on the first row.
Second row of timber
To do this, the crowns are aligned and fastened with metal pins with a diameter of 10 mm and a length of 20-25 cm (4 pieces are needed per corner) or wooden dowels. The pins are fixed into pre-made holes, the diameter of which is adjusted to the diameter of the cut reinforcement. The drill should go through the entire top beam and go down half the length of the beam lying below. Next, the beam located on top is removed, a pin is driven in, and then the upper beam is finally laid on the fasteners.
Scheme for installing pins and laying insulation
In this way, the logs of all the walls are attached, right up to the top. There is no need to fasten the beams of the last row, because when the ceiling beams are fixed, they will need to be removed.
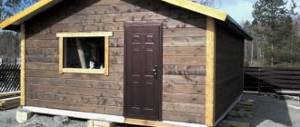
An example of building a bathhouse from timber
Construction of timber walls
Bathroom ceiling
Calculation of floor beams
Laying logs can be done in some other ways. The most modern fastening method is the “Force” spring unit. Externally, this fastening resembles a screw with a spring. The bars connected using “Force” will have no gaps, and no cracks or deformations will occur. This method is considered the most expensive, but when building “for centuries” it is definitely worth thinking about.
Spring assembly
Node installation diagram
Installation of the unit in the beam
Sometimes beams are secured with nails without heads. To prevent the nails from rusting and damaging the wood, they are sunk deep.
For fastening, wooden dowels are also used, with a length of no more than 25 cm and a diameter of 18x18 mm. For them, 21 mm holes are cut with a drill.
When laying the walls, a strip of flax is laid between the beams, which is secured with a stapler. Instead of flax, you can use moss, jute or hemp.
Intercrown insulation
As work progresses, partitions made of 100 mm x 100 mm timber are installed between the rooms.
Partitions made of timber
Prices for spring assembly
spring assembly
Video - Internal partition of a wooden house. Half dovetail cut-in
The jambs and windows for a small bathhouse should be made to slide along the grooves. However, they think about where they will be installed in advance. The openings are cut out after the bath has settled. The period of intense shrinkage lasts six months, so special preparations are made for it. Boards 50 mm thick are placed on the top row and covered with roofing material such as slate or roofing felt. In this form, the log house should “survive” the winter.
The most important feature of the installation of doors and window structures in buildings made of wood is that such a structure, unlike a brick house, is very unstable throughout its entire operational life. Therefore, the so-called casing is installed in the window openings; it makes the window structures “independent” of the walls. The simplest option is a 50x50 cm beam, which is inserted into a vertical groove.
Video - Features of preparing openings in a timber house before installing windows/doors
Video - Installing windows in a wooden house
When installing doors, a casing is used.
On the side of the locker room or in another planned place, a brick stove with a firebox is laid out.
Timber bathhouse projects
Number of projects 404
- 2 bathrooms
Project Baths BD-36, Beshtau
- To favorites
- 35.7² Total area
- 6 x 6m Construction area
from 590,000 rub.
Construction time individually
- 1 room
Lazur Baths Project
- To favorites
- 12² Total area
- 4 x 4m Building area
from 350,000 rub.
Construction time individually
Bathhouse project “Russian Steam”
- To favorites
- 36² Total area
- 6 x 6m Construction area
from RUB 420,968
Construction time individually
- 1 room
- 1 bathroom
Pelageya Baths Project
- To favorites
- 61.4² Total area
- 11 x 5m Construction area
from 826,000 rub.
Construction time individually
- 2 rooms
- 1 bathroom
Project Baths made of timber AR-038
- To favorites
- 43² Total area
- 7 x 9m Construction area
from 580,500 rub.
Construction period 90 days
Mini bathhouse project No. 1
- To favorites
- 6² Total area
- 2 x 3m Building area
from 255,000 rub.
Construction time individually
- 1 room
- 1 bathroom
Bani B-5 project
- To favorites
- 4 x 7m Construction area
from 360,000 rub.
Construction period 12 days
- 1 room
- 2 bathrooms
Bathhouse project "Azov"
- To favorites
- 33.5² Total area
- 7 x 5m Building area
from 931,000 rub.
Construction time individually
- 2 rooms
- 2 bathrooms
Bani Kauri Project
- To favorites
- 100.7² Total area
- 7 x 8m Construction area
from 1,257,900 rub.
Construction time individually
- 2 bathrooms
Bath Captain project
- To favorites
- 32² Total area
- 6 x 8m Construction area
from 800,000 rub.
Construction time individually
- 2 rooms
- 2 bathrooms
Bathhouse project BKm-3
- To favorites
- 63² Total area
- 6 x 6m Construction area
from 850,500 rub.
Construction time individually
- 1 room
- 1 bathroom
Bani Elena project
- To favorites
- 42² Total area
- 6 x 8m Construction area
individual calculation
Construction period individually
- 1 bathroom
Log bathhouse project BO-020
- To favorites
- 33² Total area
- 5 x 7m Construction area
from 445,500 rub.
Construction period 90 days
Bathhouse project “Slavyanka”
- To favorites
- 15² Total area
- 3 x 5m Building area
from RUR 292,294
Construction time individually
- 1 room
Project Mini-Bani Malyutka
- To favorites
- 6² Total area
- 3 x 2m Building area
from 82,850 rub.
Construction time 1 day
Project of a 3m square barrel bath
- To favorites
- 6.6² Total area
- 3 x 2m Building area
from 189,000 rub.
Construction time individually
- 3 rooms
- 1 bathroom
Log bathhouse project BO-040
- To favorites
- 61² Total area
- 6 x 8m Construction area
from 823,500 rub.
Construction period 90 days
- 1 room
- 1 bathroom
Project Baths 8B-B
- To favorites
- 20.7² Total area
- 4 x 6m Building area
from RUR 270,986
Construction period 15 days
- 1 bathroom
Log bathhouse project BO-023
- To favorites
- 35² Total area
- 5 x 7m Construction area
from 472,500 rub.
Construction period 90 days
Bathhouse project "Petrovich"
- To favorites
- 24² Total area
- 4 x 6m Building area
from RUB 349,662
Construction time individually
View all projects
A timber bathhouse is an additional building on the site, the construction of which is not as easy as it might seem at first glance. If you have professional construction skills, special knowledge and experience, drawing up and implementing a project really won’t take much time. However, it is quite dangerous for a beginner to take on such a task: the structure may not last long. In any case, it is worth familiarizing yourself with the features of the projects and their implementation.
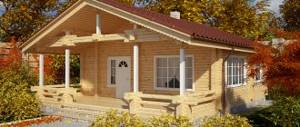
Project of a bathhouse made of timber Source bytgood.ru
Floors
The floor in the dressing room and the ceiling in the steam room can be made from 40 mm tongue and groove boards. Floor joists are made of timber, leaving a distance of 50 cm between them.
How to install logs
Attaching the log
At the bottom, thin bars are nailed across the beams.
Skull bars
Then waterproofing, a layer of insulation and a layer of vapor barrier are placed between the joists.
Vapor barrier
To create a ventilation gap, 40 x 100 mm bars are laid and secured on top of the vapor barrier. The finished wooden floor is laid on top of these bars. The surface of the bathhouse is treated with a blowtorch so that the wood does not rot.
Bath floor
Prices for vapor barrier material
vapor barrier material
Roofing device
The roof of the bathhouse has a rafter system, for which you can use 10x10 cm timber from pine or spruce. Typically a simple single- or gable roof . In areas where significant precipitation may occur, preference is given to the gable option.
The roofing system can be installed above or on the ground, followed by lifting and installing individual parts or the entire roof. The upper crown of the log house can serve as a supporting element for installing rafter legs, but it is recommended to use a special element - Mauerlat . It can be made in the form of a rectangular frame made of 15x20 cm timber. Ceiling beams are attached to it.
After assembling the rafters, a sheathing of boards with a thickness of at least 20 mm is installed between them, on which a layer of reliable waterproofing is attached. Roofing material is laid on top. Simple baths are covered with slate . , tiles and ondulin are used .
Roof for a bathhouse 4x4 m
The roof can be covered with corrugated sheeting with a lining. And only then the construction is completed, carrying out all the finishing work.
Corrugated roofing
Installation of corrugated roofing
Theoretically, a small bathhouse can be built on two floors or with an attic, placing a summer bedroom or workshop on top.
Bathhouse with attic roof
But, most likely, the staircase to this room will be located outside, which is not always convenient. If a compact attic ladder is placed inside, it will still create a certain cramped space.
External staircase to the attic
Internal staircase to the attic
Therefore, as a rule, a simple gable roof is installed in a bathhouse measuring 4x4 m, however, when installing it, one must take into account all the same features of wood, which is considered a moving material.
Gable roof
In a bathhouse made of profiled timber, when constructing any roof, special sliding supports are used. With their help, the rafter legs are attached to the mauerlat.
Due to the lack of rigid fastening, the rafter legs must be temporarily fixed during installation
Fastening the rafters
The rafter ridges are connected with bolts. Such fastening units will sensitively correct any deformation of the roof during shrinkage of the log house.
Installation of the structure
Having purchased high-quality material and familiarized yourself with the regulatory documents, you can proceed directly to the practical stage. In this case, the best solution would be to immediately purchase a ready-made bathhouse set made from profiled timber. In this case, the manufacturing company supplies you not only with a construction set of wall, roofing, and other elements, but also provides assembly instructions and a warranty for its products. Otherwise, the project, the choice of material, its adjustment, and the risks fall entirely on your shoulders.
Assembly stages
The technology under consideration for constructing a bathhouse from timber with your own hands consists of standard two main and a number of intermediate stages, which are carried out for all log-type buildings.
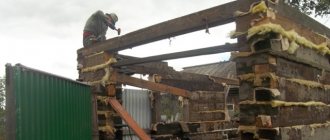
Erection of a box under the roof
You have to do:
- tying the bathhouse on the site with the removal of the axes for laying the foundation. For a simple one-story structure on dense soil, installing columns from solid blocks at all angles and intersections of the walls is sufficient. Free air flow under the building on columnar supports is a good way to ventilate and dry the underground space;
- installation of a crown (trimming, bench) along the outer perimeter, as well as under the walls of all rooms. Thus, a bathhouse made of profiled timber from the starting tier of a set of walls is connected into a single structure;
- laying all the next crowns with gasket laying, cutting corners and installing dowels;
- assembly of rafters with lathing and a layer of waterproofing. You can lay roofing material during the shrinkage period;
- installation of floor joists, floor beams;
- You can also fold the stove if it is a permanent brick structure.
After going under the roof, the bathhouse construction technology involves letting it stand until the end of the main shrinkage. The optimal solution would be to build a log house in late autumn so that the residual moisture from it is thoroughly frozen out by the winter cold. Then, in the spring, feel free to start finishing and arranging the building.
Important! Profiled timber with a moisture content of less than 12% practically does not shrink. If you manage to purchase one, which won’t be cheap, then proceed to the next big stage immediately after building the box. At the same time, be sure to carefully seat the beams during assembly to ensure good compaction of the inter-crown spacer tape.
Finishing and arrangement
The stage at which a bathhouse made of profiled timber can be completely brought with your own hands to the logical completion of construction, even if the box was installed by contractors. You should:
- assemble a permanent roofing pie. If the attic is not in use, then roll waterproofing, sheathing and roofing (slate, metal tiles) are sufficient. If you are planning, for example, an attic, then you will also have to lay insulation and vapor barrier, stuff the counter-batten and the bottom sheathing;
- cut window and door openings. This stage can also be carried out at the stage of laying the box;
- insulate floors and ceilings, lay facing flooring on them;
- install windows and doors;
- line the steam room with clapboard with lining layers. In other rooms, the technology for constructing a bathhouse from profiled timber allows for the presence or absence of internal lining at your discretion.
During the process of assembling the log house, do not forget to start and install communications: water, sewerage, electricity, ventilation.
Some additional tips for assembling a sauna from profiled timber with your own hands
Despite the fact that using profiled beams, you greatly facilitate the task of constructing a bathhouse, a high-quality result can only be obtained by observing technological requirements, showing maximum care, and also taking into account the characteristics of the material.
- The moister the lumber is at the time of purchase, the greater the likelihood of twisting and cracking. If there is significant damage to the surface of the walls, the assembly of the bathhouse may also require decorative finishing. Therefore, it is better to purchase wood blanks of standard humidity. In addition, some manufacturers make additional compensation longitudinal cuts on their products. They allow you to relieve buckling stress and also direct the development of cracks inside the material mass. Thus, the cleanliness of its surface is maintained.
- Choosing an antiseptic for a bath is a rather important moment, which causes a lot of controversy. If you do not want to use even the declared environmentally friendly modern compositions, then you can use one of the old-fashioned methods of bioprotection, for example, impregnating wood with a solution of copper sulfate.
- The construction of a bathhouse from profiled timber involves laying an inter-crown seal; it eliminates blowing between the beams. Tow or even moss is suitable as an economical option for cushioning material, however, today, jute tape is the best choice. It rolls out perfectly and quickly between the crowns, filling all the gaps without interfering with the mating of their locks.
As mentioned above, for self-assembly it is better to choose a ready-made factory bathhouse kit made from profiled timber. The slightly higher cost of purchases will be justified by the speed and quality of installation of the building. After all, even corner cuttings in production are made on machine tools according to standard templates, which guarantees the accuracy of all connections. This means that your bath will last for decades and will always be warm.